


The year 2026 has witnessed a remarkable resurgence in the appeal of natural wood elements in home design, with exposed ceiling timbers and decorative beams taking center stage. Homeowners are increasingly seeking ways to add warmth, character, and architectural interest to their living spaces without undertaking extensive, costly structural renovations. This article delves into the exciting world of DIY Box Beams and Exposed Ceiling Timbers: Transform Your Home on a Budget, providing a comprehensive guide to fabricating lightweight, non-structural box beams from readily available materials. This approach is particularly ideal for those with small workshops, offering a practical and affordable path to achieving that coveted rustic or modern farmhouse aesthetic, breathing new life into any room.
Key Takeaways
- Cost-Effective Transformation: DIY box beams offer a significantly more affordable alternative to structural timber, allowing for a high-impact aesthetic change without a high price tag.
- Lightweight & Non-Structural: Box beams are hollow and do not bear weight, making them suitable for most existing ceilings without requiring complex structural modifications or engineering.
- Accessible for Small Workshops: Fabrication primarily involves cutting, gluing, and finishing wood, processes easily managed in a compact workspace with essential tools.
- Versatile Design Potential: From rustic to contemporary, box beams can be stained, painted, or textured to match any interior design style.
- Significant ROI: Adding architectural details like exposed timbers can substantially increase a home’s perceived value and aesthetic appeal.
Understanding the Appeal of DIY Box Beams and Exposed Ceiling Timbers
The desire to bring the outdoors in, coupled with a growing appreciation for authentic, handcrafted elements, has fueled the popularity of wood ceiling treatments. While traditional exposed beams are structural and require significant architectural planning and expense, decorative box beams offer a brilliant workaround. They mimic the robust appearance of solid timbers but are hollow, lightweight, and attached to existing ceiling joists or blocking. This makes DIY Box Beams and Exposed Ceiling Timbers: Transform Your Home on a Budget a project accessible to many woodworking enthusiasts.

Why Choose Box Beams Over Solid Timber?
The decision to opt for box beams over solid timber beams is often driven by several practical considerations:
- Weight: Solid timbers, especially large ones, are incredibly heavy. Their installation typically requires structural reinforcement, which adds considerable cost, complexity, and time to a project. Box beams, being hollow, weigh a fraction of their solid counterparts.
- Cost: Raw solid timbers, particularly those suitable for architectural exposure, can be very expensive. Box beams utilize less material, often plywood or common lumber, drastically reducing material costs.
- Installation Ease: Handling and installing heavy solid beams often necessitate professional equipment and a large crew. Lightweight box beams can frequently be installed by one or two individuals, reducing labor costs.
- Workability: Working with large, solid timbers requires specialized tools and expertise. Plywood and standard lumber, the primary materials for box beams, are familiar to most DIYers and compatible with common woodworking tools.
- Utilities: Box beams can conveniently conceal electrical wiring, plumbing, or HVAC ducts, offering a clean aesthetic that solid beams cannot.
Design Versatility and Aesthetic Impact
Box beams are not just functional; they are powerful design elements. They can define spaces, add a sense of grandeur, provide visual texture, and introduce warmth that painted drywall simply cannot. Whether your home leans towards a rustic farmhouse, industrial chic, modern minimalist, or classic Craftsman style, box beams can be tailored to fit.
Consider these design possibilities:
- Rustic Charm: Distressed, rough-sawn textures with a dark stain or natural finish.
- Modern Farmhouse: Smooth, matte-finished beams in a light stain or painted white.
- Contemporary: Clean lines, precise angles, and a minimalist finish in a contrasting color to the ceiling.
- Industrial: Dark, often charcoal-stained beams with visible fasteners or metal accents.
A well-executed box beam installation can elevate a room from ordinary to extraordinary, adding a custom, high-end feel that significantly enhances your home’s ambiance and potential resale value.
Planning and Design for Your Box Beam Project

Before any cutting begins, meticulous planning and design are crucial for a successful DIY Box Beams and Exposed Ceiling Timbers: Transform Your Home on a Budget project. This stage ensures that the beams look proportional, are structurally sound in their attachment, and align perfectly with your aesthetic goals.
Measuring and Layout Considerations
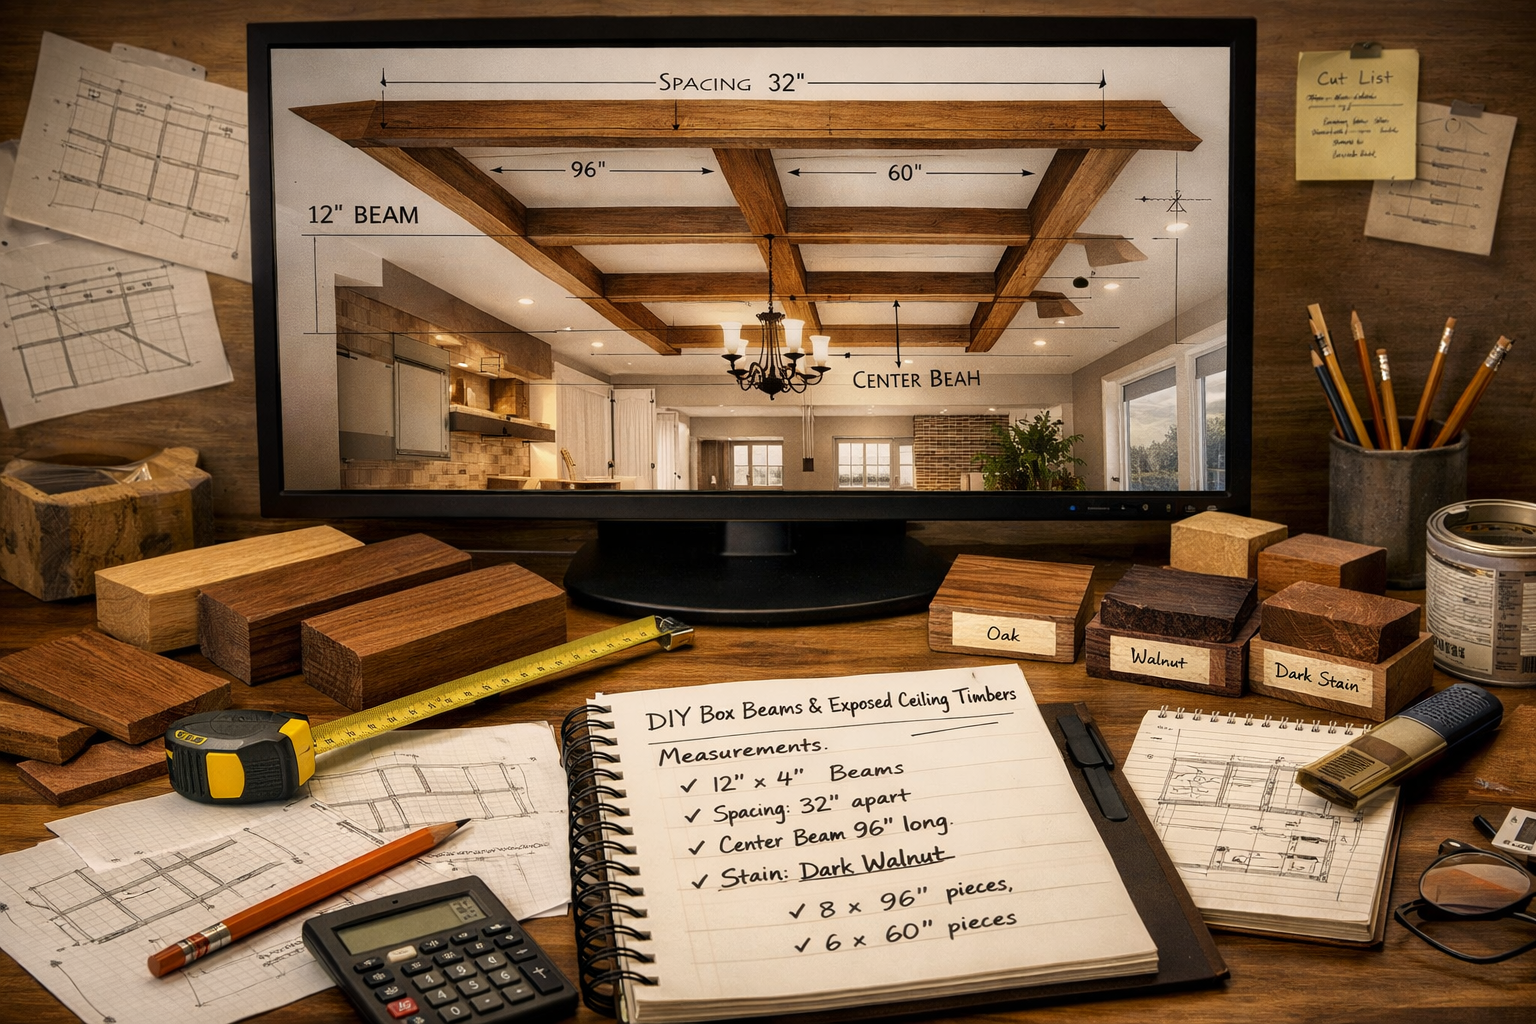
Start by thoroughly measuring your room. Sketch out the ceiling, noting all dimensions, light fixtures, ceiling fans, and any other obstructions.
- Beam Placement:
- Parallel to Walls: A common approach is to run beams parallel to the longest walls, or perpendicular to them, mimicking ceiling joists.
- Coffered Ceiling: A grid pattern creates a luxurious coffered ceiling effect.
- Accent Beams: A single beam or a pair can be used as an accent in a specific area, like over a dining table or in a bedroom.
- Beam Spacing: Consider the size of your room. In a smaller room, beams spaced too closely can make the ceiling feel lower. In a large room, beams too far apart might lose their impact. A good rule of thumb is to aim for symmetry and balance.
- Ceiling Joist Location: Crucially, you need to locate your ceiling joists. Box beams are typically attached to these structural members. Use a stud finder or exploratory drilling to map out their positions. Mark them clearly on your ceiling.
- Proportion: The width and depth of your beams should be proportionate to your ceiling height and room size. A good starting point is often a 6-inch to 8-inch width and depth for standard 8-9 foot ceilings. Taller ceilings can accommodate larger beams.
💡 Pro Tip: Use painter’s tape or string to outline your beam layout on the ceiling. This allows you to visualize the finished look before committing and make adjustments.
Material Selection: What Wood to Use?
The choice of wood greatly influences the final look and the ease of fabrication. For box beams, the goal is typically a lightweight, stable, and easily workable material.
- Plywood:
- Cabinet-grade plywood (e.g., birch, maple): Excellent for smooth finishes, staining, or painting. Offers good stability and minimal warping.
- Pine plywood: More economical, can be stained or painted, but may have more knots or imperfections.
- MDF (Medium-Density Fiberboard): Ideal for painting, offers a perfectly smooth surface. However, it’s heavier than plywood and can be prone to sagging if not adequately supported. Not recommended for areas with high humidity.
- Common Lumber:
- Pine or Poplar: Often used for the internal framing of the box beam, providing rigidity, especially if you’re wrapping thin plywood or veneer. Can also be used for the visible faces if a rustic, knotty look is desired.
- Reclaimed Wood (for veneer): For an authentic rustic look without the weight, consider salvaging thin pieces of reclaimed wood to wrap around a plywood core.
Table 1: Material Comparison for DIY Box Beams
| Material Type | Pros | Cons | Best Use Case |
|---|---|---|---|
| Cabinet Plywood | Stable, smooth finish, good for staining/painting | More expensive than construction-grade plywood | Modern, clean looks, high-quality finishes |
| Pine Plywood | Economical, readily available | May have knots, less smooth grain, can warp | Rustic or painted beams, budget-conscious projects |
| MDF | Very smooth, ideal for painting | Heavy, absorbs moisture, less durable, difficult to stain | Painted beams where weight isn’t a major concern |
| Pine/Poplar Lumber | Good for internal framing, cost-effective | Can warp or twist if not selected carefully | Internal structure, rustic visible faces |
| Reclaimed Wood Veneer | Authentic aged look, lightweight | Sourcing can be challenging, requires careful application | Achieving a truly vintage or rustic aesthetic without solid wood |
Tool Essentials for Your Workshop
Even a small workshop can be equipped to handle this project. Here’s a list of essential tools:
- Table Saw: Absolutely critical for making long, straight, accurate cuts on plywood and lumber. Consider a Delta 36-600 table saw or similar model for precision.
- Miter Saw: For precise cross-cuts and angled cuts on internal framing pieces. Accuracy here is key to tight joints.
- Drill/Driver: For pilot holes and fastening. For more on fasteners, explore Mastering Woodworking Screws: Your Ultimate Guide for 2026.
- Clamps: Essential for holding pieces together while glue dries. Have a variety of bar clamps and pipe clamps.
- Tape Measure, Square, Pencil: For accurate marking and measuring.
- Sanding Equipment: Orbital sander, sanding blocks, and various grits of sandpaper.
- Safety Gear: Safety glasses, hearing protection, dust mask.
- Optional but Helpful: Router with flush trim bit, planer (if using rough lumber for internal frames), wooden work table for assembly.
Fabrication and Installation of DIY Box Beams
With planning complete and materials sourced, the next phase involves fabricating your box beams and then carefully installing them. This is where your woodworking skills come into play to bring your vision of DIY Box Beams and Exposed Ceiling Timbers: Transform Your Home on a Budget to life.
Step-by-Step Box Beam Fabrication
The core principle of a box beam is to create a three-sided (U-shaped) channel or a four-sided box, usually around an internal cleat or frame.
Cut Your Material:
- Faces (Bottom and Sides): Using your table saw, cut your plywood or solid wood to the desired width and length for the bottom face and two side faces of each beam. Remember that the side pieces will typically be shorter than the desired beam depth if they butt against the bottom piece.
- Internal Cleats/Blocking: Cut strips of 2x lumber (e.g., 2x4s or 2x2s) to serve as internal framing. These cleats provide surfaces for attaching the side pieces and for mounting the beam to the ceiling.
- Mitered Edges (Optional): For a seamless look, cut the edges where the side pieces meet the bottom piece at a 45-degree angle. This creates a mitered joint that, when glued, hides the end grain of the plywood. For a simpler, more rustic look, a butt joint is acceptable.
Assemble the Box Beam Sections:
- Method 1: U-Shaped Beam (Wrapping Cleats):
- Fasten two parallel cleats to the ceiling joists first (this is explained in the installation section).
- Then, cut your bottom and side pieces. The bottom piece should be wide enough to span the cleats, and the side pieces tall enough to create the desired beam depth.
- Attach the bottom piece to the cleats using screws.
- Finally, attach the side pieces to the cleats and the edges of the bottom piece.
- Method 2: Pre-Assembled Box (Simpler for Smaller Beams):
- This method is often preferred for a cleaner, more controlled assembly in the workshop.
- Lay your bottom piece flat. Apply wood glue along the edges where the side pieces will attach.
- Carefully position one side piece, ensuring it’s flush. Use clamps or a few small finishing nails to hold it in place while the glue sets.
- Repeat for the second side piece.
- If using mitered edges, apply glue to both 45-degree cuts, align carefully, and secure with strong clamps or even specialized tape/straps to hold the miter tight while drying.
- Let the glue dry completely before handling. Reinforce joints with screws from the inside if possible, especially if not using miter joints. Does Super Glue Work on Wood? might be helpful for quick bonds during assembly.
- Method 1: U-Shaped Beam (Wrapping Cleats):
Sanding and Finishing:
- Once the glue is dry, sand all surfaces smooth. Start with a coarser grit (e.g., 80 or 100) to remove any imperfections, then progress to finer grits (120, 180, 220) for a silky-smooth finish.
- Clean off all dust.
- Apply your chosen finish: stain, paint, or a combination. For ideas on achieving specific looks, check out guides on unique wood finishing techniques or rustic wood finishing techniques. Always test your finish on scrap pieces first! Allow ample drying time between coats and before installation.
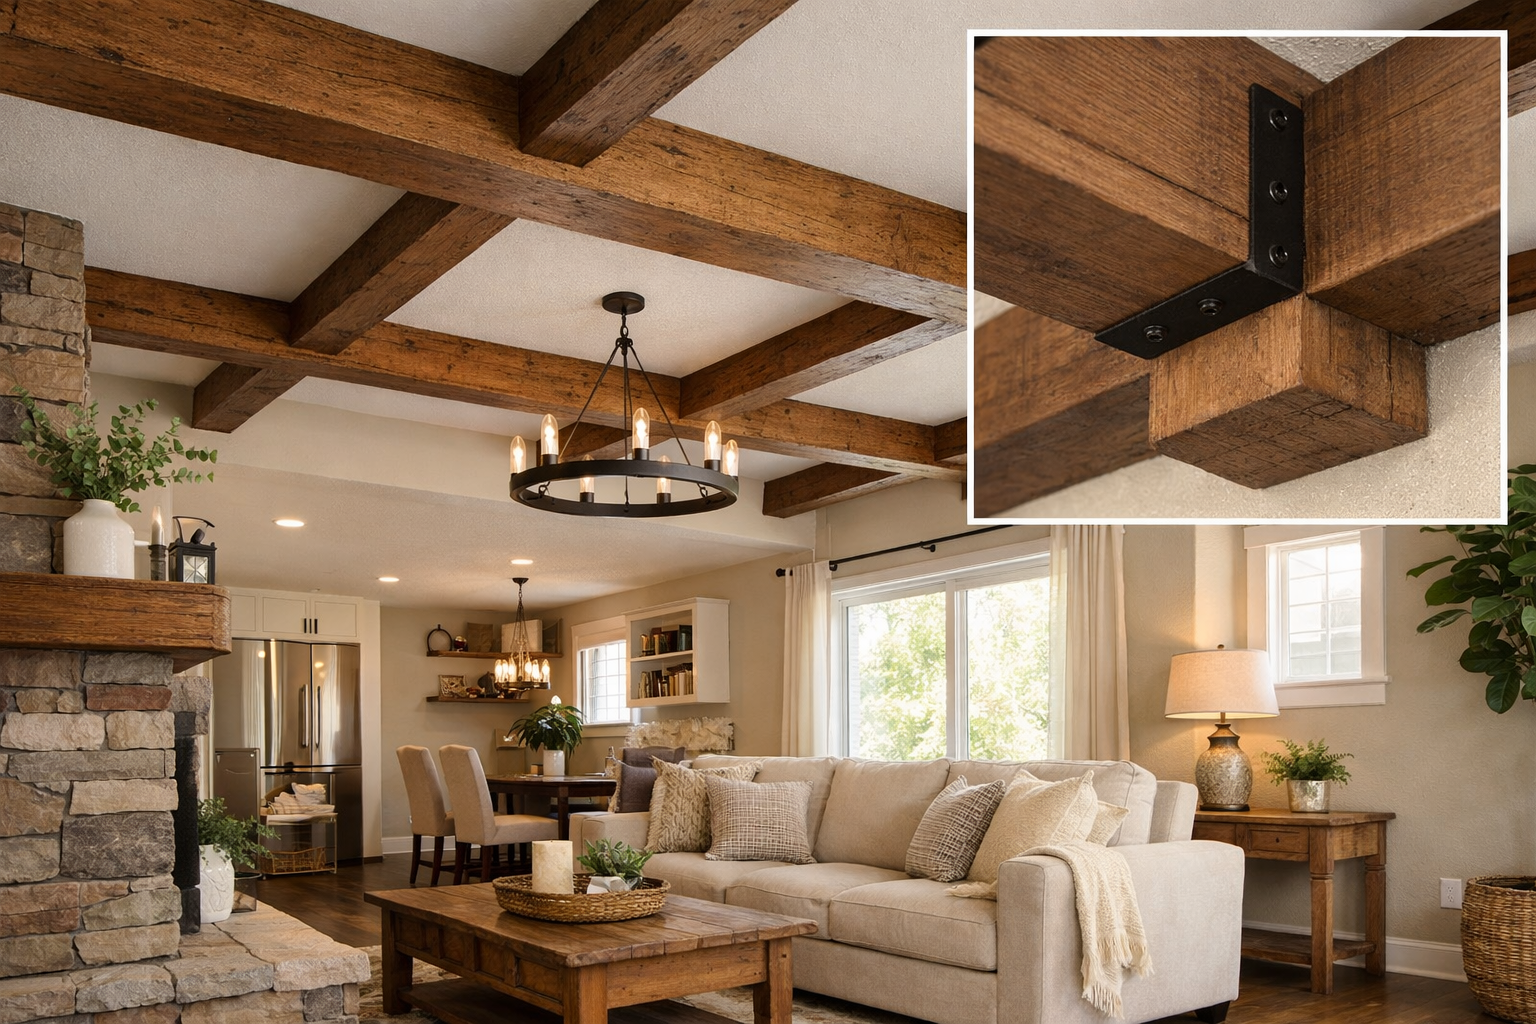
Installation Techniques for Exposed Ceiling Timbers
Installing box beams requires precision and a safe working environment. Work slowly and methodically.

- Locate and Mark Ceiling Joists: As mentioned, this is critical. Use a stud finder and confirm with small exploratory drill holes if needed. Mark the center of each joist along your beam’s path.
- Install Mounting Cleats:
- Cut 2×4 or 2×6 lumber (depending on beam size) to the length of your beams.
- Mark the cleat where it will align with the ceiling joists.
- Pre-drill pilot holes through the cleat and into the center of the ceiling joists.
- Attach the cleats firmly to the ceiling joists using long construction screws (e.g., 3-inch or longer) spaced every 12-16 inches. Ensure the screws penetrate well into the joists. Use a minimum of two screws per joist for solid attachment.
- For wider beams, you might install two parallel cleats, or a wider single cleat.
- Lift and Attach Box Beams:
- This is often a two-person job, especially for longer beams. Use temporary supports or a dedicated panel lift if working alone.
- Carefully lift the pre-assembled, finished box beam onto the installed ceiling cleat(s). The U-shaped beam will essentially “cap” the cleat.
- Align the beam precisely with your layout marks.
- Attach the box beam to the cleat using finish screws or construction screws. For a cleaner look, drive screws through the sides of the beam into the cleat, then fill the screw holes. Alternatively, some prefer driving screws through the bottom face and filling them. Consider drilling pilot holes to prevent splitting, especially near edges.
- Space screws every 12-16 inches along the length of the beam.
- For mitered beams, ensure the bottom and side pieces are securely fastened to the cleat.
- Concealing Fasteners and Seams:
- If using visible screws, you can counter-sink them and fill with wood putty that matches your finish, or use decorative wood plugs for a more rustic look.
- For mitered seams, a thin bead of colored caulk or wood filler can help hide any minor gaps after installation.
- Lightly sand filled areas and re-apply finish if necessary.
💡 Safety First: Always use appropriate safety gear. When working overhead, use a stable ladder or scaffolding. Ensure your power tools are in good working order and you understand their safe operation.
Common Challenges and Troubleshooting
- Uneven Ceilings: Old homes often have wavy or uneven ceilings. You might need to shim behind your ceiling cleats to create a perfectly straight line for your beams. Use a long straightedge to identify high and low spots.
- Sagging Beams: If your beams are very long or heavy, they might sag slightly. Ensure cleats are securely fastened to joists and consider adding additional internal blocking within the box beam for extra rigidity.
- Gap Between Beam and Ceiling: Minor gaps can often be filled with paintable caulk. For larger gaps, you might need to adjust the mounting cleat or use a small trim piece.
- Finishing Imperfections: Take your time with sanding and finishing. Dust nibs, uneven stain, or brush marks can detract from the final look. Proper surface preparation and application techniques are key.
Maximizing Impact: Finishing Touches and Integration
The successful installation of DIY Box Beams and Exposed Ceiling Timbers: Transform Your Home on a Budget doesn’t end with the last screw. Thoughtful finishing touches and seamless integration into your home’s existing decor can significantly enhance their impact.
Choosing the Right Finish: Stain, Paint, or Distressing
The finish you choose for your box beams will dictate their overall aesthetic.
- Stain: This allows the natural wood grain to show through, offering warmth and depth.
- Light Stains: Popular for modern farmhouse or Scandinavian styles, like a light oak or natural pine finish.
- Medium Stains: Walnut, cherry, or medium oak tones provide classic richness.
- Dark Stains: Espresso or dark walnut creates a dramatic, elegant, or industrial feel.
- Grey Stains: For a contemporary touch, consider maple grey stain which can give a weathered, yet refined look.
- Remember to apply a protective topcoat, such as polyurethane, after staining. For guidance, see our article on unique wood finishing techniques.
- Paint: Offers versatility and a clean, uniform look.
- White: Blends seamlessly with white ceilings, adding architectural detail without visual clutter. Creates a bright, airy feel.
- Contrasting Colors: Black or dark grey beams against a white ceiling can create a striking, modern statement.
- Matching Trim: Painting beams to match existing trim can create a cohesive design.
- Distressing: For a truly rustic or reclaimed look, techniques like wire brushing, chiseling, or adding faux wormholes before staining can mimic aged wood.
- Glaze/Washes: A thin coat of diluted paint or glaze applied over a base coat or stain can create unique effects, adding subtle color and depth.
Always ensure the finish is applied evenly and allows for proper drying between coats. Good ventilation is crucial, especially when using oil-based products.
Integrating Lighting and Electrical
One of the significant advantages of box beams is their hollow nature, which allows for the concealment of wiring. This opens up possibilities for integrated lighting, a critical element in transforming your space.
- Recessed Lighting: Small LED recessed lights can be installed directly into the bottom face of your box beams, providing focused or ambient light. Plan for this during fabrication by adding internal blocking for the light fixtures to attach to.
- Track Lighting: Tracks can be mounted to the underside of beams, offering flexible lighting options where fixtures can be repositioned.
- Pendant Lights: For a dramatic effect over an island or dining table, pendant lights can be suspended from a box beam. Ensure appropriate electrical boxes are installed within the beam and securely attached to the internal framing.
- Uplighting: LED strips can be concealed along the top edges of beams, casting a soft glow upwards onto the ceiling, creating an inviting atmosphere.
Important Note: Any electrical work should ideally be performed or inspected by a qualified electrician to ensure safety and compliance with local building codes. Plan your wiring pathways before installation and ensure access points if needed for future maintenance.
Enhancing the Room’s Overall Aesthetic
The addition of box beams will fundamentally change the character of your room. Consider these elements to complete the transformation:
- Wall Colors: Choose wall colors that complement your newly installed beams. Warm neutrals often work well with wood tones, while bolder colors can create striking contrasts.
- Furniture and Decor: Lean into the style established by your beams. For rustic beams, consider leather furniture, wrought iron accents, and natural fiber rugs. For modern beams, opt for clean-lined furniture and minimalist decor.
- Flooring: Ensure your flooring choice harmonizes with the ceiling. Hardwood floors in a similar or complementary tone often create a cohesive look.
- Window Treatments: Simple, elegant drapes or blinds that don’t compete with the beams can enhance the overall design.
By carefully considering these finishing touches, your DIY Box Beams and Exposed Ceiling Timbers: Transform Your Home on a Budget project will seamlessly integrate into your home, creating a cohesive, high-end look that feels both professional and personal.
“Box beams are more than just decorative elements; they are architectural storytellers that can completely redefine a room’s character and emotional appeal.”
Conclusion
The journey of creating DIY Box Beams and Exposed Ceiling Timbers: Transform Your Home on a Budget is a rewarding one, culminating in a significant aesthetic upgrade that adds warmth, character, and architectural gravitas to your home. By choosing lightweight box beams over solid timbers, homeowners can achieve a high-end look without the prohibitive costs, structural complexities, or heavy labor associated with traditional methods. From meticulous planning and careful material selection to precise fabrication and thoughtful installation, each step contributes to a stunning finished product that reflects your craftsmanship and personal style.
Whether you aim for a rustic farmhouse charm, a sleek modern edge, or a timeless traditional feel, box beams offer unparalleled versatility. They enhance perceived value, create visual interest, and can even cleverly conceal utilities. With the right tools, a bit of patience, and adherence to safe woodworking practices, even those with small workshops can successfully tackle this transformative project in 2026.
Actionable Next Steps:
- Visualize: Use painter’s tape to lay out beam patterns on your ceiling and get a feel for the scale and placement.
- Measure and Plan: Accurately measure your room and map out ceiling joist locations. Create a detailed cut list for your materials.
- Gather Tools: Ensure your workshop is equipped with the necessary tools, especially a reliable table saw and miter saw.
- Practice: If new to box beam construction, practice on smaller, scrap pieces of wood to perfect your cutting and assembly techniques.
- Start Small: Consider starting with a single accent beam or a smaller room to build confidence before tackling a larger, more complex installation.
Embrace the challenge, enjoy the process, and soon you’ll be admiring a beautifully transformed space, testament to your skill and vision.

