
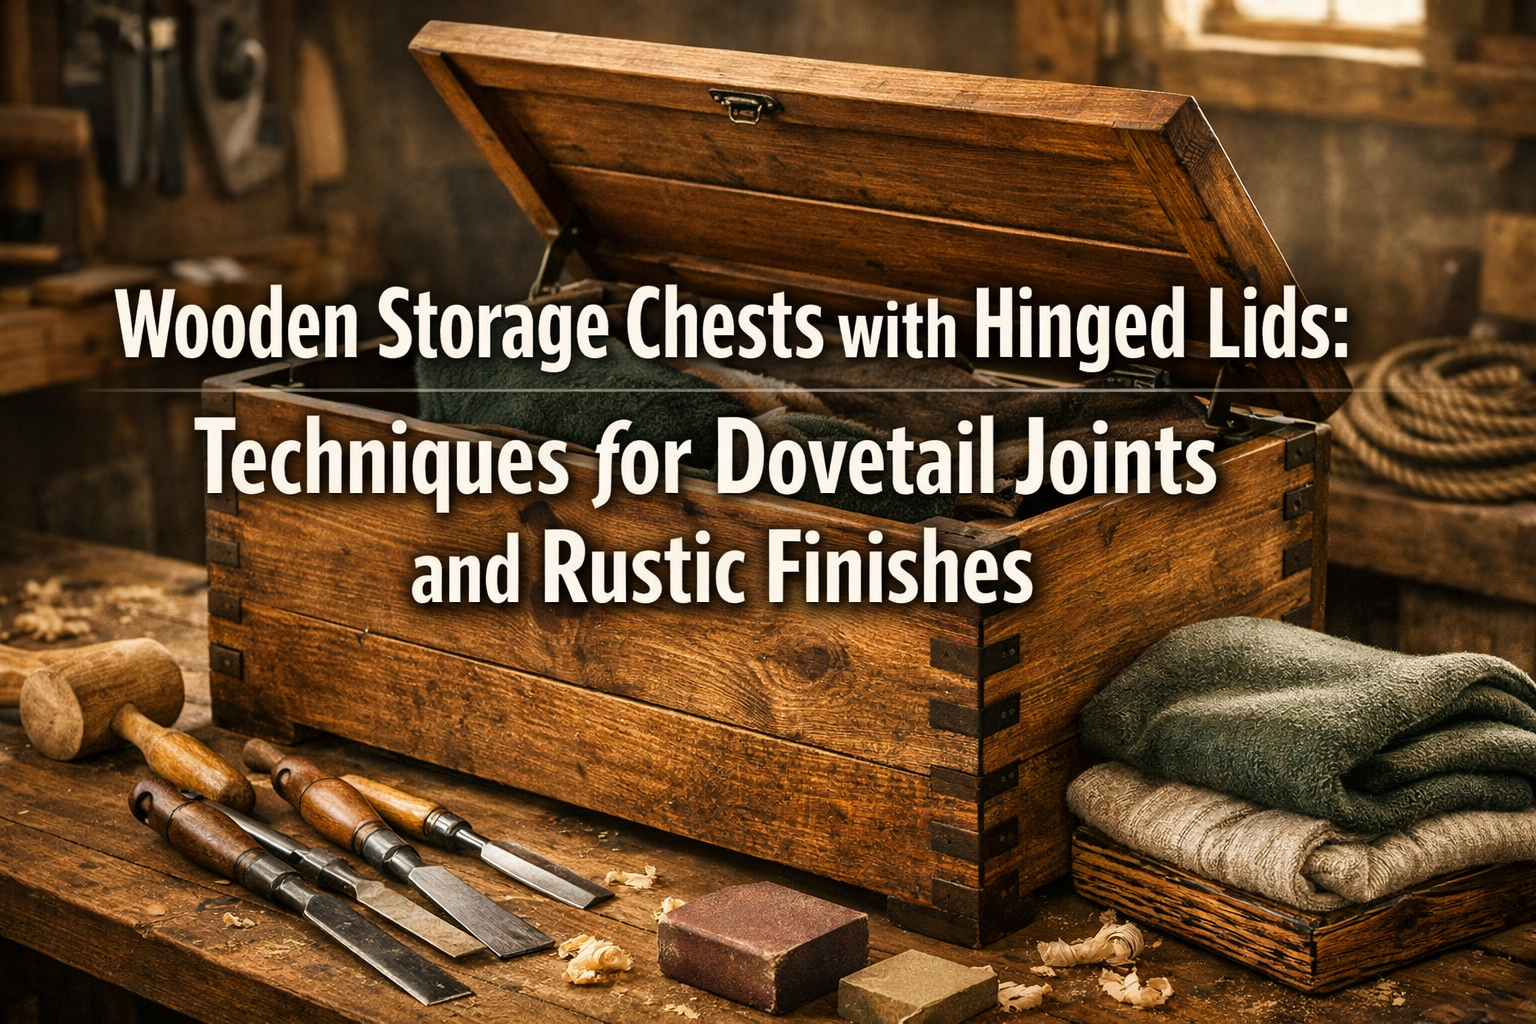

Imagine a piece of furniture that marries robust utility with timeless beauty, a cornerstone of organization that can house everything from precious family heirlooms to essential workshop tools. That’s the essence of wooden storage chests with hinged lids: techniques for dovetail joints and rustic finishes. These chests are more than just storage; they are statements of craftsmanship, built to last generations. In this comprehensive guide, we’ll delve into the rewarding process of creating heirloom-quality wooden storage chests, focusing on the strength and aesthetic appeal of dovetail joints and the character-rich charm of rustic finishes. Whether you’re looking to organize your workshop or add a touch of handcrafted elegance to your home, mastering these techniques will empower you to build pieces that are both functional and profoundly beautiful.
Key Takeaways
- Dovetail Joints for Strength and Beauty: Dovetail joints are paramount for constructing durable and aesthetically pleasing wooden storage chests, offering superior mechanical strength and a classic look.
- Hand Tools vs. Power Tools: While traditional hand tools provide an unparalleled connection to the craft, power-assisted techniques (like router jigs) can significantly increase efficiency without sacrificing quality for dovetail creation.
- Selecting the Right Wood: The choice of wood significantly impacts the chest’s durability, appearance, and how well it accepts rustic finishes. Hardwoods like oak, maple, and walnut are excellent choices.
- Achieving Authentic Rustic Finishes: Rustic finishes add character and protect the wood. Techniques range from distressing and wire-brushing to natural oil and wax applications, enhancing the natural beauty of the wood grain.
- Hinged Lids: Functionality and Safety: Proper hinge selection and installation are crucial for the functionality, durability, and safety of the chest, especially for heavier lids or those intended for children’s use.
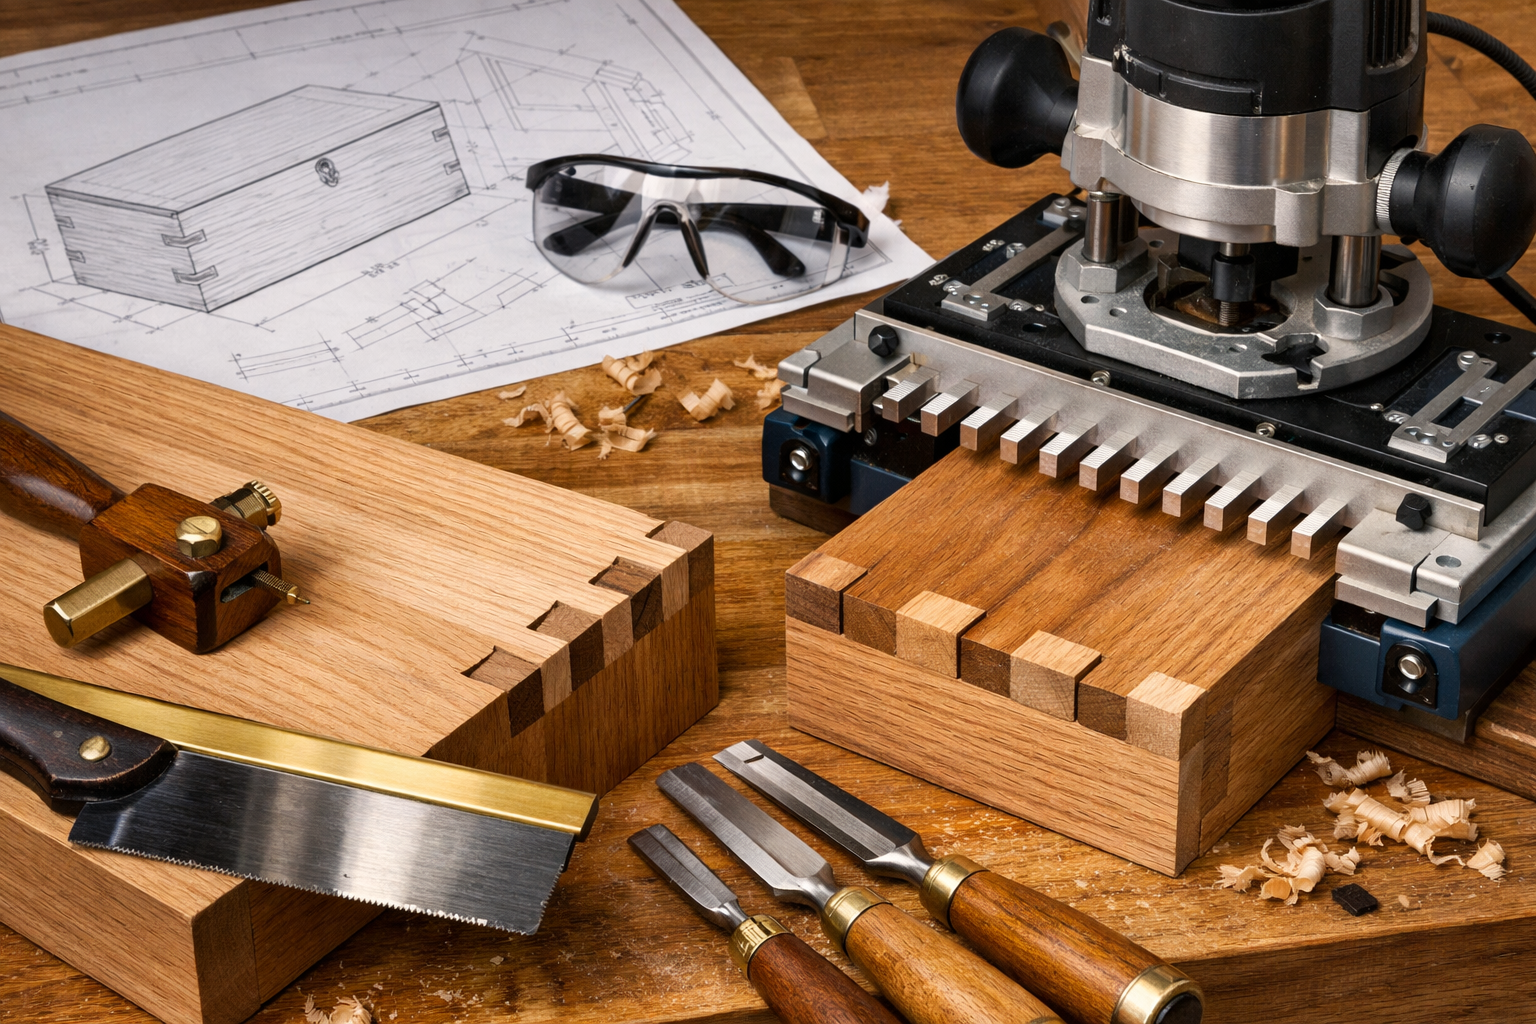
Mastering Dovetail Joints for Robust Construction
[[IMAGE_PLACEHOLDER]]

The dovetail joint stands as a testament to traditional woodworking skill, offering unmatched mechanical strength and a beautiful, interlocking aesthetic. For wooden storage chests with hinged lids, these joints are not merely decorative; they are fundamental to creating a chest that can withstand the test of time and heavy use. This section will guide you through the process, covering both classic hand-tool methods and efficient power-assisted approaches.
Understanding the Dovetail: Pins and Tails
A dovetail joint consists of two primary components: the “pins” and the “tails.” The tails are wider at their base and taper towards the end, resembling a bird’s tail. The pins are the narrower, interlocking parts that fit perfectly between the tails. This design creates a strong mechanical lock that resists being pulled apart, making it ideal for the corners of a heavy storage chest.
There are several types of dovetail joints, each with specific applications:
- Through Dovetail: The most common type, where the end grain of both pieces is visible. Perfect for wooden storage chests with hinged lids where the joint is meant to be a prominent feature.
- Half-Blind Dovetail: One face hides the joint, while the other shows the pins. Often used for drawer fronts or situations where one exterior face needs to remain clean.
- Secret Dovetail (or Mitered Dovetail): Completely conceals the joint, leaving only mitered corners visible. This is the most challenging to execute and is typically reserved for fine furniture where ultimate refinement is desired. For a rustic chest, the through dovetail is often preferred for its honest display of craftsmanship.
Essential Tools for Dovetail Joinery
Whether you choose hand tools or power tools, having the right equipment is critical for success.
Hand Tool Essentials 🪚
- Dovetail Saw: A fine-toothed saw with a thin blade, designed for precision cuts.
- Chisels: A set of sharp chisels (1/4-inch to 1-inch) for cleaning out waste wood. A specialized “dovetail chisel” with a bevel on both sides is excellent for getting into tight corners.
- Marking Gauge: For accurately marking shoulder lines.
- Dovetail Marker/Template: A small tool or template to scribe the angle of the tails. Common angles are 1:6 for hardwoods and 1:8 for softwoods.
- Mallet: For driving chisels.
- Coping Saw: Useful for removing larger sections of waste wood between tails.
- Sharpening Stones/System: Crucially, sharp chisels and saws are non-negotiable for clean dovetail joints.
- Measuring Tools: A precise ruler, square, and marking knife for accuracy.
Power-Assisted Tools (and Hand Tool Integration) ⚡
While purists may prefer entirely hand-cut dovetails, power tools can offer speed and consistency, especially for multiple chests or larger projects.
- Router with Dovetail Jig: A router equipped with a dovetail bit and a specialized jig can create perfectly consistent dovetails quickly. This is an excellent option for beginners or those working on production runs.
- Bandsaw or Table Saw: Can be used to cut the bulk of the waste from tails and pins, significantly reducing chiseling time. For precision cuts with a table saw, proper setup is key; refer to our guide on “Pro Tech Table Saw: A Comprehensive Guide for Effective Usage”.
- Drill Press: Can be used to bore out waste in the pin boards before chiseling.
Step-by-Step Hand-Cut Through Dovetail Process
Let’s walk through the fundamental steps for creating a hand-cut through dovetail joint for your wooden storage chest.
- Prepare Your Stock: Ensure your wood pieces are perfectly flat, square, and cut to their final dimensions. Accuracy here prevents frustration later.
- Mark the Baselines: Use a marking gauge to scribe a baseline on the end grain of both boards, setting the depth of the pins and tails. This depth should match the thickness of the adjoining board.
- Lay Out the Tails:
- Place the tail board vertically in a vise.
- Use a dovetail marker or template to transfer the tail angles onto the end grain. Determine the number and size of tails based on the board’s width and desired aesthetic. Generally, wider tails look more substantial on larger chests.
- Extend these lines down to the baseline using a square.
- Cut the Tails:
- With your dovetail saw, carefully cut along the marked angled lines, aiming to stay on the waste side of the line.
- Then, make vertical cuts along the baseline to sever the waste between the tails.
- Use a coping saw or fret saw to remove the bulk of the waste.
- Finally, use sharp chisels to pare precisely down to the baseline, ensuring the sides of the tails are perfectly flat and square.
- Transfer the Tails to the Pin Board:
- Position the tail board precisely over the end of the pin board, aligning the baselines.
- Carefully scribe around the tails onto the end grain of the pin board using a marking knife. Accuracy is critical here.
- Lay Out and Cut the Pins:
- Extend the scribed lines down to the baseline on the pin board.
- Use your dovetail saw to cut the vertical sides of the pins, again staying on the waste side of the lines.
- Then, angle your saw to cut along the waste areas next to the pins, down to the baseline.
- Remove the waste with a coping saw and finish by chiseling down to the baseline and the angled shoulders of the pins.
- Test Fit and Refine:
- Gently try to fit the joint together. It should be snug but not require excessive force.
- If too tight, identify the high spots (often shiny burnished areas) and pare them down with a chisel. If too loose, unfortunately, the joint needs to be recut, or the gap filled, which is less ideal.
- Once a good fit is achieved, the joint is ready for glue-up.
Glue-Up and Clamping
When gluing dovetail joints, use a high-quality wood glue. Apply a thin, even coat to both the pins and tails. Assemble the joint carefully, using a mallet and a block of wood to gently tap the pieces fully home. Clamp the assembly square, ensuring even pressure, and wipe off any squeeze-out with a damp cloth before it dries. Allow ample drying time before removing clamps.
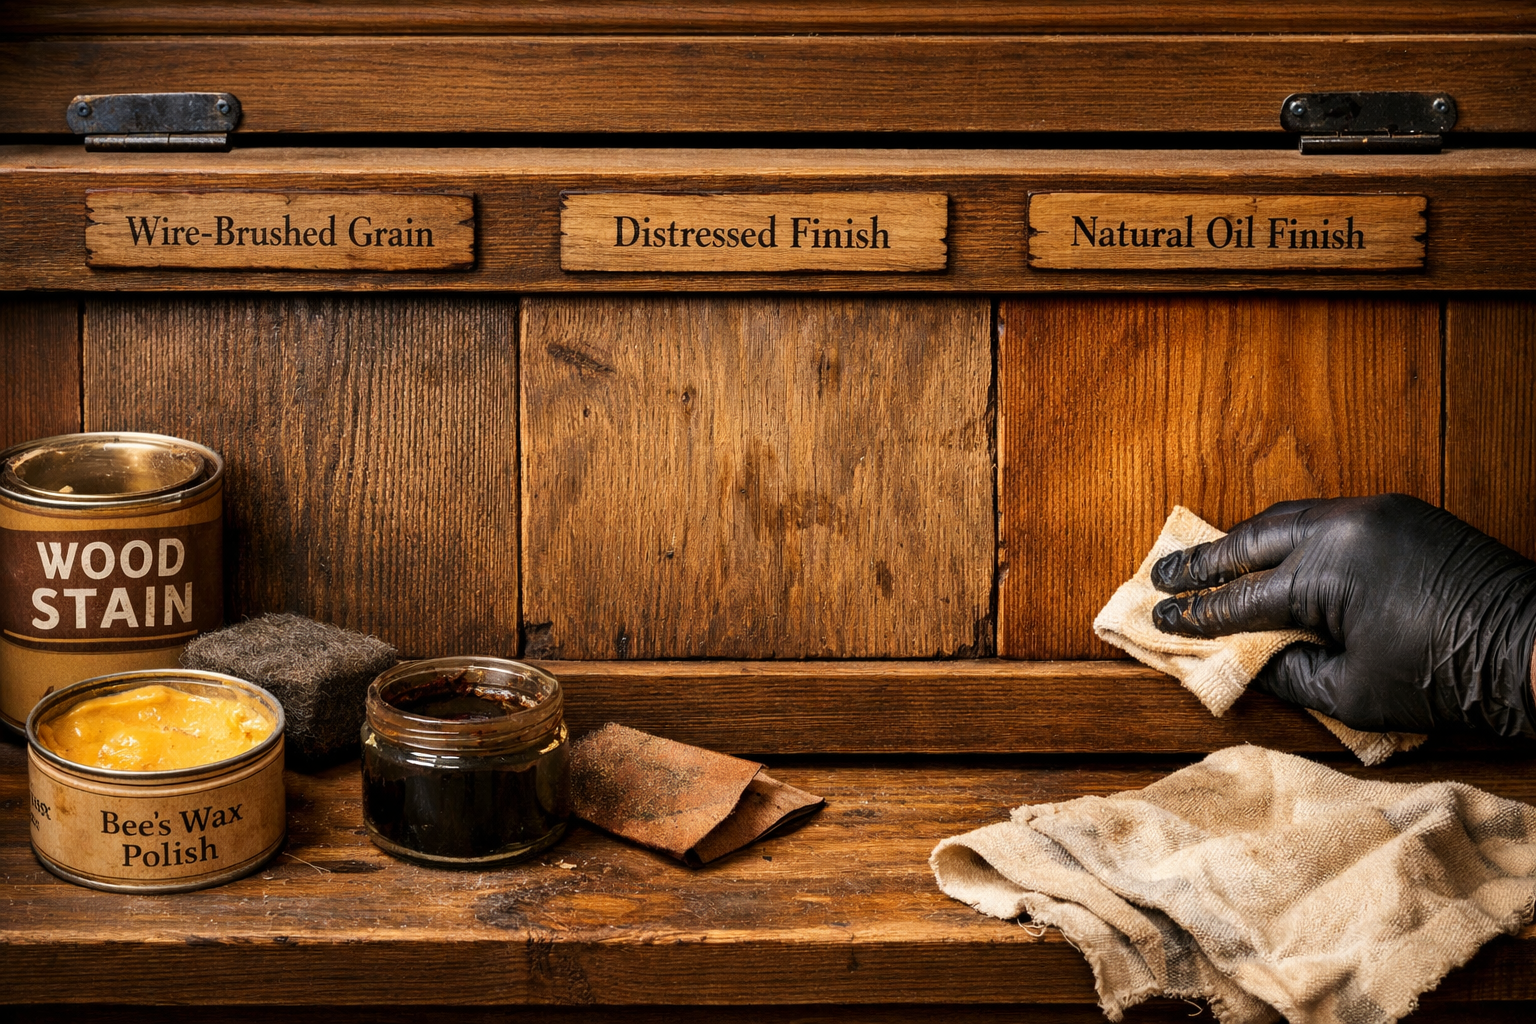
Applying Rustic Finishes to Wooden Storage Chests with Hinged Lids
[[IMAGE_PLACEHOLDER]]
Once your wooden storage chest with hinged lids is structurally sound, it’s time to imbue it with character through a rustic finish. Rustic finishes celebrate the natural beauty of wood, often embracing imperfections and creating a sense of history. These techniques are perfect for enhancing the visual appeal of your hand-crafted chest, making it truly unique.
Why Choose a Rustic Finish?
A rustic finish serves several purposes:
- Character and Warmth: It adds a warm, inviting, and lived-in feel to your chest, fitting perfectly into various decor styles from farmhouse to industrial.
- Hides Imperfections: Minor woodworking flaws can be disguised or even celebrated as part of the rustic aesthetic.
- Durability and Protection: Many rustic finishes, particularly oils and waxes, offer good protection against moisture and wear while allowing the wood to breathe.
- Enhances Wood Grain: Techniques like wire brushing or specific stains can dramatically highlight the natural grain patterns, making the wood’s inherent beauty shine.
Wood Selection for Rustic Appeal
The type of wood you choose greatly influences the final rustic look.
- Pine: Affordable, soft, and easy to distress, pine readily accepts stains and develops a beautiful patin over time. It’s excellent for a classic farmhouse look. For specific considerations, explore “Oil on Pine: Benefits, Tips & Alternatives”.
- Oak: Known for its prominent, open grain, oak takes on rustic finishes beautifully, especially wire brushing which accentuates its texture.
- Maple: While generally smoother, maple can achieve a lovely rustic look with distressing and specific staining techniques. See our guide on “maple wood finishing techniques – Wood Craft Wiz” for more.
- Reclaimed Wood: The ultimate choice for rustic appeal, as it comes with its own history, dents, and character. Ensure it’s clean and stable before use.
Popular Rustic Finishing Techniques
There’s a wide range of methods to achieve a rustic look. Here are some of the most popular and effective for wooden storage chests with hinged lids. For a deeper dive into these and other options, consult our resource on “rustic wood finishing techniques – Wood Craft Wiz”.
1. Distressing 🔨
Distressing involves intentionally creating minor dents, scratches, and wear patterns to simulate age.

- Tools: Chains, hammers, rasps, screwdrivers, awls, wire brushes, and even rocks.
- Method:
- Start with a clean, sanded surface.
- Randomly tap edges with a hammer, drag chains across surfaces, or gently score with a screwdriver.
- Focus on areas where natural wear would occur (edges, corners, lid top).
- Vary the intensity and type of marks for an authentic look.
- Lightly sand rough areas with fine-grit sandpaper (220 grit) to soften harsh marks.
- Tip: Practice on scrap wood first to get a feel for the tools and desired effect. You can also learn more about specific approaches in our guide on “distressed wood finishing techniques – Wood Craft Wiz”.
2. Wire Brushing 🧽
This technique removes softer wood fibers, leaving the harder grain raised and textured, creating a pronounced, weathered look.
- Tools: Stiff wire brush (brass or steel, depending on wood hardness), power drill with a wire brush attachment (use carefully!).
- Method:
- Work in the direction of the grain.
- Apply consistent pressure, brushing repeatedly until the desired texture is achieved.
- Vacuum or wipe away the loosened fibers.
- Follow with a light sanding to smooth any overly sharp edges.
- Caution: Can be aggressive, so test on scrap. Wear appropriate safety gear (gloves, eye protection, dust mask).
3. Staining and Glazing 🎨
Stains and glazes are excellent for altering wood color and enhancing depth, particularly after distressing or wire brushing.
- Stains:
- Penetrating Stains (Oil-based): Deeply color the wood and highlight grain. Apply, let sit, then wipe off excess.
- Water-based Stains: Offer quicker drying times and less odor. Can sometimes raise the grain, requiring light sanding.
- Gel Stains: Sit on the surface more, good for even coverage on blotchy woods like pine.
- Glazes: Applied over a base stain or sealer, glazes sit in the pores and distressed areas, adding aged depth and shading.
- Method: Apply glaze, then wipe back gently, leaving more in recesses and less on raised areas.
4. Natural Oil and Wax Finishes 🌿
These finishes penetrate the wood, providing protection while maintaining a very natural look and feel. They are often favored for their ease of application and repair.
- Linseed Oil or Tung Oil:
- Method: Apply several thin coats, wiping off excess between coats. Allows the wood to breathe and develops a rich patina. Provides a durable, water-resistant finish. For comparing options, consider “Linseed Oil vs. Stain: Pros, Cons, and Choosing the Right Finish”.
- Beeswax/Paste Wax:
- Method: Apply over a sealed or oiled surface (or directly to raw wood for a very soft sheen). Buff to a desired luster. Offers a soft, natural feel and subtle protection, easy to reapply.
5. Milk Paint and Chalk Paint 🖌️
For a truly antique or farmhouse rustic look, these paints are excellent.
- Milk Paint: Creates a matte, often chipped or crackled finish that is inherently rustic. Can be used with a bonding agent for better adhesion or without for a chippy look.
- Chalk Paint: Known for its matte, velvety finish and easy distressing capabilities. Apply, let dry, then sand through areas to reveal the wood or another color underneath. Finish with wax for protection.
Incorporating Hinged Lids and Hardware
The “hinged lids” aspect of your wooden storage chest requires careful consideration of hardware for both functionality and aesthetic harmony with the rustic finish.
- Hinge Types:
- Butt Hinges: Standard, durable hinges that require mortising (recessing) into the wood for a flush fit. Excellent for heavy lids.
- Piano Hinges: Run the full length of the lid, providing maximum support and preventing warping.
- Decorative Strap Hinges: Often chosen for rustic chests, these are surface-mounted and visually appealing, though sometimes less robust than mortised butt hinges for heavy use.
- Lid Stays/Supports: Essential for preventing the lid from slamming shut and for holding it open at a desired angle. These can be spring-loaded, friction-based, or gas struts.
- Hardware Finish: Choose hardware with a finish that complements your rustic aesthetic. Options like blackened steel, antique brass, or hammered iron are perfect.
- Installation: Mark hinge locations precisely. Mortise carefully if using butt hinges. Secure with screws, ensuring they are not too long to pierce through the wood. For a detailed guide on lid construction, consider “Mastering the Woodworking Box Lid: A Comprehensive Guide for 2026 – Wood Craft Wiz”.
Customization and Practical Applications for 2026

[[IMAGE_PLACEHOLDER]]
The beauty of crafting wooden storage chests with hinged lids lies not just in their inherent charm but also in their incredible versatility. In 2026, these handcrafted pieces remain highly valued for their ability to serve diverse organizational and aesthetic needs within both the home and the workshop. Customizing your chest allows it to perfectly fit its intended purpose, whether it’s storing blankets, tools, or anything in between.
Designing for Purpose: Blanket Chests vs. Tool Chests
The internal layout and overall dimensions of your wooden storage chest should be tailored to its primary function.
Blanket Chests 🧺
- Dimensions: Often wider and deeper to accommodate bulky textiles. A common size might be 48″ L x 20″ W x 20″ H, but adjust based on your specific needs.
- Interior Finish: A smooth, splinter-free interior is essential to protect delicate fabrics. Consider lining the interior with cedar for its moth-repelling properties and pleasant scent, or a soft fabric like felt.
- Aesthetics: Often feature softer edges, ornate hardware, and finishes that complement interior home decor. A subtly distressed and waxed finish works wonderfully.
- Safety: If the chest is for a child’s room, incorporate spring-loaded lid stays to prevent the lid from slamming shut, greatly reducing the risk of injury.
Tool Chests 🛠️
- Dimensions: Can vary widely depending on the tools. A workbench-height chest (around 34-36″ tall) can double as an additional work surface. Shorter chests might fit under a workbench.
- Internal Organization:
- Dividers: Fixed or removable dividers are crucial for separating tools, preventing damage and making them easy to find.
- Trays: Sliding or removable trays can maximize storage space, especially for smaller hand tools.
- Protective Lining: Consider a rubber mat or felt lining at the bottom to cushion tools and prevent them from sliding.
- Durability: Focus on robust construction. Hardwoods are preferred for their resistance to dents and dings. The finish should be durable and easy to clean, such as a polyurethane or oil-based finish.
- Mobility: For a workshop chest, adding heavy-duty casters can make it easy to move around your workspace, especially useful for larger items. For inspiration on optimizing workshop storage, check out “Master Your Craft: Building the Ultimate Woodworking Storage Bench in 2026”.
Hinged Lid Mechanisms and Safety Considerations
The choice and installation of your hinged lid system are critical for both functionality and safety.
- Standard Butt Hinges: As discussed, these are robust and reliable. Ensure they are sized appropriately for the weight and size of your lid.
- Lid Supports/Stays:
- Spring-Loaded Stays: Ideal for heavy lids, they assist in opening and hold the lid securely open, preventing accidental closure.
- Soft-Close Hinges/Stays: These are particularly useful for chests in living areas or children’s rooms, ensuring the lid closes slowly and silently, preventing pinched fingers.
- Friction Stays: Provide resistance to keep the lid open at various angles, but may not be strong enough for very heavy lids.
- Installation Tips:
- Pre-Drill Pilot Holes: Always pre-drill holes for screws to prevent splitting the wood.
- Use the Right Screws: Ensure screws are long enough to hold securely but not so long they protrude.
- Check Alignment: Ensure the lid sits perfectly flush when closed and opens smoothly without binding.
Enhancing Functionality and Aesthetics
Beyond the basic structure, several additions can elevate your wooden storage chests with hinged lids.
- Handles: Recessed handles offer a clean look, while surface-mounted pulls can add a decorative element, particularly in wrought iron or antique brass for a rustic feel.
- Feet/Base: Adding feet or a solid plinth base can lift the chest off the floor, protecting it from moisture and giving it a more finished appearance. This also adds to the perceived solidity of the piece.
- Decorative Accents: Metal strapping, carved details, or inlay work can further enhance the rustic aesthetic. For example, a simple chamfer or round-over on the top edge of the lid adds a touch of refinement without detracting from the rustic feel.
- Locking Mechanism: For valuable tools or personal items, a simple padlock clasp or an internal lock can be incorporated.
- Mobility: As mentioned, casters are invaluable for workshop chests. For home use, consider furniture glides to easily move the chest without scratching floors.
Longevity and Maintenance of Your Rustic Chest
An heirloom-quality chest requires ongoing care to maintain its beauty and functionality.
- Cleaning: Dust regularly with a soft cloth. For tougher grime, use a wood-specific cleaner, but always test in an inconspicuous area first. Avoid harsh chemicals that can strip the finish.
- Re-finishing: Depending on the type of rustic finish, occasional re-application might be necessary. Oil and wax finishes are generally easy to touch up or re-apply. Painted finishes might need light sanding and repainting in worn areas.
- Humidity Control: Wood is a natural material that reacts to changes in humidity. Keep your chest in an environment with stable humidity to prevent warping or cracking.
- Hardware Check: Periodically check screws on hinges and handles to ensure they remain tight. Lubricate hinges if they start to squeak.
By thoughtfully designing, constructing with precision dovetail joints, applying character-rich rustic finishes, and considering the practical needs for hinged lids, you create a piece that is not only functional but truly an extension of your craft. Whether for blankets or tools, these chests are built to be treasured.

Conclusion
Crafting wooden storage chests with hinged lids: techniques for dovetail joints and rustic finishes is a profoundly rewarding endeavor that blends skill, artistry, and practicality. We’ve explored the foundational strength and timeless beauty of dovetail joints, understanding how both traditional hand tools and modern power-assisted methods can be employed to create robust, interlocking connections that stand the test of time. Furthermore, we delved into the myriad of rustic finishing techniques, from distressing and wire brushing to natural oils and paints, each designed to imbue your chest with unique character and a rich, aged aesthetic.
The journey from selecting the right wood to meticulously cutting pins and tails, and finally, applying a finish that tells a story, culminates in a truly heirloom-quality piece. These chests are more than just functional storage; they are tangible legacies, capable of organizing a bustling workshop or bringing a touch of handcrafted elegance to any home. By carefully considering lid mechanisms, internal customization for tools or blankets, and ongoing maintenance, you ensure that your creation serves its purpose beautifully for generations to come.
Actionable Next Steps
- Plan Your Project: Decide on the primary use (blanket chest, tool chest, etc.) and determine ideal dimensions. Sketch out your design, considering wood type and desired rustic finish.
- Gather Materials and Tools: Source your chosen wood and ensure you have the necessary hand tools (dovetail saw, chisels, marking gauge) or power tools (router, jig) for joinery. Don’t forget finishing supplies.
- Practice Dovetails: If you’re new to dovetail joints, practice on scrap wood until you achieve a consistent, snug fit.
- Execute Construction: Follow the steps for cutting and assembling your dovetail joints, ensuring squareness during glue-up.
- Apply Your Rustic Finish: Experiment with finishing techniques on scrap pieces of your chosen wood before applying them to your chest. Remember to apply protective topcoats as needed.
- Install Hardware: Carefully select and install hinges, lid stays, and handles that complement your chest’s design and ensure safe, smooth operation.
- Enjoy and Maintain: Place your finished chest in its intended spot and enjoy its beauty and utility. Remember to maintain it regularly to preserve its condition for years to come.
Embark on this woodworking journey, and you will not only create a magnificent wooden storage chest but also hone valuable skills that connect you to centuries of craftsmanship.
References
- Duginske, M. (1995). The Dovetail Handbook: A Guide to the Art of Dovetail Joinery. Taunton Press.
- Flexner, B. (2005). Understanding Wood Finishing: How to Select and Apply the Right Finish. Fox Chapel Publishing.
- Underhill, J. (2007). The Woodworker’s Guide to Hand Tools. Popular Woodworking Books.
