
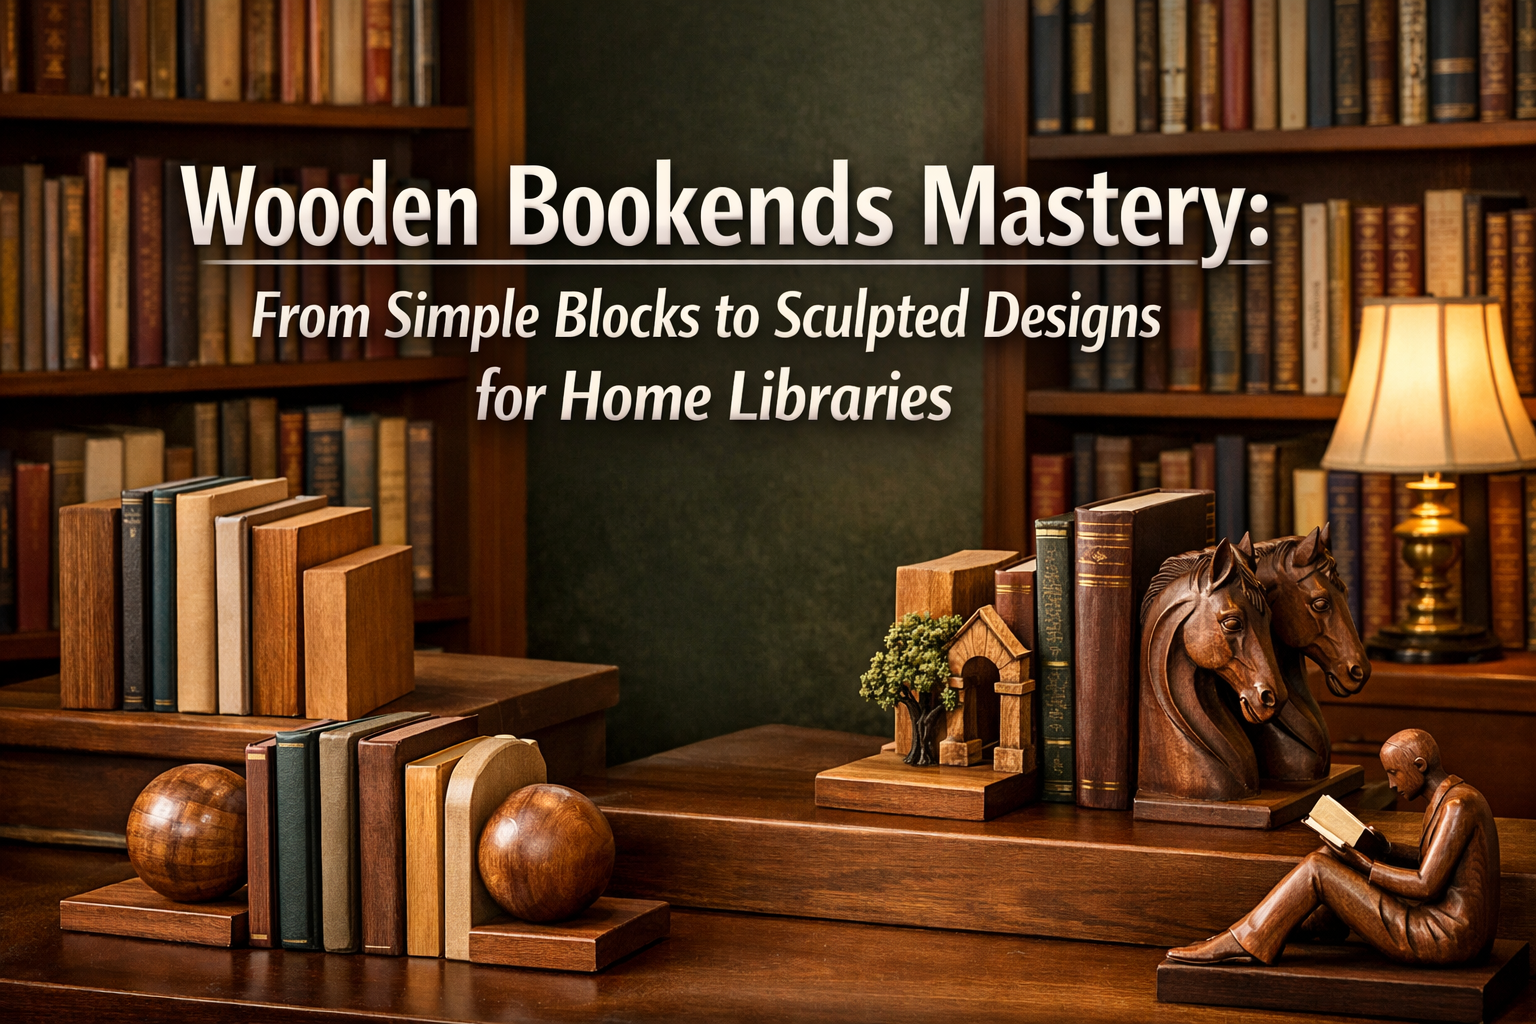

In the tranquil corners of a home library, beyond the hushed rustle of turning pages, lies an opportunity for artistry and order: the humble bookend. More than mere functional objects, wooden bookends possess a unique charm, bringing warmth, character, and a touch of handcrafted elegance to any collection. For the woodworking enthusiast, from the absolute beginner to the seasoned artisan, the journey of Wooden Bookends Mastery: From Simple Blocks to Sculpted Designs for Home Libraries offers a rewarding path. This article will guide you through the process, starting with beginner-friendly plans and progressing to advanced lathe work, focusing on essential balancing techniques, highlighting unique wood grains, and ensuring non-slip bases, all while considering strategies for presenting and selling your creations at craft fairs in 2026.
Imagine the satisfaction of creating a functional piece of art that perfectly complements your literary haven. Whether you envision minimalist blocks that let the books speak for themselves or intricate sculptures that tell a story of their own, mastering wooden bookends is an accessible and fulfilling pursuit.

Key Takeaways
- Start Simple, Grow Confident: Begin with basic block designs to master fundamental woodworking skills before moving to more complex sculpted forms.
- Balance is Key: Proper weight distribution and a non-slip base are crucial for effective bookends, regardless of design complexity.
- Highlight Wood’s Beauty: Choose woods with interesting grains and learn various finishing techniques to bring out their natural character.
- Embrace the Lathe: For advanced designs, wood turning opens up a world of sculptural possibilities and intricate detailing.
- Market Your Masterpieces: Understand how to present and price your wooden bookends for success at craft fairs and online.
The Foundation: Simple Wooden Bookends for Beginners 🌳
The journey into Wooden Bookends Mastery: From Simple Blocks to Sculpted Designs for Home Libraries begins with fundamental techniques that are perfect for novices. Crafting simple block bookends is an excellent way to familiarize yourself with basic woodworking tools and concepts, ensuring a solid foundation for more complex projects.
Choosing the Right Wood and Tools
The success of any woodworking project starts with material selection. For simple bookends, consider readily available and forgiving woods like pine, poplar, or maple. These woods are easy to work with and take finishes well. For a more distinctive look, even at the beginner stage, woods like oak or cherry offer beautiful grain patterns.
Essential Tools for Simple Block Bookends:
- Measuring Tape & Pencil: For accurate marking.
- Square: To ensure precise 90-degree angles.
- Hand Saw or Miter Saw: For straight cuts. A miter saw makes the process significantly faster and more accurate.
- Clamps: To hold wood securely while cutting or gluing.
- Sanding Blocks & Sandpaper (various grits): For smoothing surfaces.
- Wood Glue: For joining pieces.
- Protective Finish (e.g., Danish oil, polyurethane): To seal and protect the wood. Consider exploring different natural wood finishing techniques to enhance your bookends’ appeal.
- Non-slip Pads: Essential for the base.
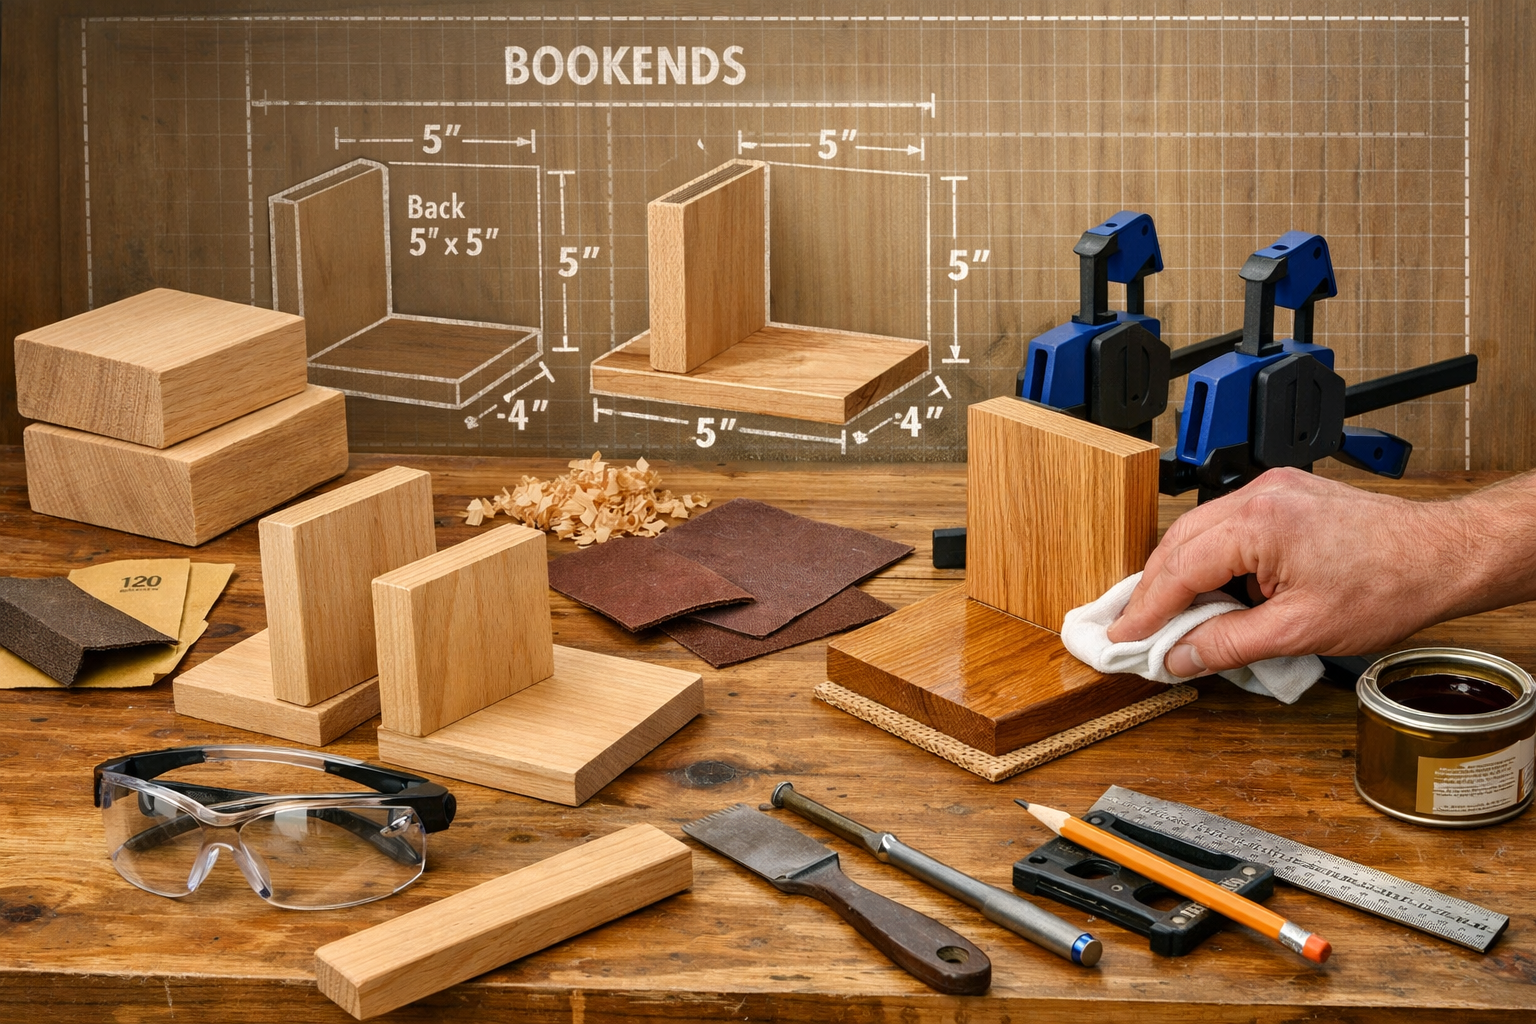
Step-by-Step: Crafting a Basic Block Bookend
Let’s walk through the process of creating a sturdy, effective block bookend. The key here is precision and attention to detail, even in simplicity.
Design and Dimensions: A common size for a simple block bookend is around 6 inches high, 4-5 inches deep, and 3-4 inches wide. You’ll typically need two pieces of wood for each bookend: a vertical upright and a horizontal base.
- Vertical Piece: 6″ H x 4″ W x 1″ D
- Horizontal Base: 4″ D x 4″ W x 1″ D
Cutting the Wood:
- Using your measuring tape and pencil, mark your chosen wood for the two pieces per bookend.
- Carefully cut the pieces to size. If using a hand saw, ensure your cuts are straight. A miter saw will provide cleaner, more accurate cuts.
- Pro Tip: Cut all pieces for both bookends at once to ensure consistency.
Achieving Balance and Stability:
- The most crucial aspect of a bookend is its ability to stand firm. The horizontal base provides leverage against the weight of the books.
- For stability, the vertical piece should be securely joined to the base.
Assembly:
- Apply a generous but not excessive amount of wood glue to the bottom edge of the vertical piece.
- Position the vertical piece squarely onto the horizontal base, ensuring it’s centered or slightly off-center (depending on your aesthetic preference). The goal is to maximize the base’s contact with the shelf.
- Clamp the pieces together firmly. Wipe away any excess glue that squeezes out immediately with a damp cloth.
- Allow the glue to dry completely according to the manufacturer’s instructions, typically 24 hours.
Sanding for Smoothness:
- Once the glue is dry, begin sanding. Start with a coarser grit sandpaper (e.g., 100-120 grit) to remove any rough edges or dried glue.
- Progress to finer grits (e.g., 180, 220 grit) for a smooth, touchable finish. Pay close attention to all edges and corners.
Applying a Finish:
- Choose a finish that complements your wood and desired aesthetic. Danish oil penetrates the wood, enhancing its natural grain, while polyurethane creates a durable protective layer.
- Follow the product instructions carefully for application and drying times. Multiple thin coats are often better than one thick coat. For different effects, explore various unique wood finishing techniques.
Adding a Non-Slip Base:
- This is a critical, often overlooked step. Apply self-adhesive rubber feet or cork pads to the bottom of the horizontal base. This prevents the bookends from sliding under the weight of books and protects your shelves.
“Even the simplest wooden bookend, when crafted with care and precision, can elevate a library shelf from mundane to magnificent. It’s the attention to detail that transforms a block of wood into a cherished object.” — Woodcraft Wiz Editor
Beyond the Block: Simple Variations
Once comfortable with the basic block, you can introduce simple variations:
- Mitered Edges: Cut the top edges of the vertical piece at an angle (e.g., 45 degrees) for a more refined look.
- Contrasting Woods: Use two different types of wood for the vertical and horizontal pieces, creating a striking visual contrast.
- Personalization: Wood burning or stenciling simple designs or initials can add a personal touch.
Elevating Craftsmanship: Sculpted Designs and Advanced Techniques ✨

Moving beyond the fundamentals, Wooden Bookends Mastery: From Simple Blocks to Sculpted Designs for Home Libraries truly shines when exploring advanced techniques. This section delves into the exciting world of wood sculpting and turning, opening up endless possibilities for unique and artistic bookends.
Understanding Wood Grain for Sculpting
When sculpting, understanding the wood grain is paramount. The grain dictates how the wood will carve, turn, and respond to tools.
- Straight Grain: Easier to carve cleanly, predictable results.
- Figured Grain: Can be stunning visually, but requires careful tool handling to avoid tear-out. Woods like curly maple, spalted tamarind, or highly figured walnut offer incredible aesthetic potential.
- Hardness: Harder woods (e.g., oak, cherry, walnut) hold fine detail better but are more challenging to work with. Softer woods (e.g., basswood, pine) are easier to carve but may not allow for intricate details.
Introduction to Wood Turning for Bookends
The wood lathe is a transformative tool for creating sculpted wooden bookends. It allows for symmetrical, rounded, and elegant forms that are difficult to achieve otherwise.
Basic Steps for Lathe-Turned Bookends:
- Wood Blank Preparation: Select a suitable wood blank, ensuring it’s free of major defects. Square the ends and find the center points for mounting on the lathe.
- Mounting on the Lathe: Securely mount the wood blank between the headstock and tailstock of the lathe.
- Roughing Out: Using a roughing gouge, slowly and carefully turn the square blank into a cylindrical shape.
- Shaping: With various turning tools (spindle gouges, skew chisels), begin to shape your bookend. Common forms include:
- Columnar: Simple, elegant pillars.
- Vase-shaped: Wider at the base or middle, tapering upwards.
- Abstract: Organic, flowing forms.
- Sanding on the Lathe: While the piece is still spinning, sand it with progressively finer grits for an incredibly smooth finish.
- Parting Off: Carefully cut the bookend from the blank using a parting tool.
- Finishing: Apply your chosen finish. For turned pieces, friction polishes or wipe-on finishes like Danish oil or shellac work beautifully. Discover more about maple wood finishing techniques or explore antique wood finishing techniques for a vintage appeal.
Considerations for Lathe-Turned Bookends:
- Weight: Ensure the turned piece has sufficient weight at its base for stability. Hollow forms might require a weighted insert.
- Base Attachment: A flat bottom is essential. This can be achieved by turning a tenon that fits into a separate, flat base piece, or by carefully flattening one end after turning.
- Paired Design: If creating a pair, strive for symmetry or complementary asymmetry.
Hand Carving and Sculpting Techniques
For those without a lathe, or for designs that demand intricate, non-symmetrical forms, hand carving is the answer.
Carving Tools:
- Carving Knives: For fine detail and general shaping.
- Gouges & Chisels: Various sizes and sweeps for removing material, creating curves, and flat surfaces.
- Mallet: For driving chisels in harder woods.
Popular Sculpted Designs:

- Animal Figures: Owls, foxes, cats, elephants – these add personality and can be highly detailed.
- Architectural Elements: Miniature columns, arches, or stylized facades.
- Abstract Forms: Geometric patterns, swirling lines, or organic, flowing shapes that evoke movement.
- Storytelling Scenes: Carve a minimalist landscape or a silhouette that hints at a narrative.
Integrating Carving and Turning: Many advanced bookends combine both techniques. A turned column might have carved detailing, or a carved animal figure could sit atop a turned base. This blending of methods can lead to truly unique and captivating pieces.
Balancing Techniques for Sculpted Bookends
With sculpted designs, ensuring proper balance becomes even more critical due to potentially irregular shapes.
- Weight Distribution: For taller or more slender designs, ensure the base is sufficiently wide and heavy. This might involve:
- Internal Weights: Drilling a cavity in the base and filling it with lead shot or heavy metal pellets, secured with epoxy.
- Heavy Base Material: Using a denser, heavier wood for the base than the sculpted top, or even integrating a metal plate into the wooden base.
- Non-Slip Base Reinforcement: For sculpted pieces, robust non-slip pads are paramount. Consider full cork sheeting on the entire base for maximum friction.
- Structural Integrity: Ensure all sculpted elements are securely attached and that the design itself is robust enough to withstand the pressure of books.
“The leap from a simple block to a sculpted form is where the woodworker truly becomes an artist. It’s about coaxing beauty from the grain, respecting the material, and imbuing each piece with a story.” — Experienced Woodturner & Carver
For inspiration on joining different wood pieces and ensuring strong bonds, consider reviewing resources like how to glue mirror to wood step-by-step guide – the principles of strong adhesion apply across various projects.
Showcasing Your Mastery: Finishing, Selling, and Home Library Integration 🏡
Having honed your skills in Wooden Bookends Mastery: From Simple Blocks to Sculpted Designs for Home Libraries, the final stages involve presenting your creations beautifully and effectively, whether for your own home or for sale. This includes expert finishing, strategic presentation, and successful selling strategies for craft fairs in 2026.
Advanced Finishing Techniques to Highlight Grain
A superior finish can transform a good bookend into an outstanding one. Beyond basic oils and polyurethanes, explore techniques that truly make the wood’s grain pop.
- Deep Penetrating Oils: Tung oil or linseed oil (like Danish oil vs. boiled linseed oil) can provide a natural, hand-rubbed look that enhances chatoyancy (the shimmering effect in certain grains). Build up multiple thin coats.
- Grain Filling: For open-grain woods like oak or ash, grain fillers create a perfectly smooth surface, making the finish appear glass-like and highlighting the depth of the grain.
- Staining: While natural wood is often preferred, staining can deepen color or unify varied wood tones. Practice on scrap pieces to achieve your desired shade. Remember, lighter woods like maple can be stained to mimic darker species, and there are specific techniques for clear finish for maple to prevent darkening. For darker woods, consider dark stain on birch for a rich aesthetic.
- Buffing and Polishing: After the finish has fully cured, buffing with fine compounds can create a high-gloss, mirror-like surface that accentuates every detail of the wood.
- Waxing: A final coat of furniture wax adds a protective layer and a soft, inviting sheen. This is especially good for pieces that will be frequently handled. For more insights, explore can you wax polyurethane.
Integrating Wooden Bookends into Home Libraries
For personal use, thoughtfully placed wooden bookends elevate the aesthetic of any reading space.
- Match the Decor: Consider the existing style of your home library. A rustic library might benefit from reclaimed wood mantels and bookends made from similar distressed wood. A modern space might call for sleek, minimalist designs.
- Contrast for Impact: Sometimes, a contrasting style works best. A dark, traditional library could be brightened with light-colored, contemporary bookends.
- Groupings: Use bookends to break up long rows of books, creating visual interest and smaller, manageable sections.
- Themed Bookends: If you have specific collections (e.g., fantasy, history), consider themed bookends that reflect the genre.
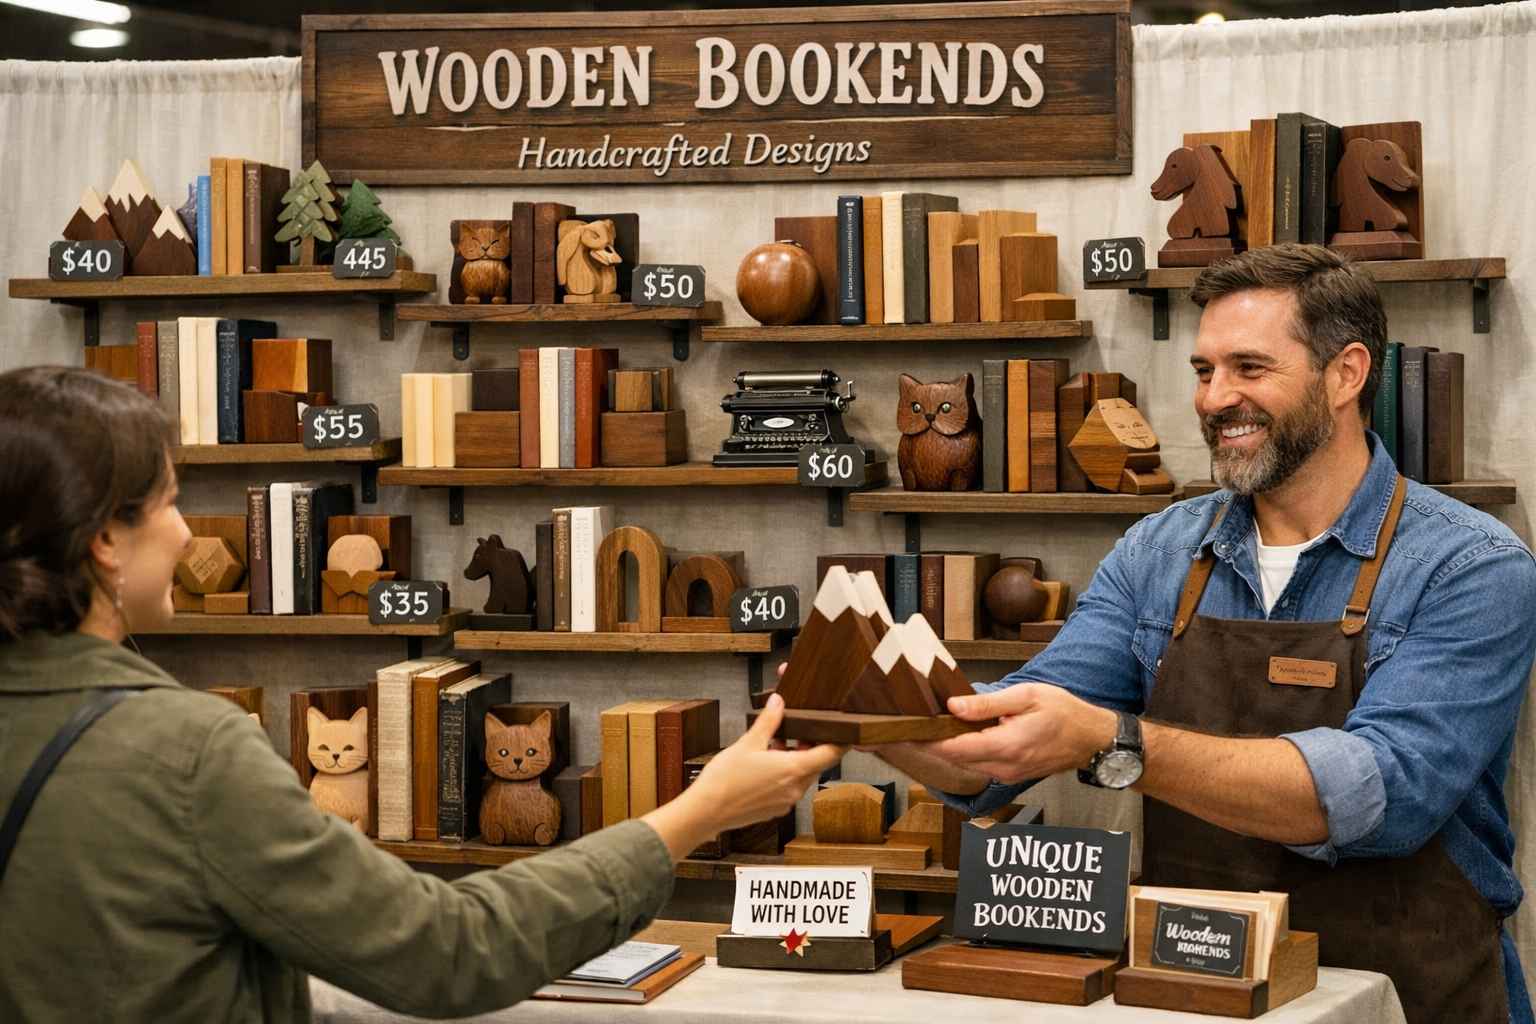
Selling Your Wooden Bookends at Craft Fairs in 2026
For those aspiring to turn their woodworking hobby into a side hustle, craft fairs are an excellent venue.
Presentation is Everything:
- Display Strategy: Create an attractive, well-lit display. Use tiered shelves to showcase various sizes and styles. Arrange some bookends holding books to demonstrate their function.
- Branding: Develop a simple logo and include it on small tags or etched into the bookends’ bases. Have business cards available.
- Storytelling: People love to buy handmade items with a story. Be ready to talk about the wood you used, the inspiration behind a design, or the techniques involved. “This oak was reclaimed from an old barn,” or “I carved this owl, inspired by the ones in my backyard.”
- Variety: Offer a range of designs and price points, from simple, affordable blocks to more intricate, higher-priced sculpted pieces.
Pricing Your Work:
Calculating a fair price is crucial. Consider:
- Material Costs: The actual cost of the wood, glue, finish, non-slip pads.
- Time Investment: How many hours did you spend? Value your time. A common formula is (material cost + labor rate * hours) * 2 (to cover overheads and profit).
- Skill Level & Uniqueness: Highly sculpted or intricately turned pieces command higher prices.
- Market Research: Look at similar items at other craft fairs or online marketplaces to gauge competitive pricing.
Logistics for Craft Fairs:
- Packaging: Offer simple, attractive packaging for your bookends, perhaps with a small care instruction card.
- Payment Options: Be prepared to accept various payment methods, including cash, card readers (like Square or PayPal Here), and mobile payment apps.
- Insurance: Consider vendor liability insurance for craft fairs.
By following these strategies, your creations from Wooden Bookends Mastery: From Simple Blocks to Sculpted Designs for Home Libraries can find appreciative homes and become successful sales at craft fairs and beyond. For those looking to craft other pieces for their home or for sale, expanding your knowledge with resources like crafting your perfect woodworking nightstand: a comprehensive guide for 2026 can be incredibly beneficial. Similarly, understanding concepts from live edge wood projects: from design to execution for home craftspeople can inspire even more unique bookend designs.
Conclusion
The journey through Wooden Bookends Mastery: From Simple Blocks to Sculpted Designs for Home Libraries is one of continuous learning, creativity, and immense satisfaction. From the moment you select your first piece of wood to the final buffing of a meticulously sculpted owl, each step offers an opportunity to connect with the material and express your artistic vision.
Starting with simple, sturdy block designs provides an excellent foundation, allowing you to master essential cuts, assembly, and finishing techniques. As your confidence grows, the world of sculpted designs, whether through the elegant symmetry of wood turning or the detailed artistry of hand carving, awaits. Always prioritize proper balancing techniques and non-slip bases to ensure your bookends are not only beautiful but also highly functional.
Finally, remember that the presentation of your finished pieces is as important as their creation. Whether adorning your own home library or displayed at a bustling craft fair in 2026, thoughtful finishing and strategic showcasing will ensure your wooden bookends are appreciated for their craftsmanship and unique charm. Embrace the process, experiment with different woods and designs, and let your home library be a testament to your growing woodworking mastery.

Actionable Next Steps:
- Gather Supplies: Purchase a few pieces of pine or poplar, wood glue, sandpaper, and non-slip pads to start your first simple block bookend project.
- Practice Cuts: Spend time making accurate straight cuts with your chosen saw. Precision here will pay dividends.
- Experiment with Finishes: Try out Danish oil, polyurethane, or a simple wax on scrap pieces of wood to see which aesthetic you prefer.
- Explore Design Ideas: Browse online galleries or visit local craft shows for inspiration on more complex sculpted designs you might attempt in the future.
- Consider a Wood Lathe: If advanced sculpting appeals to you, research beginner-friendly wood lathes and turning tools.
- Plan Your Display: Even if not selling immediately, think about how you would best showcase your creations to highlight their beauty and functionality.
