
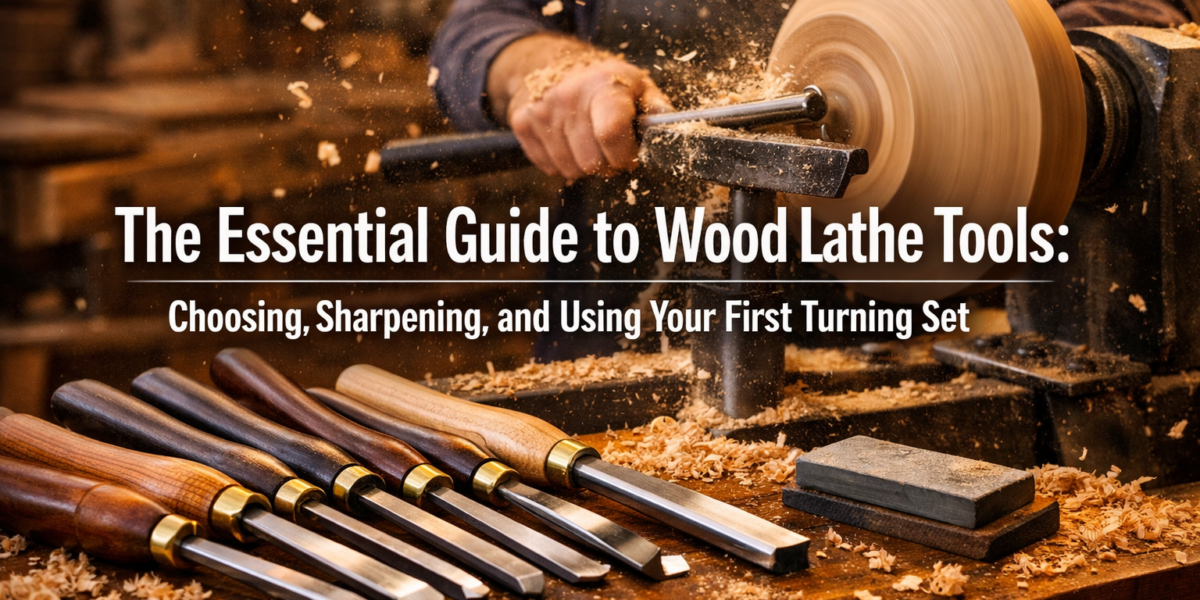

The profound satisfaction of transforming a rough block of wood into a smooth, elegant form is a unique allure of woodturning. Yet, for many aspiring artisans, the sheer variety of wood lathe tools can be daunting. Choosing the right set, understanding their individual purposes, and mastering the crucial skill of sharpening are fundamental steps that determine success or frustration. This comprehensive article, “The Essential Guide to Wood Lathe Tools: Choosing, Sharpening, and Using Your First Turning Set,” demystifies these processes, offering a clear path for beginners to confidently embark on their woodturning journey in 2026.
Key Takeaways
- Understand Tool Types: Different lathe tools serve specific functions (roughing, shaping, finishing). Knowing their purpose is crucial for effective turning.
- Prioritize Quality: Invest in a quality starter set made from high-speed steel (HSS) for durability and better edge retention.
- Master Sharpening: Proper sharpening is non-negotiable for safe, efficient, and enjoyable turning. A sharp tool cuts cleanly; a dull tool tears and causes frustration.
- Learn Basic Techniques: Start with fundamental cuts like roughing, planing, and forming coves and beads before attempting complex projects.
- Safety First: Always wear appropriate personal protective equipment (PPE) and understand your lathe’s operation before beginning.
Choosing Your First Wood Lathe Tools: The Essential Guide to Wood Lathe Tools: Choosing, Sharpening, and Using Your First Turning Set
Selecting your initial set of wood lathe tools can feel overwhelming given the myriad options available. However, for a beginner, a core set of fundamental tools will cover most introductory projects, such as spindles, small bowls, and various decorative items. The key is to understand what each tool does and why it’s essential.

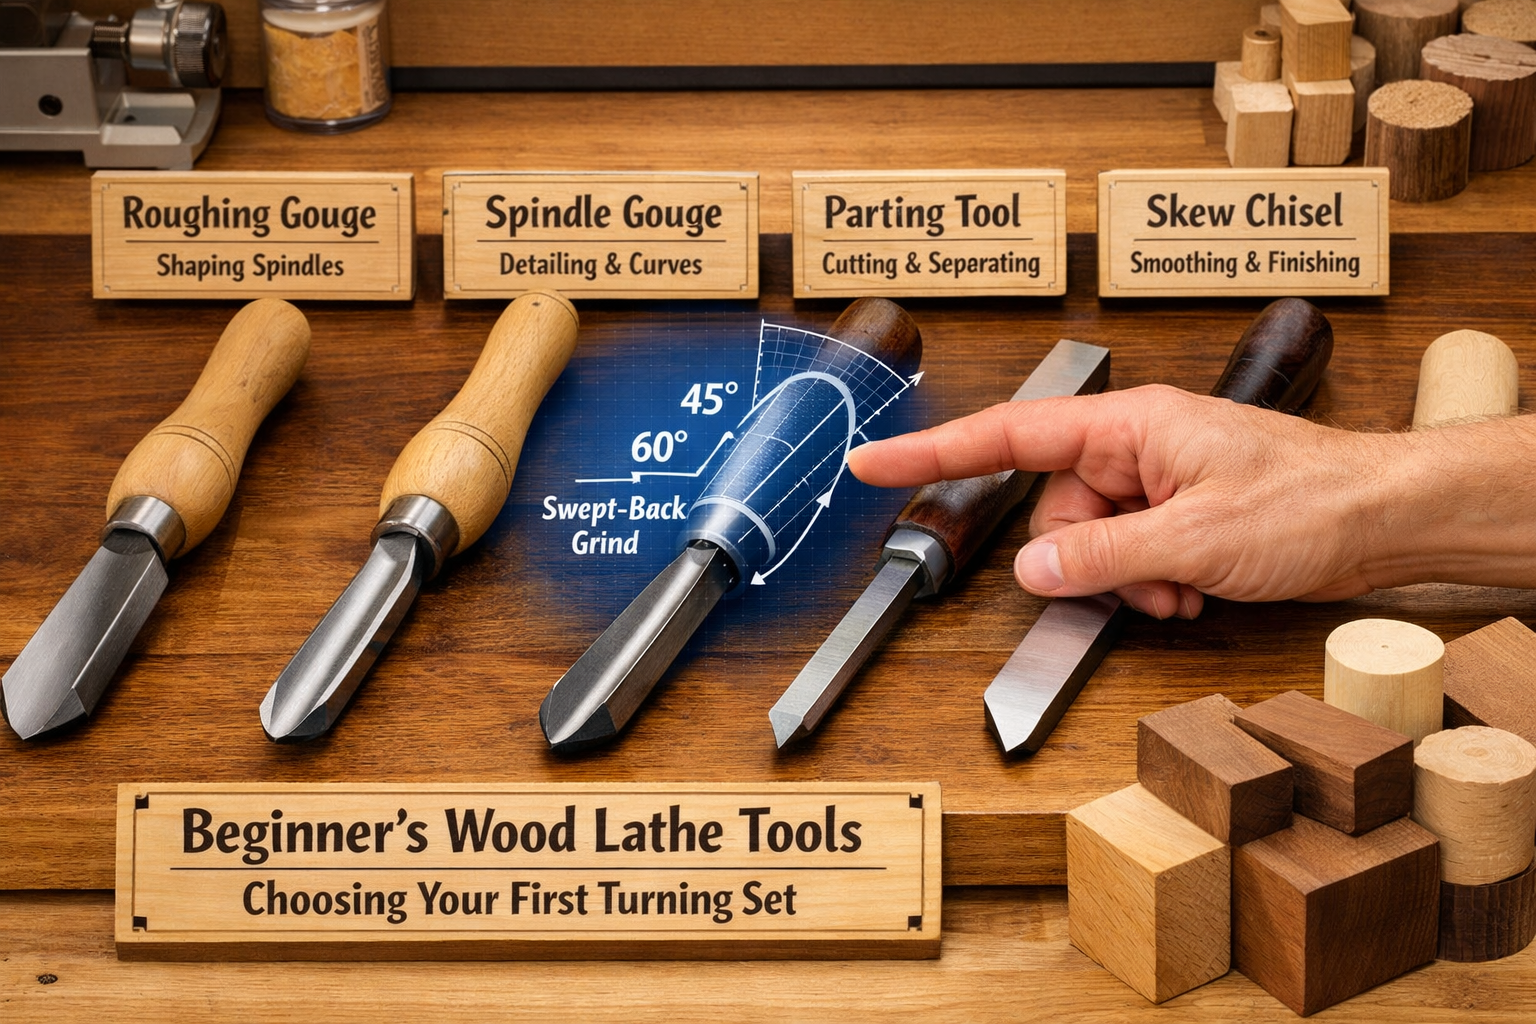
Essential Lathe Tool Types for Beginners
A typical beginner’s set usually includes 4-8 tools designed to cover the basic operations of woodturning. Here’s a breakdown of the most common and vital tools:
Roughing Gouge:
- Purpose: Primarily used for taking square or irregularly shaped blanks and turning them into a round cylinder (roughing out).
- Characteristics: Typically has a deep flute and a fairly straight or slightly curved cutting edge. Large and robust.
- Tip: Always use for spindle turning, never for faceplate turning (bowls) as the large flute can catch the unsupported rim.
Spindle Gouge (or Detail Gouge):
- Purpose: For shaping details, coves, beads, and general profile work on spindle projects.
- Characteristics: Shallower flute than a roughing gouge, often with a more swept-back grind. Comes in various sizes.
- Tip: Essential for creating smooth curves and fine details.
Parting Tool:
- Purpose: To separate (part off) the finished workpiece from the remaining stock, or to create tenons and cut grooves.
- Characteristics: A thin, wedge-shaped tool, sometimes with a diamond or round profile.
- Tip: Often used to size tenons for chucks or to establish depth.
Skew Chisel:
- Purpose: One of the most versatile but challenging tools to master. Used for planing cuts (creating smooth, flat surfaces), making V-cuts, beads, and planing shoulders.
- Characteristics: Has a flat blade with a bevel on both sides, ground at an angle (skewed) to the handle.
- Tip: Requires a delicate touch and good technique, but yields incredibly clean surfaces. Many beginners find it frustrating initially but rewarding with practice.
Bowl Gouge:
- Purpose: Specifically designed for turning bowls and other hollow forms (faceplate turning).
- Characteristics: Features a deep, U-shaped flute, allowing it to remove large amounts of material and clear shavings effectively. Often has a swept-back “fingernail” grind.
- Tip: The go-to tool for shaping the exterior and interior of bowls. If your interest is bowls, this is non-negotiable.
Scraper (Round Nose, Square End, or Spear Point):
- Purpose: Used for refining surfaces, removing tool marks, and creating final profiles. Scrapers push the wood away rather than cutting cleanly.
- Characteristics: Flat or shaped cutting edge, often presented level or slightly downward to the workpiece.
- Tip: Great for smoothing, especially on end grain, but can leave a torn surface if dull or used improperly. Should be used for light finishing passes.
Material Considerations: High-Speed Steel (HSS) vs. Carbon Steel
When selecting tools, the material is paramount for durability and performance.
- High-Speed Steel (HSS): This is the recommended choice for beginners and experienced turners alike. HSS tools hold an edge significantly longer than carbon steel, reducing the frequency of sharpening and increasing productivity. They also tolerate the heat generated during grinding much better, preventing the edge from softening (losing temper).
- Carbon Steel: While often cheaper, carbon steel tools dull quickly and are more susceptible to losing their temper when sharpened on a grinder, potentially ruining the tool. Avoid these for lathe tools unless specifically for specialized, infrequent use.
What to Look for in a Beginner Set
- Reputable Brand: Stick with well-known manufacturers known for quality tools.
- HSS Material: Confirm the tools are made from HSS.
- Ergonomic Handles: Comfortable handles reduce fatigue and improve control.
- Balance: A well-balanced tool feels like an extension of your hand.
Remember, a smaller set of high-quality tools is far more valuable than a large set of inferior ones. You can always expand your collection as your skills grow and projects become more complex. For an excellent introduction to the broader craft, consider exploring a general “Introduction to Wood Turning for Beginners: Mastering Basic Lathe Operations and Simple Bowl Projects” to solidify foundational knowledge.

Sharpening Your First Turning Set: A Critical Skill
A sharp tool is not just about producing a clean cut; it’s about safety and enjoyment. A dull tool requires more force, generates more heat, can grab the wood violently, and ultimately leads to frustration and poor results. Mastering sharpening is arguably as important as learning the turning techniques themselves.
The Importance of Sharpness
Imagine trying to slice a tomato with a butter knife – it’s messy, difficult, and ineffective. A sharp chef’s knife, however, glides through effortlessly. The same principle applies to woodturning. A properly sharpened tool:
- Cuts Cleanly: Leaves a smooth surface that requires less sanding.
- Reduces Tear-Out: Minimizes splintering and grain disturbance.
- Requires Less Force: Makes turning less fatiguing and more controlled.
- Is Safer: Less likely to catch or dig into the wood unexpectedly.
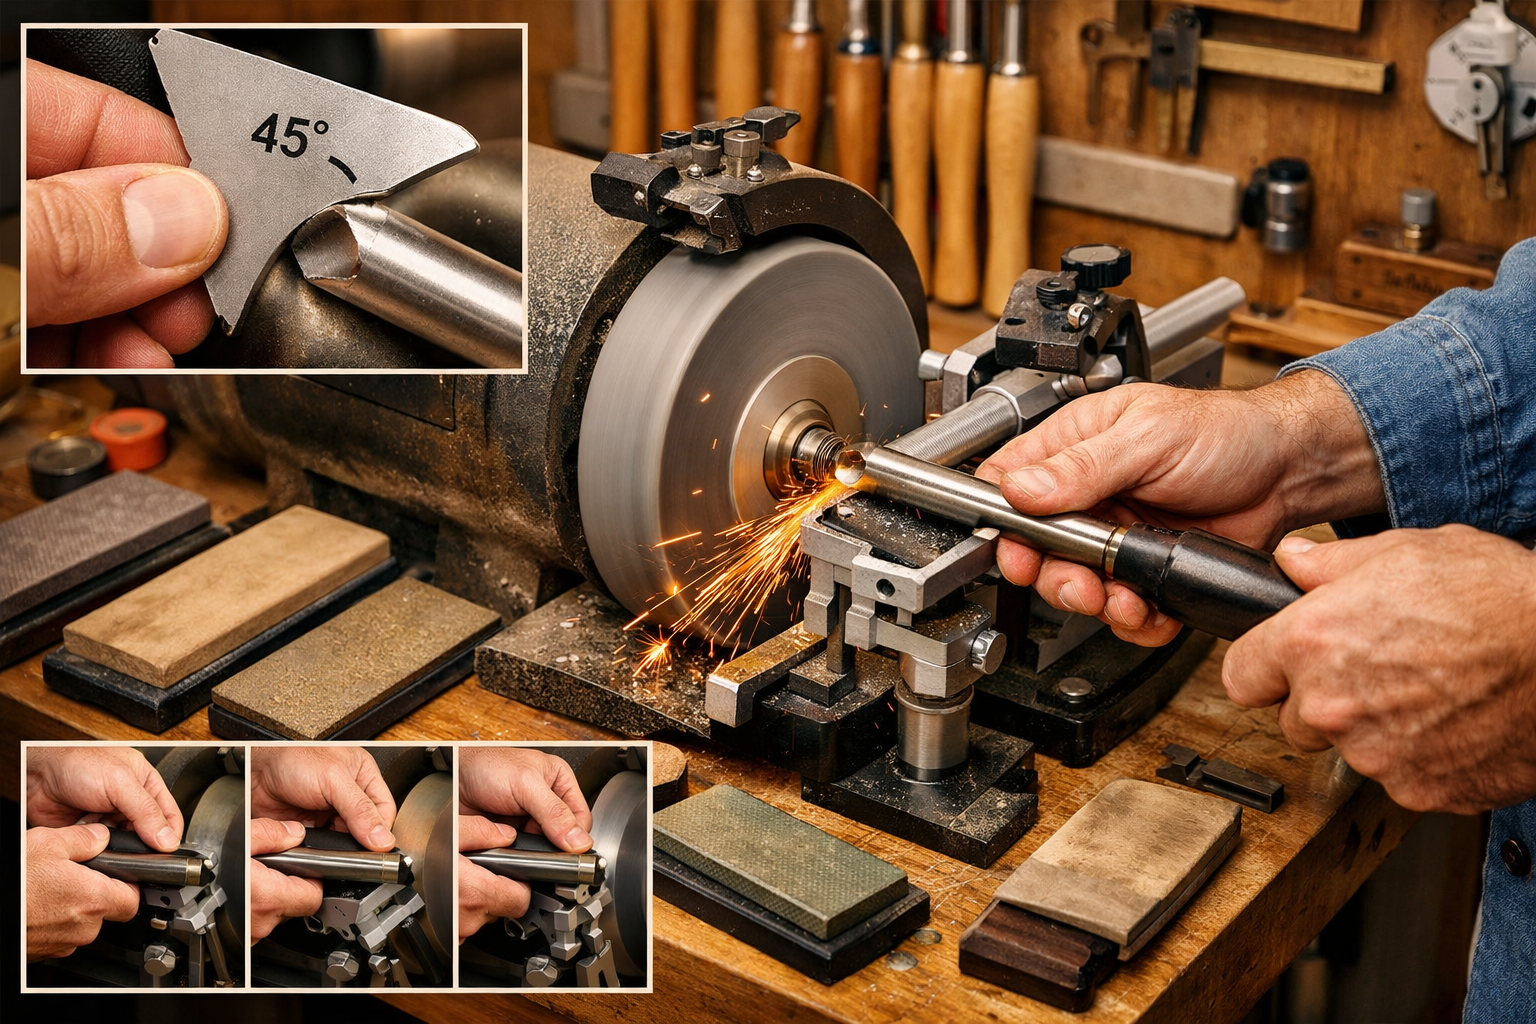
Essential Sharpening Equipment
- Bench Grinder: A slow-speed (1725 RPM) bench grinder is highly recommended. High-speed grinders (3450 RPM) can quickly overheat and damage tool edges.
- Grinding Wheels: Invest in good quality aluminum oxide wheels (e.g., 80-grit for shaping, 120-grit for refining) or CBN (Cubic Boron Nitride) wheels for superior performance and longevity.
- Grinding Jigs/Systems: These are crucial for consistently replicating precise bevel angles. Many turners start with a simple platform jig and later invest in more elaborate systems like the Wolverine Grinding System, which helps achieve consistent grinds for bowl gouges and spindle gouges.
- Angle Gauge: A simple protractor or dedicated angle gauge helps ensure you’re grinding at the correct bevel angle for each tool.
- Safety Glasses: Non-negotiable. Grinding creates sparks and can throw off tiny metal particles.
- Dust Mask: Protect your lungs from grinding dust.
Basic Sharpening Principles
- Consistent Angle: The goal is to maintain the tool’s original bevel angle or a slightly modified, consistent angle that suits your turning style.
- Light Touch: Don’t press too hard. Let the grinder do the work. Excessive pressure generates heat and can burn the edge.
- Cool the Tool: For HSS, overheating is less of a concern than with carbon steel, but still avoid turning the edge blue. Dip the tool in water frequently if it starts to get hot.
- Grind the Bevel: You are primarily grinding the bevel of the tool. Grind until you see a tiny “wire edge” (a burr) forming on the opposite side of the cutting edge.
- Hone (Optional but Recommended): After grinding, a quick pass on a fine sharpening stone or leather strop can remove the wire edge and polish the cutting edge, making it even sharper.
Sharpening Specific Tools
| Tool Type | Typical Bevel Angle | Sharpening Focus |
|---|---|---|
| Roughing Gouge | 30-45 degrees | Simple straight or slightly curved bevel. Keep consistent. |
| Spindle Gouge | 30-40 degrees | Maintain the “fingernail” or swept-back grind for smooth curves. Use a jig for consistency. |
| Parting Tool | 30-40 degrees | Flat V-bevel, ensuring both sides are even. |
| Skew Chisel | 20-30 degrees | Flat, symmetrical bevels on both sides. A steady hand is critical. |
| Bowl Gouge | 40-50 degrees | Complex swept-back “fingernail” grind. A dedicated jig (like the Wolverine system) is highly beneficial here. |
| Scrapers | 60-80 degrees | A single, blunt bevel. Can form a burr by rubbing the top of the tool on the wheel. |
For more general sharpening advice on other woodworking tools, refer to “Essential Hand Tools for Every Woodworker: A Comprehensive Guide to Selection, Sharpening, and Maintenance.”

Using Your First Turning Set: Basic Techniques and Safety

With your tools chosen and sharp, it’s time to move to the lathe. Safety is paramount, and understanding basic cuts will build confidence and proficiency. “The Essential Guide to Wood Lathe Tools: Choosing, Sharpening, and Using Your First Turning Set” culminates in practical application.
Lathe Safety Essentials
Before you even turn on the lathe, ensure you have:
- Eye Protection: Safety glasses or a face shield are mandatory. Wood chips, dust, and potential tool catches can cause serious injury.
- Hearing Protection: Lathes can be noisy, especially with larger pieces of wood.
- Dust Mask/Respirator: Fine wood dust is a health hazard.
- No Loose Clothing or Jewelry: These can get caught in the spinning workpiece. Tie back long hair.
- Proper Lathe Setup: Ensure your lathe is securely mounted and stable.
- Workpiece Securely Mounted: Double-check that your wood blank is firmly attached to the spindle or faceplate.
- Tool Rest Position: Always position the tool rest as close as possible to the workpiece, usually about 1/8 inch (3mm), slightly below the center line. Remove the tool rest before starting the lathe to ensure it clears the spinning wood.
Basic Woodturning Techniques
Practice these fundamental cuts to develop muscle memory and control:
Roughing to Round (Spindle Turning):
- Tool: Roughing Gouge.
- Technique: With the lathe spinning, gently bring the roughing gouge to the workpiece. Support the tool on the tool rest, angled slightly towards the direction of cut. Take light, shearing cuts, moving from larger diameter towards smaller, or from the center outwards. Let the bevel ride on the wood. The goal is to create a true cylinder.
- Tip: Don’t try to remove too much material at once. Let the tool do the work.
Planing Cut (Spindle Turning):
- Tool: Skew Chisel (advanced) or Spindle Gouge.
- Technique (Skew): For a planning cut with a skew, present the long point of the skew to the wood, with the tool’s handle angled slightly downwards, and the top edge of the chisel parallel to the lathe bed. Ride the bevel, gently gliding the tool across the surface to produce a clean, smooth shave.
- Tip: This takes practice! Start with a spindle gouge if the skew is too challenging initially.
Forming Coves and Beads (Spindle Turning):
- Tool: Spindle Gouge.
- Cove: Start from the edges of where the cove will be and cut inwards towards the center, rolling the gouge as you go to maintain the bevel rubbing.
- Bead: Start at the apex of the bead and cut down to the shoulders, again rolling the gouge and riding the bevel.
- Tip: Practice smooth, continuous movements. Think of painting a curve.
Shear Scraping (Spindle or Faceplate Turning):
- Tool: Scraper (Round Nose or Square End).
- Technique: Position the tool rest close. Hold the scraper with the cutting edge slightly above the center line and tilted about 15-20 degrees to the direction of the cut (like an airplane wing). This slight angle creates a “shear” effect, producing a cleaner cut than a straight scrape.
- Tip: Use light pressure for finishing passes. Shear scraping can reduce sanding time significantly.
Bowl Turning Basics (Faceplate Turning):
- Tool: Bowl Gouge.
- Technique: With a bowl blank mounted on a faceplate, begin shaping the exterior with a bowl gouge. Present the bevel to the wood, allowing it to rub. Follow the curve you intend to create, guiding the gouge along the tool rest. For hollowing the interior, use a similar motion, working from the rim towards the center, constantly rolling the gouge to maintain the bevel rubbing.
- Tip: Always keep the bevel rubbing on the wood. This acts as a fulcrum and prevents catches. For more in-depth bowl projects, explore resources like “Wooden Fruit Bowls: Lathe-Turned and Segmented Builds for Kitchen Statement Pieces.”
Troubleshooting Common Issues
- Tool Catching: Usually caused by not having the bevel rubbing, too aggressive a cut, a dull tool, or improper tool rest height. Stop the lathe, re-evaluate your technique, and sharpen the tool.
- Tear-Out: Often a sign of a dull tool, cutting against the grain incorrectly, or using a scraper too aggressively. Sharpen your tool and consider lighter shear cuts.
- Vibrations/Chatter: Can be due to a dull tool, an unbalanced workpiece, too much overhang from the tool rest, or loose machine parts.
- Burn Marks: Caused by friction from a dull tool or stopping the lathe with the tool still in contact with the wood.
Consistent practice is key. Start with simple projects to build confidence and refine your skills. You might find our “Beginner’s Guide to Building a Simple Wooden Bookshelf: Tools” a useful resource for developing basic woodworking competence which translates well into understanding wood.

Conclusion
Embarking on the journey of woodturning is a rewarding experience that combines artistry with skill. By diligently following “The Essential Guide to Wood Lathe Tools: Choosing, Sharpening, and Using Your First Turning Set,” you’ve gained a comprehensive understanding of selecting the right tools, mastering the critical skill of sharpening, and applying fundamental turning techniques. Remember that patience, practice, and a commitment to safety are your most valuable assets. Don’t be discouraged by initial challenges; every master turner started as a beginner. With each piece you create, your confidence will grow, and your hands will become more attuned to the subtle dance between wood and steel.
Actionable Next Steps:
- Invest Wisely: Purchase a quality HSS beginner tool set from a reputable brand.
- Set Up Sharpening: Acquire a slow-speed bench grinder and a suitable sharpening jig. Dedicate time to practice sharpening before you start turning.
- Prioritize Safety: Always wear appropriate PPE (eye, ear, dust protection) and review lathe safety guidelines before each turning session.
- Start Simple: Begin with basic spindle turning projects like practice cylinders, coves, and beads. Master these before moving to more complex forms.
- Seek Further Learning: Consider taking a local woodturning class or watching reputable online tutorials to see techniques demonstrated in real-time. For a deeper dive into turning for beginners, revisit “Introduction to Wood Turning for Beginners: Mastering Basic Lathe Operations and Simple Bowl Projects.”
Happy Turning in 2026! 🌳✨
References
- Crawford, T. (2012). Turning Wood with Richard Raffan. Taunton Press.
- Raffan, R. (2010). The Complete Illustrated Guide to Woodturning. Taunton Press.
