
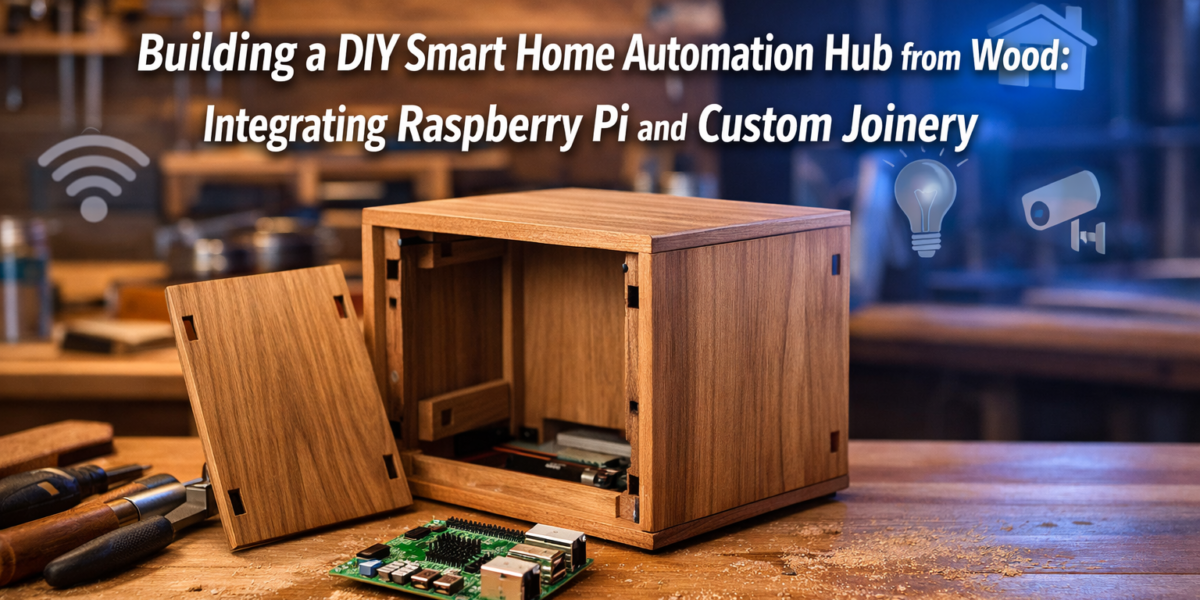

The pervasive glow of screens and an ever-increasing tangle of wires often detract from the serene aesthetics of a well-designed home. Yet, in 2026, the demand for integrated smart home technology continues to soar. Instead of succumbing to generic plastic casings, why not merge the warmth of natural wood with cutting-edge automation? This guide delves into Building a DIY Smart Home Automation Hub from Wood: Integrating Raspberry Pi and Custom Joinery, offering a path to creating a sophisticated, visually appealing, and highly functional control center for your smart home devices.
Key Takeaways

- Building a DIY smart home hub with a wooden enclosure integrates advanced technology with custom aesthetics.
- Raspberry Pi offers a powerful, flexible, and cost-effective platform for home automation.
- Custom joinery techniques are essential for creating durable, visually appealing, and functional enclosures.
- Careful planning, from material selection to ventilation, is crucial for both woodworking and electronics integration.
- This project empowers makers to achieve a truly personalized and elegant smart home solution.
The Synergy of Woodcraft and Smart Home Technology: Building a DIY Smart Home Automation Hub from Wood
The modern smart home relies on a central brain—a hub that orchestrates various devices, from lighting and climate control to security systems. While many commercial hubs exist, they often come with proprietary limitations and uninspired designs. A custom-built hub, particularly one encased in a meticulously crafted wooden enclosure, offers unparalleled flexibility and aesthetic integration. By harnessing the power of a Raspberry Pi, makers can deploy open-source home automation platforms like Home Assistant or OpenHAB, gaining complete control over their smart ecosystems without vendor lock-in.
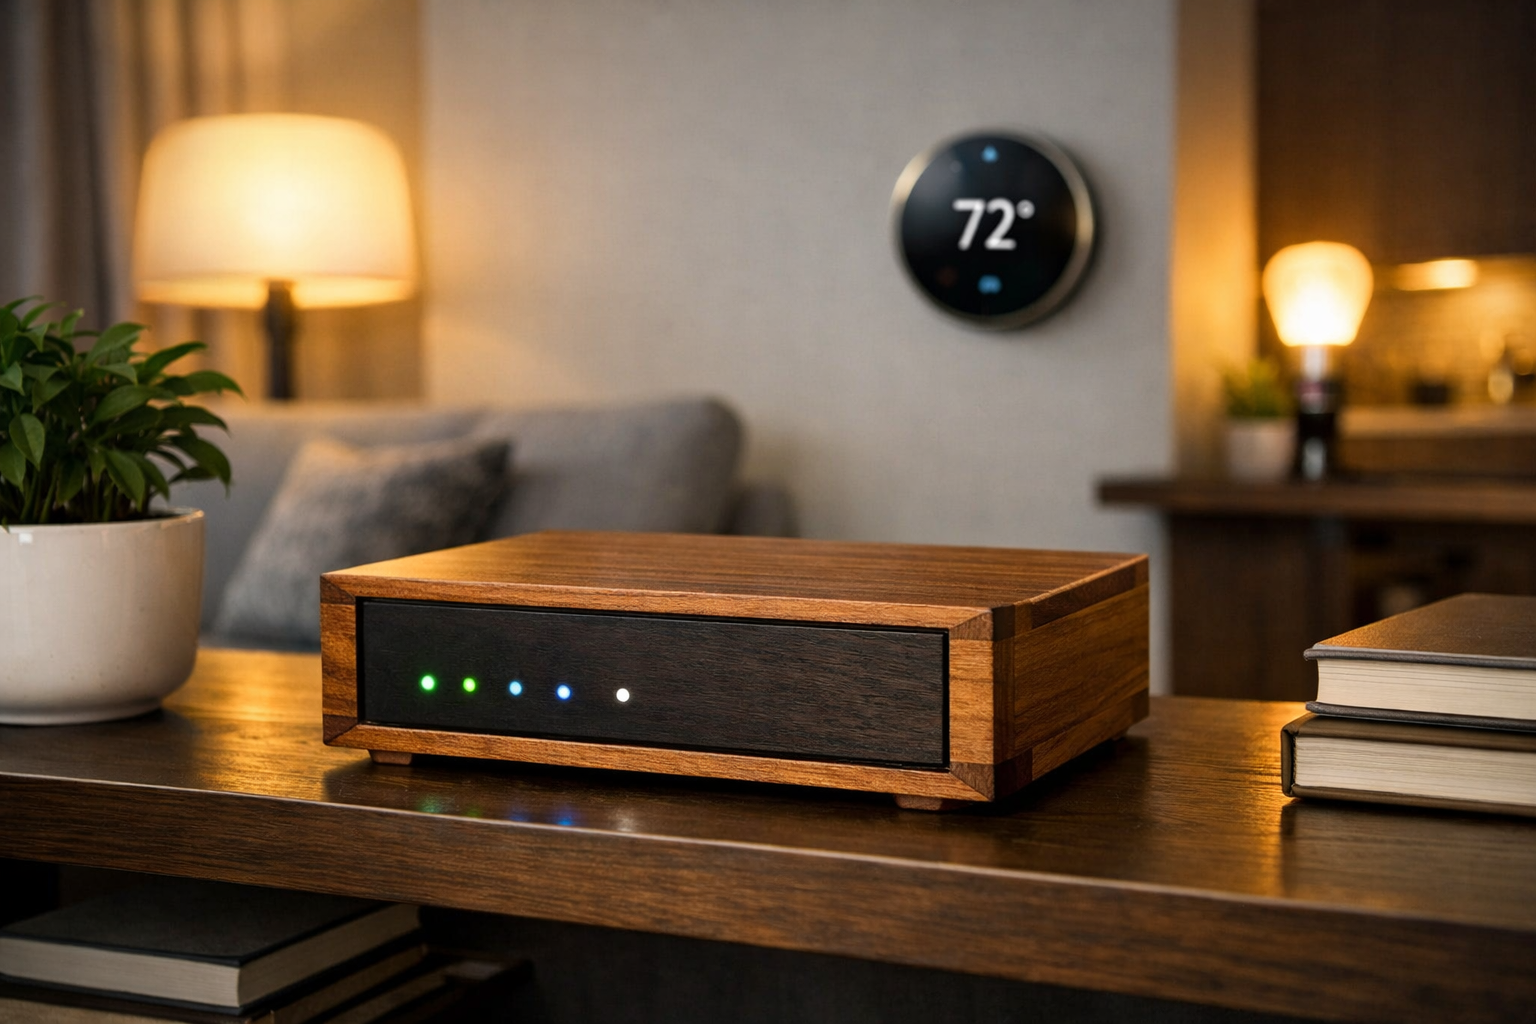
The beauty of Building a DIY Smart Home Automation Hub from Wood: Integrating Raspberry Pi and Custom Joinery lies in its dual appeal: the technical challenge of configuring a robust automation system and the artistic satisfaction of woodworking. Wood provides not only a durable and beautiful housing but also offers advantages such as natural electromagnetic interference (EMI) shielding, albeit minimal, and excellent thermal insulation if properly ventilated. This approach transforms a functional piece of technology into a sophisticated element of interior design, proving that tech can be both powerful and beautiful.
Choosing the right wood is the first step in this journey. Hardwoods like cherry, walnut, or maple offer strength, durability, and a rich grain that enhances the finished product. Softer woods like pine or poplar are easier to work with but may not offer the same level of refined aesthetics or longevity. Reclaimed wood also presents a sustainable and characterful option, adding a unique story to your hub. When working with various wood types, understanding their properties is key to successful joinery and finishing. For guidance on sourcing unique materials, consider exploring Sourcing Reclaimed and Salvaged Wood.
Designing for Functionality and Aesthetics
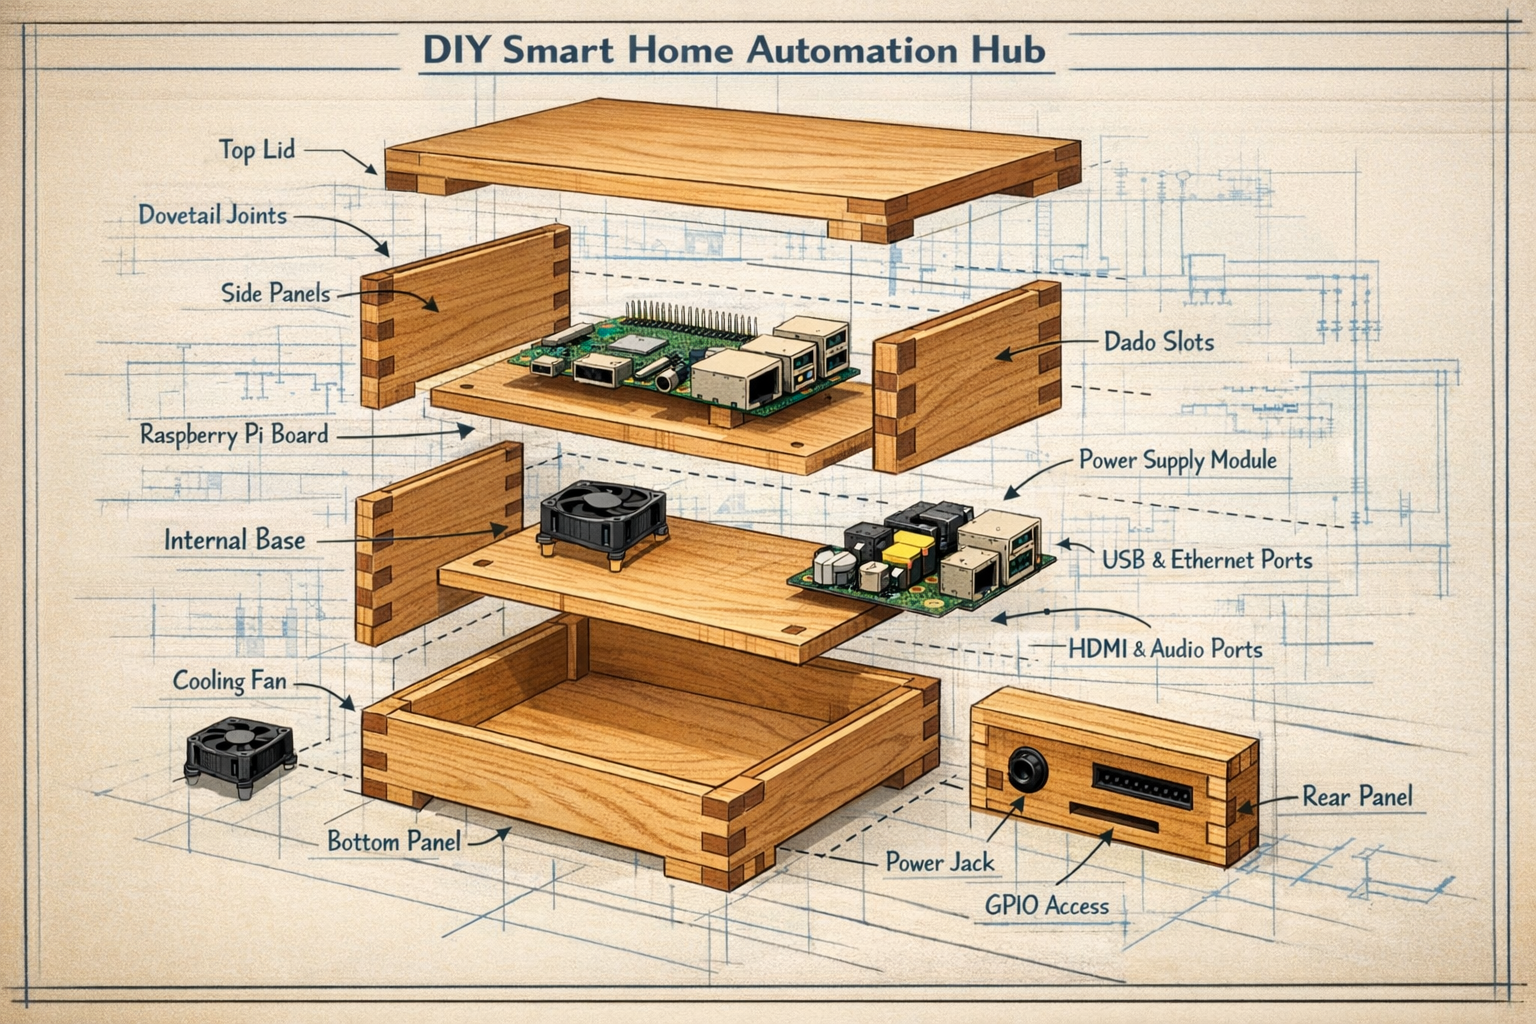
Before cutting any wood, a comprehensive design plan is paramount. This plan must encompass both the physical dimensions required for the Raspberry Pi and its associated components (power supply, expansion boards, cooling solutions) and the aesthetic considerations of the wooden enclosure.
Key Design Elements:
- Internal Layout: Map out the placement of the Raspberry Pi, any HATs (Hardware Attached on Top), power supply, and wiring. Ensure sufficient space for air circulation.
- Port Access: Plan cutouts or recessed areas for all necessary ports: power, Ethernet, USB, HDMI (if needed for initial setup), and any external antenna connections for Wi-Fi or Zigbee/Z-Wave modules.
- Ventilation: Critical for electronic components. Design strategically placed vents, grilles, or even fan mounts to prevent overheating. Overheating can lead to system instability and reduced lifespan for the Raspberry Pi.
- Assembly Method: Determine how the enclosure will be assembled and disassembled for maintenance or upgrades. This influences the choice of joinery.
- Aesthetic Integration: Consider how the hub will fit into its environment. Will it be a subtle accent or a focal point? This dictates the wood finish, style, and overall size.
For inspiration on integrating tech with custom woodworking, see our article on DIY Smart Home Integration with Custom Woodwork: Hiding Tech with Style.
Crafting the Enclosure: Precision Joinery for a Robust Hub
The true artistry in Building a DIY Smart Home Automation Hub from Wood: Integrating Raspberry Pi and Custom Joinery comes alive in the construction phase. Custom joinery techniques not only provide structural integrity but also elevate the visual appeal of the enclosure, transforming it from a simple box into a finely crafted piece.
Selecting the Right Joinery Techniques
Different joinery methods offer varying levels of strength, complexity, and aesthetic character.
| Joinery Technique | Description | Best Use Cases |
|---|---|---|
| Dovetail Joints | Interlocking pins and tails, known for exceptional strength and beauty. | Visible corners of the main enclosure, creating a classic, refined look. Adds significant structural integrity. |
| Miter Joints | Angled cuts that join at 90 degrees, often reinforced. | Clean, seamless corners. Can be reinforced with splines or biscuits for strength. |
| Dado/Rabbet Joints | Grooves (dado) or recesses (rabbet) cut into one piece to accept another. | Internal dividers, mounting shelves for components, securing top/bottom panels. |
| Tongue and Groove | Interlocking edges, common for panels and larger sections. | Creating removable back panels or securing faceplates. |
| Mortise and Tenon | A robust joint where a projection (tenon) fits into a cavity (mortise). | Extremely strong, suitable for critical structural points or attaching a hinged lid. |
For a deeper dive into essential woodworking joints, refer to our Beginner’s Guide to Essential Woodworking Joints. Mastering dovetail joinery, in particular, can significantly enhance the quality of your project, as detailed in Mastering Dovetail Joinery for Drawers.
Step-by-Step Construction Considerations
Material Preparation:
- Carefully select and cut your wood pieces according to your design plan. Ensure all cuts are square and precise.
- Plane and sand all surfaces to the desired smoothness before assembly.
Cutting Joinery:
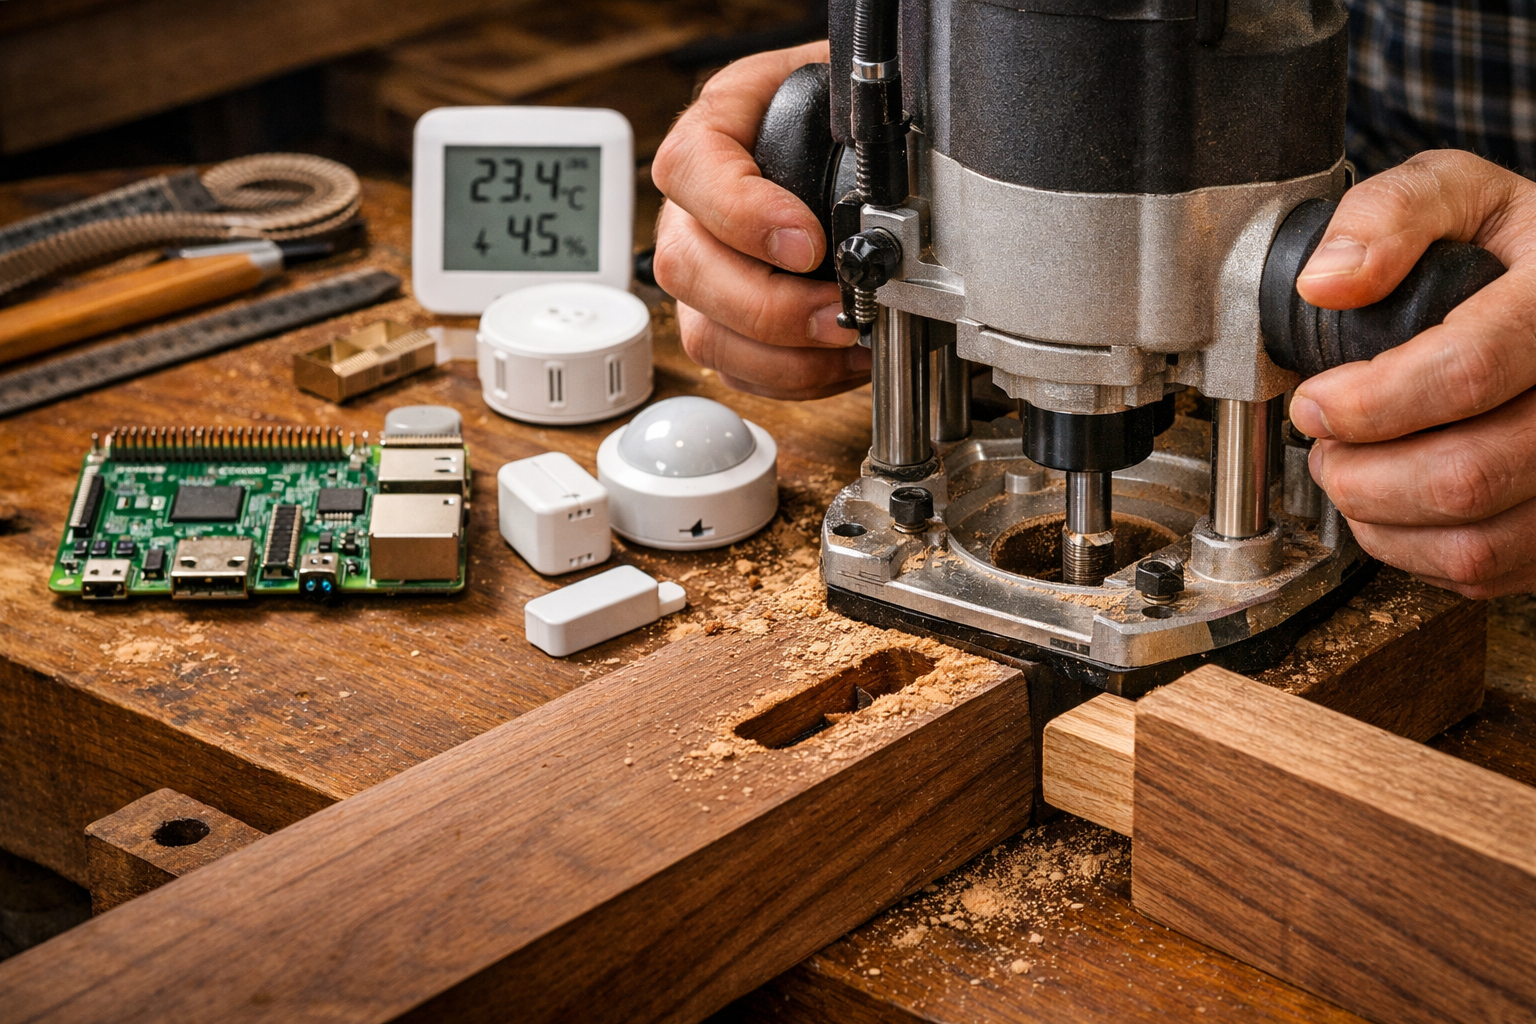
- Use appropriate tools for your chosen joinery: a router table for dados and rabbets, a dovetail jig for precise dovetails, or hand tools for traditional methods.
- Precision is key. Even slight inaccuracies can compromise the fit and strength of the joints. Consider reviewing Mastering the Router Table: Beyond Basic Edges for Precision Joinery for advanced techniques.
Component Mounting Points:
- Pre-drill mounting holes for the Raspberry Pi and other components. Using standoffs (plastic or brass spacers) is essential to prevent short circuits and allow airflow beneath the board.
- Plan cable routing channels or clips to keep the internal wiring neat and prevent interference with opening/closing panels.
Ventilation Features:
- Integrate decorative grilles or carefully spaced ventilation holes. These can be cut using a drill press or a scroll saw. Consider designs that are both functional and aesthetically pleasing.
Finishing:
- After assembly (and dry-fitting all components), disassemble and apply your chosen finish. Options range from clear oils that enhance natural wood grain to stains and lacquers for a more robust protective layer.
- Ensure the finish is fully cured before installing electronics.
Integrating Raspberry Pi and Software: Bringing Your Hub to Life
With the beautiful wooden enclosure complete, the focus shifts to the heart of your smart home—the Raspberry Pi and its software. This section details the steps for integrating the electronics and setting up your automation platform, making Building a DIY Smart Home Automation Hub from Wood: Integrating Raspberry Pi and Custom Joinery a fully functional reality.
Hardware Integration
- Mounting the Raspberry Pi: Securely attach the Raspberry Pi board to its designated standoffs within the enclosure. Ensure it’s stable and there’s no undue stress on the board or its components.
- Power Supply: Route the power cable cleanly. Consider a secure internal mounting point for the power adapter if space allows, or plan a discreet entry point for the external power cord.
- Network Connectivity:
- Ethernet: If using a wired connection, ensure the Ethernet port aligns perfectly with its cutout.
- Wi-Fi/Bluetooth: If relying on wireless, ensure the wooden enclosure doesn’t overly impede the signal. Wood generally has minimal impact, but very thick sections or certain types of wood might require testing. External antennas, if used, should have clear line of sight.
- Peripheral Connections: Connect any external USB devices (e.g., Zigbee/Z-Wave USB sticks) or HATs (e.g., GPIO breakout boards, displays). Ensure their access points or displays align with your enclosure’s openings.
- Cooling (Optional but Recommended): Install a small fan if your design includes it, connecting it to the Raspberry Pi’s GPIO pins or a dedicated power source. Ensure the fan’s airflow is directed to exhaust warm air efficiently.
Software Setup: The Brains of the Operation
The Raspberry Pi’s versatility shines in its ability to host various open-source smart home platforms.
- Operating System: Begin by installing a suitable operating system. Raspberry Pi OS (formerly Raspbian) Lite is a popular choice for headless setups, offering a lean environment.
- Home Assistant: This is a leading open-source home automation platform.
- Installation: Home Assistant offers dedicated images for Raspberry Pi (Home Assistant OS) which simplify installation. Alternatively, it can be installed as a container on Raspberry Pi OS.
- Configuration: Once installed, access Home Assistant via a web browser. The initial setup involves creating an administrator account and discovering local devices.
- Integrations: Add integrations for your smart devices (Philips Hue, SmartThings, TP-Link, etc.). Home Assistant supports thousands of devices and services.
- Automations: Create automations using the graphical user interface or YAML configurations. This is where you define rules like “turn on lights when motion is detected” or “adjust thermostat at specific times.”
- OpenHAB: Another powerful and flexible open-source automation platform.
- Installation: Similar to Home Assistant, OpenHAB can be installed on Raspberry Pi OS.
- Bindings: OpenHAB uses “bindings” to connect to different smart devices and services.
- Rules: Define automation rules using various scripting languages or a graphical rule engine.
Best Practices for Software Configuration:
- Static IP Address: Assign a static IP address to your Raspberry Pi on your local network. This ensures consistent access to your hub.
- Regular Backups: Implement a regular backup strategy for your Home Assistant or OpenHAB configuration. This protects your automations and device settings from data loss.
- Security: Change default passwords, enable two-factor authentication if available, and keep your software updated to patch vulnerabilities.
By meticulously integrating both the hardware and software, your custom-crafted wooden enclosure becomes the elegant and powerful control center for your entire smart home ecosystem.

Conclusion
Building a DIY Smart Home Automation Hub from Wood: Integrating Raspberry Pi and Custom Joinery is more than just a project; it’s an opportunity to blend the timeless artistry of woodworking with the innovation of modern technology. By carefully designing and crafting a wooden enclosure with precision joinery, and then integrating a powerful Raspberry Pi running open-source automation software, you create a smart home hub that is not only highly functional but also a beautiful, bespoke addition to your living space.
This endeavor offers deep satisfaction, from the selection of the perfect piece of wood to the first successful automation routine. It empowers you to take control of your smart home environment, free from proprietary limitations, and to express your personal style in every detail. As you look around your home in 2026, let this project inspire you to create technology that truly harmonizes with your aesthetic values.
Actionable Next Steps:
- Conceptualize: Sketch out your desired design, considering both internal component layout and external aesthetics.
- Gather Materials: Select your wood, acquire a Raspberry Pi (e.g., Raspberry Pi 4 or 5), and any necessary peripherals (power supply, SD card, smart home USB stick).
- Refine Design: Create detailed plans, perhaps using CAD software or precise hand drawings, noting all cuts, joinery, and port locations.
- Practice Joinery: If new to certain techniques, practice on scrap wood before making cuts on your final pieces.
- Build and Integrate: Follow the steps for crafting the enclosure and integrating the hardware and software.
- Automate and Personalize: Dive into Home Assistant or OpenHAB, start adding your devices, and create automations that simplify your daily life.
By embarking on this journey, you’re not just building a smart home hub; you’re crafting a centerpiece that embodies both your technical prowess and your woodworking passion.
