

The distinct smell of charred wood and the precise hum of a focused beam now mingle with the familiar scents of sawdust and tung oil in workshops across the globe. No longer solely the domain of industrial applications, affordable desktop laser engravers are revolutionizing how woodworkers approach small projects. This technological leap offers unprecedented avenues for personalization and intricate designs, bypassing the often complex and time-consuming demands of traditional hand carving. This Beginner’s Guide to Laser Engraving for Woodworkers: Adding Precision Details to DIY Projects aims to bridge the gap between traditional woodworking and this exciting new digital craft, illustrating how laser technology can seamlessly integrate into your creative process.
Key Takeaways
- Desktop laser engravers are now accessible and affordable, opening new design possibilities for woodworkers.
- Understanding different laser types (diode vs. CO2) is crucial for selecting the right machine for your woodworking projects.
- Software proficiency and material knowledge are key to achieving precise and high-quality engravings.
- Safety precautions, including ventilation and eye protection, are non-negotiable when operating a laser engraver.
- Laser engraving complements traditional woodworking by adding intricate details, personalization, and efficiency.
Demystifying Laser Engravers: What They Are and Why Woodworkers Need Them
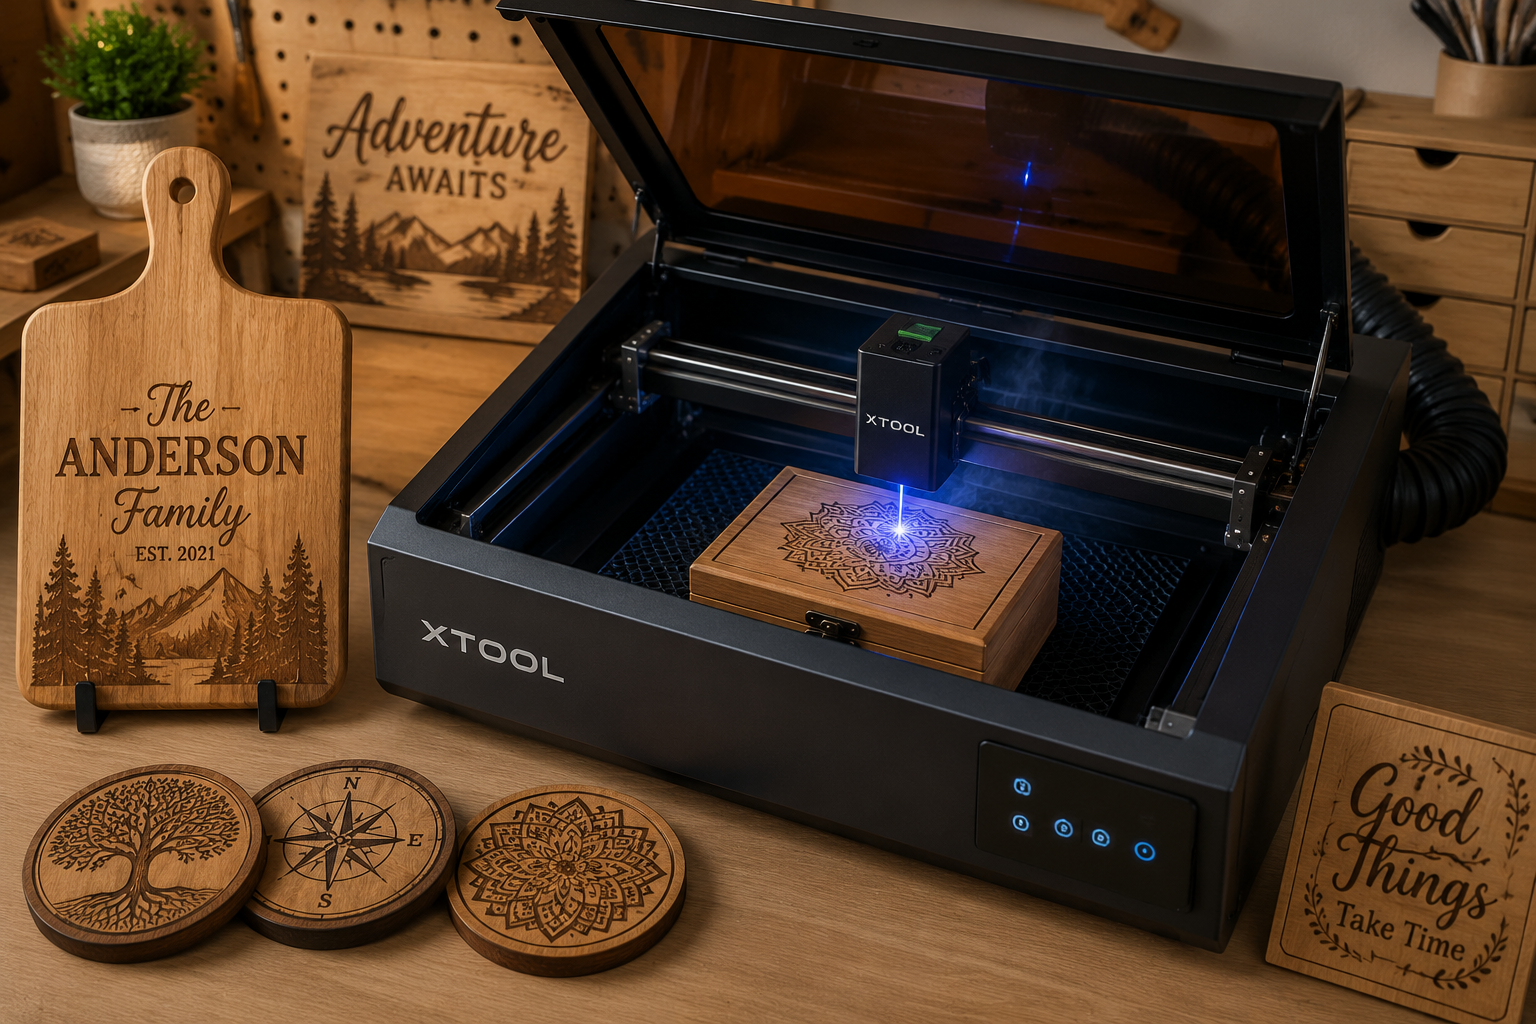
For many woodworkers, the term “laser engraver” might conjure images of industrial machinery or complex, expensive equipment. However, the landscape has changed dramatically. In 2026, compact, user-friendly desktop laser engravers are readily available, making this precision tool accessible to hobbyists and small businesses alike. These machines use a focused laser beam to burn, etch, or cut designs into various materials, with wood being one of the most popular and rewarding.

The Appeal for Woodworkers
Why should a woodworker consider adding a laser engraver to their toolkit? The answer lies in precision, speed, and design flexibility. Imagine adding a perfectly crisp, personalized monogram to a custom cutting board, intricate scrollwork to a jewelry box without hours of carving, or delicate signage to a reclaimed wood restoration piece. Laser engravers excel at:
- Intricate Details: Achieving fine lines, tiny text, and complex patterns that are challenging or impossible with hand tools alone.
- Personalization: Customizing projects with names, dates, logos, or unique artwork, making each piece truly one-of-a-kind.
- Efficiency: Reproducing designs consistently and quickly, especially useful for batch production of items like coasters or small decorative elements.
- Design Freedom: Translating digital designs directly onto wood, opening up a world of creative possibilities from vector art to photographic engravings.
This technology doesn’t replace traditional woodworking skills; it enhances them. It allows you to add a new layer of sophistication and bespoke craftsmanship to your projects, whether you’re building a live-edge dining table or simple wooden candle holders.
Types of Laser Engravers for the Beginner Woodworker
When starting your journey, you’ll primarily encounter two types of desktop laser engravers:
| Feature | Diode Laser | CO2 Laser |
|---|---|---|
| Power Output | Lower (5W – 20W optical power typical) | Higher (30W – 150W typical) |
| Cost | More Affordable (often under $500 – $1500) | More Expensive (often $2000+) |
| Engraving Speed | Slower | Faster |
| Cutting Ability | Thin materials (3mm-6mm softwoods, veneer) | Thicker materials (up to 12mm+ plywood/hardwoods) |
| Maintenance | Generally low, solid-state | Requires lens/mirror cleaning, tube replacement |
| Footprint | Smaller, often open-frame or compact enclosed | Larger, typically enclosed box-style |
| Best For | Engraving details, light cutting, hobbyists | Faster production, cutting, wider material range |
For a Beginner’s Guide to Laser Engraving for Woodworkers: Adding Precision Details to DIY Projects, a diode laser is often the most recommended starting point. Its lower cost, ease of use, and sufficient power for engraving wood and light cutting make it ideal for learning the ropes without a significant investment.
Getting Started: Essential Equipment and Software for Laser Engraving
Embarking on your laser engraving journey requires a few key pieces of equipment and a grasp of the accompanying software. Think of it as another set of tools for your workshop, each with its own learning curve and best practices.
The Laser Engraver Itself
As discussed, a desktop diode laser engraver is an excellent choice for beginners. When selecting one, consider:
- Work Area Size: How large are the projects you plan to engrave? Common sizes range from 200x200mm to 400x400mm or larger.
- Power (Wattage): Higher wattage means faster engraving and better cutting ability. For pure engraving, 5-10W is often sufficient, but 10-20W offers more versatility.
- Safety Features: Look for enclosed designs, emergency stop buttons, and interlocks that prevent operation when the lid is open.
- Connectivity: USB, Wi-Fi, or SD card support for ease of use.
- Brand Reputation & Support: Research reviews and check for active user communities and reliable customer service.
Essential Accessories
Beyond the engraver, a few accessories are crucial for safety and successful operation:
- Safety Glasses: ALWAYS wear appropriate laser safety glasses. The wrong wavelength can cause permanent eye damage. The glasses that come with your machine are a good starting point, but research specific ratings (OD value) for your laser’s wavelength.
- Ventilation System: Laser engraving creates smoke and fumes, which can be toxic. A dedicated enclosure with an exhaust fan and ducting to vent outdoors is essential. If outdoor venting isn’t possible, a robust air filtration system is necessary, though often more expensive.
- Air Assist: This is a small air pump that directs a stream of compressed air onto the laser’s focal point. It helps blow away smoke and debris, preventing charring and producing cleaner cuts and engravings. Highly recommended for improved results.
- Honeycomb Bed: A metal honeycomb grid elevates your material, allowing airflow underneath and minimizing flashback (laser bouncing off your workbench).
- Fire Extinguisher: Keep a small fire extinguisher (rated for electrical fires) within easy reach. Wood can ignite if the laser dwells too long or settings are incorrect.
Software for Design and Control
The magic of laser engraving truly begins with software. You’ll need two main types:
- Design Software: This is where you create or import your designs. Popular options include:
- Vector Graphics Software: Adobe Illustrator, Inkscape (free), CorelDRAW. Ideal for logos, text, and intricate line art.
- Raster Graphics Software: Adobe Photoshop, GIMP (free). Best for photo engraving and detailed images.
- CAD Software: AutoCAD, SketchUp. Useful for precise geometric shapes or parts.
- Laser Control Software: This software interprets your design file and sends commands to the laser engraver.
- LightBurn (Highly Recommended): A powerful, intuitive, and widely supported software that handles both design and machine control. It’s paid but offers a free trial and is considered an industry standard for hobbyist and prosumer machines.
- Manufacturer-Specific Software: Many engravers come with their own software, which can be adequate for basic tasks but often lack the features of LightBurn.
- GRBL-based software: Some open-source machines use GRBL firmware, compatible with various control interfaces.
When preparing designs, remember that lasers work with vector (lines, shapes) and raster (pixel-based images) data differently. Vector engraving involves tracing lines, while raster engraving (or “dithering”) converts images into dots of varying intensity to create shades.
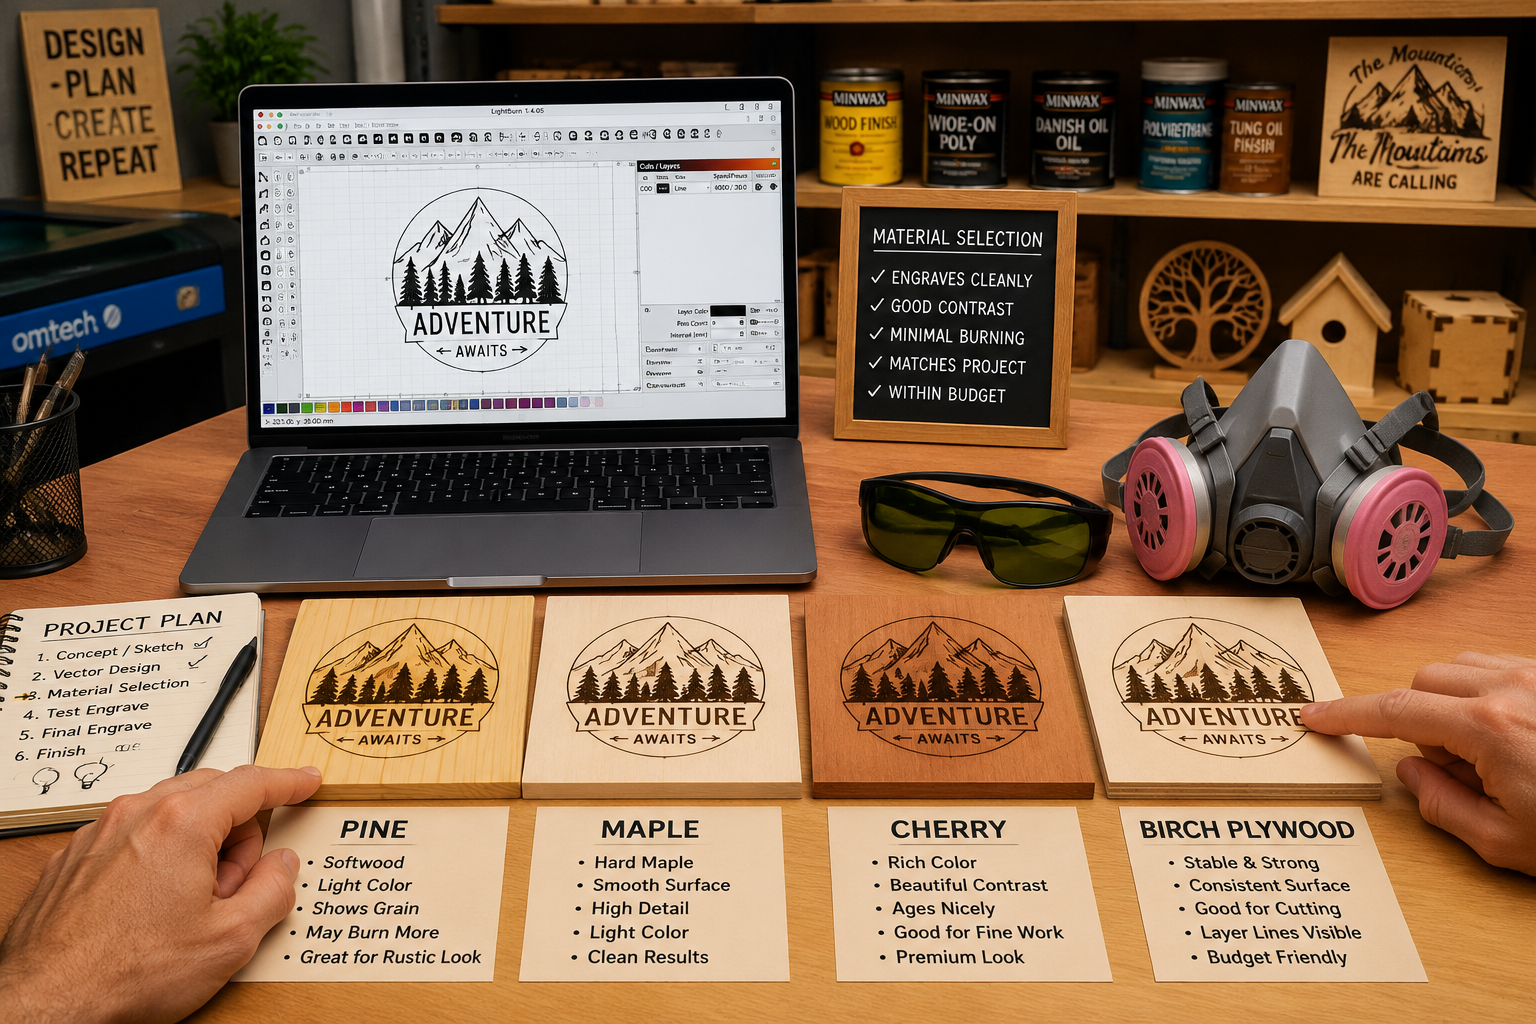
Choosing the Right Wood for Engraving
Not all wood is created equal when it comes to laser engraving. Different species react in unique ways due to their density, grain structure, and resin content.
- Plywood (Baltic Birch, Basswood): Excellent and cost-effective for both engraving and cutting. Baltic birch, in particular, offers a smooth, light surface that provides good contrast.
- Hardwoods (Maple, Cherry, Walnut): Engrave beautifully with good contrast. Maple produces a crisp, darker mark, while cherry offers a rich, reddish-brown engraving. Walnut gives a subtle, sophisticated dark-on-dark effect.
- Softwoods (Pine, Poplar): Engrave well but can be prone to more charring and less detail due to softer fibers and varying density. Requires careful parameter adjustments.
- MDF: Engraves uniformly but can produce more toxic fumes and has a less appealing etched texture than natural wood.
- Exotic Woods: Experiment with caution, as some can produce unpleasant odors or toxic fumes. Always research before engraving.
Tip: Lighter woods generally offer better contrast for engraving. However, darker woods can also create stunning, subtle effects. Always perform test engravings on scrap pieces of your chosen material to dial in settings before committing to your main project. This iterative process is key to mastering the nuances of a Beginner’s Guide to Laser Engraving for Woodworkers: Adding Precision Details to DIY Projects.
Mastering the Process: From Design to Finished Product
With your equipment ready and software installed, it’s time to dive into the practical steps of laser engraving. This section covers the workflow, essential parameters, and post-processing techniques to ensure professional results.
The Laser Engraving Workflow
A typical laser engraving project follows these steps:

Design Creation/Selection:
- Create your design in vector (for crisp lines, cuts) or raster (for images, shading) format using your chosen design software.
- Ensure all lines are clean, text is converted to paths, and images are properly sized and dithered if necessary.
- For customization strategies for mass-producing small woodcraft, develop templates to streamline this stage.
Import to Laser Control Software:
- Import your design file (SVG, DXF, PNG, JPG, etc.) into LightBurn or your machine’s control software.
- Size and position the design accurately on your virtual workspace, ensuring it fits your material.
Material Placement & Focusing:
- Place your wood piece securely on the honeycomb bed. Use clamps if necessary to prevent movement.
- Crucially, focus the laser beam. Most desktop lasers have a manual focus mechanism or an auto-focus assist. Proper focus ensures the smallest, most intense laser spot, leading to crisp engravings.
Parameter Setting (Power, Speed, Passes):
- This is the heart of successful engraving. You’ll set:
- Power: The intensity of the laser beam (percentage of max power). Higher power results in deeper/darker marks.
- Speed: How fast the laser head moves (mm/second or inches/minute). Slower speeds mean more laser dwell time, leading to darker/deeper marks.
- Passes: How many times the laser goes over the same area. Multiple passes can achieve deeper engraving or cutting.
- Always do test cuts/engravings on scrap material. Create a “test grid” with varying power and speed settings to find the optimal combination for your specific wood and desired effect. This saves costly mistakes on your final project.
- This is the heart of successful engraving. You’ll set:
Running the Job:
- Safety Check: Ensure all safety glasses are worn, ventilation is active, and no flammable materials are near the machine.
- Start the engraving process. Never leave the machine unattended while operating. Be prepared to hit the emergency stop button if something goes wrong (e.g., fire).
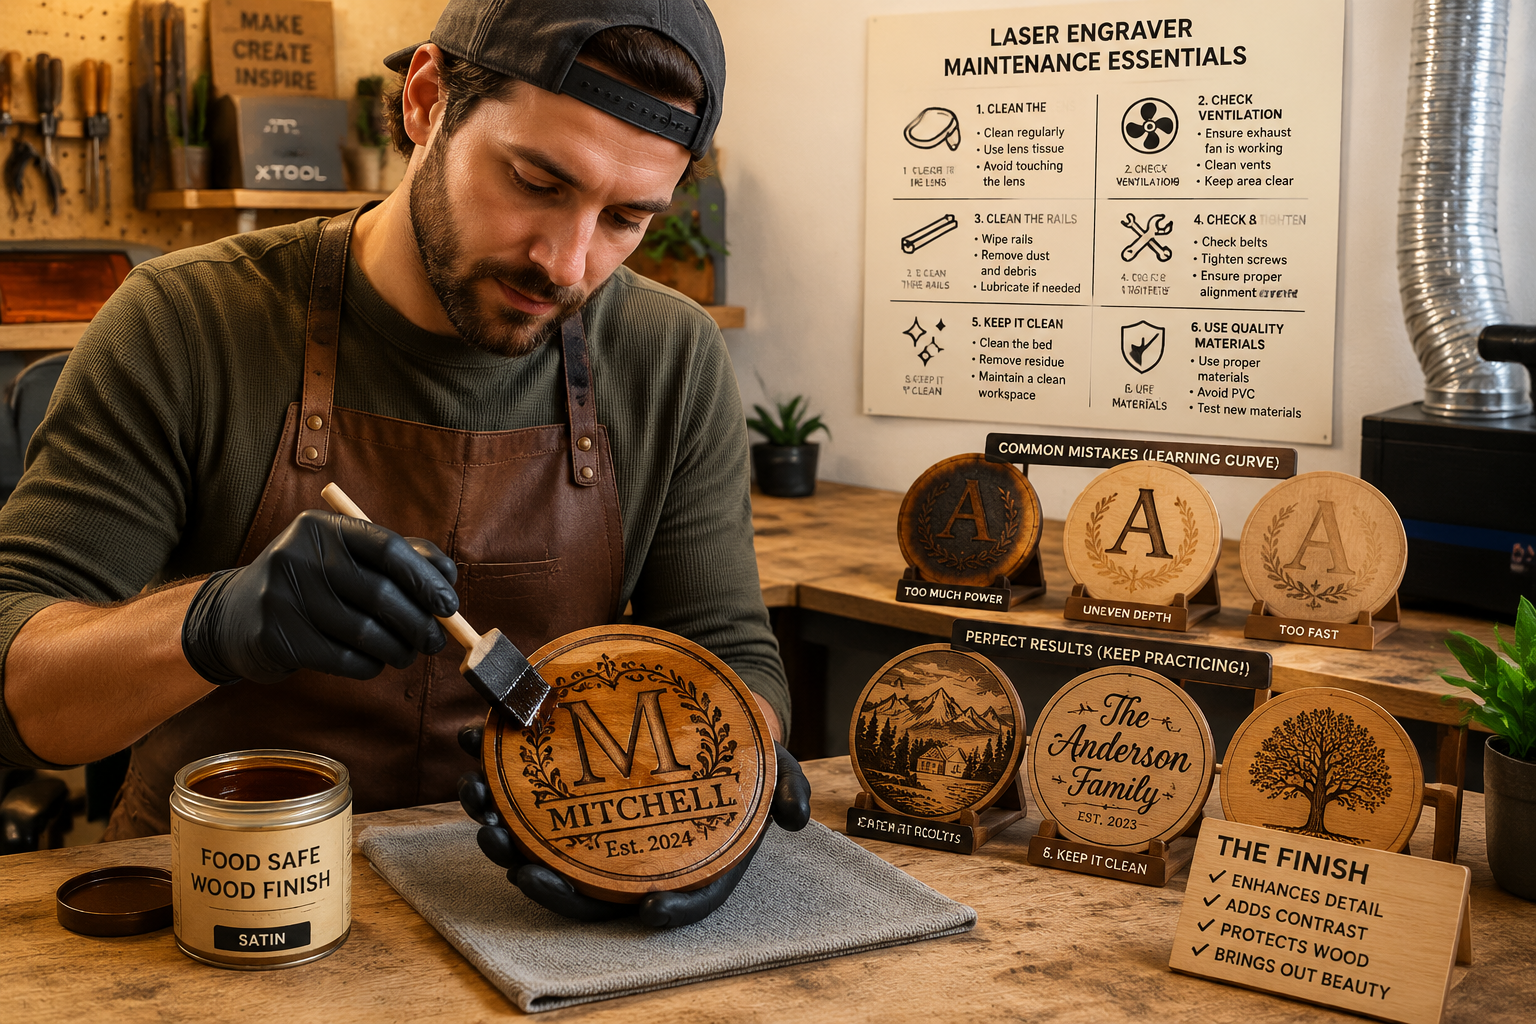
Post-Engraving Finishing Touches
Once the laser has done its work, the project isn’t quite finished. Post-processing is vital for a professional look:
- Cleaning: Laser engraving often leaves behind smoke residue or “soot” on the surface, especially around the engraved areas.
- Use a soft brush (like a toothbrush) to gently remove loose soot.
- For stubborn residue, a damp cloth with a mild soap solution or isopropyl alcohol can work, but test on an inconspicuous area first to avoid smudging the engraving. Denatured alcohol is often effective.
- Sanding lightly with very fine grit sandpaper (400+ grit) can clean surfaces, but be careful not to sand away the engraving itself.
- Sanding & Shaping: This is where your traditional woodworking skills come into play. Finish sanding edges, round over corners, or apply any final shaping that wasn’t possible before engraving. For advanced joinery like dovetails or mortise and tenon, the laser can precisely mark your cuts, making hand tool work even more accurate.
- Finishing: Apply your preferred wood finish to protect the piece and enhance the engraving.
- Oils (Tung Oil, Linseed Oil): Penetrate the wood, enriching the color and often making the engraving pop.
- Polyurethane (Water-based or Oil-based): Provides a durable protective layer. Consider sprayable water-based polyurethane for an even coat over intricate details.
- Waxes: Offer a softer sheen and protection.
Experiment with different finishes to see how they interact with your laser engravings. A good finish can dramatically elevate the final appearance of your project. For more general guidance on wood finishing techniques, check out our comprehensive guide.
Troubleshooting Common Issues
Even with the best preparation, you might encounter issues. Here’s a quick troubleshooting guide:
- Uneven Engraving Depth:
- Cause: Improper focus, warped material, uneven surface.
- Fix: Re-focus, ensure material is flat, use shims if necessary.
- Excessive Charring/Burn Marks:
- Cause: Too much power, too slow speed, no air assist, dirty lens.
- Fix: Reduce power, increase speed, use air assist, clean lens.
- Fuzzy/Blurred Engraving:
- Cause: Out of focus, dirty lens, material vibrating.
- Fix: Re-focus, clean lens, secure material.
- Ghosting/Double Lines:
- Cause: Machine vibration, loose belts, improper speed/acceleration settings.
- Fix: Check machine stability, tighten belts, adjust settings in software.
- Laser Not Firing:
- Cause: Loose connections, software error, laser module failure.
- Fix: Check cables, restart software/machine, contact manufacturer if persistent.
Patience and a methodical approach to testing and troubleshooting are invaluable as you explore this new skill set.
Conclusion
Integrating laser engraving into your woodworking practice opens up a world of creative possibilities, transforming ordinary DIY projects into personalized masterpieces with unparalleled precision. This Beginner’s Guide to Laser Engraving for Woodworkers: Adding Precision Details to DIY Projects has walked you through the essentials, from understanding the technology and selecting your first machine to mastering the software and refining your finished pieces.
The journey into laser engraving is an exciting one that bridges traditional craftsmanship with modern digital fabrication. By embracing this technology, woodworkers in 2026 can expand their skillset, create more intricate designs, and offer a level of personalization that sets their work apart. Start small, prioritize safety, and don’t be afraid to experiment. The precise details you can now add to your woodworking projects are limited only by your imagination.
Actionable Next Steps:
- Research: Explore specific desktop laser engraver models within your budget, focusing on diode lasers for beginners.
- Learn Software: Download a trial of LightBurn and watch tutorials to familiarize yourself with its interface.
- Gather Supplies: Start collecting scrap wood pieces from different species for testing.
- Prioritize Safety: Invest in proper laser safety glasses and plan your ventilation setup before your engraver arrives.
SEO Meta Title: Laser Engraving for Woodworkers: Precision DIY Guide SEO Meta Description: Master laser engraving for woodworkers in 2026! Add precision details, personalize DIY projects, and elevate your craft with this beginner’s guide.
