

The average hobbyist woodworker spends 40% more time on projects than necessary due to poor visibility, leading to frustrating mistakes and potential safety hazards. This often stems from inadequate workshop lighting that fails to adapt to specific tasks or evolving needs. Instead of struggling under a single, static fluorescent fixture, imagine a woodworking space where illumination intelligently adjusts to your every move, enhances precision, and drastically cuts energy bills. This is the promise of DIY Smart Workshop Lighting: Optimizing Visibility and Energy Efficiency with Automated Woodworking Illumination – a practical, accessible upgrade for any serious woodworker.
Achieving superior visibility and maximizing energy savings is no longer a luxury reserved for commercial operations. With readily available smart technology, anyone can design and implement an automated lighting system that transforms their workshop into a safer, more productive, and enjoyable environment. From selecting the right LEDs to integrating motion sensors and smart controls, this guide will illuminate the path to a brighter, smarter woodworking future in 2026.

Key Takeaways
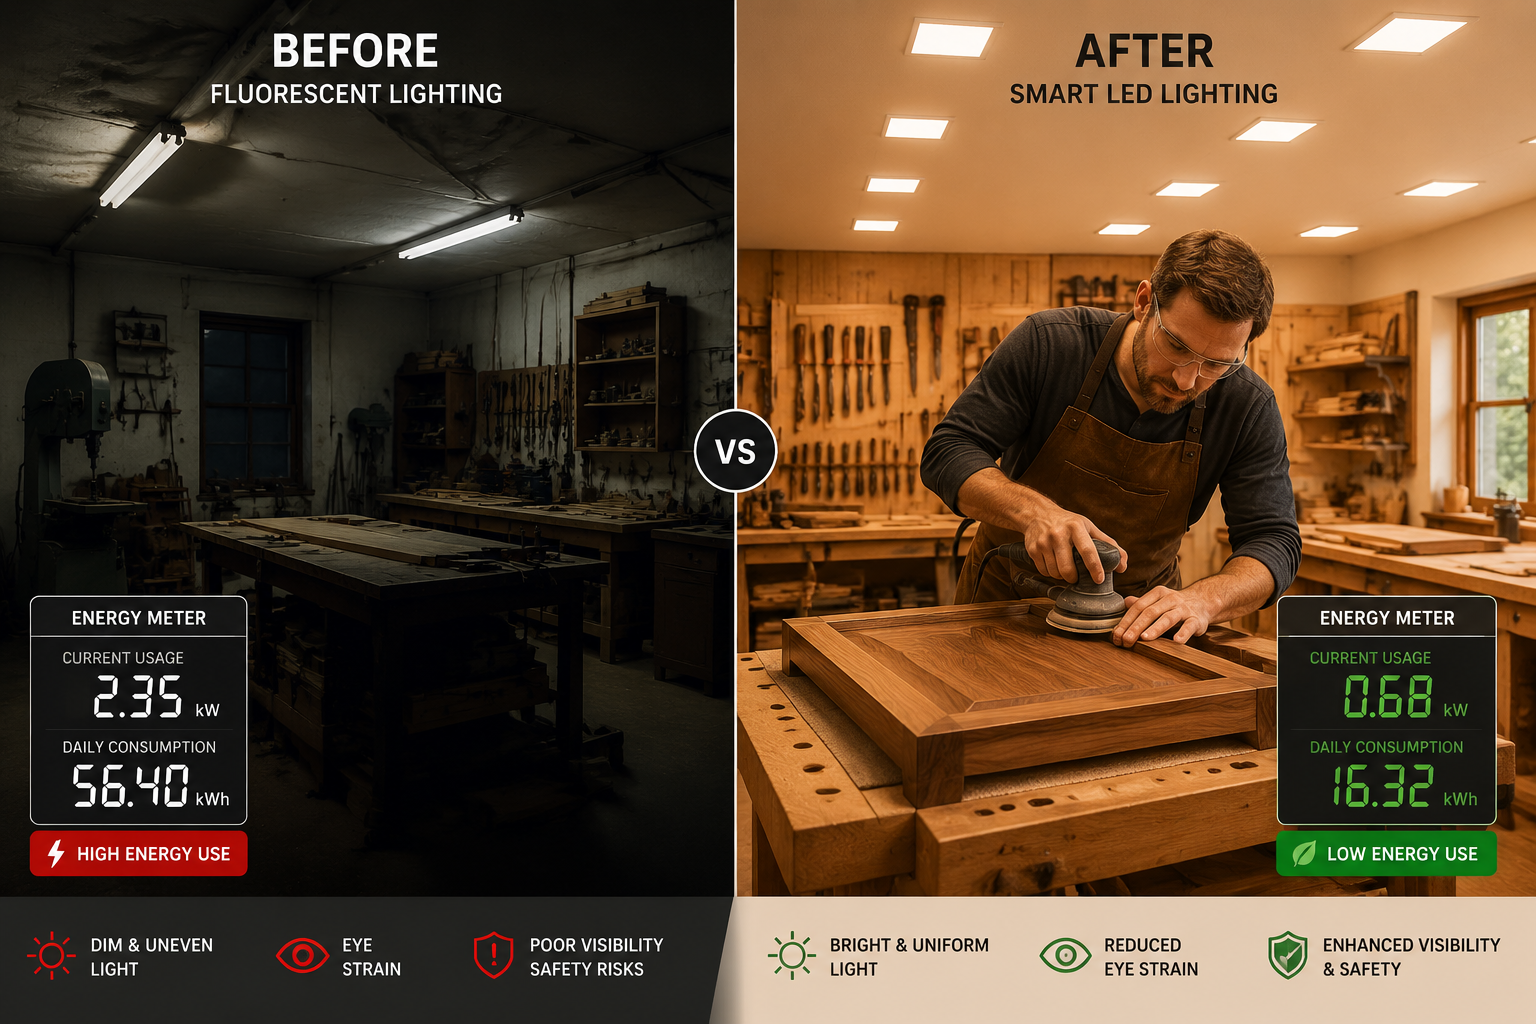
- Smart lighting significantly improves visibility and reduces eye strain, enhancing safety and precision in woodworking tasks.
- Automated controls like motion sensors and timers drastically cut energy consumption, leading to long-term savings.
- Customizable color temperature and brightness settings optimize lighting for different stages of woodworking, from rough cuts to fine finishing.
- DIY smart lighting solutions are accessible and offer a high return on investment through improved efficiency and lower utility costs.
- Planning, component selection, and safe installation are crucial for a successful and effective smart workshop lighting system.
The Foundation: Designing Your DIY Smart Workshop Lighting System
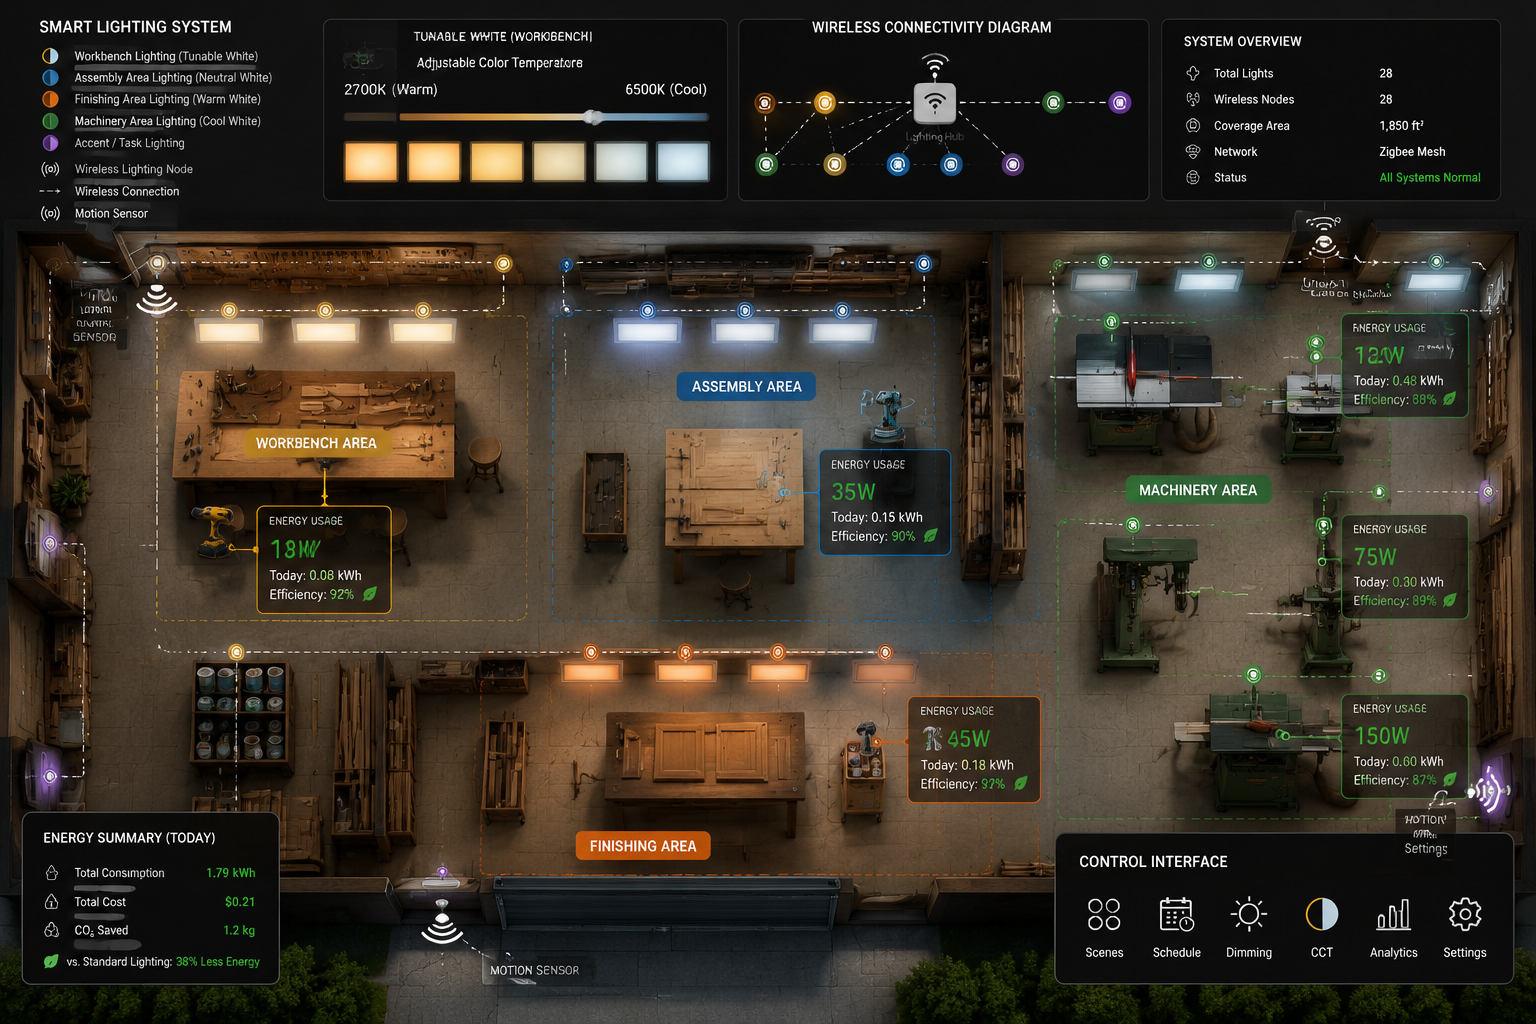
Designing an effective DIY smart workshop lighting system requires a thoughtful approach, focusing on zones, light quality, and automation potential. Your workshop isn’t a single entity; it comprises distinct work areas, each with unique lighting demands. Recognizing these zones is the first step toward optimizing visibility and energy efficiency.
Understanding Workshop Lighting Zones
Effective workshop lighting is not about uniform brightness across the entire space. It’s about tailoring illumination to specific tasks and areas. Consider these common zones:
- General Illumination: This provides overall ambient light, ensuring safe movement and a basic level of visibility throughout the workshop. Overhead LED panel lights or strip lights are ideal here.
- Task Lighting: This is critical for detailed work at the workbench, around machinery, and for assembly. Task lighting should be bright, focused, and adjustable. Under-cabinet lighting, adjustable arm lamps, or even LED strips mounted directly on tools can serve this purpose.
- Accent/Spot Lighting: Useful for highlighting specific areas, such as a tool storage wall or a display of finished projects. While less critical for core woodworking, it contributes to the overall aesthetic and functionality.
A well-designed system balances these three types, ensuring no area is too dim or causes excessive glare. Remember, good lighting minimizes shadows, a major cause of error and fatigue.
Choosing the Right Smart Lighting Components
The core of any smart lighting system lies in its components. For a woodworking shop, durability, brightness, and color rendition are paramount.
LED Technology: The Smart Choice
Light Emitting D Diodes (LEDs) are the undisputed champion for workshop lighting in 2026 due to their:
- Energy Efficiency: LEDs consume significantly less power than traditional incandescent or fluorescent bulbs, directly contributing to lower electricity bills.
- Longevity: They last much longer, reducing maintenance and replacement costs.
- Instant On/Off: No warm-up time, which is perfect for motion-activated systems.
- Dimmability: Most smart LEDs offer smooth dimming, allowing you to adjust brightness as needed.
- Color Temperature Control: This is a game-changer for woodworking.
Color Temperature (CCT) and Color Rendering Index (CRI)
These two metrics are vital for woodworking:
- Color Temperature (CCT): Measured in Kelvins (K), CCT describes how warm or cool the light appears.
- Warm White (2700K-3000K): Similar to incandescent, good for relaxed environments but can be too yellow for accurate color rendition.
- Neutral White (3500K-4100K): A good balance, suitable for general tasks.
- Cool White/Daylight (5000K-6500K): Best for task lighting in a workshop. It mimics natural daylight, which is crucial for seeing fine details, distinguishing wood grains, and accurately assessing finishes. Look for adjustable CCT lights that allow you to switch between warmer tones for relaxed cleanup and cooler tones for precision work.
- Color Rendering Index (CRI): This measures how accurately a light source reveals the true colors of objects compared to natural daylight.
- For woodworking, aim for LEDs with a CRI of 90 or higher. A high CRI is essential for identifying subtle differences in wood species, stains, and finishes, preventing costly color mismatches.
Smart Controls and Connectivity
Integrating smart controls elevates basic LED lighting into a truly automated system.
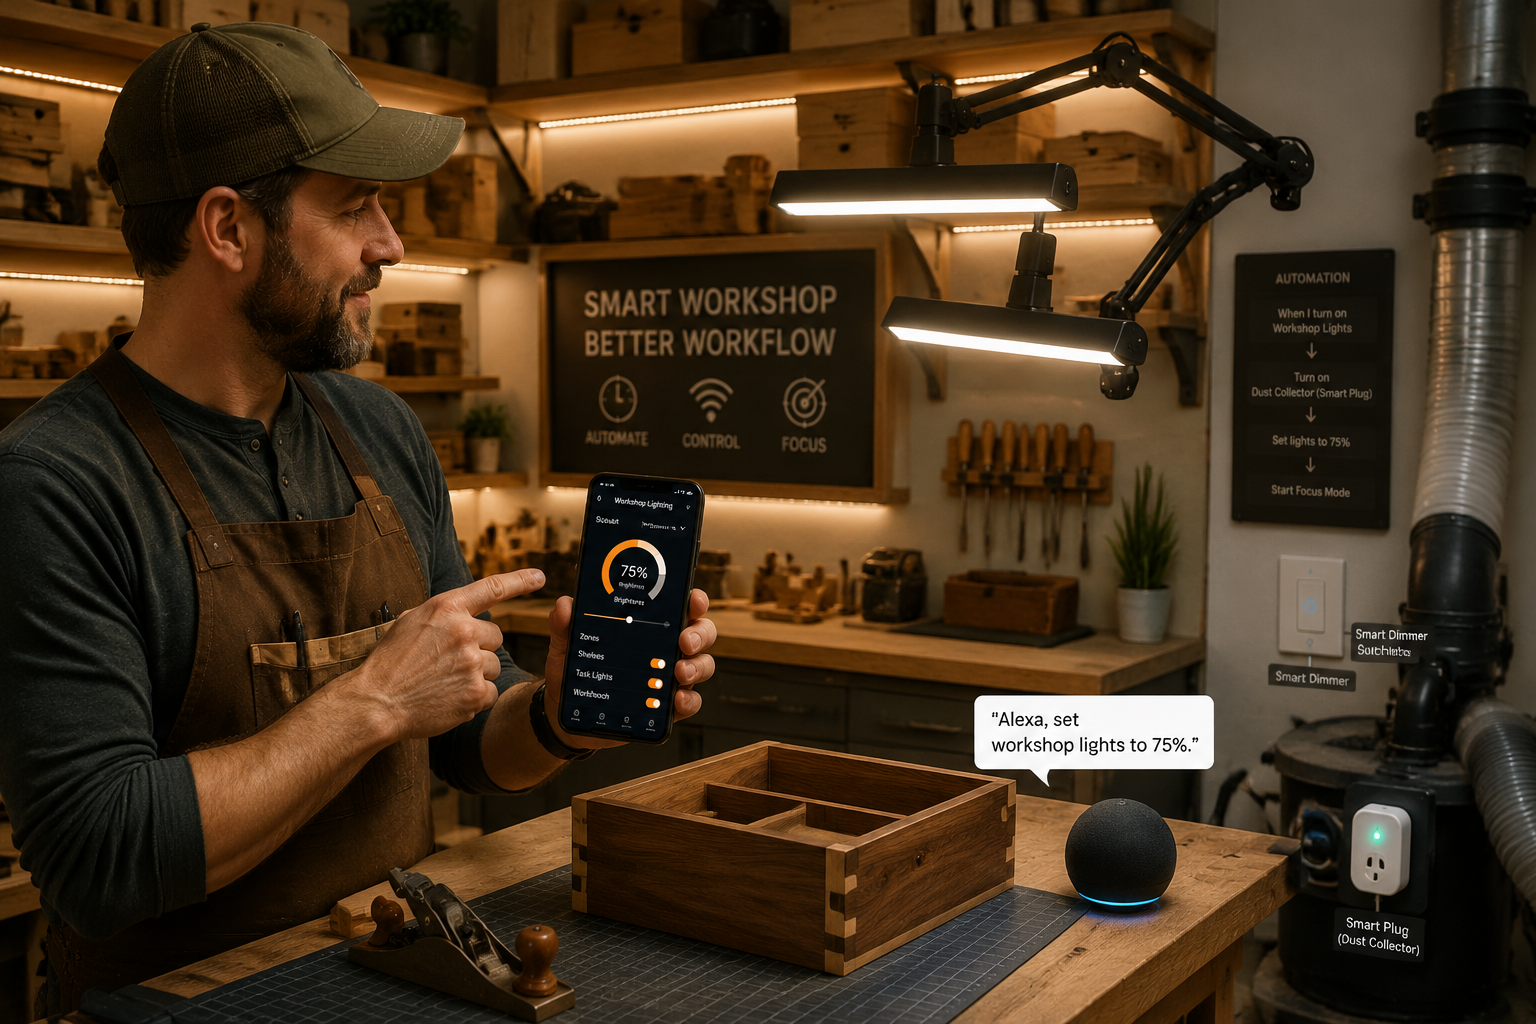
- Smart Switches/Dimmers: Replace existing light switches to enable app control, scheduling, and integration into smart home ecosystems.
- Smart Plugs: Turn any standard lamp or power tool into a smart device, allowing for automated on/off and scheduling. For example, integrate a smart plug with your dust collection system so it activates with your table saw.
- Motion Sensors: Strategically placed motion sensors are key to energy efficiency. Lights can automatically turn on when you enter a zone and off when no activity is detected, preventing wasted energy.
- Voice Assistants (e.g., Alexa, Google Assistant): For hands-free control, integrating your lighting with a voice assistant allows you to turn lights on/off, adjust brightness, or change color temperature with a simple command. This is incredibly useful when your hands are full or dirty.
- Hubs/Bridges: Some smart lighting systems require a central hub (e.g., Philips Hue Bridge, SmartThings hub) to communicate with all devices, while others use Wi-Fi or Bluetooth directly. Consider the ecosystem you prefer.
A well-planned layout, combined with high-CRI, adjustable CCT LEDs and smart controls, forms the bedrock of an efficient and ergonomic woodworking environment. For instance, combining cool white task lighting over your workbench with general neutral white ambient light can significantly reduce eye strain during long working sessions.
Implementing Automation and Energy Efficiency in DIY Smart Workshop Lighting
Once you’ve selected your components, the next step is to integrate them effectively to maximize automation and energy savings. DIY Smart Workshop Lighting: Optimizing Visibility and Energy Efficiency with Automated Woodworking Illumination truly shines when intelligent controls take over.
Smart Lighting Scenarios and Automation Rules
The real power of smart lighting comes from setting up automated scenarios and rules. This allows your lights to anticipate your needs and react dynamically.
Here are some practical automation ideas for your woodworking shop:
- Entry Activation: Install a motion sensor near the main entrance. When you walk in, the general ambient lights turn on automatically.
- 💡 Rule: “If motion detected at entrance, then turn on General Lights to 70% brightness (Neutral White).”
- Workbench Task Lighting: A dedicated motion sensor or a contact sensor on your workbench can activate task lighting when you’re actively working there.
- 💡 Rule: “If motion detected at workbench zone AND General Lights are on, then turn on Workbench Task Lights to 100% brightness (Daylight White).”
- Tool-Specific Activation: Use smart plugs for individual tools. When a tool like a table saw is powered on, specific task lights for that machine can activate, and the dust collector can simultaneously power on.
- 💡 Rule: “If Table Saw Smart Plug power consumption > 50W, then turn on Table Saw Task Lights to 100% brightness (Daylight White) AND turn on Dust Collector Smart Plug.”
- Timed Shut-Offs: Implement timers to turn off lights after a period of inactivity. This is critical for energy savings.
- 💡 Rule: “If no motion detected in Workshop for 15 minutes, then turn off all lights.”
- Cleaning Mode: Create a scene for cleaning, turning on all lights to their brightest, coolest setting to reveal dust and debris.
- 💡 Scene: “Cleaning Mode” – All lights 100% brightness, 6500K.
- Finishing Mode: A dedicated scene for finishing projects, using warmer, softer light to better assess how stains and finishes appear.
- 💡 Scene: “Finishing Mode” – Workbench Task Lights 50% brightness, 3000K.
Many smart home platforms (like Home Assistant, SmartThings, Apple HomeKit) allow for complex rule creation, linking multiple sensors and devices.
“A truly smart workshop isn’t just about turning lights on and off; it’s about anticipating the woodworker’s needs and creating an environment that adapts without conscious effort.”
Integration with Other Smart Workshop Tools
The benefits of smart lighting extend beyond just illumination. Integrating your lighting system with other smart workshop components can create a truly cohesive and efficient workspace.

- Dust Collection: Link your smart lighting to your dust collection system. When a power tool (connected to a smart plug) is activated, the dust collector automatically turns on and remains on for a few minutes after the tool is turned off. This enhances air quality and tool longevity. Consider pairing this with smart workshop storage solutions to keep your space organized and dust-free.
- Smart Vents/Fans: If your workshop has smart ventilation, integrate it with motion sensors or air quality monitors. When air quality degrades or motion is detected, fans can kick on.
- Security: Integrate exterior smart lights with motion sensors for added security around your workshop. If unexpected motion is detected outside, specific workshop lights can flash or turn on.
- Smart Workbenches: Imagine a workbench that knows what project you’re working on and adjusts lighting accordingly. While advanced, basic smart features like integrated USB charging and power outlets controllable via smart plugs are easily achievable. For ideas on optimizing your workspace, explore Building a Compact and Ergonomic Workbench for Small Workshops.
When designing your system, prioritize reliable connectivity (Wi-Fi, Zigbee, Z-Wave) and ensure compatibility between devices from different manufacturers, if mixing brands. Establishing a robust network will prevent frustrating delays and dropped connections.
Installation and Maintenance for Your Automated Woodworking Illumination
Once the design and components are chosen, the final phase is careful installation and ongoing maintenance. Properly installing your DIY Smart Workshop Lighting: Optimizing Visibility and Energy Efficiency with Automated Woodworking Illumination ensures safety, performance, and longevity.
Safe Installation Practices for Smart Lighting
Working with electricity requires caution. If you are uncomfortable with electrical wiring, consult a licensed electrician.
- Safety First: Always turn off power at the circuit breaker before beginning any electrical work. Use a voltage tester to confirm circuits are dead.
- Mounting:
- Overhead Lighting: Install LED panels or strip lights evenly across the ceiling for general illumination. Ensure they are securely mounted to joists or use appropriate anchors. Avoid placing fixtures directly above where your head will often be, which can create shadows.
- Task Lighting: Mount adjustable arm lamps or LED strips where they provide direct, shadow-free light on your work surface. Under-shelf lighting in storage areas can also be very useful for finding tools. For example, integrate LED strips into your DIY Smart Workshop Storage Solutions.
- Dust and Moisture Protection: Workshops are dusty environments. Choose fixtures rated for damp locations (if applicable) and consider sealed or enclosed fixtures to protect against dust ingress.
- Wiring:
- Follow local electrical codes.
- Ensure all connections are secure and properly insulated.
- For smart switches, correctly identify line, load, neutral, and ground wires. Many smart switches require a neutral wire, which older homes may lack.
- Consider dedicated circuits for high-draw power tools to prevent overloads.
- Sensor Placement:
- Motion Sensors: Place them strategically to cover active work zones without being triggered by non-essential movement (e.g., passing by a doorway instead of entering the shop). Avoid placing them near heat sources or direct sunlight, which can cause false triggers. Test their range and sensitivity.
- Door/Window Sensors: Use these to trigger lights when entering or exiting, particularly for smaller, enclosed spaces.
- Network Setup: Ensure your Wi-Fi signal is strong throughout the workshop for reliable smart device communication. A Wi-Fi extender may be necessary for larger spaces or those with concrete walls.
Maximizing Longevity and Performance
A well-installed system will last, but a little maintenance goes a long way.
- Regular Cleaning: Dust is the enemy of electronics and light output. Periodically clean LED fixtures with a dry or slightly damp cloth to remove sawdust buildup. This maintains optimal brightness and prevents overheating.
- Firmware Updates: Smart devices often receive firmware updates that improve performance, add features, or patch security vulnerabilities. Keep your smart hub and devices updated.
- Battery Replacement: If using battery-powered motion sensors or other wireless devices, replace batteries as recommended by the manufacturer.
- Troubleshooting: Familiarize yourself with basic troubleshooting steps for your smart lighting system (e.g., resetting devices, checking network connection). Most smart apps provide diagnostic tools.
- Energy Monitoring: Many smart plugs and smart home platforms offer energy usage monitoring. Regularly check this data to identify areas where you can further optimize energy consumption. You might discover certain tools are drawing more power than expected, or lights are staying on longer than necessary.
By dedicating time to both careful installation and routine maintenance, your DIY smart workshop lighting system will continue to provide optimal visibility and energy efficiency for years to come, truly enhancing your woodworking experience in 2026.
Conclusion
Embracing DIY Smart Workshop Lighting: Optimizing Visibility and Energy Efficiency with Automated Woodworking Illumination is one of the most impactful upgrades a woodworker can make to their workspace. Beyond the immediate benefits of reduced eye strain and enhanced safety, a smart lighting system unlocks a new level of productivity and precision. The ability to fine-tune color temperature for accurate finishing, activate task lights with your presence, and integrate lighting with dust collection systems transforms a conventional workshop into a truly intelligent environment.
By strategically planning your lighting zones, investing in high-CRI, adjustable CCT LED technology, and leveraging the power of smart controls and automation, you create a workspace that not only adapts to your needs but also proactively conserves energy. The initial investment in smart components is quickly offset by significant energy savings and the invaluable gains in efficiency, comfort, and safety.
Don’t let inadequate lighting dim your woodworking passion. Take the actionable steps outlined in this guide: assess your current workshop, plan your zones, select smart LEDs with high CRI and adjustable CCT, integrate motion sensors and smart switches, and install everything with safety and longevity in mind. Transform your workshop into a brilliantly lit, energy-efficient haven where every cut is clearer, every finish is truer, and every project is a joy.
