

Every seasoned woodworker understands that the true mark of fine furniture isn’t just in its design or joinery, but in the breathtaking smoothness of its finish. A surface that feels like glass and reflects light with crystal clarity transforms a piece from ordinary to extraordinary. This article will guide you through Achieving a Glass-Smooth Finish: Advanced Sanding and Polishing Techniques for Fine Furniture, detailing the meticulous steps and expert practices required to elevate your woodworking projects to a professional, mirror-like standard. Get ready to dive into the world where patience, precision, and the right techniques converge to create truly exceptional results in 2026.
Key Takeaways
- Progressive Sanding is Paramount: Success hinges on incrementally stepping through grits, never skipping, and meticulously removing scratches from the previous grit.
- Grain Filling is Non-Negotiable: For open-pored woods, effective grain filling is crucial to create a level, unblemished foundation for the final finish.
- Surface Inspection is Critical: Utilize raking light and magnifying aids at every stage to identify and rectify imperfections before they become permanent.
- Choose Your Finish Wisely: The choice of finish (e.g., lacquer, varnish, oil) significantly impacts the final look and requires tailored polishing techniques.
- Buffing and Polishing Achieve the Sheen: Final buffing with compounds and machine polishers is essential for that signature deep, reflective shine.
The Foundation: Advanced Sanding for an Impeccable Surface
Achieving a Glass-Smooth Finish: Advanced Sanding and Polishing Techniques for Fine Furniture begins long before the first coat of finish is applied. It starts with a meticulous, systematic approach to sanding. This stage is arguably the most critical; any shortcuts here will manifest as flaws later, no matter how skilled your polishing.

Understanding Sandpaper and Grit Progression
Sanding isn’t about brute force; it’s about controlled abrasion. The goal is to remove material progressively, replacing deeper scratches with shallower ones until they are invisible to the naked eye.
The Right Abrasives
- Aluminum Oxide: A common, durable abrasive suitable for most woods.
- Silicon Carbide: Sharper and harder, often preferred for finishes, plastics, and wet sanding.
- Stearated Abrasives: Coated with a zinc stearate to reduce clogging, especially useful for finishes and resinous woods.
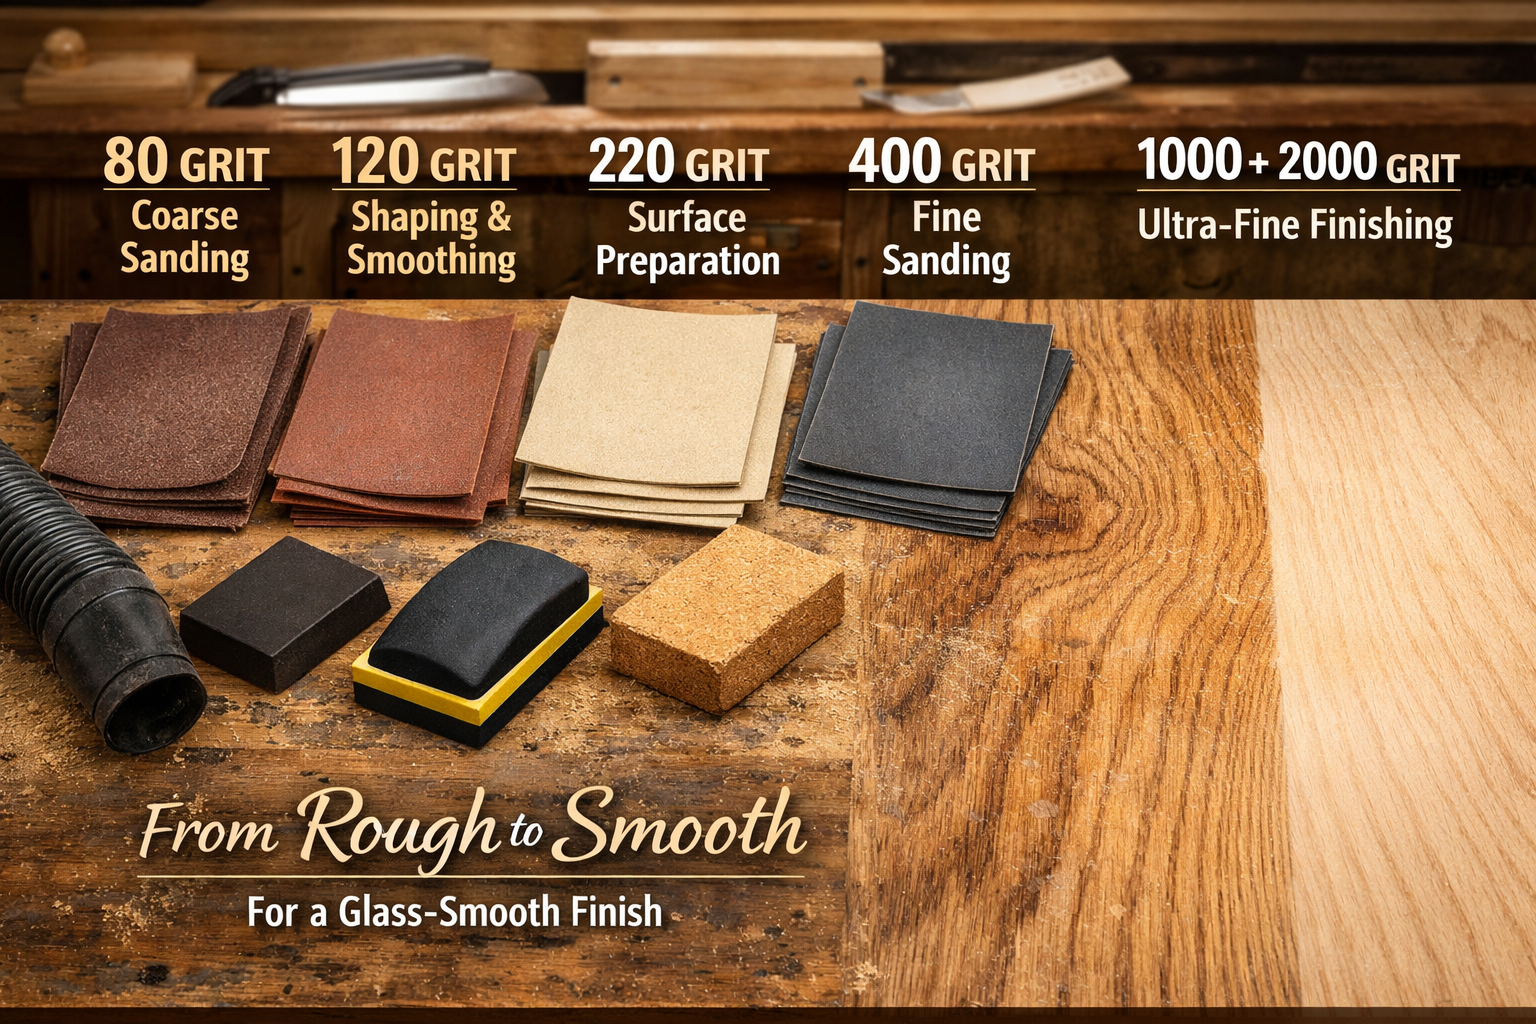
The Grit Progression Ladder
Never skip grits! Each grit’s purpose is to remove the scratches left by the previous grit. A typical progression for fine furniture might look like this:
| Grit Range | Application | Notes |
|---|---|---|
| 80-100 | Initial shaping, removing planer marks, heavy imperfections. | Use sparingly, only when necessary. |
| 120-150 | Refine surface, remove 80-100 grit scratches. | Standard starting point for many projects. |
| 180-220 | Prepare for staining/sealing, remove 120-150 grit scratches. | Crucial for even stain absorption and a good base. |
| 320 | Fine surface preparation, between finish coats. | Use after sealer or first topcoat. |
| 400-600 | Ultra-fine surface preparation, light denibbing. | For exceptionally smooth feel, prior to final topcoats or polishing. |
| 800-2000+ | Wet sanding cured finishes for ultimate smoothness. | Used with lubricant (water, mineral spirits, specialty sanding liquid). |
Pro Tip: For particularly challenging woods or when restoring antique wooden furniture, consider a final pass with 320-400 grit before your first finish coat to truly open the grain for optimal adhesion and absorption.
Advanced Sanding Techniques
- Directional Sanding: Always sand with the grain. Sanding across the grain leaves permanent scratches that become glaringly obvious once a finish is applied.
- Raking Light Inspection: This is your secret weapon. After each grit, shine a bright light across the surface at a low angle. This will highlight any remaining scratches, swirls, or uneven areas. Address them before moving to the next grit.
- Using Sanding Blocks and Backing Pads:
- Hard Blocks: For perfectly flat surfaces, use hard rubber or cork blocks.
- Foam/Soft Blocks: For contoured surfaces, profiles, or when a slight “give” is beneficial.
- Random Orbital Sanders: Excellent for initial passes, but always finish with hand sanding in the direction of the grain for fine furniture.
- Interface Pads: Use these soft pads between your random orbital sander and sandpaper for finer grits (320+) to prevent swirl marks and allow the abrasive to conform slightly to the surface.
- Dust Management: Effective dust extraction is paramount. Dust trapped between the sandpaper and wood can cause deeper scratches. Use a shop vac with a HEPA filter and wear appropriate respiratory protection. For more on workshop efficiency, see our guide on building a mobile dust collection cart.
- Raising the Grain: After 180-220 grit, lightly dampen the wood surface with distilled water. This will raise any compressed fibers. Allow it to dry completely, then lightly sand with your final pre-finish grit (e.g., 220 or 320). Repeat if necessary. This prevents the finish itself from raising the grain and creating a rough texture.
Grain Filling: The Secret to a Truly Flat Surface
For open-pored woods like oak, mahogany, or walnut, Achieving a Glass-Smooth Finish: Advanced Sanding and Polishing Techniques for Fine Furniture is impossible without proper grain filling. No matter how fine your sanding, these woods will have microscopic valleys and pores that prevent a truly level surface.
Why Grain Fillers are Essential
Grain fillers, also known as pore fillers, are designed to fill these natural voids in the wood’s surface. They create a solid, stable foundation for subsequent finish layers, preventing the finish from sinking into the pores and creating an undesirable “orange peel” effect or visible grain patterns under a high-gloss finish.
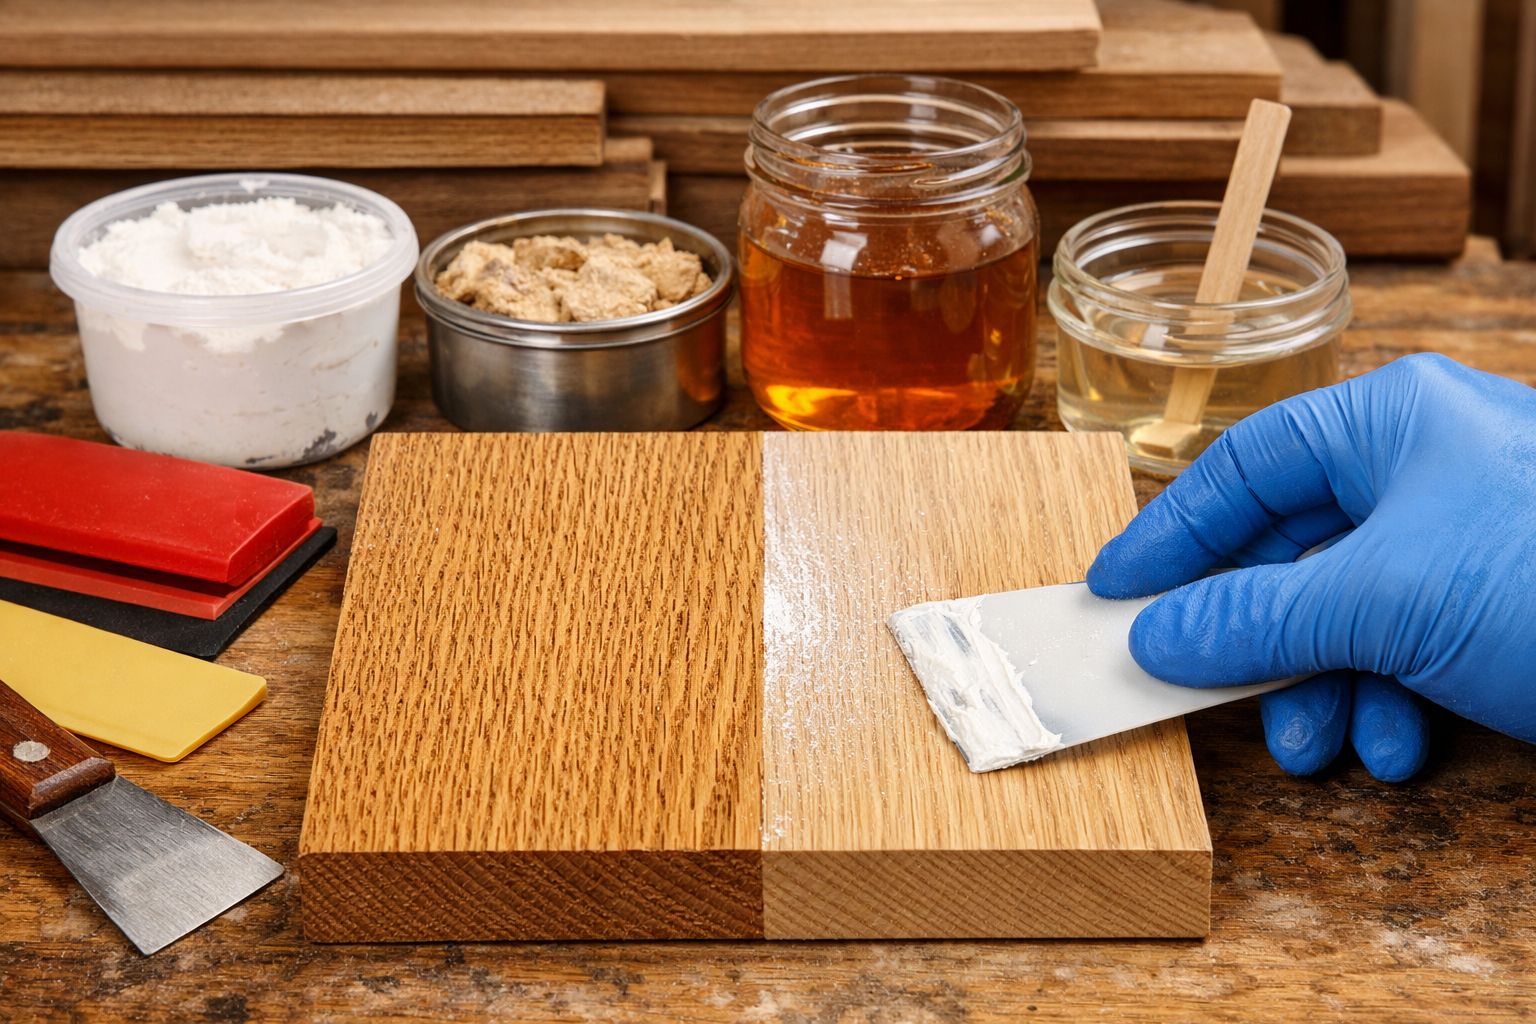
Types of Grain Fillers
- Paste Wood Fillers: Traditional, oil-based or water-based products that are thick and applied with a squeegee or cloth. They often contain silica or other inert materials that mechanically fill the pores. They can be tinted to match or contrast the wood.
- Shellac: Thin shellac washes (1-lb cut) can act as a natural pore filler for finer-pored woods or as a seal coat before applying other fillers. Multiple thin coats are often necessary.
- Epoxy: For the ultimate in pore filling, especially on highly figured or very open-pored woods. Thin epoxy resin can be brushed on, allowed to penetrate, and then scraped off the surface after partially curing. This creates an incredibly durable and stable filled surface.
- Water-based Putties/Spreads: Modern alternatives that are easier to clean up and dry faster. Ensure they are compatible with your chosen finish.
Application Techniques for a Flawless Fill
- Prepare the Surface: Ensure the wood is sanded to at least 220-320 grit and completely free of dust.
- Apply Generously (Paste Fillers): Work the filler into the pores across the grain first, using a plastic spreader, squeegee, or a stiff brush. This pushes the filler deep into the pores.
- Wipe Off Excess (Paste Fillers): After allowing the filler to “flash off” (lose its initial wetness), wipe off the excess across the grain, then with the grain, using burlap or a coarse cloth. The goal is to leave filler only in the pores, not on the surface. Change your wiping cloth frequently.
- Drying Time: Allow ample drying time, often 24-48 hours, depending on the filler type and humidity. Rushing this step can lead to shrinkage and sink-back.
- Sanding Back: Once fully cured, lightly sand the surface with 320-400 grit to remove any remaining surface haze from the filler. Be careful not to sand through the filler in the pores.
- Multiple Coats (if needed): For very deep pores, a second application of grain filler may be necessary after the first has cured and been sanded.
Consider this: For specific wood types, like maple, there are specialized finishing techniques that might integrate a grain filling step or rely on the wood’s naturally tight grain. Learn more about maple wood finishing techniques.
The Grand Finale: Advanced Polishing for a Mirror Finish
Once the wood surface is flawlessly smooth and pore-free, it’s time to apply the finish and bring out that incredible depth and luster. Achieving a Glass-Smooth Finish: Advanced Sanding and Polishing Techniques for Fine Furniture culminates here, transforming a well-prepared piece into a masterpiece.

Building the Finish Layers
The choice of finish is crucial. Lacquers, varnishes (like polyurethane or spar urethane), and even certain oils can achieve a high-gloss, glass-like appearance. For durability and depth, many fine furniture pieces utilize multiple thin coats.
- Sealer Coat: A thin coat of shellac or a compatible sealer helps lock down fibers and provides an even absorption base for subsequent finish coats.
- Build Coats: Apply 3-5 (or more) thin coats of your chosen finish. Allow adequate drying time between coats.
- Denibbing: After each coat (except the last one), lightly sand the surface with 400-600 grit sandpaper (or 320-400 for earlier coats) to remove any dust nibs or minor imperfections. This creates a perfectly flat surface for the next coat. Always use a sanding block for consistency.
- Final Curing: Allow the final finish coats to cure completely. This can take several days to several weeks, depending on the finish type and environmental conditions. Rushing this step will lead to a soft finish that is prone to scratching and difficult to polish.
Important Note: If you’re working with polyurethane in a humid environment, special techniques are required to prevent issues. Check out our tips for applying polyurethane in high humidity.
The Art of Rubbing Out and Polishing
This is where the magic happens. “Rubbing out” refers to the process of leveling the cured finish and then buffing it to a high sheen.
Step-by-Step Polishing Process
- Wet Sanding the Cured Finish:
- Start with a fine grit, usually 800-1000 grit wet/dry sandpaper, lubricated with water (with a drop of dish soap), mineral spirits, or a specialized sanding lubricant.
- Use a very soft, flexible sanding block.
- Sand gently and evenly, working in small sections. The goal is to remove any minor dust specks, orange peel, or slight unevenness, leaving a uniform, dull matte finish.
- Progress to 1200, 1500, and finally 2000-grit (or even 3000-grit for automotive-level finishes).
- Continuously wipe the surface clean and inspect with raking light to ensure all scratches from the previous grit have been removed. The surface should be uniformly hazy, with no shiny spots indicating low areas.
- Compounding (Cutting):
- Apply a small amount of fine-cut rubbing compound (automotive compounds work very well) to the surface.
- Using a foam applicator pad or a buffing wheel on a rotary or orbital polisher, spread the compound evenly.
- Work in small sections, using slow, deliberate motions. The compound’s abrasive particles will gently cut away microscopic imperfections, starting to bring out a shine.
- Wipe off residue with a clean microfiber cloth.
- Polishing:
- Switch to a finer polishing compound (often called “swirl remover” or “finishing polish”).
- Apply with a clean, soft foam pad or buffing wheel.
- This step removes any faint haziness or swirl marks left by the rubbing compound and further refines the surface to a high gloss.
- Work until the desired level of shine is achieved, wiping frequently to inspect.
- Glazing/Waxing (Optional):
- For an even deeper shine and protection, apply a non-abrasive glaze or a high-quality paste wax designed for fine finishes.
- Apply thinly, allow to haze, and buff to a final shine with a clean, soft microfiber cloth. This adds a layer of protection and can enhance the reflective qualities.
Remember: Practice on scrap pieces first! This entire process requires a delicate touch and a keen eye. The results, however, are undoubtedly worth the effort, transforming your project into a piece of art that truly showcases the depth and beauty of the wood. For more inspiring ideas, explore various cool wood finishing techniques.
Conclusion
Achieving a Glass-Smooth Finish: Advanced Sanding and Polishing Techniques for Fine Furniture is a journey of patience, precision, and continuous learning. It’s an art form that elevates good woodworking to exceptional craftsmanship. By meticulously following a progressive sanding regimen, expertly filling the grain, and then carefully building, wet-sanding, and polishing your chosen finish, you can achieve a level of refinement that will stand the test of time and captivate all who behold it. In 2026, the demand for finely crafted pieces with impeccable finishes continues to grow, making these advanced techniques more valuable than ever. Embrace the challenge, hone your skills, and let your furniture reflect your dedication to perfection.
Actionable Next Steps:
- Evaluate Your Current Tools: Invest in a high-quality random orbital sander with dust extraction, various sanding blocks, and a good selection of wet/dry sandpaper up to 2000-grit or higher.
- Research Grain Fillers: Identify the best grain filler for the specific type of wood you’re working with.
- Practice on Scraps: Before tackling your fine furniture, practice the entire sanding, filling, and polishing sequence on similar wood offcuts until you’re confident in your technique.
- Invest in Quality Compounds: Purchase automotive-grade rubbing and polishing compounds for superior results.
- Maintain a Clean Workspace: Ensure your workshop is as dust-free as possible during finishing stages. Consider our guide on DIY smart workshop storage solutions to help keep things tidy.
