

Transforming a plain wall into a captivating focal point can dramatically alter the ambiance of any room, and few design elements achieve this as effectively as a barnwood accent wall. In 2026, the rustic-modern aesthetic continues to gain immense popularity, blending the warmth and character of aged wood with sleek, contemporary design. Achieving a professional, enduring finish for your Barnwood Accent Walls: Professional Installation Techniques for Rustic-Modern Spaces requires more than just nailing planks to a wall; it demands careful planning, precise execution, and an understanding of the unique properties of reclaimed materials. This comprehensive guide will walk you through the professional installation techniques necessary to create a stunning barnwood accent wall that stands the test of time and elevates your interior design.
Key Takeaways
- Thorough Preparation is Crucial: Proper wall preparation, including cleaning, marking studs, and potentially painting the wall black, is fundamental for a successful and visually appealing barnwood accent wall.
- Material Selection Matters: Choose high-quality, pre-finished, and dimensionally stable barnwood planks to ensure a consistent and professional look. Consider reclaimed wood finishing techniques for enhancing their appeal.
- Secure Fastening is Key: A combination of construction adhesive and 18-gauge brad nails provides robust, long-lasting adhesion, preventing warping and sagging.
- Precision in Layout: Meticulous planning of plank placement, including staggering seams by at least 8 inches, ensures a visually appealing and professionally finished wall.
- Attention to Detail: From measuring cuts to handling corners and outlets, meticulous detail work distinguishes a DIY project from a professionally installed barnwood accent wall.
Planning and Preparation: Laying the Foundation for Your Barnwood Accent Wall
The journey to a magnificent barnwood accent wall begins long before the first plank is attached. Careful planning and meticulous preparation are the cornerstones of a successful project, ensuring durability, aesthetic appeal, and structural integrity. Overlooking these initial steps can lead to frustration, rework, and a less-than-perfect finish. Let’s delve into the essential pre-installation phases for Barnwood Accent Walls: Professional Installation Techniques for Rustic-Modern Spaces.

Choosing the Right Barnwood Material
The character of your accent wall is largely defined by the barnwood you select. Reclaimed barnwood comes in various species, ages, and conditions, each offering unique textures, patinas, and color variations. When choosing, consider:
- Species: Common options include oak, pine, and hemlock, each with distinct grain patterns and hardness.
- Finish: Some barnwood comes “skip planed” or pre-finished, which removes loose fibers and dirt while retaining the aged look [4]. Others might be rough-sawn, requiring more cleaning or rustic wood finishing techniques before installation.
- Dimensions: Planks typically vary in width and thickness. Consistent thickness is important for a smooth surface, while varying widths can add visual interest.
- Quantity: Measure your wall’s area (height x width) and add 10-15% for waste, cuts, and future repairs. This buffer is crucial, especially with reclaimed materials where some pieces might be unusable.
It’s often beneficial to lay out your chosen planks on the floor before installation to visualize the pattern and blend colors and textures evenly across the wall [5]. This pre-layout allows you to swap pieces and ensure a cohesive design.
Essential Tools and Materials
Having the right tools at hand will make the installation process smoother and more efficient. Here’s a checklist:
- Measuring Tools: Tape measure, level (long and short), stud finder.
- Cutting Tools: Miter saw (for precise angle cuts), circular saw or jigsaw (for ripping planks or cutting around obstacles).
- Fastening Tools: Brad nailer (pneumatic or electric) with an air compressor if needed, hammer (for any manual nailing).
- Adhesives: High-quality construction adhesive (e.g., PL Premium), caulk gun.
- Nails: 1.5-inch, 18-gauge brad nails. Fasteners should be stainless steel, galvanized, or black oxide/bronze finishes to prevent rust [4].
- Safety Gear: Safety glasses, gloves, dust mask.
- Cleaning Supplies: Shop vacuum, damp rags.
- Marking Tools: Pencil.
- Substrate Preparation: Black paint (latex), paint roller, paint tray, or roofing felt.
Preparing the Wall Surface
Proper wall preparation is paramount to the success and longevity of your barnwood accent wall.
- Clean the Wall: Ensure the wall is clean, dry, and free of dust, grease, or peeling paint. A quick wipe-down with a damp cloth can suffice.
- Remove Obstructions: Take off any existing trim, baseboards, switch plates, outlet covers, and wall hangings.
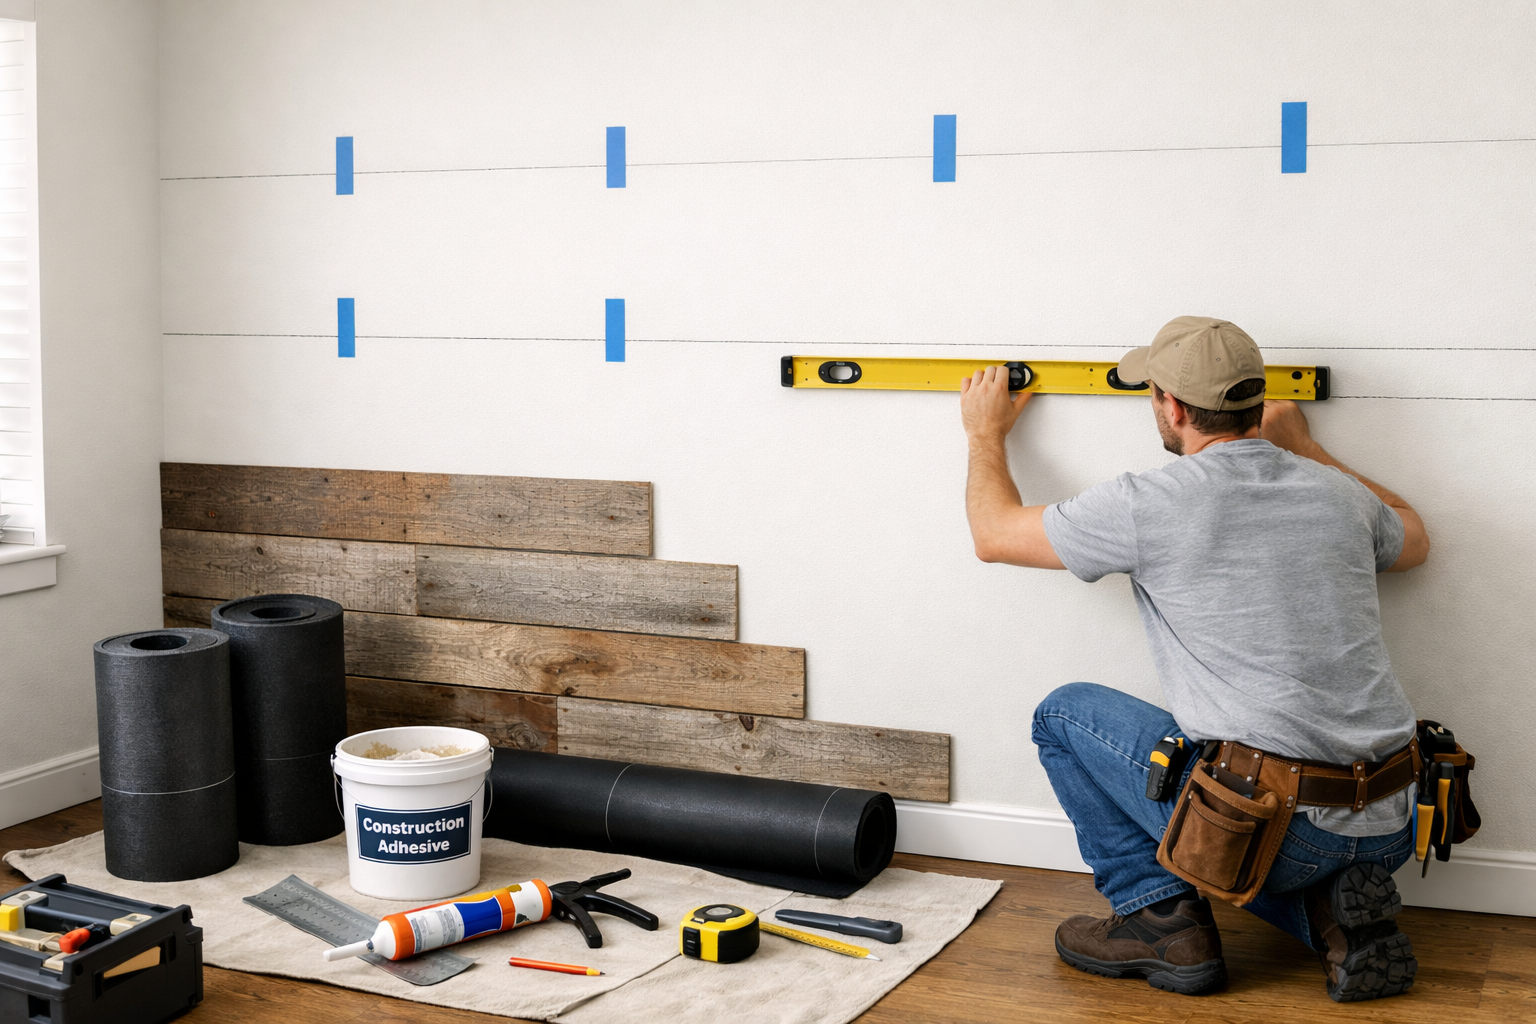
- Locate and Mark Studs: Use a reliable stud finder to locate all wall studs. Mark their positions clearly with a pencil and a level from floor to ceiling [2]. Nailing into studs provides the strongest attachment point and is vital for structural integrity.
- Consider Painting the Wall Black: This is a crucial professional tip. Painting the wall with a flat black latex paint or covering it with black roofing felt before installation is highly recommended [2]. This helps to conceal any gaps between planks, prevents the original wall color from showing through cracks or imperfections in the barnwood, and makes the finished wall appear more cohesive and professional [2].
- Level the Starting Line: Use a level to draw a perfectly straight horizontal line across the wall where you intend to start your first row. This is usually near the floor or ceiling, depending on your chosen installation method. Starting straight ensures that all subsequent rows remain level.
“The secret to a stunning barnwood accent wall lies not just in the beauty of the wood, but in the meticulous preparation of the canvas beneath. Don’t rush this stage; it defines the final quality.”
Executing the Installation: Techniques for a Flawless Barnwood Accent Wall
Once your wall is prepped and your materials are ready, it’s time to bring your vision to life. This section details the professional installation techniques that will ensure your Barnwood Accent Walls: Professional Installation Techniques for Rustic-Modern Spaces look exceptional and last for years to come.
Planning Your Layout and First Row
Before you start fastening, visualize the layout of your planks.
- Dry Fit (Optional but Recommended): For complex walls or if you’re using planks of varying widths, a dry fit can be helpful. Lay out several rows on the floor, arranging them to achieve the desired look, varying textures, and colors, and ensuring seams are well-staggered.
- Determine Starting Point: Typically, starting at the bottom or top of the wall and working your way across is easiest. If starting at the bottom, ensure your first plank is perfectly level. If starting from the top, you might want to ensure a full-width board is at eye-level, making cuts at the bottom near the baseboard less noticeable.
- Plan for Seam Staggering: To avoid an unnatural, ladder-like appearance, plank seams should be staggered by at least 8 inches between rows [5]. This creates a more authentic and visually appealing pattern.
- Account for Outlets and Switches: Measure and mark where outlets and switches will fall. You’ll need to cut out sections from the barnwood planks to accommodate these.
Applying Adhesive and Nailing Techniques
The combination of construction adhesive and brad nails provides a super strong bond, preventing planks from warping or detaching over time.
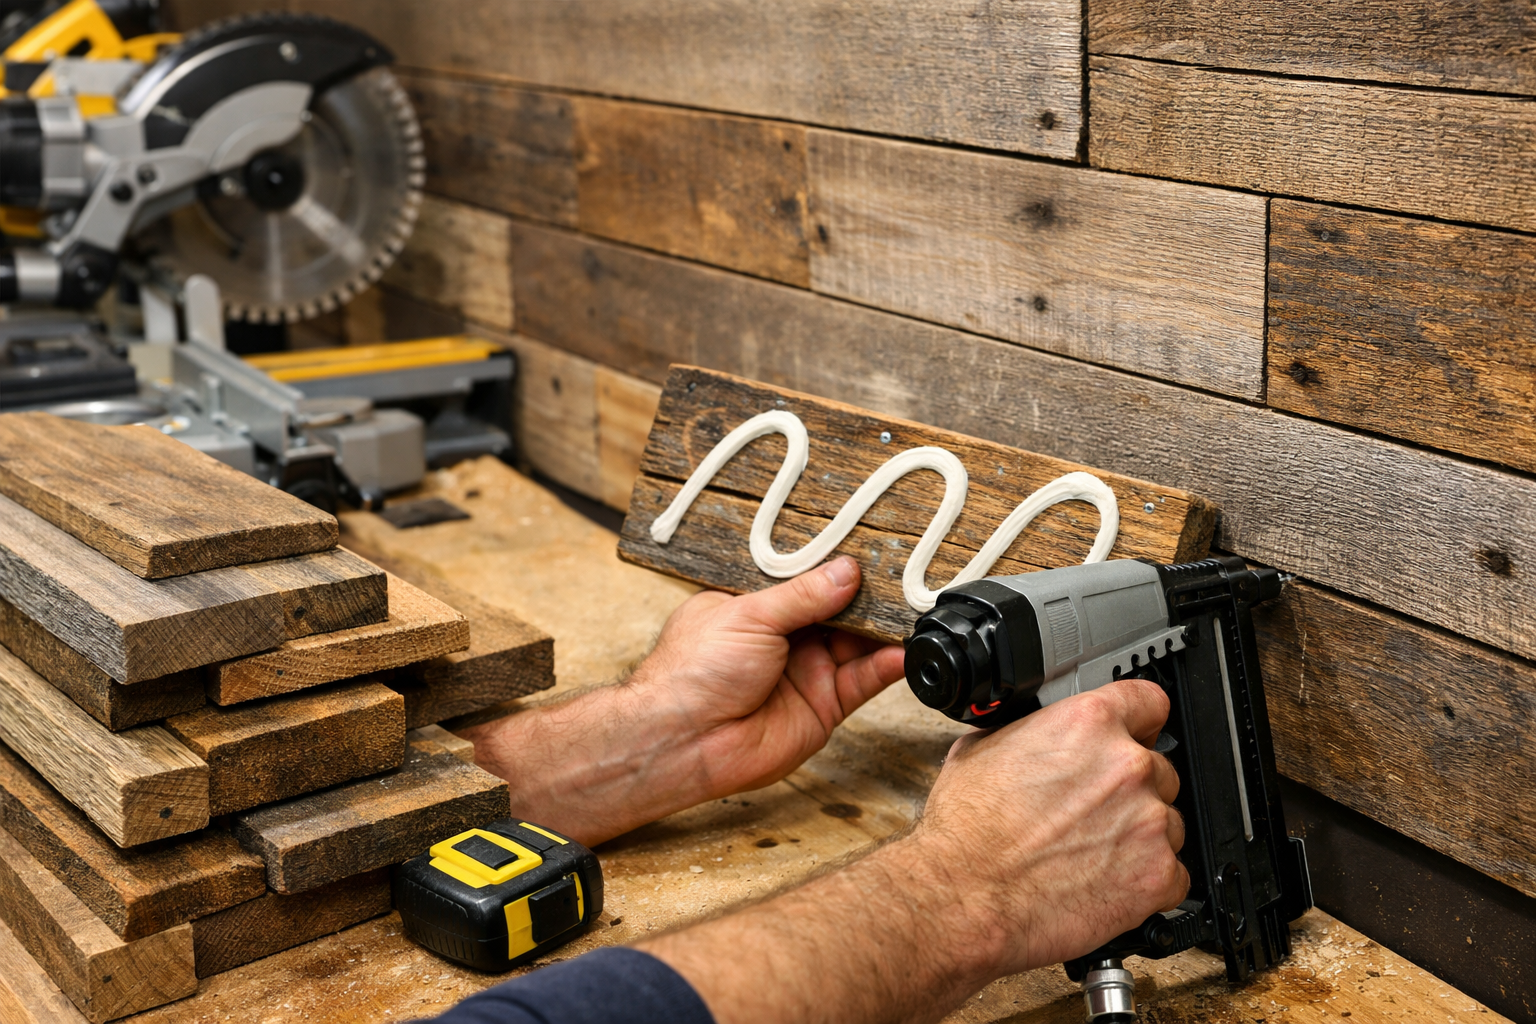
Apply Construction Adhesive: On the back of each plank, apply construction adhesive in a wavy or S-pattern [5, 8]. Keep the adhesive about 0.5 to 1 inch away from the edges to prevent it from oozing out when pressed against the wall [5]. Oozed adhesive can be messy and hard to clean from the textured surface of barnwood.
Position the Plank: Carefully place the plank onto the wall, aligning it with your guide lines or the previous row. Press firmly along the entire length of the plank to ensure good adhesive contact.
Secure with Brad Nails: Using an 18-gauge brad nailer, secure the board by shooting nails into the wall studs you marked earlier [2]. For maximum hold and to minimize visible nail holes, place nails approximately 0.5 inches from the edges of the plank, at the corners, and every 12-16 inches along the length where possible, especially into studs [1, 5, 8].
Pro Tip: When using a brad nailer, ensure the pressure is set correctly to drive the nail head just below the surface of the wood. This prevents damage to the wood and creates a cleaner finish. If a nail doesn’t set perfectly, a nail set can be used to recess it.
Cutting and Fitting Planks
Precision cutting is vital for a seamless look, especially around corners, windows, and doors.
- Measure Twice, Cut Once: This old adage is particularly true with barnwood. Measure the gap you need to fill precisely, accounting for the plank’s thickness and any slight variations in the wall.
- Using a Miter Saw: A miter saw is excellent for making straight, clean cross-cuts. For planks that need to be ripped lengthwise (e.g., for the top or bottom row, or around a window frame), a circular saw or table saw will be necessary. For more on various wood finishing techniques, including how to prepare different wood types, see our comprehensive guide to wood finishing techniques.
- Cutting Around Obstacles:
- Outlets/Switches: Measure the exact position and size of the electrical box. Transfer these measurements to the barnwood plank and use a jigsaw or oscillating multi-tool to cut out the opening. Remember to turn off the power at the breaker before working near electrical outlets.
- Corners: When turning an outside corner, you can either butt the boards against each other or miter the ends for a cleaner, more finished look. For inside corners, simply cut the planks to fit snugly into the corner.
- Windows/Doors: Cut planks to fit around the existing trim. If no trim is present, you may need to add a simple trim piece after the barnwood is installed for a polished edge.
Working with Irregularities and Finishing Touches
Reclaimed barnwood often comes with unique irregularities that add to its charm.
- Embrace Imperfections: Minor gaps or slight variations in plank thickness are part of the rustic aesthetic. Don’t strive for absolute perfection, as this can detract from the natural appeal of the material.
- Edge Treatment: For exposed edges (like at the end of a wall), you might consider using a matching trim piece or carefully sanding the edge of the last plank for a smoother finish.
- Finishing (Optional): While many prefer the natural, weathered look of barnwood, you might consider applying a clear, matte sealant to protect the wood and prevent splinters, especially in high-traffic areas. This can also help to bring out the depth of the wood’s natural color. For ideas on enhancing the aged look, explore weathered wood finishing techniques. If you’re looking for different wood finishing ideas, consider exploring articles like natural wood finishing techniques.
Following these professional installation techniques will ensure your barnwood accent wall is not just a collection of planks, but a meticulously crafted design feature that enhances your rustic-modern space.
Addressing Common Challenges in Barnwood Accent Walls: Professional Installation Techniques for Rustic-Modern Spaces
Even with careful planning, installation can present a few hurdles. Knowing how to troubleshoot these common issues ensures a smooth project.
- Warped Planks: Reclaimed wood can sometimes have a slight warp. If a plank isn’t lying flat, apply extra adhesive and use more brad nails, potentially adding weight or clamps temporarily until the adhesive cures. You might need to discard severely warped pieces.
- Gaps Between Planks: Minor gaps are acceptable and part of the rustic charm. However, if larger gaps appear, try shifting the plank slightly before nailing or use a wood filler matched to the barnwood’s color. Remember that painting the wall black underneath helps disguise these.
- Uneven Wall Surface: If your wall isn’t perfectly flat, the planks might not sit flush. Shimming with thin pieces of wood behind the planks can help, or you might need to use more adhesive and stronger fastening techniques.
By understanding these techniques and being prepared for potential challenges, you are well on your way to creating a beautiful and enduring barnwood accent wall.

Maintenance and Longevity of Your Barnwood Accent Wall
Once your beautiful barnwood accent wall is complete, a minimal amount of care will ensure its longevity and preserve its unique aesthetic. Since most barnwood is reclaimed, it has already endured decades of exposure, making it naturally durable.
- Cleaning: Dust your barnwood wall regularly with a soft cloth or a vacuum cleaner with a brush attachment. For any stubborn spots, a slightly damp cloth can be used, but avoid excessive moisture which can damage the wood.
- Protection: If you chose to seal your barnwood, occasional reapplication of a clear, matte finish might be beneficial every few years, depending on wear and tear. This is particularly relevant in areas with high humidity, where understanding applying polyurethane in high humidity can be useful.
- Humidity Control: Wood naturally expands and contracts with changes in humidity. Maintaining a stable indoor humidity level (ideally between 35-55%) will help minimize movement and prevent potential warping or cracking of the planks.
By following these simple maintenance tips, your barnwood accent wall will remain a stunning feature in your rustic-modern space for many years to come.
Conclusion
Creating Barnwood Accent Walls: Professional Installation Techniques for Rustic-Modern Spaces is a rewarding project that can dramatically enhance the character and warmth of your home. From selecting the perfect reclaimed wood to meticulously preparing your wall and executing precise installation techniques, every step plays a vital role in achieving a professional and enduring finish. Remember the importance of thorough preparation, proper material selection, and secure fastening methods like construction adhesive and brad nails into studs. Embrace the unique imperfections of barnwood, and apply careful attention to detail around obstacles and corners. The result will be a captivating feature that beautifully marries rustic charm with modern elegance.
Ready to transform your space? Start by assessing your wall, sourcing high-quality barnwood, and gathering the necessary tools. With the professional techniques outlined in this guide, you’re equipped to create a stunning barnwood accent wall that will be admired for years to come in 2026.
References
[1] Watch – https://www.youtube.com/watch?v=Fz7QLxovW24 [2] Installing Barn Wood Wall Board – https://vintagetimbers.com/pages/installing-barn-wood-wall-board [3] How To Install A Reclaimed Barn Wood Accent Wall – https://mcarthurhomes.com/2017/04/22/how-to-install-a-reclaimed-barn-wood-accent-wall/ [4] Skip Planed Barnwood – https://www.bayandbent.com/skip-planed-barnwood [5] How To Install Reclaimed Wood Wall – https://centennialwoods.com/pages/how-to-install-reclaimed-wood-wall [6] Reclaimed Wood Accent Wall In My Workshop – https://www.instructables.com/Reclaimed-Wood-Accent-Wall-in-My-Workshop/ [7] Customer Feature Installing A Barn Wood Accent Wall With Cindy – https://realcraft.com/blogs/articles/customer-feature-installing-a-barn-wood-accent-wall-with-cindy [8] Simple Steps For A Beautiful Reclaimed Wood Wall – https://moderntimbercraft.com/blogs/reclaimed-wood-products/simple-steps-for-a-beautiful-reclaimed-wood-wall [9] Barn Wood Diy Feature Wall – https://www.homedepot.ca/en/home/ideas-how-to/decor/barn-wood-diy-feature-wall.html
SEO Meta Title: Barnwood Accent Walls: Pro Installation for Rustic-Modern Spaces SEO Meta Description: Master professional techniques for installing barnwood accent walls in 2026. Learn prep, tools, and expert tips for stunning rustic-modern design.
