


In the world of woodworking and DIY, a dedicated workspace is often seen as a luxury. However, for many enthusiasts and professionals, space is a premium. This article is your ultimate guide to Building a Compact and Ergonomic Workbench for Small Workshops: Maximizing Space and Efficiency. We will explore innovative design principles, material choices, and construction techniques to create a workbench that not only fits into tight quarters but also enhances your productivity and comfort. By strategically designing and constructing your workbench in 2026, you can transform a cramped corner into a highly functional and enjoyable workspace.
Key Takeaways
- Prioritize Functionality: Focus on multi-purpose features like integrated storage, mobility, and convertible surfaces to maximize the utility of limited space.
- Embrace Ergonomics: Design for adjustable height, proper lighting, and convenient tool access to minimize strain and improve working comfort.
- Smart Material Choices: Select durable yet manageable materials like plywood and MDF, considering their strength-to-weight ratio and ease of fabrication.
- Modular & Adaptable Designs: Incorporate modular elements and adaptable configurations that can evolve with your needs and different project requirements.
- Leverage Vertical Space: Utilize wall-mounted storage, pegboards, and overhead shelving to keep the workbench surface clear and tools accessible.
Designing Your Workbench for Optimal Space Utilization
When space is at a premium, every inch of your workbench needs to work hard. The key to Building a Compact and Ergonomic Workbench for Small Workshops: Maximizing Space and Efficiency lies in clever design that integrates storage, versatility, and intelligent dimensions.

Assessing Your Space and Needs
Before cutting any lumber, thoroughly evaluate your workshop’s footprint. Consider:
- Available Wall Space: Can your workbench be wall-mounted or pushed against a wall to free up floor space?
- Foot Traffic: How will you move around the workbench? Ensure clear pathways.
- Tool Storage: What tools do you primarily use? How can they be stored efficiently on or around the workbench?
- Project Size: What are the typical dimensions of your projects? Your workbench needs to accommodate them without being excessively large.
“A well-designed compact workbench isn’t about sacrificing capability; it’s about smart consolidation and adaptability.”
Essential Features for Compact Workbenches
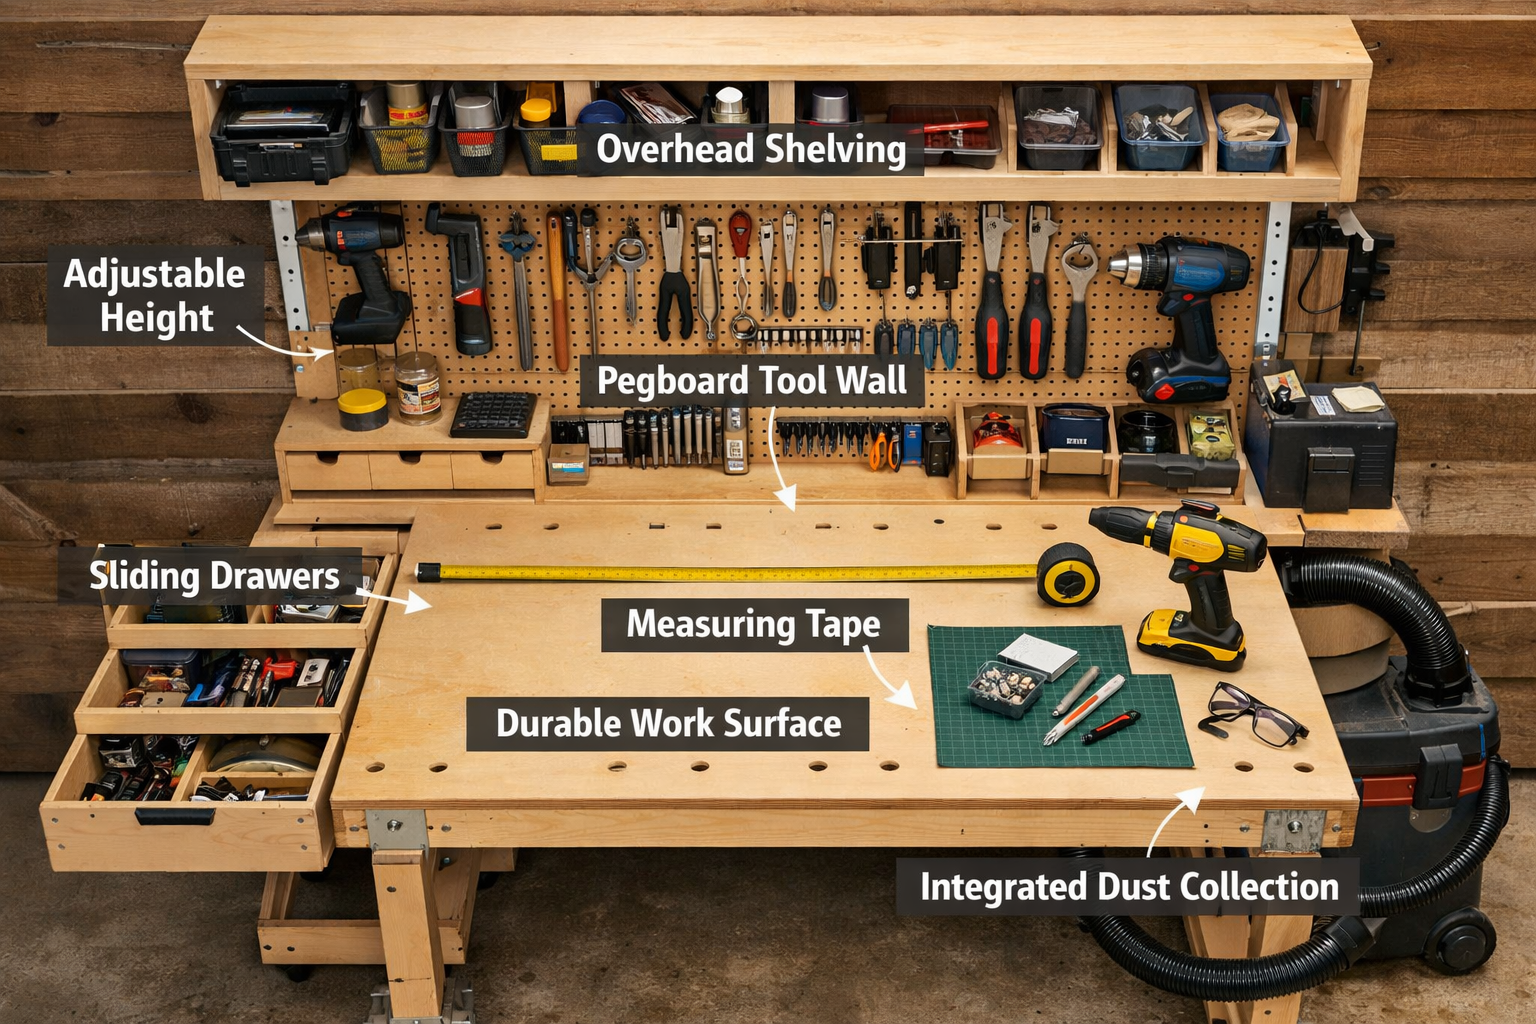
- Integrated Storage: This is paramount. Instead of relying on separate cabinets, build storage directly into your workbench.
- Drawers: Deep drawers beneath the work surface are ideal for hand tools, fasteners, and small power tools.
- Shelving: Open shelves can hold larger items, project materials, or bins for organization.
- Pegboards/French Cleats: Mount these on the back of the workbench or adjacent walls for immediate access to frequently used tools. Consider a well-organized pegboard to keep your precision tools in order.
- Cabinets: Enclosed cabinets protect tools from dust and offer a cleaner aesthetic.
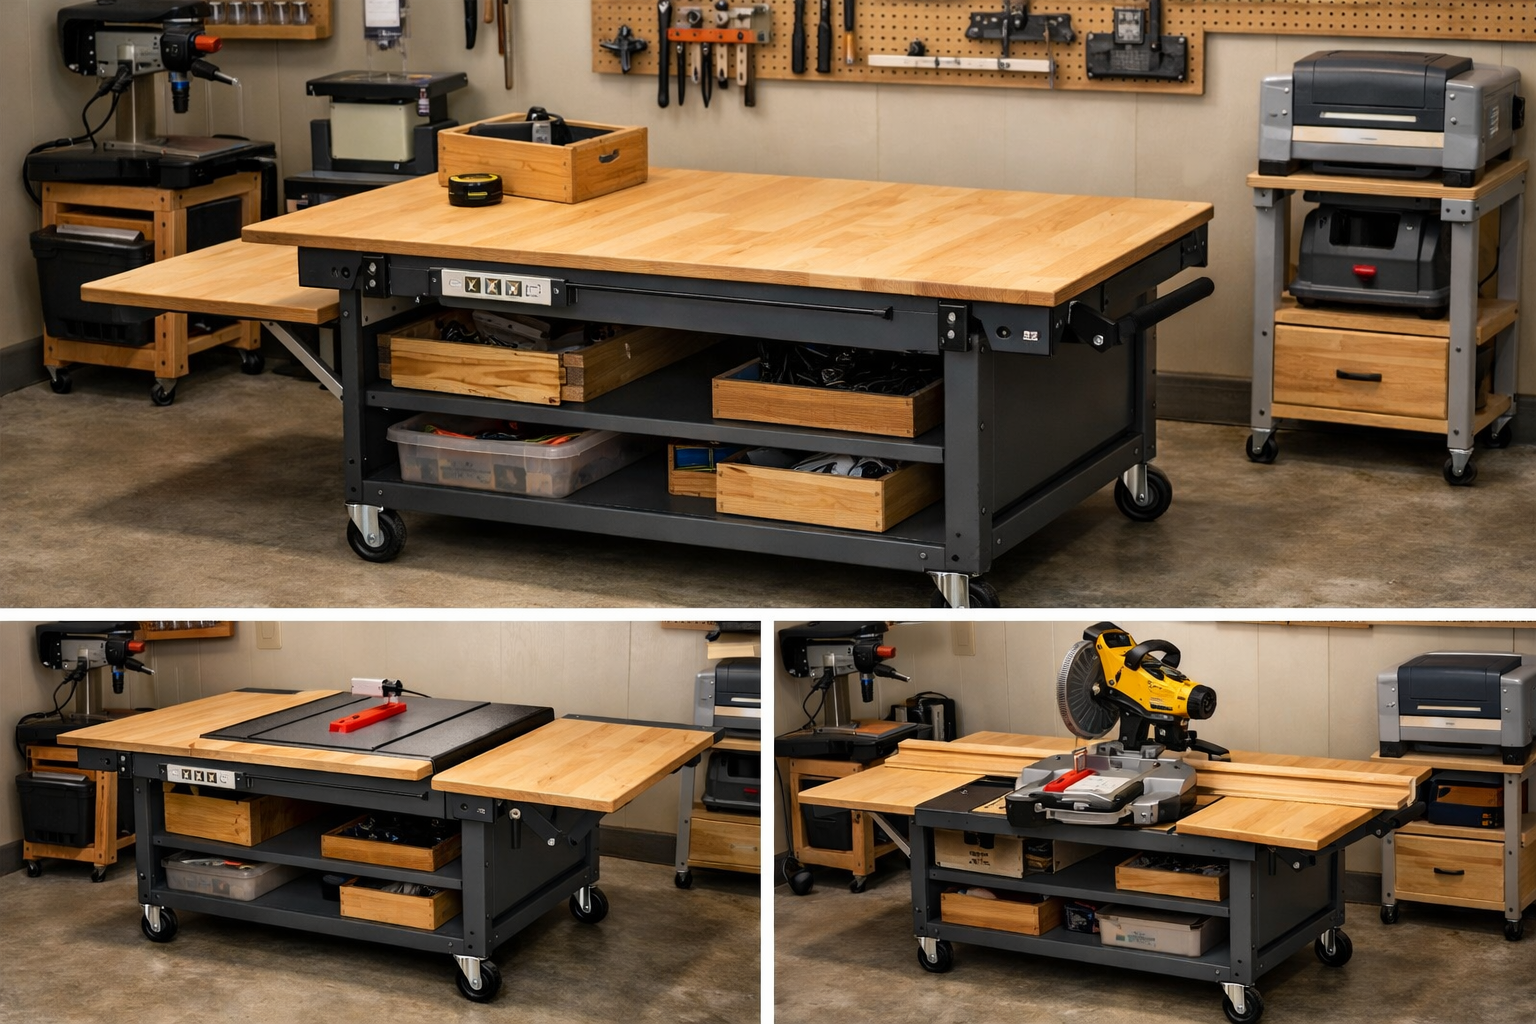
- Mobility: Casters are a game-changer for small workshops.
- Locking Casters: Allow you to move the workbench out of the way when not in use or reposition it for specific tasks (e.g., using it as an outfeed table for a table saw).
- Retractable Casters: Some designs allow the workbench to rest firmly on its legs when locked down, providing extra stability.
- Convertible Surfaces:
- Fold-Down Extensions: Add a hinged leaf to one or both sides of the workbench that can be extended for larger projects and folded down to reclaim space.
- Tool Integration: Design cutouts or removable inserts to accommodate benchtop tools like a drill press or a miter saw, allowing them to sit flush with the main work surface when in use, and be stored away otherwise.
- Vice Mounting Points: Pre-drill or incorporate removable plates for attaching a woodworking vice or other clamping accessories.
Here’s a comparison of common workbench types for small spaces:
| Workbench Type | Pros | Cons | Ideal For |
|---|---|---|---|
| Folding/Wall-Mounted | Maximizes floor space, highly portable | Less stable, limited storage | Very small spaces, occasional use |
| Mobile (Caster-based) | Versatile, easy to reconfigure layout | Can drift if casters aren’t locked | Garages, multi-purpose rooms |
| Benchtop (on existing surface) | Low cost, uses existing surface | Limited work surface, no dedicated storage | Extremely tight spaces, light-duty work |
| Compact Integrated | Excellent storage, stable, multi-purpose | More complex to build, heavier | Dedicated small workshops, frequent use |
Material Selection and Dimensions
For a compact workbench, choose materials that are durable, stable, and relatively easy to work with.
- Plywood (Baltic Birch, ACX): Excellent for surfaces, shelves, and cabinets. It’s stable and strong.
- MDF (Medium-Density Fiberboard): Good for flat surfaces, drawer bottoms, and jigs due to its smooth finish and stability. However, it’s heavy and susceptible to moisture.
- Lumber (2x4s, 4x4s): Ideal for frames and legs, providing strength and rigidity.
- Hardwood (Maple, Oak): For heavy-duty tops or specific applications like vice jaws, offering superior durability.
Recommended Dimensions (Adjustable for your space):
- Height: Aim for an ergonomic height. For general woodworking, 34-36 inches (86-91 cm) is common. Consider an adjustable height mechanism or different sections for precision work vs. heavy assembly.
- Width: 4-6 feet (122-183 cm) offers a good balance between workspace and compactness.
- Depth: 24-30 inches (61-76 cm) is often sufficient, allowing you to reach across easily.
Ergonomics and Workflow Optimization
Ergonomics isn’t just a buzzword; it’s about designing your workspace to fit your body, reducing strain, and increasing efficiency. For Building a Compact and Ergonomic Workbench for Small Workshops: Maximizing Space and Efficiency, this means thinking beyond just the workbench itself.
Achieving the Right Working Height
The ideal workbench height depends on your height and the type of work you do.
- Precision Work (e.g., carving, joinery): A slightly higher surface, allowing you to stand upright without stooping.
- Heavy Assembly/Forceful Work (e.g., planing, hammering): A lower surface, enabling you to use your body weight effectively.
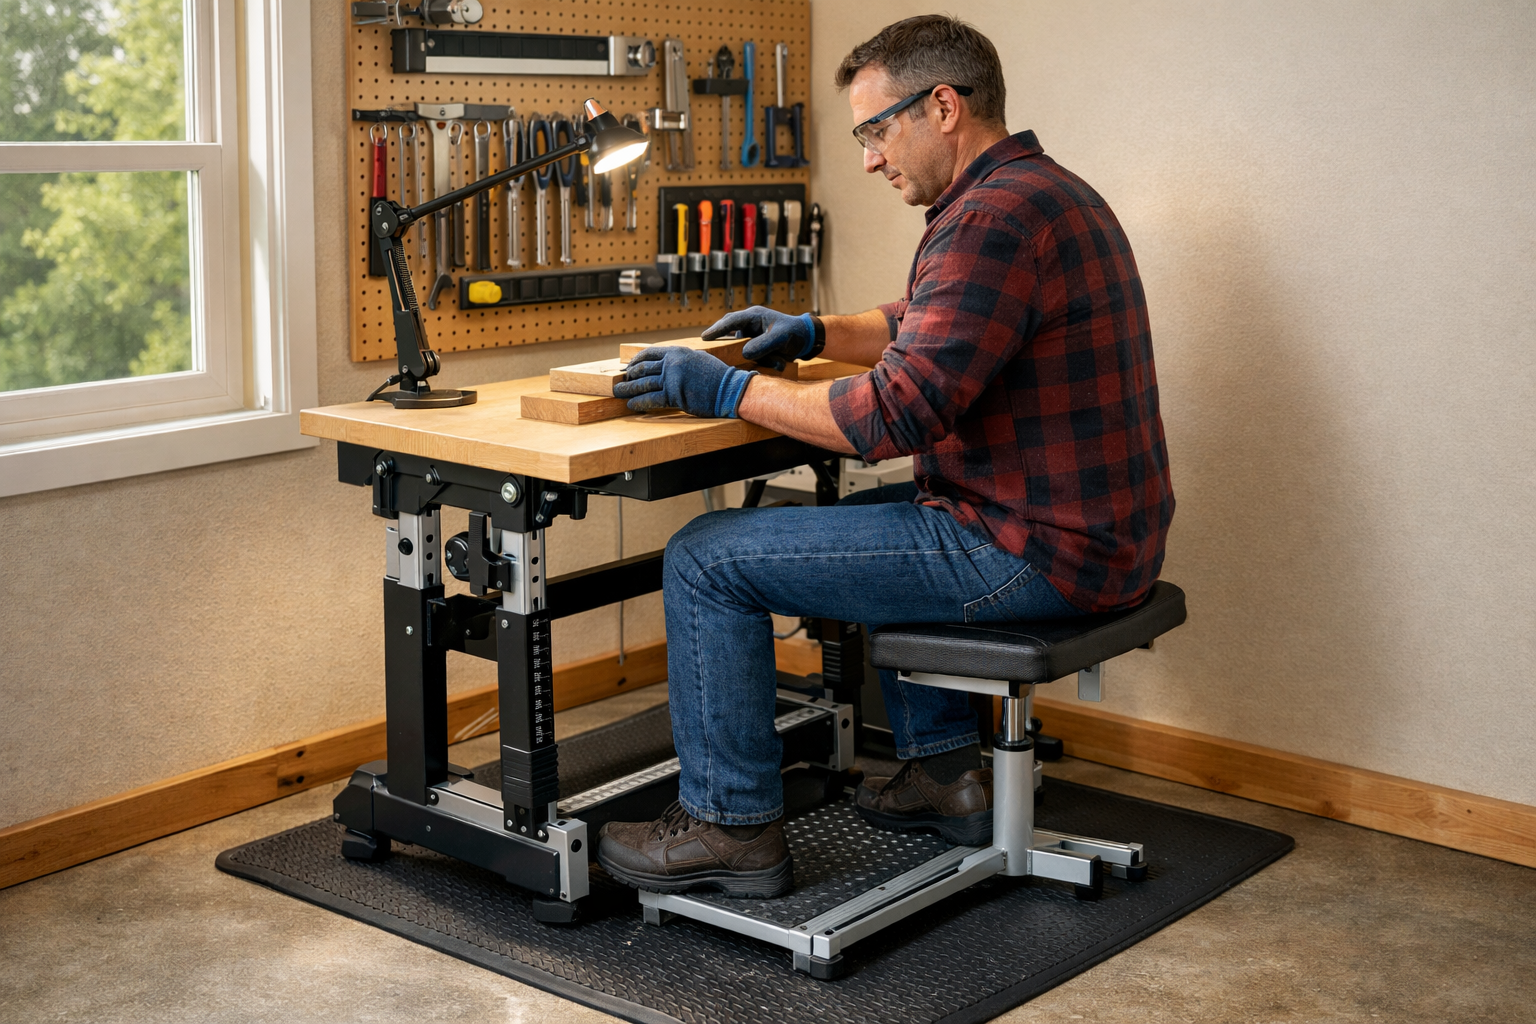
- Adjustable Height Mechanisms: If possible, incorporate a crank or hydraulic system to change the workbench height. This is the ultimate ergonomic solution.
- Sitting vs. Standing: Design your workbench to accommodate both. A comfortable stool is essential for seated tasks.
Lighting and Ventilation
Good lighting prevents eye strain and improves accuracy.
- Task Lighting: Install adjustable LED lamps directly over your work surface.
- Ambient Lighting: Ensure your workshop has adequate overall illumination.
- Natural Light: Position your workbench to benefit from windows if available.
Ventilation is crucial for health and safety, especially when dealing with sawdust, glues, and finishes.
- Dust Collection: Integrate dust collection ports or have a shop vacuum easily accessible.
- Air Filtration: Consider an ambient air filter to capture fine dust particles.
- Cross-Ventilation: Open windows or use fans when possible.
Tool Placement and Accessibility
The “zone” concept is critical for a small, ergonomic shop.
- Primary Zone: Tools used constantly (e.g., measuring tape, pencil, utility knife) should be within arm’s reach without stretching.
- Secondary Zone: Tools used frequently (e.g., specific chisels, screwdrivers, sandpaper) should require a slight pivot or step.
- Tertiary Zone: Less-used tools or bulk supplies can be stored further away.
Consider these solutions:
- Magnetic Strips: Great for small metal tools like chisels, drivers, and files.
- Wall-Mounted Organizers: Pegboards, French cleat systems, or specific tool racks keep your walls tidy and tools visible. For more ideas on effective organization, check out our guide to precision woodworking tools.
- Drawer Inserts/Dividers: Prevent tools from becoming a jumbled mess, making them easier to find.
Cable Management
Untamed cords are a safety hazard and an annoyance.
- Integrated Power Strips: Mount power strips directly onto the workbench or its frame.
- Cable Clips/Ties: Securely route power cords and extension cords to keep them out of the way.
- Cord Reels: Retractable cord reels can be mounted to the ceiling or wall for power delivery to portable tools.
Smart Construction Techniques and Features
Now that the design principles are clear, let’s delve into the construction aspect of Building a Compact and Ergonomic Workbench for Small Workshops: Maximizing Space and Efficiency.
Basic Workbench Frame Construction
A sturdy frame is the foundation of any good workbench.

- Cut Lumber: Precisely cut all frame pieces (legs, stretchers) to your chosen dimensions. Accuracy here is key.
- Joinery:
- Pocket Holes: A fast and strong method for attaching frame pieces.
- Mortise and Tenon: A traditional, extremely strong joint, suitable for experienced woodworkers. Our article on mastering modern hand-cut joinery can offer more insights.
- Bolts and Lag Screws: Excellent for heavy-duty construction where disassembly might be required.
- Assembly: Ensure the frame is square and level during assembly. Use wood glue in addition to fasteners for maximum rigidity.
Building the Workbench Top
The work surface is where all the action happens.
- Substrate: Use a durable sheet good like 3/4″ or 1″ thick plywood or MDF. Two layers can be glued together for extra heft and stability.
- Edge Banding: Apply solid wood edge banding to protect the edges of your plywood/MDF top from damage and provide a clean finish.
- Finishing:
- Hard-wearing finish: Spar urethane or multiple coats of polyurethane will protect the surface from spills, dents, and scratches. Consider comparing water-based spar urethane vs. polyurethane for the best protection.
- Sacrificial Top: For heavy-duty work or tasks involving glue and paint, consider adding a replaceable layer of hardboard or MDF on top of your main workbench surface.
Integrating Storage Solutions
- Drawers: Use sturdy drawer slides (full extension is best for accessibility). Build drawer boxes from plywood.
- Shelving: Adjustable shelves offer flexibility. Use shelf pins and holes for easy height changes.
- Wall Organization: Mount pegboard or a French cleat system to the back of the workbench or the wall behind it. This is a fantastic way to utilize vertical space. Learn more about turning shop scraps into design features for making custom holders for your cleat system.
Enhancing Functionality: Specific Features
- Dog Holes: Drill a grid of 3/4-inch holes in your workbench top. These allow for the use of bench dogs, holdfasts, and specialized clamping accessories, turning your entire surface into a versatile clamping platform.
- T-Track System: Router in T-tracks into the workbench surface to easily attach clamps, fences, and jigs. This significantly increases the versatility of your compact space.
- Built-in Vises: Install a woodworking vise directly into the workbench frame or opt for a quick-release bench vise.
- Router Table Insert: If you frequently use a router, consider building an integrated router table into a section of your workbench, complete with a fence and dust collection.
Safety First
- Stability: Ensure your workbench is rock-solid. Any wobbling is a safety hazard.
- Clear Work Area: Always keep your immediate work surface clear of clutter.
- Personal Protective Equipment (PPE): Always wear safety glasses, hearing protection, and appropriate gloves.
- Electrical Safety: Properly ground all tools and ensure wiring is up to code.
Conclusion
Building a Compact and Ergonomic Workbench for Small Workshops: Maximizing Space and Efficiency is an investment that pays dividends in productivity, comfort, and safety. By thoughtfully planning your design, carefully selecting materials, and incorporating smart storage and ergonomic features, you can create a highly functional workspace, even in the most limited environments.
Don’t let a small workshop deter your woodworking ambitions. With a well-designed workbench, your creative potential is boundless. Begin by assessing your unique needs, sketching out a detailed plan, and then confidently embark on your build. Your future self, and your body, will thank you for it.
Actionable Next Steps:
- Measure Your Space: Accurately determine the dimensions of your available workshop area.
- List Your Tools: Inventory all hand and power tools you own to plan storage effectively.
- Sketch Designs: Draw out several workbench concepts, focusing on integrated storage and versatility.
- Research Materials: Source durable and cost-effective materials like plywood and sturdy lumber.
- Start Building: Follow a plan, paying close attention to stability, ergonomics, and safety throughout the construction process.
References
- Fine Woodworking. (2020). Workbenches: From Design & Theory to Construction & Use. Taunton Press.
- Schwartz, J. (2018). The Workbench Book. Taunton Press.
- Woodsmith Magazine. (2021). Small Shop Solutions: Building the Ultimate Compact Workbench. August 2021 issue.
