
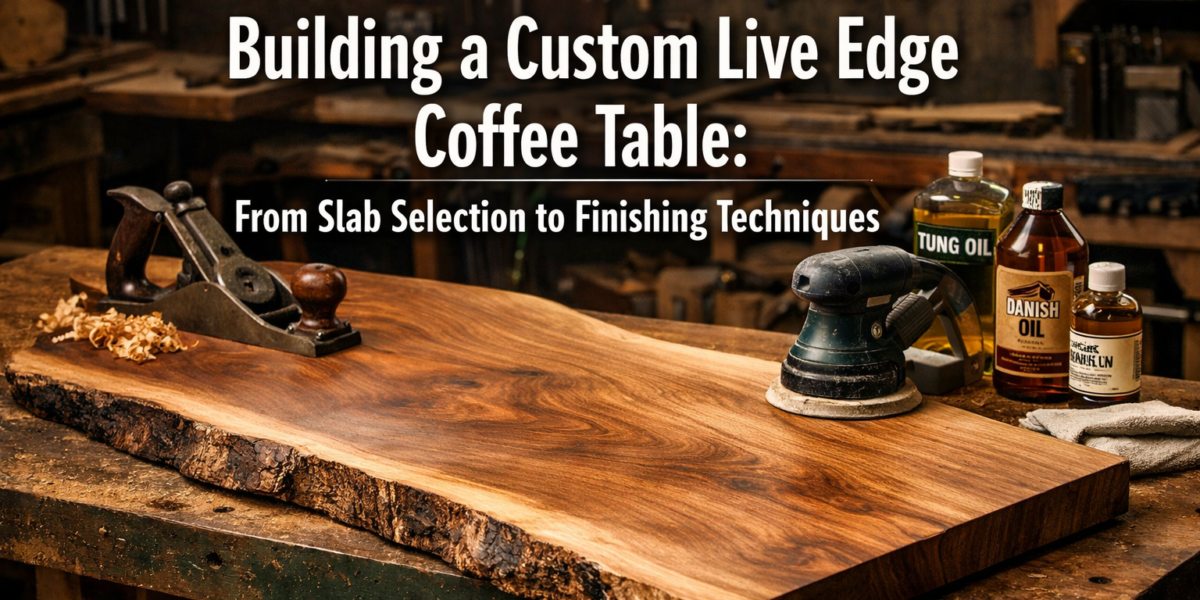

In a world increasingly dominated by mass-produced furniture, a custom live edge coffee table stands as a testament to natural beauty, craftsmanship, and individuality. It’s more than just a piece of furniture; it’s a conversation starter, a focal point that brings the organic allure of nature directly into your living space. For the discerning woodworker or ambitious DIY enthusiast, undertaking the project of Building a Custom Live Edge Coffee Table: From Slab Selection to Finishing Techniques offers an incredibly rewarding experience, culminating in a unique heirloom piece that perfectly complements your home’s aesthetic in 2026. This comprehensive guide walks you through every crucial step, ensuring your journey from raw wood to polished centerpiece is successful and enjoyable.
Key Takeaways
- Slab Selection is Paramount: Choosing the right kiln-dried slab with desirable character and minimal flaws is the foundation of a successful live edge project.
- Precision Flattening is Essential: Employing methods like a router sled or planer ensures a perfectly flat surface, critical for stability and a professional finish.
- Thoughtful Base Design: The coffee table base must complement the slab’s aesthetic and provide robust support.
- Careful Joinery: Strong, well-executed joinery is crucial for the longevity and stability of the entire table structure.
- Finishing Elevates Beauty: The final finishing technique protects the wood and dramatically enhances its natural grain and live edge details.
Part 1: Slab Selection and Initial Preparation for Your Custom Live Edge Coffee Table
The journey of Building a Custom Live Edge Coffee Table: From Slab Selection to Finishing Techniques begins with the most critical decision: selecting the perfect wood slab. This single choice will dictate the aesthetic, character, and much of the structural integrity of your finished piece.

Understanding Live Edge Slabs
A “live edge” refers to wood that retains its natural edge, complete with bark, unique contours, and natural irregularities. This organic element is what gives live edge furniture its distinctive charm. Common species for coffee tables include:
- Walnut: Prized for its rich, dark color and dramatic grain.
- Oak (White or Red): Durable with prominent grain, takes stains well.
- Maple: Lighter in color, often with striking figuring like curly or bird’s eye.
- Cherry: Known for its warm, reddish-brown tones that deepen with age.
- Mesquite: Extremely durable, often featuring intriguing knots and cracks.
Sourcing Your Slab
Finding a quality slab requires a bit of research. Look for:
- Local Sawmills: Often have a wide selection and can offer advice.
- Specialty Wood Suppliers: Tend to stock higher-grade, kiln-dried slabs.
- Online Retailers: Offer convenience but make sure to request detailed photos and specifications.
What to Look for in a Slab
When inspecting potential slabs, prioritize these characteristics:
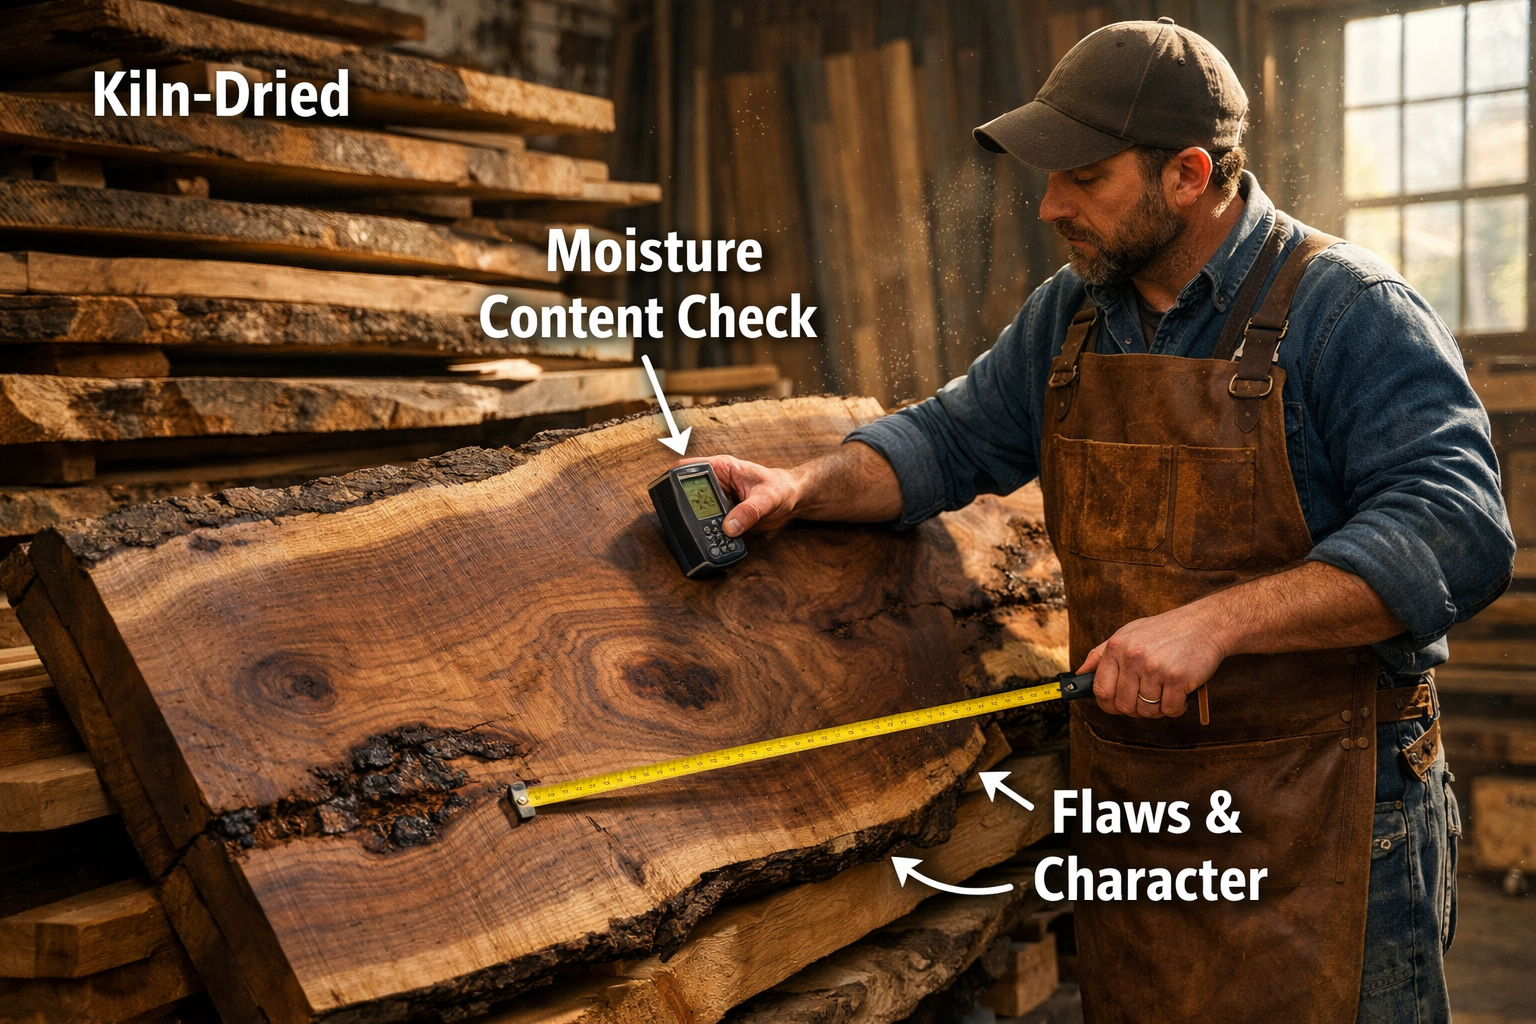
- Kiln-Dried: This is non-negotiable. Air-dried wood can continue to move, warp, or crack after you’ve built your table. Kiln-drying stabilizes the wood, bringing its moisture content down to an appropriate level (typically 6-8%). Always bring a moisture meter if possible to verify.
- Thickness: For a coffee table, a slab between 1.5 to 2.5 inches thick is ideal. Thicker slabs offer more presence but are heavier and harder to work with.
- Width and Length: Ensure the dimensions are suitable for your intended coffee table size. Remember that you might trim some edges.
- Character: Look for interesting grain patterns, knots, unique bark inclusions, and natural imperfections that enhance its beauty.
- Minimal Flaws: While live edge embraces natural imperfections, avoid slabs with severe checks (cracks), excessive rot, or deep structural damage that would compromise integrity. Small cracks can often be filled with epoxy, but large ones are problematic.
- Flatness (Relative): No slab will be perfectly flat, but avoid those with severe cupping, twisting, or bowing, as these will be more challenging and time-consuming to flatten.
Initial Cleaning and Bark Management
Once you’ve selected your slab, bring it to your workshop.
- Clean the Bark: Use a stiff brush or a chisel to remove any loose bark, dirt, or debris. Decide if you want to preserve the bark or remove it entirely. Preserving bark adds to the natural aesthetic but can chip off over time if not properly adhered and sealed. If removing, use a drawknife or chisel.
- Basic Rough Cut (Optional): If the slab is significantly oversized or has areas you definitely don’t want, perform a rough cut.
Part 2: Flattening, Shaping, and Base Construction
With your chosen slab, the next phase in Building a Custom Live Edge Coffee Table: From Slab Selection to Finishing Techniques involves transforming the raw wood into a functional tabletop and constructing a sturdy, complementary base. This stage demands precision and an understanding of woodworking techniques.
Achieving a Flat Surface
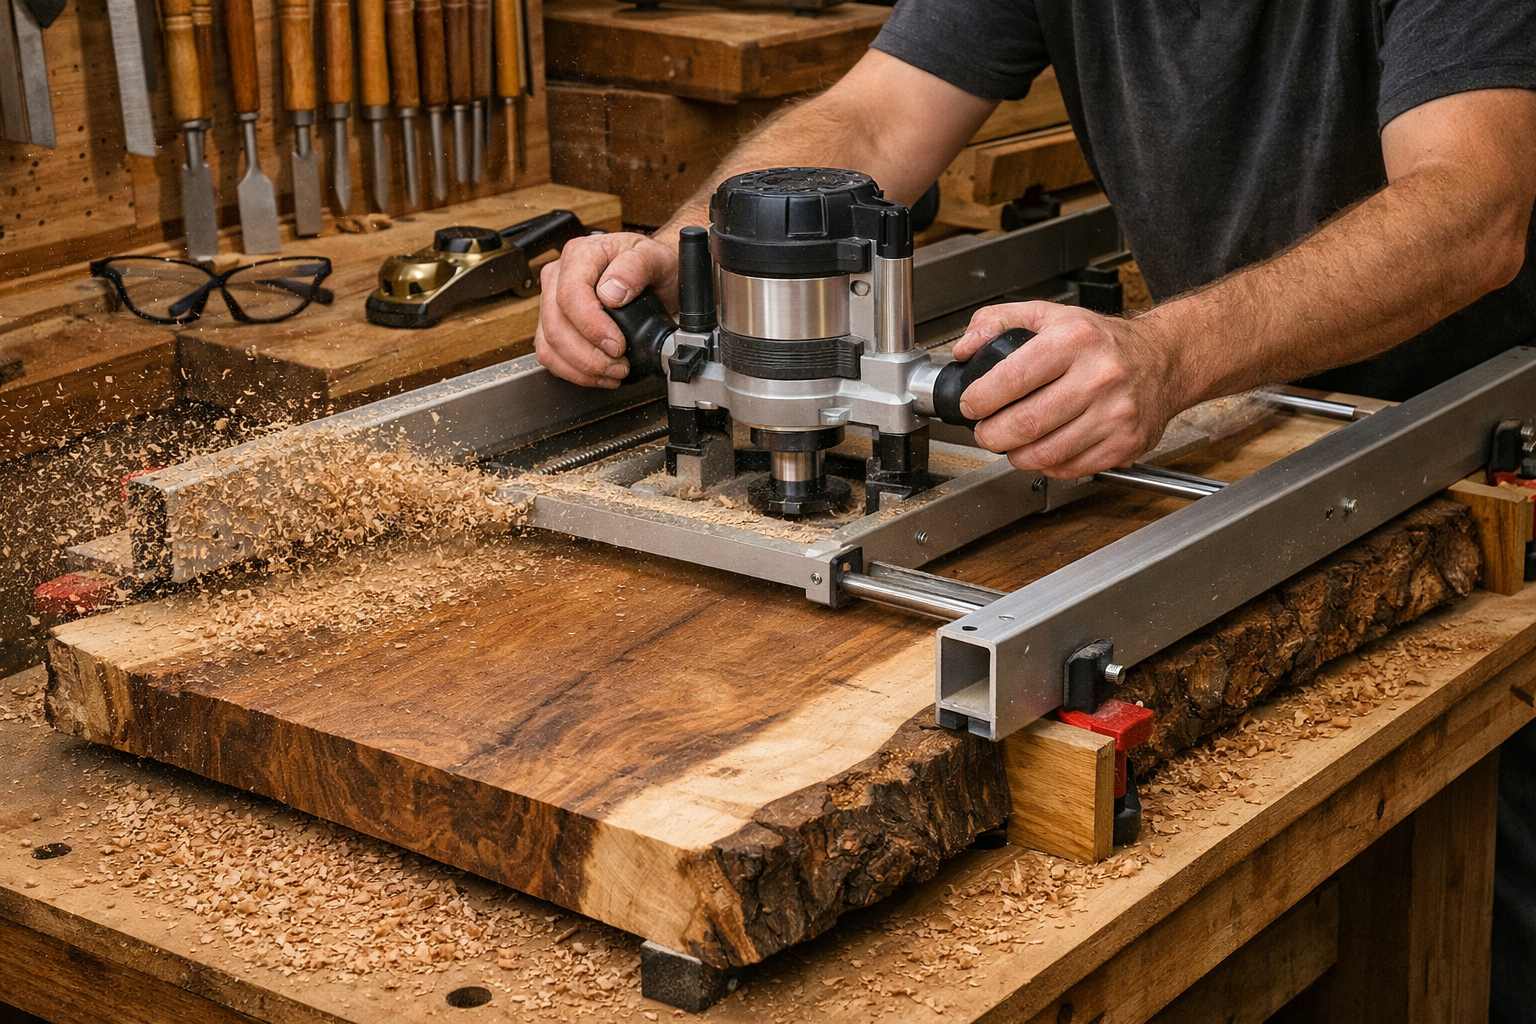
A truly flat slab is paramount for a stable and professional-looking coffee table. There are several methods:
- Router Sled: This is arguably the most accessible and effective method for most DIY woodworkers. It involves building a jig that allows a router to pass consistently over the slab, removing material in thin layers until both faces are parallel and flat. For detailed guidance on utilizing your router effectively, consider exploring resources on mastering the router table.
- Wide Belt Sander: If you have access to a professional shop, a wide belt sander can flatten slabs quickly and efficiently.
- Hand Planing: For experienced woodworkers, a set of hand planes can be used, but this requires significant skill and effort for larger slabs.
- Electric Planer (Limited): Most standard electric planers have width limitations. For wider slabs, you would need to mill the slab in sections and then glue them, which is not ideal for a single live edge slab.
After flattening one side, flip the slab and repeat the process for the second side, ensuring both faces are parallel.
Addressing Imperfections and Enhancing Stability
Live edge slabs often come with unique features that require attention:
- Filling Voids and Cracks: Use epoxy resin to fill knots, checks, or voids. Clear epoxy preserves visibility of the natural features, while colored epoxy (e.g., black) can create a striking contrast. Ensure the wood is completely dry and clean before applying epoxy.
- Bow Tie Inlays: For larger cracks, especially those prone to spreading, consider adding decorative “bow tie” or “butterfly” inlays. These not only stabilize the crack but also add a touch of handcrafted elegance.
Sanding the Slab
Sanding is crucial for a smooth, even surface that will properly accept a finish.
- Start with a coarser grit (e.g., 80 or 100) to remove milling marks and level the surface.
- Gradually work your way up through finer grits (120, 150, 180, 220, and sometimes 320), ensuring all scratches from the previous grit are removed before moving to the next.
- Pay special attention to the live edge, gently cleaning and sanding any remaining bark or rough spots.
Designing and Building the Base
The base is critical for stability and must complement the live edge top. Consider the following:
- Style: Metal bases (steel, cast iron) offer an industrial or modern look. Wooden bases provide a warmer, more traditional feel.
- Stability: Ensure the base design provides ample support and prevents rocking. The wider the base, the more stable the table.
- Joinery: For wooden bases, strong joinery techniques are essential. Mortise and tenon, lap joints, or robust dowel joints are good choices. For tips on strong woodworking joints, you might find our guide on understanding wood movement helpful, as it touches on joinery considerations.
- Attachment Method: The base must securely attach to the slab while allowing for natural wood movement. Slotted screw holes, Z-clips, or figure-8 fasteners are common methods. Avoid rigidly attaching the slab to the base with fixed screws, as this can lead to cracking.
For those interested in other live edge projects, our article on building live edge dining tables with reclaimed wood offers further insights into slab handling and base design.
Part 3: Finishing Techniques for Your Custom Live Edge Coffee Table
The final stage in Building a Custom Live Edge Coffee Table: From Slab Selection to Finishing Techniques is where the true beauty of the wood is revealed and protected. The right finish enhances the grain, seals the wood, and provides durability for years to come.
Preparing for Finish
Before applying any finish, ensure the slab is immaculate:

- Dust Removal: Thoroughly clean the surface with compressed air, a tack cloth, or a vacuum to remove all dust particles. Even tiny specks can ruin a finish.
- Wipe Down: Some woodworkers wipe the slab with mineral spirits or denatured alcohol to reveal any missed sanding marks or glue residue.
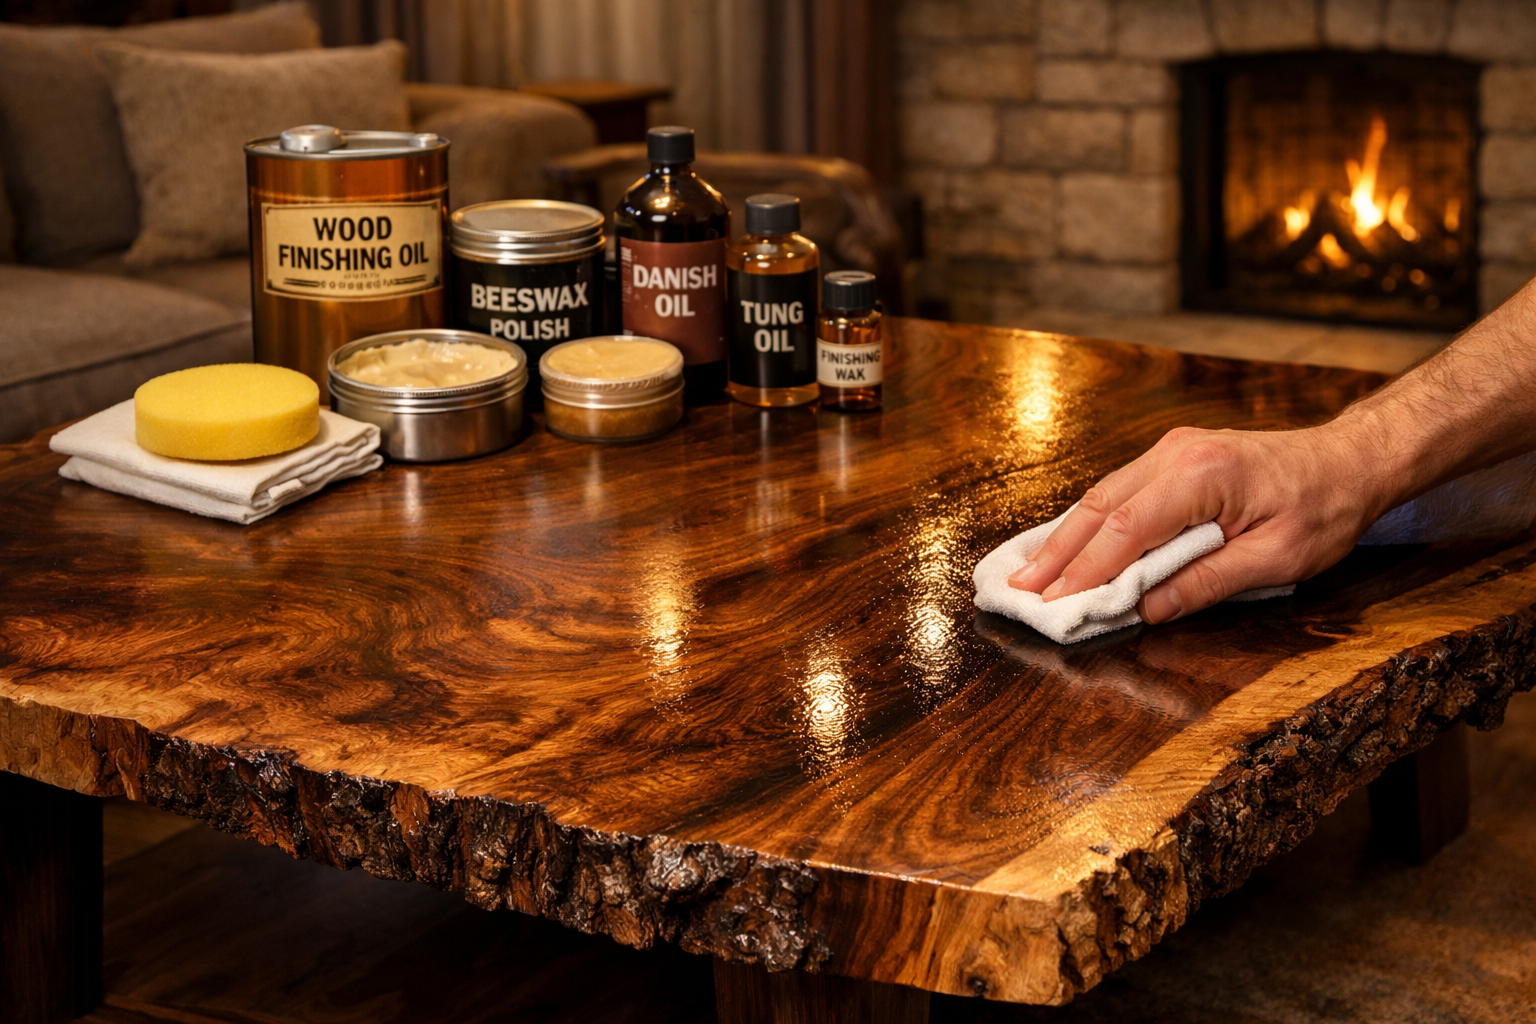
Choosing the Right Finish
The choice of finish depends on the desired look, durability, and ease of application.
Oil Finishes (e.g., Tung Oil, Linseed Oil, Rubio Monocoat):
- Pros: Penetrates the wood, creating a natural, warm, and tactile feel. Easy to repair localized damage. Enhances grain depth beautifully.
- Cons: Less durable against spills and heat than film finishes. Requires more frequent reapplication.
- Application: Apply in thin coats, wiping off excess between coats. Multiple coats build up protection. For a more detailed look at various applications, check out sustainable finishes for reclaimed wood.
Polyurethane (Oil-Based or Water-Based):
- Pros: Creates a durable, protective film on the surface. Highly resistant to moisture, scratches, and heat. Available in various sheens (matte to high gloss).
- Cons: Can sometimes look “plasticky” if applied too thickly. Repairs are more challenging as the entire surface may need to be sanded and refinished. Oil-based polyurethanes can yellow over time.
- Application: Apply thin, even coats with a brush or sprayer. Lightly sand between coats with fine-grit sandpaper (e.g., 320-400) to ensure adhesion and a smooth finish. If you’re encountering issues like polyurethane not drying, our guide can help.
Varnish (e.g., Spar Varnish):
- Pros: Extremely durable, especially for surfaces exposed to wear and moisture. Often used for marine applications due to UV resistance.
- Cons: Slower drying times. Can be challenging to apply without brush marks.
- Application: Similar to polyurethane, apply thin coats with light sanding in between.
Hardwax Oils (e.g., Osmo Polyx-Oil):
- Pros: A hybrid finish offering the natural feel of oil with added durability. Easy to apply and repair. Good water resistance.
- Cons: Can be more expensive than traditional oils.
- Application: Typically 1-2 thin coats, buffed into the wood.
Application Tips for a Flawless Finish
- Work in a Clean, Dust-Free Environment: This is crucial for avoiding imperfections in the finish.
- Apply Thin Coats: Multiple thin coats are always better than one thick coat. This prevents drips, bubbles, and ensures proper curing.
- Follow Manufacturer Instructions: Drying times, recoat windows, and application methods vary significantly between products.
- Sand Between Coats (for film finishes): Use a very fine grit (320-400) sandpaper or a sanding pad to lightly scuff the surface, then clean thoroughly before applying the next coat. This creates a smoother, more durable finish.
- Finishing the Live Edge: Take care to apply finish evenly to the live edge, including any bark, to protect it and enhance its texture.
- Allow Full Cure Time: Even when dry to the touch, finishes take days or weeks to fully cure. Avoid heavy use or placing objects on the table until it’s fully cured.
For those interested in exploring a wider array of finishing options, guides like unique wood finishing techniques and high-gloss wood finishing techniques can provide further inspiration and instruction.
Conclusion
Building a Custom Live Edge Coffee Table: From Slab Selection to Finishing Techniques is a deeply satisfying project that yields a unique, stunning piece of furniture. From the initial hunt for the perfect raw slab to the meticulous process of flattening, shaping, and finally, applying a beautiful protective finish, each step contributes to the table’s character and longevity.
The journey requires patience, attention to detail, and a willingness to learn new skills. However, the reward of seeing a natural piece of wood transformed into a functional work of art, infused with your own craftsmanship, is immeasurable. This guide has provided a clear roadmap for creating your own live edge coffee table in 2026, ensuring you have the knowledge to select wisely, build skillfully, and finish expertly. Embrace the process, respect the material, and you’ll create a table that not only serves its purpose but also tells a story for generations.
Actionable Next Steps:
- Source Your Slab: Begin by visiting local sawmills or reputable online suppliers to find your ideal kiln-dried live edge slab.
- Gather Tools: Ensure you have the necessary tools for flattening (e.g., router and sled jig), sanding, and joinery.
- Design Your Base: Sketch out a design for your coffee table base that complements your slab and fits your aesthetic.
- Practice Finishing: Test your chosen finish on a scrap piece of the same wood to familiarize yourself with the application process before working on your main slab.
SEO Meta Title: Build a Custom Live Edge Coffee Table: Slab to Finish Guide SEO Meta Description: Master building a custom live edge coffee table in 2026. Learn slab selection, flattening, base construction, and finishing techniques for a stunning result.
