


Over 80% of entryways in homes are considered disorganized, often serving as a chaotic dumping ground for shoes, coats, and bags, rather than a welcoming transition space. This startling statistic highlights a pervasive design challenge that can significantly impact a home’s first impression and daily functionality. Addressing this common pain point, the solution lies not just in adding furniture, but in creating intelligently designed pieces. This article explores the comprehensive process of building a modern mid-century inspired entryway bench with integrated shoe storage and coat hooks, transforming cluttered entryways into stylish, organized, and inviting spaces in 2026. This project blends timeless aesthetic appeal with practical utility, offering a bespoke solution to a widespread problem.
Key Takeaways
- Mid-Century Modern Appeal: The design embraces clean lines, organic curves, and warm wood tones characteristic of mid-century modern aesthetics, ensuring a stylish and timeless addition to any home.
- Integrated Functionality: This bench design maximizes space efficiency by combining seating, dedicated shoe storage, and accessible coat hooks into a single, cohesive unit.
- DIY Empowerment: Provides a detailed, step-by-step guide for woodworkers of various skill levels to undertake this rewarding project, from material selection to finishing.
- Enhanced Organization: Offers a practical solution for decluttering entryways, creating an organized drop-zone that improves daily routines and welcomes guests.
- Customization Potential: Encourages makers to personalize dimensions, wood types, and finishes to perfectly match their home’s decor and specific storage needs.
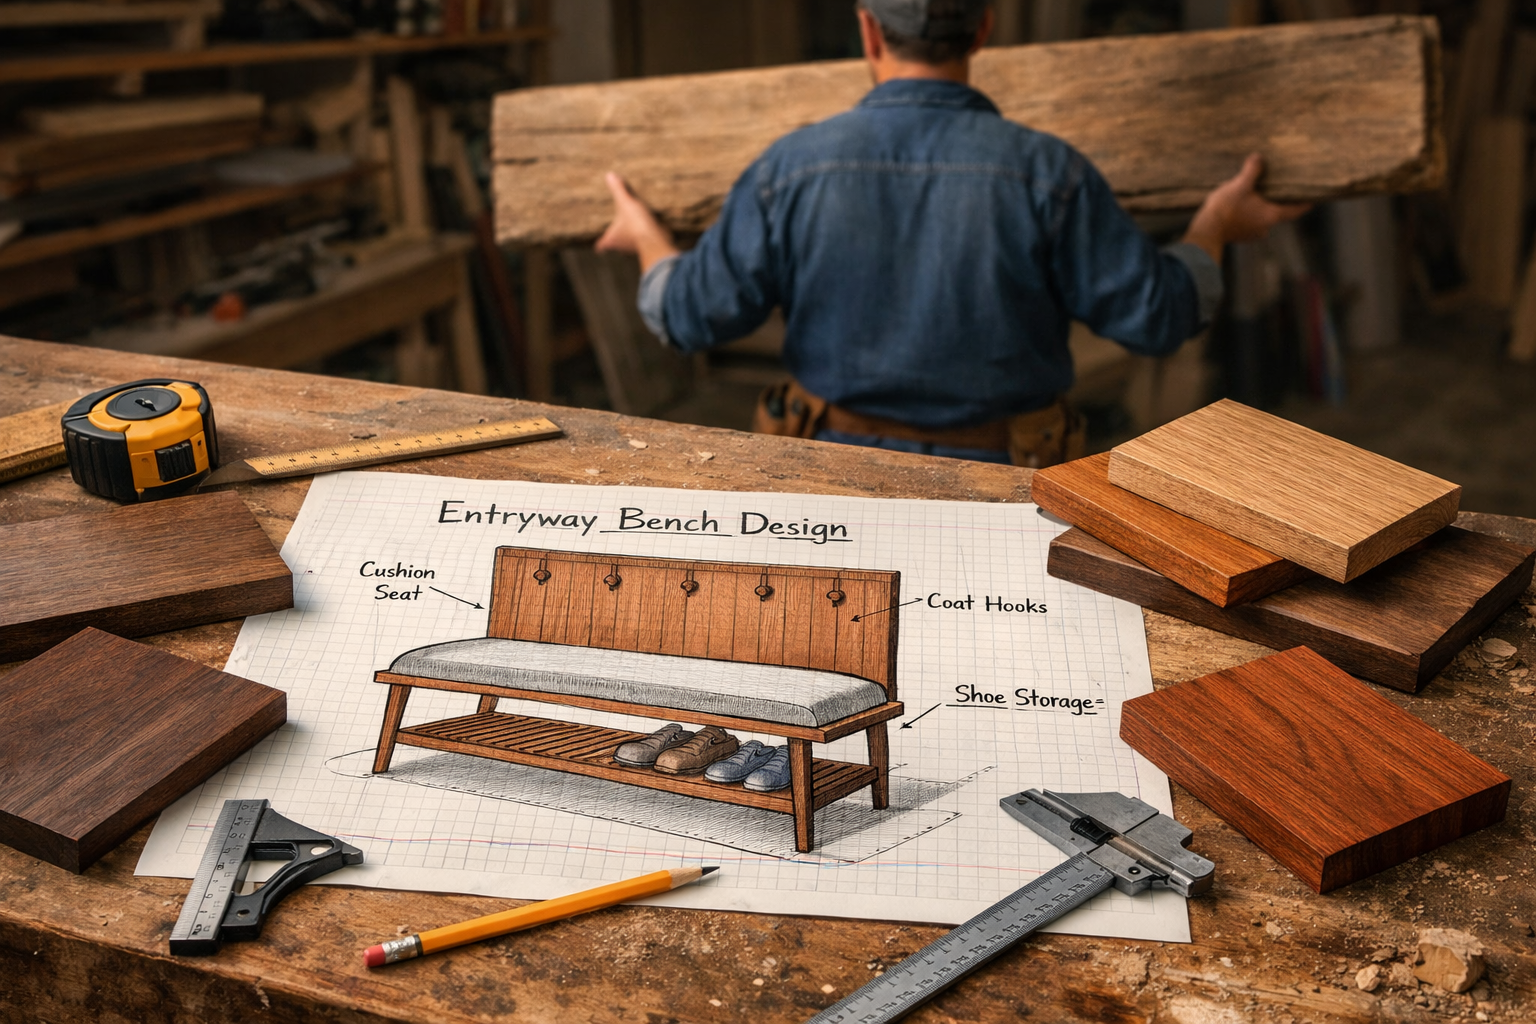
Designing Your Modern Mid-Century Inspired Entryway Bench
The foundation of any successful woodworking project begins with meticulous planning and design. For a piece as central as an entryway bench, especially one with integrated storage and hooks, thoughtful design ensures both aesthetic appeal and peak functionality. The mid-century modern style, known for its clean lines, minimalist forms, and emphasis on natural materials, is an ideal choice for a piece that needs to be both beautiful and hardworking.

Conceptualizing the Mid-Century Aesthetic ✨
Mid-century modern design flourished from the mid-1940s to the late 1960s, characterized by its functionality, simple forms, and often organic or geometric shapes. When designing your entryway bench, consider:
- Tapered Legs: A hallmark of mid-century furniture. Tapered legs lend a sense of lightness and elegance.
- Clean Lines: Avoid excessive ornamentation. The beauty lies in the simplicity of form and the quality of the materials.
- Warm Woods: Walnut, teak, and oak are quintessential mid-century materials. Their rich tones contribute significantly to the aesthetic.
- Integrated Elements: Seamlessly incorporating shoe storage and coat hooks into the overall design, rather than tacking them on as afterthoughts, is key to the style.
Start by sketching various bench profiles. Think about the overall height, length, and depth that will best suit your entryway. Consider how the shoe cubbies will be accessed and how the coat hooks will integrate with the backrest or wall panel.
Material Selection: Wood Choices and Hardware 🌳
The choice of wood dramatically influences both the look and durability of your entryway bench. For a truly authentic mid-century feel, consider:
- Walnut: A premium choice, known for its rich, dark brown color and beautiful grain patterns. It’s stable and carves well.
- Teak: Prized for its durability and golden-brown hue. While often more expensive, its resistance to moisture makes it a excellent choice for high-traffic areas.
- Oak (White or Red): A more budget-friendly yet still durable option. White oak has a beautiful, subtle grain, while red oak offers a stronger, more pronounced pattern.
- Plywood (for hidden elements): High-quality Baltic birch or apple ply can be used for internal dividers in shoe cubbies to save on cost while maintaining stability.
For hardware, choose minimalist and functional pieces. Matte black, brushed brass, or chrome coat hooks can complement the wood tones beautifully. Ensure the hooks are sturdy enough to hold coats, bags, and scarves. For joinery, internal fasteners or exposed decorative joinery like dovetails can enhance the piece’s craftsmanship. For those looking to master precision joinery, exploring “Mastering Dovetail Joints with Hand Tools” can provide valuable insights for creating robust and aesthetically pleasing connections. Mastering Dovetail Joints with Hand Tools: A Step-by-Step Guide for
Planning for Integrated Shoe Storage and Coat Hooks 👟🧥
This is where the “modern” aspect truly shines in the functionality of “Building a Modern Mid-Century Inspired Entryway Bench with Integrated Shoe Storage and Coat Hooks.”
Shoe Storage:
- Open Cubbies: Simple, accessible, and allows shoes to air out. Determine the number and size of cubbies based on typical shoe sizes in your household. A depth of 12-14 inches is usually sufficient for most shoes.
- Sliding Trays/Shelves: For a more concealed look, consider pull-out trays or adjustable shelves behind a simple face frame.
- Slatted Design: If you choose open cubbies, a slatted bottom can prevent dirt and debris from accumulating, allowing it to fall through to a removable tray for easy cleaning.
Coat Hooks:
- Back Panel Integration: Design a back panel that extends upwards from the bench, providing a solid surface for mounting hooks. This creates a cohesive unit.
- Wall-Mounted Hooks: Alternatively, the hooks can be mounted directly to the wall above the bench, maintaining a cleaner bench profile. Ensure they are aligned with the bench for visual harmony.
- Hook Type: Opt for single or double hooks depending on your storage needs. Consider the height – accessible for adults, possibly lower for children.
| Feature | Mid-Century Design Element | Practical Consideration |
|---|---|---|
| Legs | Tapered, splayed, or cylindrical | Sturdy attachment, anti-tipping design |
| Bench Top | Solid wood slab, clean edges, perhaps a slight chamfer | Comfortable seating, durable finish |
| Shoe Storage | Open cubbies, slatted shelves, simple dividers | Accommodates varying shoe sizes, easy cleaning |
| Coat Hooks | Minimalist metal (brass, black), integrated back panel | Secure mounting, appropriate height for users |
| Joinery | Mortise and tenon, dado, dowel, or hidden fasteners | Structural integrity, aesthetic appeal |
| Wood Finish | Natural oil, clear lacquer, satin polyurethane | Protects wood, enhances grain, matches decor |
A precise plan will save time, materials, and frustration during the building process. Taking the time to visualize and detail every aspect of your “Building a Modern Mid-Century Inspired Entryway Bench with Integrated Shoe Storage and Coat Hooks” ensures a truly custom and functional piece.
Step-by-Step Construction: Building Your Entryway Bench
With your design finalized and materials gathered, the next phase involves bringing your plans to life. This section details the critical steps in the construction of your modern mid-century inspired entryway bench, focusing on precision and craftsmanship.
Cutting and Preparing Components 📏
Accuracy in cutting is paramount. Use a table saw, miter saw, or track saw for precise, square cuts. Always double-check your measurements.
- Cut Major Panels: Start by cutting the main benchtop, side panels, and any internal shoe cubby dividers to their specified dimensions.
- Prepare Legs: Cut the leg blanks. If you’re opting for tapered legs, this is the stage to create those tapers using a tapering jig on your table saw or a band saw. For those interested in improving their workshop setup for such precision, “Building a Custom Wood Workbench: Design Considerations and” offers excellent guidance. Building a Custom Wood Workbench: Design Considerations and
- Back Panel: Cut the back panel for the coat hooks. This may be a single piece or multiple slats, depending on your design.
- Edge Banding (if using plywood): If any exposed edges are plywood, apply edge banding for a clean, finished look.
Joinery and Assembly Techniques 🛠️
The type of joinery you choose will affect both the strength and visual appeal of your bench. For mid-century modern, clean and strong joints are essential.
- Dado Joints: Ideal for securing shelf dividers within the shoe storage compartments. A router with a straight bit or a dado stack on a table saw makes this easy.
- Mortise and Tenon Joints: A classic, incredibly strong joint perfect for attaching the legs to the bench frame, or for securing the bench sides to rails. This provides exceptional durability for a piece that will bear weight.
- Dowel Joints or Pocket Holes: For simpler construction, dowel joints offer good strength. Pocket holes are a fast and effective method for joining panels, though they may require plugs for a cleaner look if exposed.
- Glue-Ups: For wider bench tops or panels, several boards may need to be glued together. Use cauls and clamps to ensure a flat, strong bond.
Assembly Sequence:
- Construct Shoe Storage Unit: Assemble the internal dividers for the shoe storage using dado joints, dowels, or pocket holes. Ensure everything is square before gluing and clamping.
- Attach Side Panels: Secure the side panels of the bench to the shoe storage unit.
- Attach Legs: Fasten the legs to the bench structure. For mortise and tenon, ensure a tight fit. For other methods, use strong screws with pilot holes and wood glue.
- Install Benchtop: Place the benchtop onto the assembled base. Use figure-8 fasteners or Z-clips underneath to allow for wood movement while keeping the top securely attached. This is crucial for long-term stability.
- Mount Back Panel (for hooks): Attach the back panel to the bench, ensuring it’s plumb and securely fastened.
- Install Coat Hooks: Precisely measure and mark the locations for your coat hooks. Drill pilot holes and secure the hooks with appropriate fasteners.
“Precision in joinery isn’t just about strength; it’s about honoring the material and the design. A well-executed joint becomes a testament to craftsmanship.”
Sanding and Finishing for Durability and Style 🎨
A meticulous finish elevates your entryway bench from a mere structure to a piece of furniture art.

- Sanding: Start with a coarser grit sandpaper (e.g., 100-120 grit) to remove any milling marks or imperfections. Gradually work your way up to finer grits (220-320 grit) for a silky-smooth surface. Sand with the grain to avoid scratches.
- Dust Removal: Thoroughly clean all dust from the piece. A tack cloth or compressed air is effective.
- Stain/Dye (Optional): If you desire a specific color or to enhance the wood grain, apply a wood stain or dye. Test on scrap pieces first. For guidance on achieving different looks, consider exploring various wood finishing techniques.
- Protective Finish: Apply a durable protective finish.
- Oil Finish (e.g., Danish Oil, Tung Oil): Penetrates the wood, creating a natural, warm look. Offers good protection and is easy to repair.
- Polyurethane (Water-based or Oil-based): Creates a hard, protective film. Oil-based typically offers more durability and ambering, while water-based is clearer and less odorous. Apply multiple thin coats, sanding lightly between coats with fine-grit sandpaper (e.g., 320-400 grit).
- Lacquer: Dries quickly and builds a durable finish. Often applied with a spray gun.
- Shellac: A natural finish that provides a beautiful warm glow. Less durable than polyurethane but easy to repair.
After the final coat, allow ample time for the finish to cure completely before putting your “Building a Modern Mid-Century Inspired Entryway Bench with Integrated Shoe Storage and Coat Hooks” into service. This typically takes several days to a few weeks, depending on the product and environmental conditions.
By following these steps, you will construct a sturdy, functional, and visually appealing modern mid-century inspired entryway bench that will serve your home for years to come.
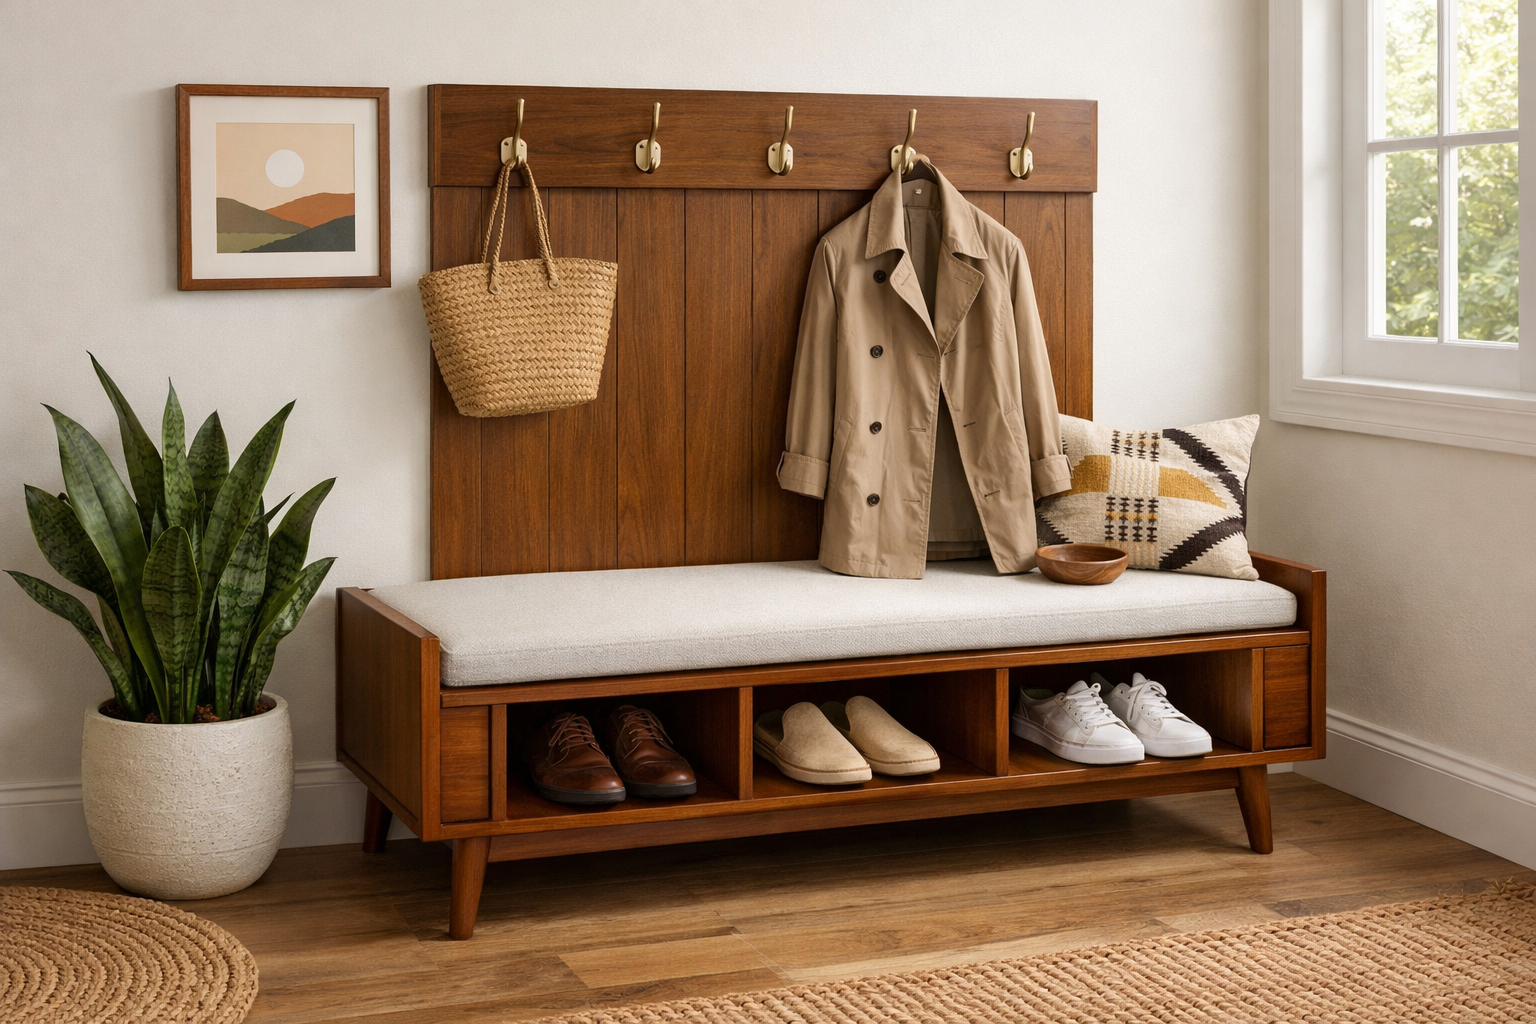
Integrating Your Bench into Your Home’s Aesthetic
A beautifully crafted entryway bench is more than just a piece of furniture; it’s a statement about your home’s style and a functional anchor for one of its busiest areas. The final stage involves thoughtfully integrating your newly built modern mid-century inspired entryway bench with integrated shoe storage and coat hooks into your home.
Styling for a Cohesive Look ✨
Once your bench is complete and cured, consider how it harmonizes with existing decor.
- Color Palette: Ensure the wood tone and finish complement the surrounding wall colors, flooring, and any existing furniture in the vicinity. Mid-century modern typically works well with earthy tones, muted pastels, and pops of vibrant color.
- Accessorize Thoughtfully:
- Cushions: Add a custom-made or off-the-shelf cushion for comfort and to introduce texture or color.
- Baskets: Place small, stylish baskets in some of the shoe cubbies to hold smaller items like keys, mail, or dog leashes.
- Artwork/Mirror: A minimalist piece of artwork or a round mid-century inspired mirror above the coat hooks can complete the look and add visual interest.
- Plants: A small potted plant can bring life and a touch of nature to the entryway, enhancing the organic feel often associated with mid-century design.
Maximizing Organization and Functionality 🏡
The primary purpose of your bench, beyond its aesthetic appeal, is to bring order to your entryway.
- Dedicated Shoe Zones: Assign specific cubbies or sections for different family members’ shoes to maintain tidiness. Encourage immediate shoe placement upon entry.
- Strategic Hook Use: Utilize the coat hooks not just for coats, but also for handbags, backpacks, and umbrellas. Consider a small decorative tray on the benchtop for keys and wallets.
- Seasonal Rotation: Periodically clear out the shoe storage, rotating seasonal footwear or donating unused items to keep the area functional and clutter-free.
- Lighting: If your entryway is dim, consider adding a stylish mid-century inspired wall sconce or a small table lamp on an adjacent console to brighten the space and highlight your new bench.
This bench project goes beyond simple construction; it’s about enhancing daily life. For those interested in creating other functional and stylish pieces, learning about Crafting Profitable Wooden Benches: From Entryway Seats to G can offer further inspiration.
Long-Term Care and Maintenance 🌿
To ensure your mid-century inspired entryway bench retains its beauty and functionality for years:
- Regular Cleaning: Wipe down the wood surfaces with a soft, damp cloth to remove dust and dirt. Avoid harsh chemical cleaners that can damage the finish.
- Protect from Moisture: Wipe up any spills immediately. Consider placing a small rug or mat under the bench to catch water from wet shoes, especially during inclement weather.
- Re-Oiling/Re-Finishing: Depending on the finish you applied, periodically reapply an oil finish or a fresh coat of polyurethane as needed to protect the wood and restore its luster. This can be every few years, or more frequently in high-traffic areas.
- Check Hardware: Occasionally check the screws on the coat hooks and any structural fasteners to ensure they remain tight.
By paying attention to these details, your modern mid-century inspired entryway bench with integrated shoe storage and coat hooks will not only serve its practical purpose but also remain a beautiful and cherished piece of furniture within your home for decades.
Conclusion
The journey of building a modern mid-century inspired entryway bench with integrated shoe storage and coat hooks is a rewarding endeavor that culminates in a highly functional and aesthetically pleasing piece for any home. From the initial conceptualization of its timeless design to the precise execution of joinery and the final touches of styling, this project offers a unique opportunity to blend craftsmanship with contemporary living needs. In 2026, where efficiency and style are paramount, a well-organized entryway serves as a true reflection of a thoughtfully curated home.
This project empowers woodworkers to tackle a multi-faceted build, improving skills in design, material selection, cutting, joinery, and finishing. The resulting bench not only declutters one of the busiest areas of a house but also introduces a touch of classic design elegance that will endure for generations. By taking the initiative to create a bespoke solution, homeowners gain a piece that perfectly fits their space and lifestyle, providing practical storage for shoes and coats, and a welcoming spot to pause upon entering or leaving.
Actionable Next Steps:
- Refine Your Design: Revisit your initial sketches. Measure your entryway precisely and adjust dimensions to ensure a perfect fit. Consider different wood finishes that complement your existing decor.
- Gather Materials: Create a comprehensive cut list and shopping list for your chosen wood, hardware (coat hooks, fasteners), glue, and finishing products. Don’t forget sandpaper in various grits.
- Set Up Your Workspace: Ensure your workshop is clean, well-lit, and has the necessary tools for accurate cutting, shaping, and assembly. Safety gear (eye protection, ear protection) is essential. For further guidance on optimizing your workspace, consider our guide on Building a Compact and Ergonomic Workbench for Small Workshops.
- Start Building: Take your time with each step, focusing on precision. Remember that patience and attention to detail during joinery and sanding will yield the best results.
- Personalize and Enjoy: Once complete, style your new bench with cushions, baskets, and artwork to truly make it your own. Enjoy the enhanced organization and timeless beauty it brings to your home.
