
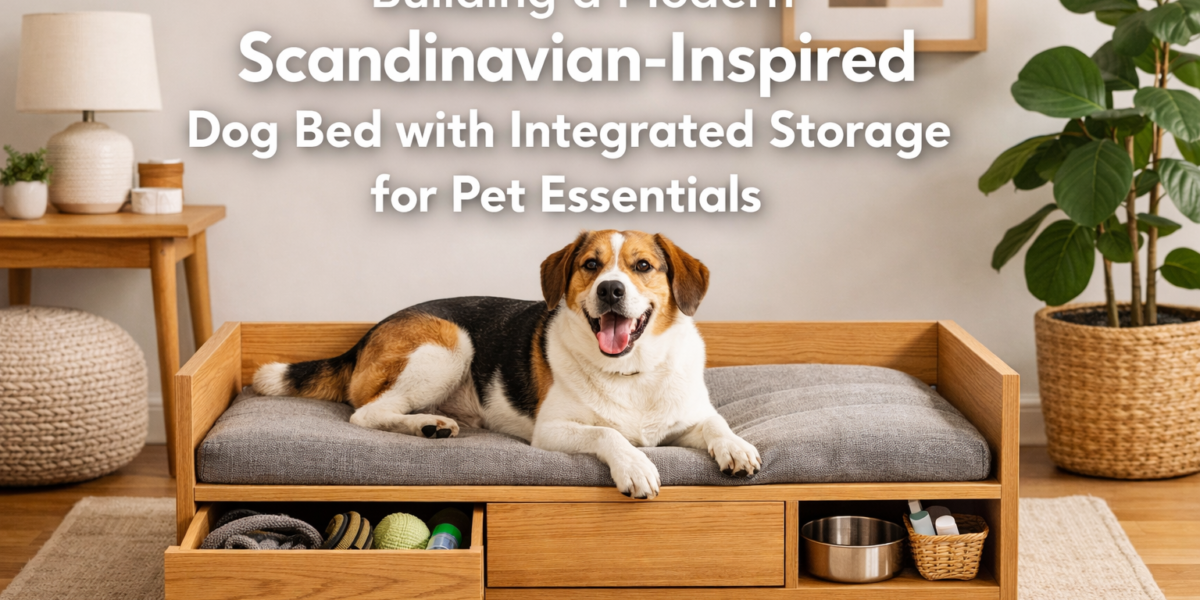

A cluttered home can decrease perceived square footage by up to 20%, a common challenge for pet owners constantly managing toys, leashes, and grooming supplies. Far from merely a place for rest, a dog bed can become an integral part of your home’s aesthetic and organizational strategy. This article guides you through Building a Modern Scandinavian-Inspired Dog Bed with Integrated Storage for Pet Essentials, a project that merges pet comfort with sophisticated, minimalist design. This project ensures your furry friend has a cozy retreat while also decluttering your living space.
Key Takeaways
- Embrace Scandinavian Design Principles: Focus on clean lines, natural materials (especially light-colored wood), functionality, and a minimalist aesthetic.
- Prioritize Integrated Storage: Design built-in compartments for pet essentials like toys, leashes, and blankets to maintain an organized home.
- Select Durable, Pet-Safe Materials: Choose hardwoods or high-quality plywood for longevity, and non-toxic finishes for your pet’s safety.
- Utilize Essential Woodworking Techniques: Employ joinery methods like dadoes, rabbets, or pocket holes for a strong and stable structure.
- Tailor to Your Pet’s Size and Needs: Custom dimensions ensure optimal comfort and support for your specific dog.
The Foundation of Scandinavian Design: Blending Form and Function for Your Pet
Scandinavian design is celebrated worldwide for its emphasis on simplicity, functionality, and natural beauty. When applied to pet furniture, these principles translate into a piece that is not only highly practical but also aesthetically pleasing, seamlessly integrating into contemporary home decor. The core idea is to create a serene environment, both for your pet and for your home.

Understanding Scandinavian Aesthetic for Pet Furniture
At its heart, Scandinavian design values clean lines, uncluttered spaces, and the use of natural materials. For your dog bed, this means opting for light-colored woods like birch, maple, or ash, or even high-quality plywood with a natural finish. The design should be minimalist, avoiding excessive ornamentation, and focusing on the inherent beauty of the wood grain. Think subtle curves or straight, purposeful edges that contribute to a calm, airy feel. This approach helps the pet bed feel like a thoughtful addition to your home, rather than an intrusive item.
Key Design Elements:
- Natural Materials: Wood is paramount. Consider its grain, tone, and texture.
- Neutral Color Palette: Light woods, white, gray, and subtle pastels for cushions and accents.
- Simplicity and Clean Lines: Avoid intricate details; focus on geometric shapes and smooth surfaces.
- Functionality: Every element should serve a purpose, especially the integrated storage.
Planning Your Design: Dimensions and Layout
Before cutting any wood, thorough planning is crucial. The size of your dog bed should be appropriate for your dog, allowing them to stretch out comfortably. A general rule of thumb is to measure your dog from nose to tail while they are sleeping in their favorite position, then add 6-12 inches to both length and width.
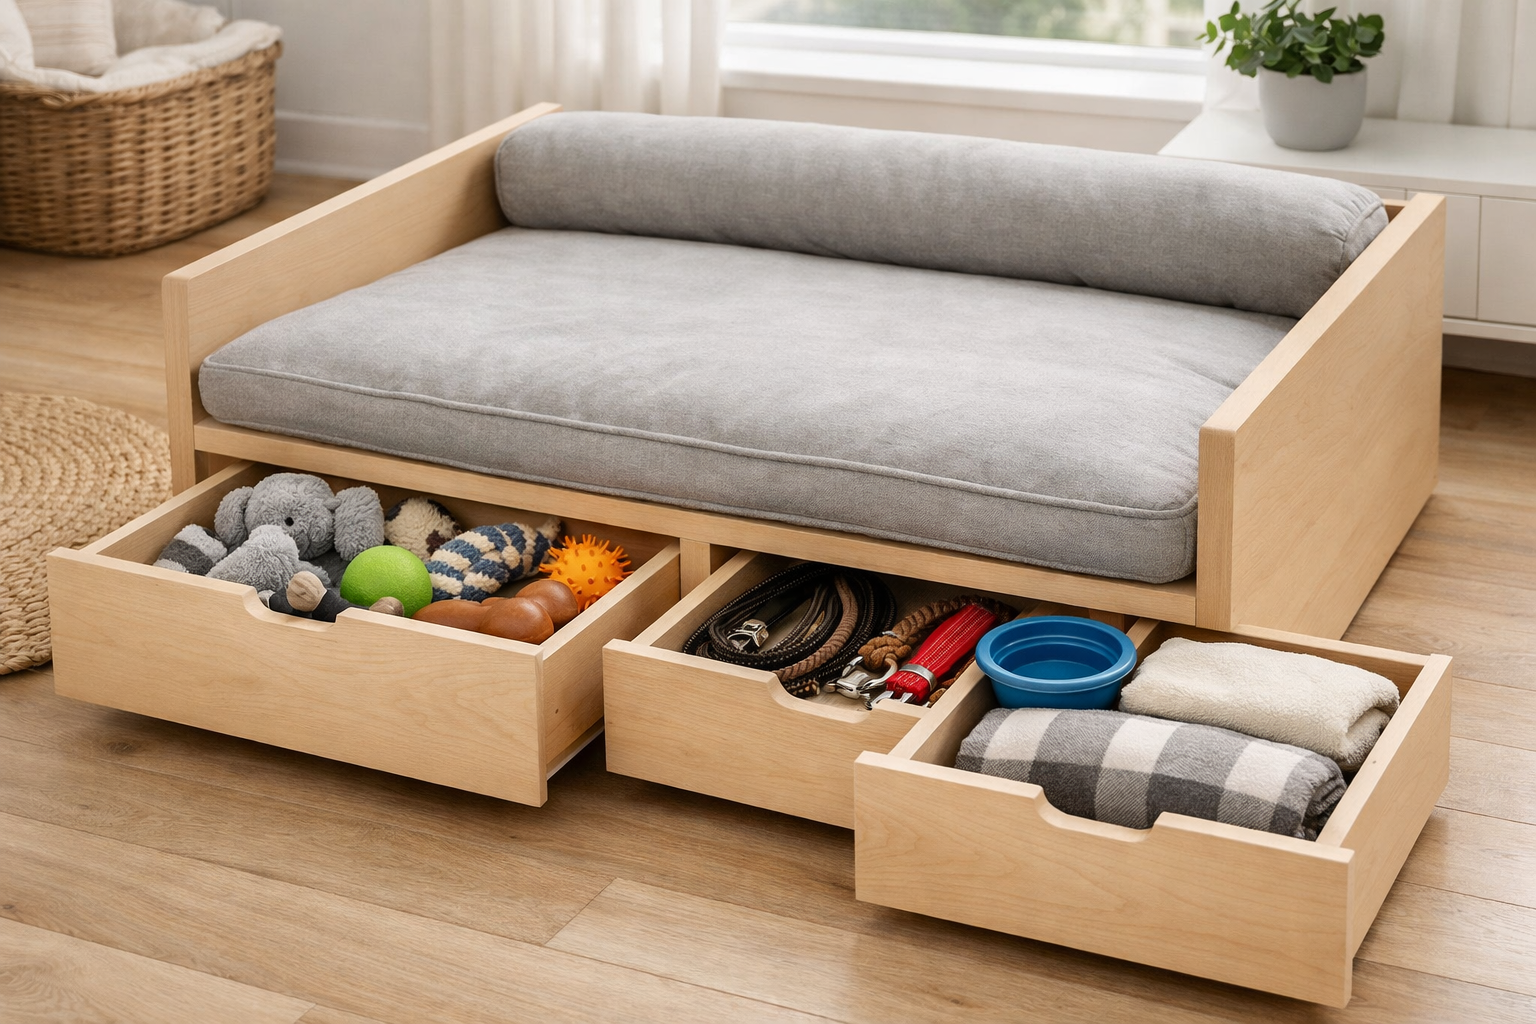
Consider the layout of the integrated storage. Common options include:
- Pull-out drawers: Ideal for toys and larger items.
- Lift-top compartments: Great for blankets or seasonal items.
- Open shelves: Suitable for bowls or easily accessible essentials.
Sketch out your design, considering dimensions, joinery types, and how the storage will function. This is also the stage to choose your wood. Hardwoods offer greater durability and resistance to wear, which is beneficial for pet furniture. High-quality plywood can also be an excellent choice, offering stability and cost-effectiveness. For inspiration, consider how designs like a modular home office desk system or a custom wooden record player console incorporate storage and clean lines.
Materials and Tools Required
A successful build starts with the right resources.
Essential Materials:
- Wood: Birch plywood (½” to ¾” thickness recommended for frame and drawers), solid hardwoods (e.g., maple, ash, or birch) for trim or legs.
- Wood Glue: High-strength wood glue.
- Fasteners: Wood screws (pocket hole screws if using a pocket hole jig), biscuits or dowels if using those joinery methods.
- Drawer Slides: Full-extension drawer slides (if building drawers).
- Pet Cushion: A comfortable, washable pet bed cushion that fits your planned dimensions.
- Wood Finish: Pet-safe, non-toxic clear coat, oil finish (e.g., Danish oil, beeswax), or low-VOC paint.
- Sandpaper: Various grits (80, 120, 180, 220).
Essential Tools:
- Safety Gear: Safety glasses, hearing protection, dust mask.
- Measuring Tools: Tape measure, ruler, square, marking knife.
- Cutting Tools: Circular saw, table saw, miter saw, jigsaw (for curves if desired).
- Joinery Tools: Pocket hole jig, biscuit joiner, or drill and doweling jig.
- Clamps: Various sizes for assembly.
- Drill: Cordless drill/driver.
- Sander: Orbital sander or sanding block.
- Router (Optional but Recommended): For decorative edges or dados.
- Wood Chisel Set (Optional): For fine adjustments in joinery.
Understanding how to effectively use your tools, such as mastering techniques on a router table or a band saw, will significantly improve the quality and precision of your build.
Building the Modern Scandinavian-Inspired Dog Bed Structure
With your design finalized and materials gathered, the real work of Building a Modern Scandinavian-Inspired Dog Bed with Integrated Storage for Pet Essentials begins. Precision in cutting and assembly is key to achieving a clean, professional look.
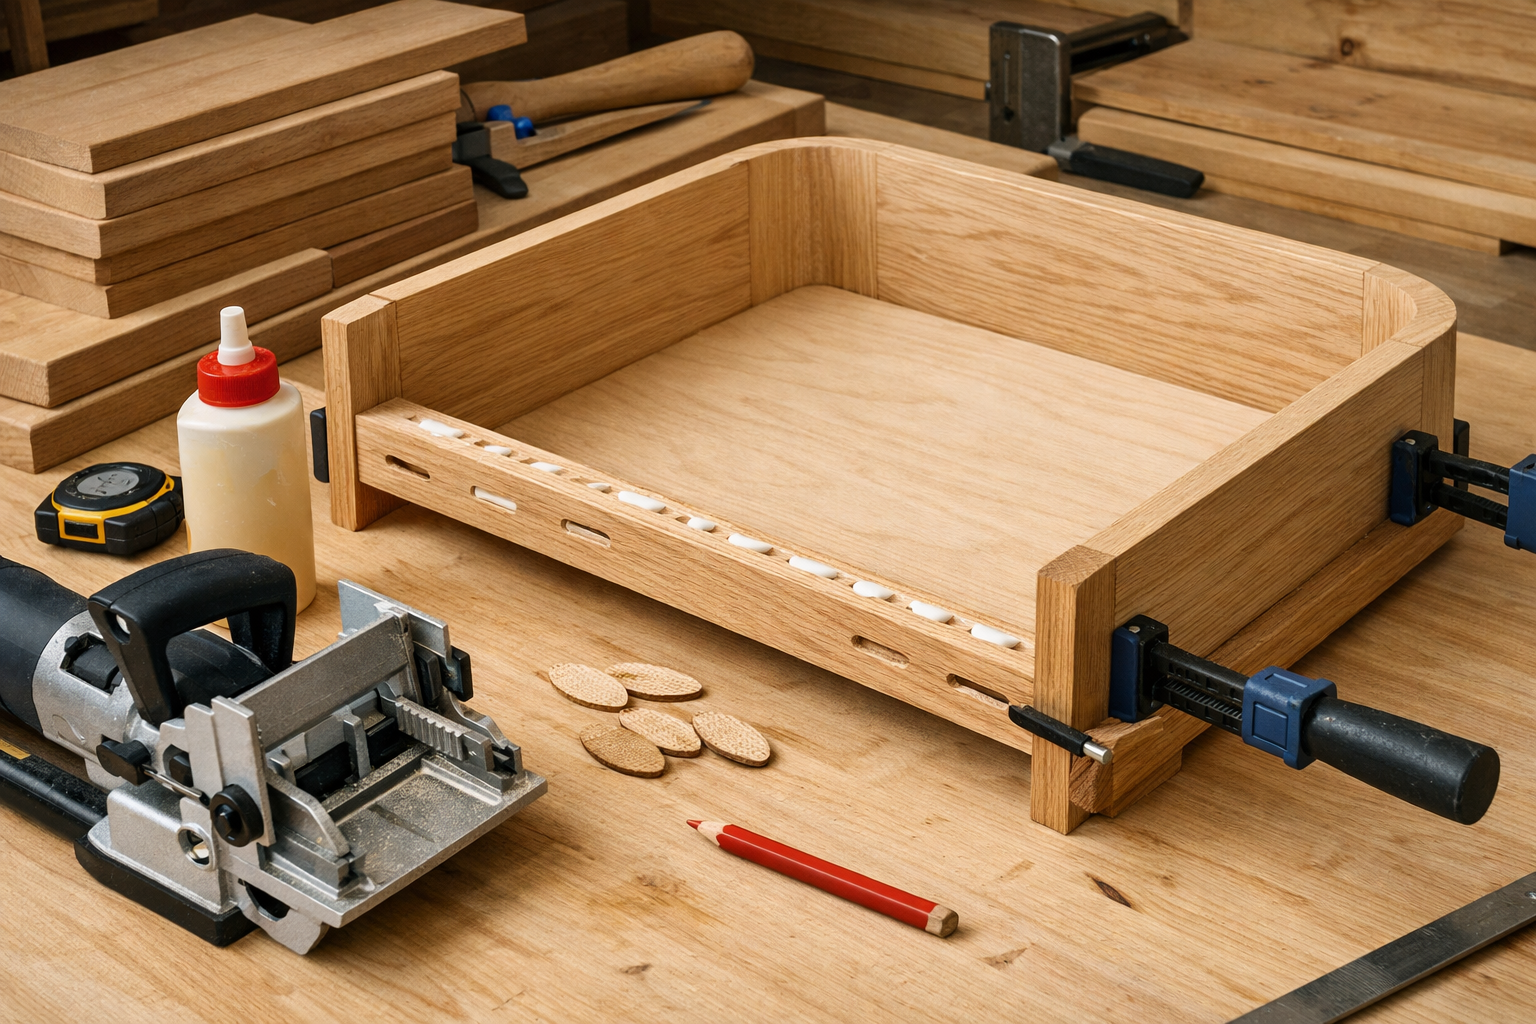
Cutting and Preparing Your Wood Components
Accuracy starts with careful measurements and precise cuts. Double-check all dimensions before cutting.
- Cut Main Panels: Start with the base, side panels, front, and back panels of the bed frame. If using plywood, ensure cuts are clean and splinter-free. A good saw blade and painter’s tape along the cut line can help prevent tear-out.
- Cut Storage Components: For drawers, cut the drawer box sides, fronts, backs, and bottoms. For lift-top compartments, cut the lid and supporting frame.
- Route Edges (Optional): If desired, use a router to create subtle chamfers or round-overs on the top edges of the bed frame for a softer, more refined look. This aligns with the “warm minimalism” aesthetic. Learn more about achieving this balance in Warm Minimalism in Woodworking: Balancing Clean Lines with Tactile Wood Materials.
- Sand Components: Before assembly, sand all individual pieces. Start with 80 or 120-grit to remove saw marks, then progress to 180 and finally 220-grit for a smooth finish. This is much easier to do now than after assembly.
Assembling the Bed Frame and Storage
The choice of joinery method impacts both strength and aesthetics. For a Scandinavian look, hidden joinery like pocket holes or biscuits (or dowels) are preferred over visible screws.
Assemble the Main Bed Frame:
- Attach the side panels to the front and back panels. Use wood glue and your chosen joinery method (e.g., pocket holes from the inside where they won’t be visible, or biscuits for strong, hidden joints).
- Ensure all corners are square before clamping. Allow the glue to dry completely.
- Install the base panel, which will support the pet cushion. This can be recessed slightly or flush with the top edge, depending on your design.
Construct Storage Compartments:
- Drawers: Assemble drawer boxes using dovetail joints (for maximum strength and classic look) or pocket holes/screws. For a cleaner look, mastering dovetail joinery is a valuable skill. Install drawer bottoms into dados routed into the drawer sides, or simply screw them to the bottom edges.
- Lift-Top: Create a sturdy frame for the lid to sit on, ensuring it aligns perfectly with the bed frame. Attach hinges for smooth operation.
Integrate Storage into the Bed Frame:
- Install drawer slides to the inside of the bed frame and onto the assembled drawers. Ensure they operate smoothly and are level.
- For lift-top compartments, ensure the lid fits snugly and the hinges are robust enough for repeated use.
This phase is critical for the overall stability and functionality. Take your time, re-measure, and use clamps generously to hold everything in place while glue dries.
Finishing Touches: Ensuring Comfort, Safety, and Style
The final steps in Building a Modern Scandinavian-Inspired Dog Bed with Integrated Storage for Pet Essentials involve finishing the wood, adding the cushion, and ensuring everything is pet-safe and durable.
Sanding and Finishing for a Pet-Safe Surface
A smooth, durable finish is essential for both aesthetics and your pet’s health.
- Final Sanding: After assembly and before applying any finish, perform a final sanding pass with 220-grit sandpaper to address any small imperfections or glue squeeze-out.
- Clean Surface: Use a tack cloth or a damp (not wet) cloth to remove all dust particles from the wood surface.
- Apply Pet-Safe Finish:
- Oils: Danish oil or tung oil provide a natural, matte finish that enhances the wood grain. They soak into the wood, offering good protection and are generally pet-safe once cured.
- Water-Based Polyurethane: A clear, low-VOC (Volatile Organic Compound) water-based polyurethane offers excellent durability and easy cleaning. Ensure it’s fully cured before your pet uses the bed.
- Beeswax/Mineral Oil: For a more natural, non-toxic option, consider a beeswax or mineral oil blend. These require more frequent reapplication but are completely safe.
Always check product labels for toxicity and curing times. Allow ample time for the finish to cure in a well-ventilated area before introducing your pet to the new bed. This ensures no harmful fumes remain.

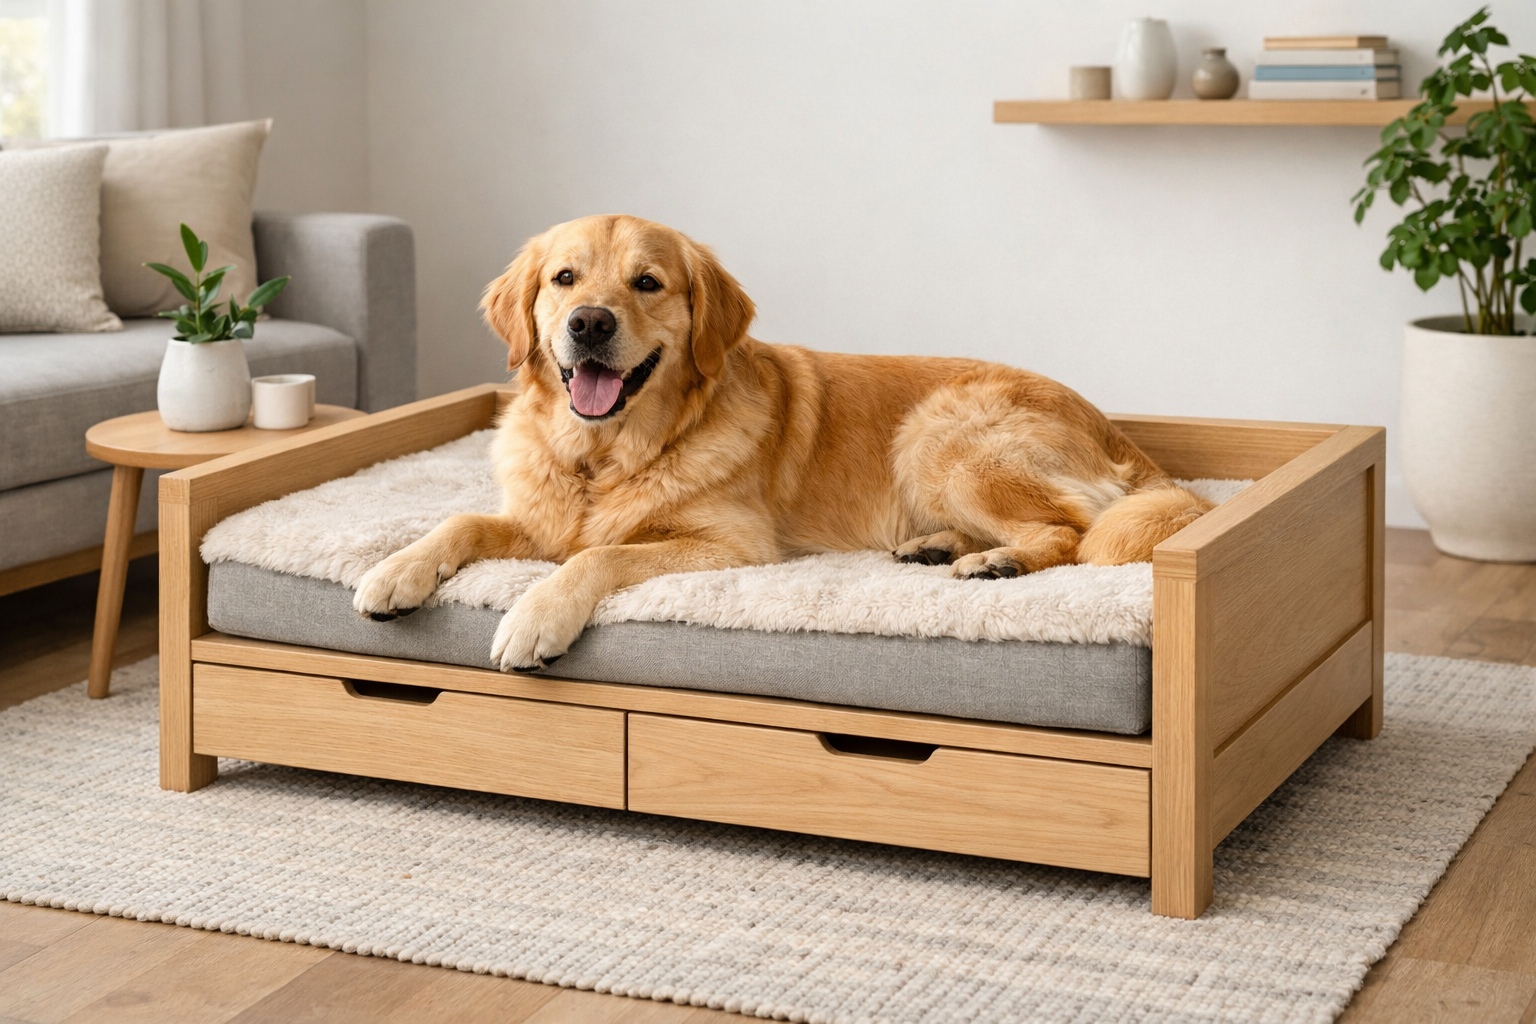
Adding the Pet Cushion and Styling
The pet cushion is where your dog’s comfort truly lies.
- Select the Right Cushion: Choose a high-quality, supportive, and washable cushion that fits perfectly within the bed frame. Memory foam or orthopedic cushions are excellent choices, especially for older dogs.
- Secure the Cushion (Optional): If your dog tends to move their cushion around, you can add non-slip pads to the bottom of the cushion or a few small Velcro strips to the bed’s base and cushion to keep it in place.
- Accessorize Thoughtfully: Store your dog’s favorite toys, leashes, and grooming tools neatly in the integrated compartments. This keeps your living space tidy while ensuring all pet essentials are within easy reach.
- Consider a small, woven basket inside a larger compartment for smaller items to maintain organization.
- A custom name tag or a small, framed photo of your pet could be placed nearby to personalize the space.
Maintenance and Durability for Long-Term Use
To ensure your Scandinavian-inspired dog bed lasts for years, regular maintenance is important.
- Clean Regularly: Wipe down the wood frame with a damp cloth to remove dust and pet hair. For deeper cleaning, use a mild, pet-safe wood cleaner.
- Wash Cushion Covers: Follow the manufacturer’s instructions for washing the pet cushion cover to maintain hygiene.
- Inspect Joinery: Periodically check all joints and fasteners for tightness, especially if your dog is particularly active.
- Reapply Finish: Depending on the finish chosen and wear, you may need to reapply a protective coat every few years to maintain the wood’s beauty and durability.
By focusing on durable materials, sound construction, and thoughtful finishing, your new dog bed will provide a comfortable, stylish, and organized space for your beloved companion for years to come. This project exemplifies how custom woodworking can enhance both functionality and aesthetic appeal in your home, much like building custom wooden TV stands or robust floating shelves.
Conclusion
Building a Modern Scandinavian-Inspired Dog Bed with Integrated Storage for Pet Essentials is a rewarding project that elevates pet furniture from a simple accessory to a key piece of functional home decor. By embracing the clean lines, natural materials, and smart storage solutions characteristic of Scandinavian design, you create a dedicated, comfortable space for your pet while simultaneously enhancing the organization and aesthetic appeal of your home. This venture is not just about craftsmanship; it’s about thoughtful living and creating a harmonious environment for every member of your household, furry ones included.
Actionable Next Steps:
- Measure Your Pet: Accurately determine the ideal dimensions for your dog’s comfort.
- Sketch Your Design: Create a detailed plan, including storage layout and joinery choices.
- Source Materials: Select high-quality, pet-safe wood and finishes.
- Gather Tools: Ensure you have the necessary woodworking tools and safety gear.
- Begin Building: Follow your plan carefully, prioritizing precision in cuts and assembly.
- Apply Finish: Choose a durable, non-toxic finish and allow it to cure fully.
- Enjoy: Introduce your pet to their new, stylish, and functional retreat!
References
- Dahlstrom, B. (2020). Scandinavian Style at Home. Ryland Peters & Small.
- Peterson, C. (2018). The Woodworking Handbook: Essential Skills and Techniques. Fox Chapel Publishing.
