


The quest for pristine audio quality in home theaters, recording studios, or even a cozy living room often leads enthusiasts down a rabbit hole of expensive, commercially produced acoustic treatments. However, a highly effective and significantly more budget-friendly path exists: Crafting Acoustic Diffusers and Absorbers from Scrap Wood: Enhance Your Home Audio with DIY Solutions. This comprehensive guide will illuminate how repurposing various scrap wood pieces can transform your auditory experience, turning unwanted echoes and muddy sound into crystal-clear fidelity. By understanding the principles of sound wave interaction and leveraging the natural properties of wood, anyone with basic woodworking skills can build functional and aesthetically pleasing panels that significantly improve their listening environment.
Key Takeaways
- Understand Acoustic Principles: Differentiate between sound absorption (reducing reflections) and diffusion (scattering sound) to choose the right panel type for specific room issues.
- Repurpose Scrap Wood: Utilize common woodworking offcuts like plywood, pine, oak, and even pallet wood to create cost-effective and eco-friendly acoustic treatments.
- Design for Function: Follow established acoustic design principles, such as QRD (Quadratic Residue Diffuser) patterns and resonant panel absorber concepts, for optimal performance.
- Prioritize Safety & Tools: Always use appropriate safety gear and ensure proper tool handling when cutting, gluing, and assembling wood components.
- Aesthetic Integration: Plan your DIY acoustic panels to complement your existing decor, turning functional elements into attractive design features.
Understanding Acoustic Principles and the Role of DIY Panels
Before embarking on Crafting Acoustic Diffusers and Absorbers from Scrap Wood: Enhance Your Home Audio with DIY Solutions, it’s crucial to grasp the fundamental concepts of acoustics. Sound waves travel through a room, bouncing off surfaces like walls, ceilings, and floors. These reflections can cause problems such as flutter echoes, standing waves, and excessive reverberation, leading to a less-than-ideal listening experience.

Acoustic panels serve two primary functions: absorption and diffusion.
- Acoustic Absorbers: These panels are designed to reduce the energy of sound waves, preventing them from reflecting back into the room. They typically achieve this by converting sound energy into a small amount of heat through porous materials. Common issues absorbers address include excessive reverberation (echo) and standing waves at specific frequencies.
- Acoustic Diffusers: Unlike absorbers, diffusers scatter sound waves. Instead of eliminating reflections, they break them up and spread them evenly throughout the room, preserving the natural ambiance while eliminating problematic echoes. This creates a more spacious and open soundstage, making the room feel larger acoustically. Diffusers are particularly valuable in critical listening environments where maintaining lively sound is important, but harsh reflections need to be tamed.
Choosing between an absorber and a diffuser, or combining both, depends on the specific acoustic challenges of your space. For instance, a room with too much echo benefits greatly from absorption, while a room that sounds “dead” might benefit more from diffusion to add naturalness back into the sound.
The Benefits of DIY Acoustic Solutions
Opting for DIY acoustic panels, particularly those made from scrap wood, offers several compelling advantages:
- Cost-Effectiveness: Purchasing pre-made acoustic panels can be expensive. Utilizing scrap wood significantly reduces material costs, making high-quality sound treatment accessible on a budget.
- Sustainability: Repurposing wood offcuts aligns with sustainable practices, reducing waste and giving new life to materials that might otherwise be discarded. This echoes the principles discussed in “Turning Shop Scraps into Design Features: Mixed-Wood Techniques and Offcut Utilization for Zero-Waste Woodworking” (https://woodcraftwiz.com/turning-shop-scraps-into-design-features-mixed-wood-techniques-and-offcut-utilization-for-zero-waste-woodworking/).
- Customization: DIY allows for complete control over size, shape, appearance, and specific acoustic properties, ensuring the panels perfectly fit your space and aesthetic preferences.
- Learning Experience: It’s an excellent opportunity to hone woodworking skills and gain a deeper understanding of acoustic principles.
Sourcing and Preparing Scrap Wood for Acoustic Panels
The beauty of Crafting Acoustic Diffusers and Absorbers from Scrap Wood: Enhance Your Home Audio with DIY Solutions lies in its resourcefulness. Nearly any type of scrap wood can be utilized, but understanding the properties of different woods can help optimize your panel’s performance and appearance.
Ideal Wood Types and Sourcing Strategies
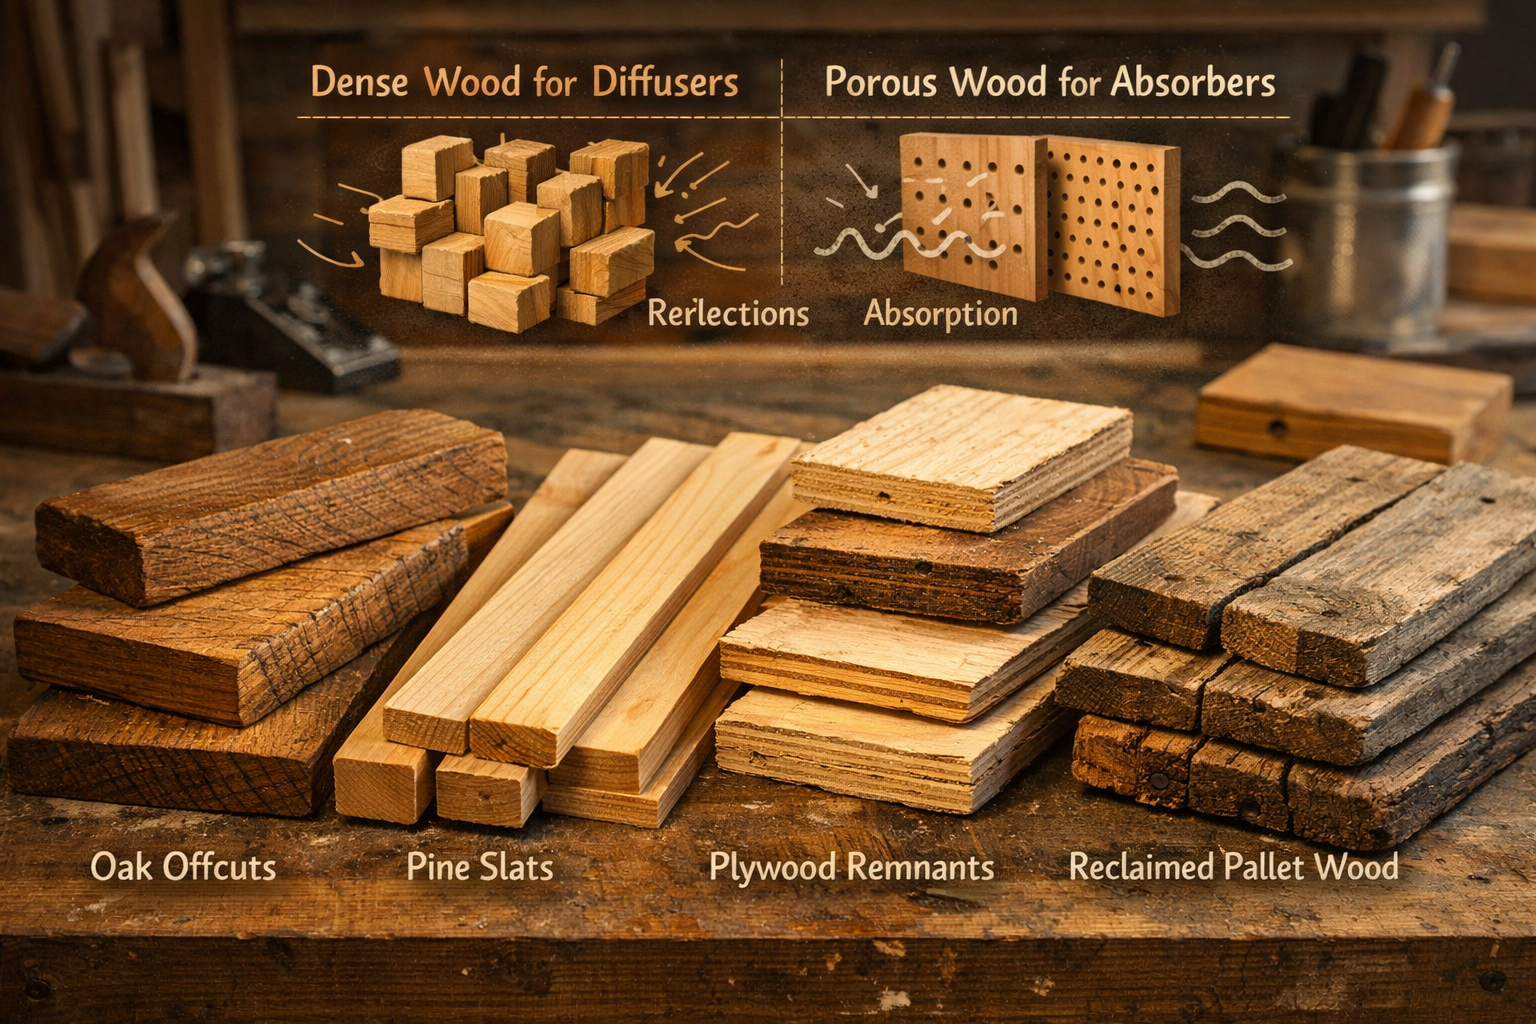
Different wood types offer varying densities and acoustic properties. For diffusers, denser woods are generally preferred for their ability to reflect and scatter sound effectively. For absorbers, the wood often serves as a frame or front panel for porous infill materials.
- Plywood Scraps: Excellent for backings or constructing the “wells” of a diffuser due to its stability and availability in various thicknesses.
- Pine/Fir Offcuts: Readily available, affordable, and easy to work with. Ideal for the varying block depths in diffusers or for constructing frames for absorbers.
- Oak/Maple/Hardwood Scraps: Denser and more resonant, these can be fantastic for high-quality diffuser elements, offering a premium look. Consider repurposing pieces from old furniture or cabinetry.
- Pallet Wood: A free and abundant resource. While it requires more preparation (denailing, cleaning, sanding), pallet wood can yield rustic and characterful panels. Ensure it’s untreated and clean.
- Wood Shims/Trim: Small pieces can be surprisingly useful for intricate diffuser designs or decorative elements on absorber frames.
Sourcing Tips:
- Local Woodworking Shops: Many shops have “scrap bins” they’re happy to let you pick through for free or a small fee.
- Construction Sites: With permission, you might find discarded lumber or plywood cut-offs.
- Furniture Manufacturers: Similar to woodworking shops, they often have offcuts perfect for smaller projects.
- Craigslist/Facebook Marketplace: Look for free wood listings or people clearing out workshops.
- Your Own Workshop: Don’t underestimate the pile of offcuts you might already have! Projects like “Building Custom Wooden TV Stands” (https://woodcraftwiz.com/building-custom-wooden-tv-stands-modern-media-consoles-with-cable-management-and-hidden-joinery/) often leave behind usable scraps.
Preparing Your Scrap Wood
Once sourced, proper preparation is key to successful and durable acoustic panels.
- Cleaning: Remove any dirt, dust, nails, staples, or other foreign objects. For pallet wood, this is particularly important.
- Drying: Ensure the wood is thoroughly dry to prevent warping or cracking after assembly.
- Dimensioning: Cut the wood to the required sizes for your chosen panel design. Precision is paramount, especially for diffusers where block depths and widths directly impact performance. A table saw or miter saw will be invaluable here. For smaller pieces, consider using a band saw for intricate cuts.
- Sanding: Lightly sand all surfaces, especially edges, to remove splinters and prepare for any desired finish. While not always acoustically critical, smooth surfaces are safer and more aesthetically pleasing.
- Finishing (Optional): Apply a clear finish, stain, or paint if desired. Low-VOC options are recommended, especially for indoor use. A natural oil finish can enhance the wood’s grain without significantly altering its acoustic properties. Our guide on “Sustainable Finishes for Reclaimed Wood” (https://woodcraftwiz.com/sustainable-finishes-for-reclaimed-wood-low-voc-recipes-and-application-tutorials/) provides excellent options.
DIY Acoustic Diffusers: Enhancing Sound Clarity
Acoustic diffusers are crucial for creating a more spacious and natural soundstage by scattering sound waves. Among the most popular and effective DIY designs is the Quadratic Residue Diffuser (QRD).
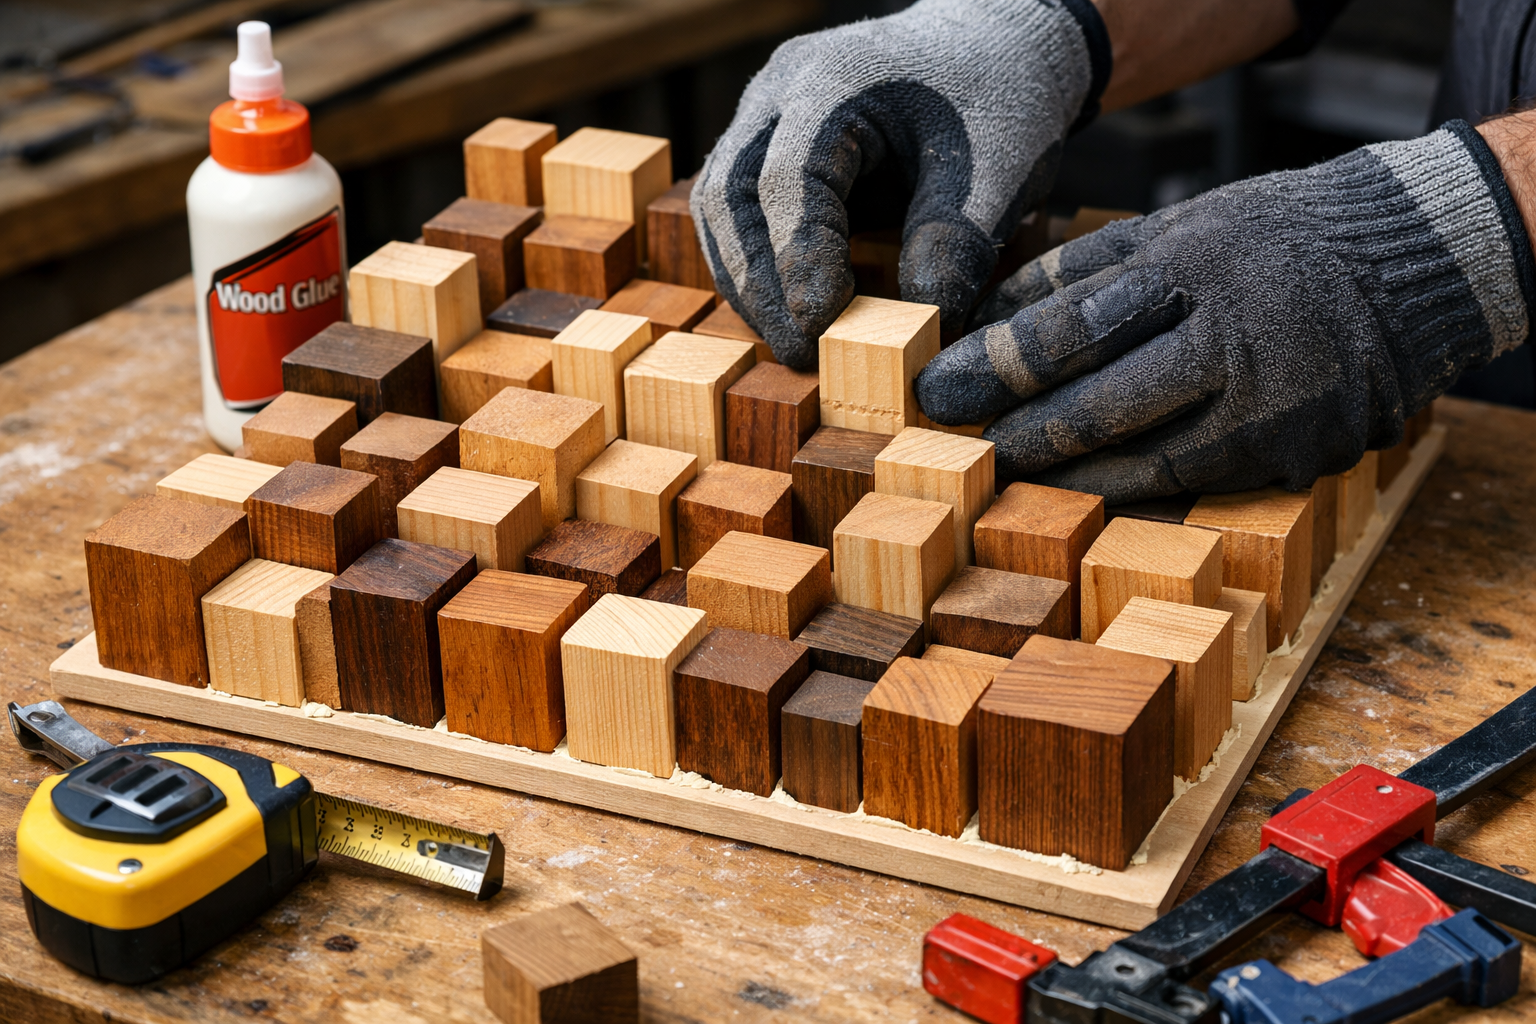
Building a Quadratic Residue Diffuser (QRD)
QRDs are designed using mathematical sequences to create wells of varying depths, which reflect sound waves at different times and angles, effectively scattering them across a wide frequency range.
Materials for a Basic QRD:
- Back Panel: A piece of plywood or MDF, typically 24×24 inches or 24×48 inches, at least 1/2 inch thick.
- Wood Blocks/Strips: Numerous pieces of scrap wood cut to a consistent width (e.g., 1.5 inches) and varying lengths (depths).
- Wood Glue: High-quality wood glue for strong bonds.
- Clamps: To hold pieces while glue dries.
- Saw: Table saw or miter saw for precise cuts.
- Measuring Tools: Tape measure, ruler, square.
- Sander: For finishing.
Design Principles (Simplified):
A QRD works by creating wells whose depths correspond to a specific mathematical sequence (e.g., the prime number 7 sequence: 0, 1, 4, 2, 2, 4, 1, 0). Each number represents a “depth unit.”
- Determine Panel Size and Number of Wells: A common design uses 7 or 11 wells across.
- Calculate Max Depth: This depends on the lowest frequency you want to diffuse. A general rule of thumb for a visually appealing diffuser is to have a max depth of 4-6 inches for home use. Let’s assume a max depth of 5 inches for our example (representing the highest number in your chosen sequence, multiplied by your depth unit).
- Determine Width of Each Well: Divide your panel width by the number of wells (e.g., 24 inches / 7 wells = approx. 3.4 inches per well).
- Create Depth Sequence: For a prime 7 QRD, the sequence of depths (in depth units) is usually 0, 1, 4, 2, 2, 4, 1. To get actual depths, multiply each number by a chosen “depth unit” (e.g., 1 inch). So, your block lengths would be 0″, 1″, 4″, 2″, 2″, 4″, 1″. (Note: The 0″ well means the base panel is exposed at that point).
- Cut Blocks: Cut your scrap wood strips to the calculated well widths and to the determined depth lengths. You’ll need multiple blocks for each depth across the width of the panel. For instance, if your panel is 24″ tall and your well width is 3.4″, you’d need approximately 7-8 blocks of each length per well column.
- Assembly:
- Lay out your back panel.
- Start gluing the cut wood blocks onto the back panel, following your calculated depth sequence. Ensure each block is flush and square.
- Use clamps to hold the blocks firmly while the glue dries.
- Repeat the sequence horizontally, creating a grid of varying depths.
Table: Example Prime 7 QRD Depths (1-inch depth unit)

| Well Number | Sequence Value | Actual Depth (inches) |
|---|---|---|
| 1 | 0 | 0 (base visible) |
| 2 | 1 | 1 |
| 3 | 4 | 4 |
| 4 | 2 | 2 |
| 5 | 2 | 2 |
| 6 | 4 | 4 |
| 7 | 1 | 1 |
Remember, accuracy in cutting and gluing is paramount for effective diffusion. Even small discrepancies can impact performance. This process of careful measuring and assembly is akin to the precision required for projects like “Building Robust Knife Blocks” (https://woodcraftwiz.com/building-robust-knife-blocks-custom-slots-safety-features-and-kitchen-display-designs-for-2026/).
DIY Acoustic Absorbers: Taming Room Reflections
Acoustic absorbers are designed to reduce reverberation and eliminate harsh reflections, making a room sound tighter and more controlled. While the primary absorbing material isn’t wood, scrap wood is invaluable for constructing the frames that hold these materials.
Building Framed Absorber Panels
The most common and effective DIY absorber panel involves a wooden frame filled with a porous, sound-absorbing material, then covered with fabric.
Materials for a Framed Absorber:
- Scrap Wood for Frame: 1×2 or 1×4 inch pine, fir, or even reclaimed pallet wood strips.
- Sound Absorbing Material: Rigid fiberglass (e.g., Owens Corning 703, Rockwool Safe’n’Sound) or dense mineral wool. Thickness of 2-4 inches is common.
- Fabric: Acoustically transparent fabric (e.g., burlap, speaker cloth, breathable cotton).
- Plywood/MDF Backing (Optional): Thin sheet for a more enclosed panel.
- Wood Screws/Brad Nails: For frame assembly.
- Staple Gun: For attaching fabric.
- Saw, Drill, Measuring Tools, Sander: Standard woodworking tools.
Construction Steps:
- Cut Frame Pieces: Cut four pieces of scrap wood to the desired length and width of your panel (e.g., 24×48 inches). You’ll create a rectangular or square frame.
- Assemble the Frame:
- Create a simple butt joint or miter joint for the corners.
- Apply wood glue to the joints and secure with wood screws or brad nails. Ensure the frame is square.
- For added stability, you can add cross braces if the panel is very large.
- Install Absorbing Material:
- Carefully cut your rigid fiberglass or mineral wool to fit snugly within the assembled frame. Always wear gloves, a dust mask, and long sleeves when handling these materials, as they can cause skin irritation.
- Place the cut material into the frame. It should fit tightly without gaps.
- Add Backing (Optional): If you desire a completely enclosed panel or plan to mount it away from the wall, attach a thin plywood or MDF backing to one side of the frame using screws or brad nails. This also helps contain the insulation.
- Wrap with Fabric:
- Lay your chosen acoustically transparent fabric face down on a clean surface.
- Place the assembled frame with the absorbing material (and optional backing) face down onto the center of the fabric.
- Pull the fabric taut over the edges of the frame.
- Begin stapling the fabric to the back edge of the frame, starting from the middle of each side and working your way towards the corners. Ensure the fabric is stretched tightly and evenly to avoid wrinkles.
- Fold the corners neatly, similar to wrapping a gift, and secure with staples.
- Finishing Touches: Trim any excess fabric. You can paint or stain the visible wooden frame if desired before wrapping.
Resonant Absorbers for Bass Frequencies
While porous absorbers tackle mid-to-high frequencies, low-frequency issues (bass traps) often require more specialized designs like resonant panel absorbers or Helmholtz resonators. Scrap wood can also be used to construct the enclosures for these. These are more complex projects but can yield significant improvements in bass response. For these advanced builds, understanding precise joinery becomes critical, similar to “Mastering Dovetail Drawers for Cabinets” (https://woodcraftwiz.com/mastering-dovetail-drawers-for-cabinets-hand-cut-and-router-jigs-for-seamless-furniture-integration/).
Placement and Integration
The effectiveness of your DIY acoustic panels depends heavily on their placement.
- First Reflection Points: For absorbers, target the first reflection points on side walls, ceiling, and rear wall. These are the spots where sound from your speakers reflects directly to your listening position. A simple mirror trick can help locate these: sit in your listening position and have a friend move a mirror along the walls until you can see the speaker’s reflection. That’s a first reflection point.
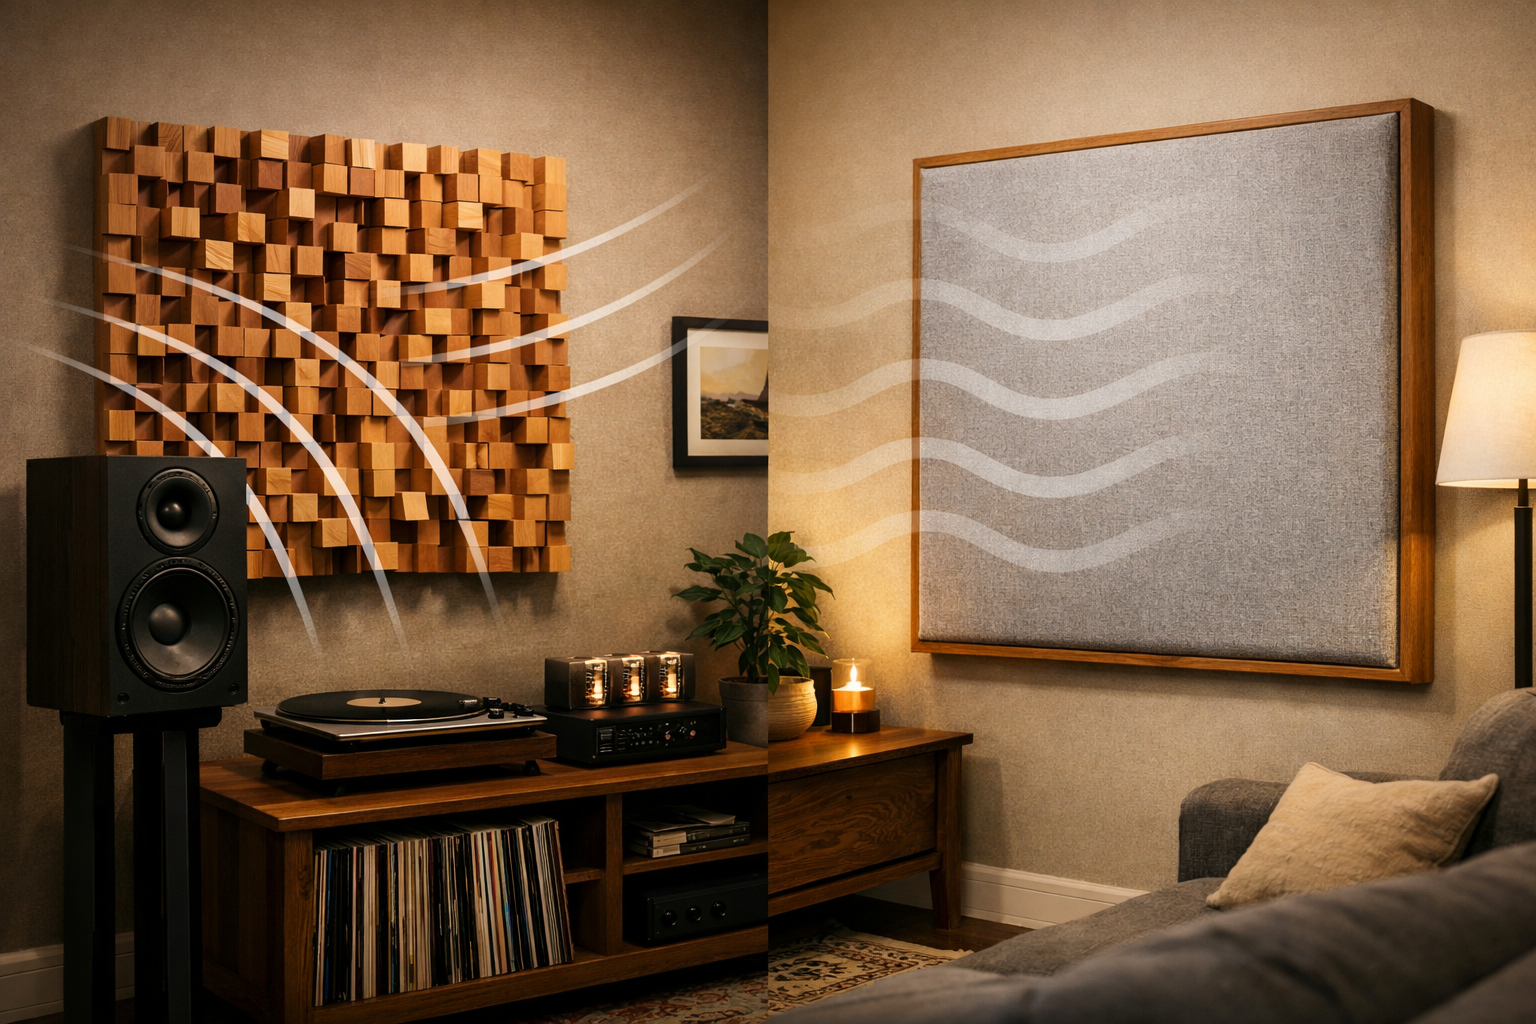
- Diffusers: Best placed on the rear wall behind the listening position, or on side walls further back from the speakers, to prevent flutter echoes and create a sense of spaciousness. Avoid placing diffusers directly behind speakers, as this can interfere with direct sound.
- Bass Traps: Corner placement is most effective for bass traps, as low frequencies tend to build up in room corners.
Integrating these panels aesthetically is also important. Consider painting the wooden frames to match your wall color, or choose fabrics that complement your interior design. The natural wood tones of diffusers can themselves be a design feature, creating a focal point. Check out “Narrative Interiors Through Woodworking” (https://woodcraftwiz.com/narrative-interiors-through-woodworking-sourcing-and-crafting-story-driven-pieces-in-2026/) for inspiration on how to make woodworking pieces tell a story within your home.
Conclusion
Crafting Acoustic Diffusers and Absorbers from Scrap Wood: Enhance Your Home Audio with DIY Solutions is a rewarding endeavor that significantly elevates your listening experience without breaking the bank. By understanding the basics of acoustics, sourcing readily available scrap wood, and applying fundamental woodworking techniques, you can create functional, effective, and visually appealing acoustic treatments for any room. The satisfaction of improving your home audio environment with your own hands, while also contributing to sustainable practices, is immense.
Beyond the immediate acoustic benefits, these projects offer a fantastic opportunity to deepen your woodworking skills and unleash your creativity. Experiment with different wood types, finishes, and diffuser patterns. The journey from a pile of offcuts to a finely tuned listening space is a testament to the power of DIY and the enduring versatility of wood.
Actionable Next Steps:
- Assess Your Room: Listen critically to your current audio setup. Identify specific problems: Is there too much echo? Is the bass boomy? Do voices sound unclear? This will guide your choice between absorbers and diffusers.
- Gather Materials: Start collecting scrap wood from local shops, construction sites, or your own workshop.
- Choose a Design: Select a diffuser or absorber design that suits your skills, available materials, and acoustic needs.
- Start Building: Take it one step at a time, prioritizing precision in cuts and strong joinery.
- Experiment with Placement: Once built, test different placements of your panels to find the optimal arrangement for your room’s acoustics.
Enhance your home audio, embrace sustainability, and enjoy the journey of Crafting Acoustic Diffusers and Absorbers from Scrap Wood: Enhance Your Home Audio with DIY Solutions in 2026.
References
- Cox, T.J., & D’Antonio, P. (2004). Acoustic Absorbers and Diffusers: Theory, Design and Application. Spon Press.
- Everest, F. A., & Pohlmann, K. C. (2015). Master Handbook of Acoustics (6th ed.). McGraw-Hill Education.
