

Creating Artisanal Wooden Serving Boards and Charcuterie Platters: Techniques for Food-Safe Finishes and Unique Designs
Step into the rewarding world of woodworking where functionality meets artistry. The demand for handcrafted, beautiful, and durable kitchenware, especially serving boards and charcuterie platters, has never been higher. Master the art of crafting beautiful and functional wooden serving boards and charcuterie platters, focusing on food-safe finishes, creative design elements, and techniques for preventing warping and cracking. This comprehensive guide, tailored for 2026, will explore everything from selecting the right wood to applying the perfect food-safe finish, ensuring your creations are not only stunning but also safe and long-lasting. Whether you’re a seasoned woodworker looking to refine your craft or a beginner eager to dive into a profitable niche, understanding the core principles of Creating Artisanal Wooden Serving Boards and Charcuterie Platters: Techniques for Food-Safe Finishes and Unique Designs is paramount.

Key Takeaways
- Wood Selection is Crucial: Choose dense, closed-grain hardwoods like maple, walnut, and cherry for durability and natural resistance to bacteria.
- Prevent Warping and Cracking: Proper wood acclimatization, grain orientation (edge grain or end grain), and controlled drying are essential for board stability.
- Achieve Food-Safe Finishes: Use non-toxic oils (mineral oil, tung oil) or wax blends (beeswax, carnauba) to protect the wood and make it safe for direct food contact.
- Embrace Unique Designs: Incorporate live edges, resin accents, contrasting wood inlays, or personalized engravings to create distinctive, high-value pieces.
- Maintenance Extends Lifespan: Educate users on proper cleaning and re-oiling to preserve the board’s beauty and food-safe properties.
Selecting the Right Wood for Artisanal Serving Boards
The foundation of any exceptional serving board or charcuterie platter lies in its material. Choosing the correct wood type is critical, influencing not only the board’s aesthetic appeal but also its durability, hygiene, and resistance to warping or cracking. For Creating Artisanal Wooden Serving Boards and Charcuterie Platters: Techniques for Food-Safe Finishes and Unique Designs, prioritize hardwoods with tight grains and natural antimicrobial properties.
Ideal Wood Types for Food Contact
When selecting wood, consider density, porosity, and natural oils. Here are some of the best choices:
- Maple (Hard Maple): A top contender, known for its extreme density, light color, and fine, uniform grain. It’s incredibly durable, resistant to knife marks, and naturally inhibits bacterial growth. Its light color also allows the natural beauty of charcuterie to stand out.
- Walnut (Black Walnut): Highly prized for its rich, dark brown hues and elegant grain patterns. Walnut is also very dense and durable, offering a luxurious aesthetic. It’s an excellent choice for boards where a darker, dramatic contrast is desired.
- Cherry: Features a beautiful reddish-brown color that darkens gracefully with age and exposure to light. Cherry is a moderately hard, closed-grain wood that provides good durability and a warm, inviting look.
- Sapele: Often mistaken for mahogany, Sapele is an African hardwood with a reddish-brown color and a distinctive ribbon-like grain pattern. It’s dense, stable, and a good sustainable alternative to traditional mahogany.
- Teak: While known for its water resistance, ensuring it’s plantation-grown and sustainably sourced is important. Teak’s natural oils make it highly durable, but its strong aroma might transfer to food if not properly sealed.
- Oak (White Oak): While less common than maple or walnut for serving boards due to its more open grain, white oak is a dense and durable option. Its pores contain tyloses, which make it resistant to liquid penetration, a useful property for food service.
{{IMG_SLOT_1}}

Wood Grain Orientation: Edge Grain vs. End Grain
The way wood fibers are oriented profoundly impacts a board’s stability and longevity.
- Edge Grain (Long Grain): This is the most common and often preferred orientation for serving boards. The wood planks are cut with the grain running along the length of the board. Edge grain boards are stable, resistant to warping, and offer a continuous grain pattern. They are durable and excellent for general serving.
- End Grain: Created by arranging small blocks of wood with their end grain facing upwards, resembling a checkerboard pattern. While more complex to construct, end grain boards are exceptionally durable and “self-healing,” as knife cuts go between the wood fibers rather than severing them, making them popular for cutting boards. However, for serving boards, the primary advantage is aesthetic and stability against deep cuts, rather than needing its “self-healing” properties. The unique visual appeal of end-grain patterns can also be a significant design feature.
Sourcing and Preparing Wood
Always source your wood from reputable suppliers. Look for kiln-dried lumber to ensure stability and prevent future cracking. When working with raw lumber, allow it to acclimate to your workshop’s environment for several weeks before milling. For information on preparing raw materials, consider exploring resources on live edge slab selection and preparation.
Pro Tip: Avoid softwoods (pine, cedar) and highly porous woods (red oak) as they are less durable, more prone to staining, and can harbor bacteria. Exotic woods should be researched for toxicity before use with food.
Crafting Techniques and Design Elements
Beyond material selection, the craftsmanship and design elements transform a simple piece of wood into an artisanal serving board. Creating Artisanal Wooden Serving Boards and Charcuterie Platters: Techniques for Food-Safe Finishes and Unique Designs involves careful shaping, smoothing, and personalizing.
Shaping and Milling
- Rough Cutting: Begin by cutting your chosen lumber to approximate dimensions. A table saw or band saw is ideal for this. For curves or irregular shapes, a band saw is indispensable.
- Planing and Jointing: Achieve perfectly flat and square stock. A jointer creates one flat face and one square edge, while a planer brings the opposite face parallel to the first.
- Glued-Up Panels: For wider boards or end-grain designs, glue multiple strips of wood together. Use waterproof, food-safe wood glue and clamp firmly. Allow adequate drying time.
- Final Shaping: Use a band saw, jigsaw, or even a router with a template to cut the final desired shape. Consider organic, free-form shapes, traditional rectangles, or unique geometric designs.
- Edge Profiling: Router tables are excellent for adding decorative or ergonomic edges. Common profiles include a round-over, chamfer, or ogee. This not only enhances aesthetics but also makes the board easier to handle. You can find more information on mastering the router table to explore various edge profiles.
Sanding and Smoothing
Achieving a silky-smooth surface is paramount for both aesthetics and food safety.
- Progressive Grits: Start with a coarser grit (e.g., 80-120) to remove milling marks and significant imperfections. Progress systematically through finer grits (150, 180, 220, 320, 400).
- Wet Sanding (Optional): After sanding to 220 grit, lightly dampen the wood surface with water. This raises any compressed wood fibers, allowing them to be sanded off with a finer grit once dry, resulting in an even smoother finish.
- Dust Removal: Thoroughly remove all sanding dust between grits and before applying finish. Compressed air, a tack cloth, or a vacuum with a brush attachment works well.
Unique Design Elements
This is where your artistic vision truly comes to life.
- Live Edges: Embrace the natural, untrimmed edge of the slab. This organic feature adds rustic elegance and makes each board truly one-of-a-kind. Ensure the bark is removed and the live edge is thoroughly cleaned and sanded smooth.
- Contrasting Wood Inlays: Cut precise channels or recesses into the board and inlay strips of contrasting wood (e.g., dark walnut into light maple). This creates striking visual patterns. Tools like a router or specialized chisels are used for this. For advanced techniques, consider exploring advanced wood carving techniques.
- Resin Accents: Incorporate food-safe epoxy resin to fill natural voids, cracks, or create decorative “rivers” through the board. Pigments can be added to the resin for vibrant color accents.
- Handle Design: Integrate ergonomic handles directly into the board’s design, or attach stylish metal or leather handles for ease of carrying. Router jigs can help create consistent handle cutouts.
- Personalization: Laser engraving or hand carving initials, logos, or intricate patterns adds significant value and makes the board a perfect gift. Learn more about engraved wooden coasters with custom designs for inspiration on engraving techniques.
- Juice Grooves: A shallow channel routed around the perimeter of the board helps contain liquids from fruits, meats, or cheeses. This is a functional detail that enhances the board’s utility.
Applying Food-Safe Finishes and Preventing Warping
The final, and arguably most critical, step in Creating Artisanal Wooden Serving Boards and Charcuterie Platters: Techniques for Food-Safe Finishes and Unique Designs is applying a finish that protects the wood, enhances its beauty, and ensures it’s safe for food contact. Equally important are strategies to prevent common issues like warping and cracking.
Understanding Food-Safe Finishes
Not all finishes are created equal when it comes to direct food contact. Always choose products explicitly labeled “food-safe” or those composed of naturally food-safe ingredients.
- Mineral Oil: This is the most common and easiest food-safe finish. It’s a non-drying oil that penetrates the wood, conditioning it and bringing out the natural grain. It needs to be reapplied regularly.
- Application: Apply generously with a clean cloth, allow it to soak in for several hours (or overnight), then wipe off any excess. Repeat several times for initial saturation.
- Beeswax/Mineral Oil Blend: A popular choice for a more durable and water-resistant finish. The wax provides a protective barrier on the surface while the oil conditions the wood.
- Application: Melt beeswax with mineral oil (typically a 1:4 wax-to-oil ratio by weight). Apply the warm (not hot) mixture generously, let it penetrate, then buff to a soft sheen with a clean cloth.
- Pure Tung Oil: A natural, drying oil derived from the tung tree nut. It penetrates deeply, hardens, and provides a durable, water-resistant, and food-safe finish. It’s important to use 100% pure tung oil and not “tung oil finish,” which often contains varnishes and solvents. Tung oil is a nut-based product, so inform customers with nut allergies.
- Application: Apply thin coats with a brush or cloth, allowing each coat to dry completely (which can take 24-72 hours) before applying the next. Several coats are recommended.
- Walrus Oil or Other Specialty Food-Safe Finishes: Several brands offer proprietary blends of food-safe oils and waxes (e.g., Walrus Oil, Howard Butcher Block Conditioner). These are often excellent, pre-formulated options.
{{IMG_SLOT_2}}

Important Considerations:

- Drying vs. Non-Drying Oils: Mineral oil is non-drying, meaning it never truly cures and needs reapplication. Tung oil is a drying oil, curing to a hard finish.
- Allergies: Be mindful of potential nut allergies if using tung oil or other nut-based oils. Always disclose ingredients if selling your boards.
- Maintenance: All wooden serving boards, regardless of finish, require regular re-oiling to prevent drying out and cracking.
Preventing Warping and Cracking
Wooden serving boards are susceptible to environmental changes. Understanding how to mitigate these risks is crucial for long-lasting creations.
- Proper Wood Drying and Acclimatization: Always start with kiln-dried wood. Allow it to sit in your workshop for several weeks before cutting to allow it to fully acclimate to the local humidity.
- Grain Orientation (Revisited): As discussed, edge grain offers good stability. For larger boards or those prone to moisture changes, end grain construction, while more complex, can provide superior stability and resistance to warping.
- Balanced Design: If gluing up multiple pieces, ensure the grain direction of adjacent pieces is alternated to counteract opposing forces, promoting overall flatness.
- Equal Finishing on All Sides: Apply your chosen food-safe finish equally to all surfaces of the board – top, bottom, and all edges. This helps to equalize moisture absorption and release, preventing one side from drying or expanding faster than another, which causes warping.
- Proper Storage: Advise users to store boards flat or upright in a dry environment. Avoid storing near heat sources (ovens, radiators) or in direct sunlight.
- Avoid Dishwashers: The extreme heat and prolonged moisture in dishwashers are devastating to wooden boards, leading to immediate warping, cracking, and damage to the finish. Hand washing only.
By meticulously following these finishing and prevention techniques, you’ll ensure your artisanal wooden serving boards and charcuterie platters are not only visually stunning but also functional, durable, and safe for years of enjoyment.
Marketing and Selling Your Artisanal Creations
Once you’ve mastered Creating Artisanal Wooden Serving Boards and Charcuterie Platters: Techniques for Food-Safe Finishes and Unique Designs, the next step is to share your craft with the world. There’s a strong market for high-quality, handmade items, and wooden serving boards are particularly popular.
Crafting Your Brand Story
Every artisanal product has a story. What makes your boards unique?
- Materials: Highlight the specific wood species you use, emphasizing sustainability, local sourcing, or unique characteristics like live edges.
- Process: Share snippets of your creation process – from raw lumber to the final polished product. People appreciate the effort and skill involved.
- Inspiration: What inspires your designs? Is it nature, modern aesthetics, or traditional woodworking?
- Care Instructions: Provide clear care instructions with every board sold. This demonstrates professionalism and helps customers preserve their purchase.
Photography and Presentation
High-quality photographs are non-negotiable for online sales and marketing.
- Natural Light: Shoot in abundant natural light to accurately capture wood tones and grain.
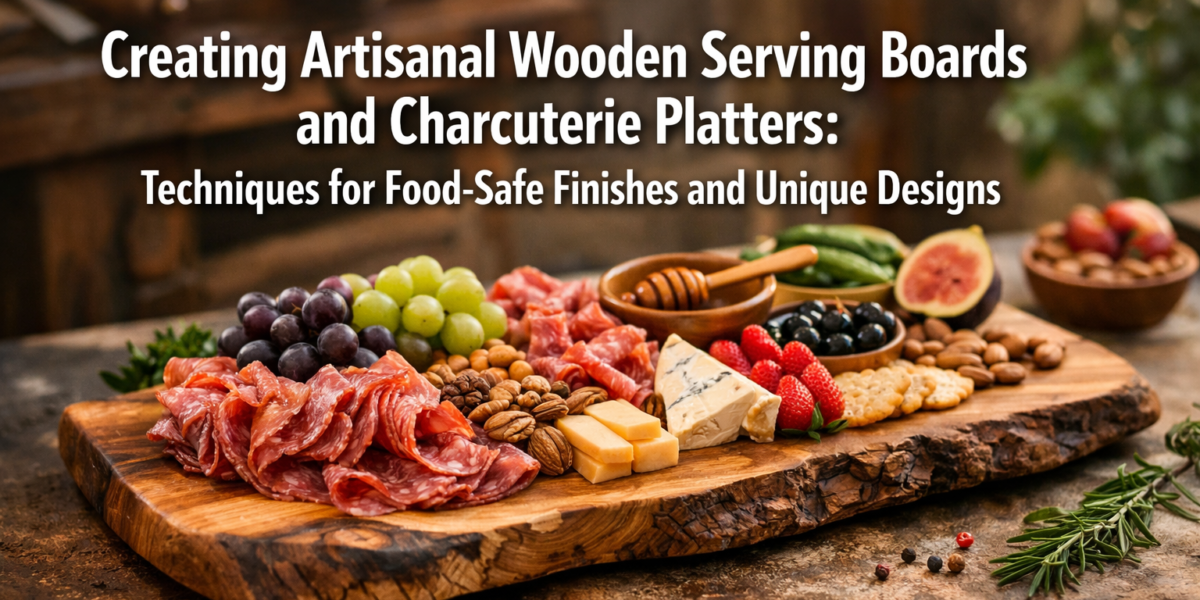
- Styling: Present your boards beautifully, perhaps with a curated selection of cheeses, fruits, and crackers to showcase their intended use.
- Multiple Angles: Include shots of the full board, close-ups of unique details (inlays, live edges, engraving), and different perspectives.
- Lifestyle Shots: Show the board in a home setting to help customers visualize it in their own space.
Pricing Your Boards
Pricing can be challenging for handmade items. Consider:
- Material Costs: Wood, glue, finish, sandpaper, packaging.
- Labor Costs: Estimate your hourly rate and the time spent on each board. Don’t undervalue your skills!
- Overhead: Workshop rent, tools, utilities.
- Market Value: Research what similar artisanal boards are selling for.
- Uniqueness: Unique designs, complex joinery, or personalized elements can command higher prices.
Sales Channels
- Online Marketplaces: Platforms like Etsy, Shopify, or your own e-commerce website offer broad reach.
- Local Craft Fairs and Markets: Excellent for direct customer interaction, storytelling, and immediate sales.
- Local Boutiques and Galleries: Consignment or wholesale arrangements can get your products into curated retail spaces.
- Social Media: Instagram and Pinterest are highly visual platforms perfect for showcasing your boards. Use relevant hashtags like #charcuterieboard #woodworking #handmade #artisan.
- Collaborations: Partner with local cheesemongers, caterers, or event planners.
{{IMG_SLOT_3}}

Remember, your artisanal boards are not just functional items; they are pieces of art crafted with passion and skill. By effectively communicating their value and beauty, you can build a thriving business around your woodworking passion. For ideas on profitable woodworking projects, consider profitable beginner woodworking.
Conclusion
Creating Artisanal Wooden Serving Boards and Charcuterie Platters: Techniques for Food-Safe Finishes and Unique Designs is a deeply satisfying endeavor that blends the precision of woodworking with artistic expression. From the initial selection of durable, food-safe hardwoods like maple and walnut to the meticulous shaping, sanding, and application of non-toxic finishes, every step contributes to a final product that is both beautiful and functional. By understanding grain orientation, employing techniques to prevent warping, and embracing unique design elements such as live edges or intricate inlays, woodworkers in 2026 can produce truly exceptional pieces. The journey of crafting these boards is a continuous learning process, but the reward of seeing your creations become cherished centerpieces in homes is unparalleled.
For those eager to dive deeper, remember to explore different wood types, experiment with diverse finishes, and continually refine your design aesthetic. The market for bespoke, high-quality wooden serving ware is robust, offering ample opportunity for skilled artisans. Keep learning, keep creating, and always prioritize both beauty and safety in your woodworking projects.
Meta Title: Crafting Artisanal Wood Serving Boards: Food-Safe Finishes & Designs Meta Description: Master techniques for creating artisanal wooden serving boards & charcuterie platters in 2026. Learn food-safe finishes, prevent warping, & design unique pieces.
