


The hum of a well-tuned saw, the smell of freshly cut lumber, the satisfaction of a perfectly joined piece – woodworking is a deeply rewarding craft. However, the pursuit of this passion can often lead to cramped, disorganized, and physically demanding workspaces, especially in small to medium-sized shops. Without a thoughtful design, fatigue, inefficiency, and even injury can become unwelcome companions. This comprehensive guide focuses on Creating Ergonomic Workshop Layouts: Maximizing Space and Workflow in Small to Medium-Sized Woodworking Shops by providing actionable strategies to transform your workspace into a safe, efficient, and comfortable haven for craftsmanship in 2026.
An ergonomic workshop isn’t just about comfort; it’s about optimizing every movement, minimizing wasted time, and safeguarding your long-term health. It involves strategic tool placement, efficient material handling, and intelligent storage solutions that work with you, not against you. By integrating ergonomic principles from the ground up, woodworkers can enhance productivity, reduce physical strain, and ultimately enjoy their craft more fully.

Key Takeaways
- Plan Meticulously: Begin with a detailed assessment of your space, tools, and typical projects. Sketching and digital planning are crucial first steps.
- Optimize Workflow Zones: Divide your shop into distinct, interconnected zones for milling, cutting, assembly, and finishing to minimize unnecessary movement.
- Embrace Mobility & Modularity: Utilize mobile bases for machinery and modular storage systems to adapt your space to different project needs.
- Prioritize Ergonomics: Implement adjustable-height work surfaces, proper lighting, and readily accessible tools to reduce strain and prevent injuries.
- Integrate Smart Storage: Leverage vertical space, wall-mounted solutions, and dedicated storage for lumber, tools, and hardware to keep your shop clutter-free.
The Foundation: Initial Planning and Assessment for an Ergonomic Workshop
Before moving a single tool or buying a new shelf, a thorough planning phase is essential for Creating Ergonomic Workshop Layouts: Maximizing Space and Workflow in Small to Medium-Sized Woodworking Shops. This involves understanding your current setup, envisioning your ideal workflow, and making the most of your available square footage.
Taking Stock of Your Space and Tools
Start by accurately measuring your workshop’s dimensions. Note the location of windows, doors, electrical outlets, and any immovable obstacles like support beams or water heaters. Create a scaled drawing or use digital layout software.
Next, inventory all your tools – stationary and handheld. Measure their footprints, especially for large items like a table saw, planer, or band saw. Don’t forget to account for the necessary clearance around these machines for safe operation and material handling. For example, a table saw needs significant infeed and outfeed space, which often dictates its optimal placement.
Consider the types of projects you typically undertake. Are you mostly building small boxes, or do you frequently work with 8-foot sheets of plywood and long lumber? The size of your common materials will heavily influence your layout decisions, particularly for cutting and assembly areas.

Mapping Your Workflow: The “Flow” in Workflow
Understanding your typical project workflow is paramount. Most woodworking projects follow a general path:
- Material Storage: Where raw lumber, sheet goods, and project components are kept.
- Milling/Dimensioning: Breaking down rough stock – using a planer, jointer, table saw, or miter saw.
- Joinery/Shaping: Cutting dados, rabbits, mortises, tenons, or curves – using a router table, band saw, or specialized jigs.
- Assembly: Gluing, clamping, and fastening components together.
- Sanding/Finishing: Preparing surfaces and applying protective finishes.
- Tool Storage/Cleaning: Returning tools, cleaning up sawdust, and waste disposal.
The goal is to arrange your workshop so that material flows logically from one stage to the next with minimal backtracking, crossing paths, or unnecessary lifting. Think of it like a production line for your projects. This reduces fatigue and saves precious time.
💡 Pull Quote: “A well-designed workshop allows the woodworker to spend more time creating and less time searching, moving, or resetting.”
Sketching and Digital Planning Tools
Once you have your measurements and workflow in mind, it’s time to put pen to paper (or mouse to screen).
- Grid Paper & Templates: Draw your workshop outline to scale on grid paper. Create paper cutouts (also to scale) for each major tool. This allows you to physically move them around to test different arrangements.
- Digital Layout Software: For a more precise approach, consider free or paid software. Programs like SketchUp, SmartDraw, or dedicated workshop planners allow for 3D visualization, which is incredibly helpful for anticipating spatial conflicts and workflow issues. These tools can even help you plan your lighting and electrical drops.
Example Planning Checklist:
| Aspect | Consideration |
|---|---|
| Space Dimensions | Length, width, ceiling height, door/window locations, immovable fixtures. |
| Tool Inventory | List all stationary and handheld tools, their dimensions, and power requirements. |
| Material Sizes | Common lengths of lumber, sheet goods dimensions, project component sizes. |
| Workflow Sequence | Map out typical project steps. Identify frequently used tool sequences. |
| Electrical Access | Number and location of outlets. Consider dedicated circuits for high-draw tools. |
| Dust Collection | Plan for main runs, drops to stationary tools, and mobile solutions. Learn more about building a mobile dust collection cart. |
| Lighting | Assess natural light; plan for ambient, task, and accent lighting to minimize shadows and eye strain. |
| Future Expansion | Leave some flexibility for new tools or changes in project scope. |
Optimizing Workflow and Smart Storage Solutions
The heart of Creating Ergonomic Workshop Layouts: Maximizing Space and Workflow in Small to Medium-Sized Woodworking Shops lies in creating logical workflow zones and implementing intelligent storage.
Defining Workflow Zones
Divide your workshop into distinct functional areas. This minimizes crisscrossing and keeps related tasks grouped together.
- Cutting/Milling Zone: This often centers around your table saw, miter saw, jointer, and planer. Ensure ample space for maneuvering full sheets of plywood or long boards. Place lumber storage nearby.
- Assembly Zone: A dedicated, clear workbench is crucial here. This area should be free of clutter and ideally near clamps, glue, and fasteners. For insights into suitable glues, explore The Ultimate Guide to Wood Glue.
- Finishing Zone: Ideally, this area should be as dust-free as possible. It may be a dedicated corner or a temporary space that can be quickly cleared. Good ventilation is key.
- Hand Tool Zone: A separate bench or area for hand tools, sharpening stations, and intricate work.
- Storage Zone: Dedicated areas for lumber, sheet goods, hardware, jigs, and small tools.
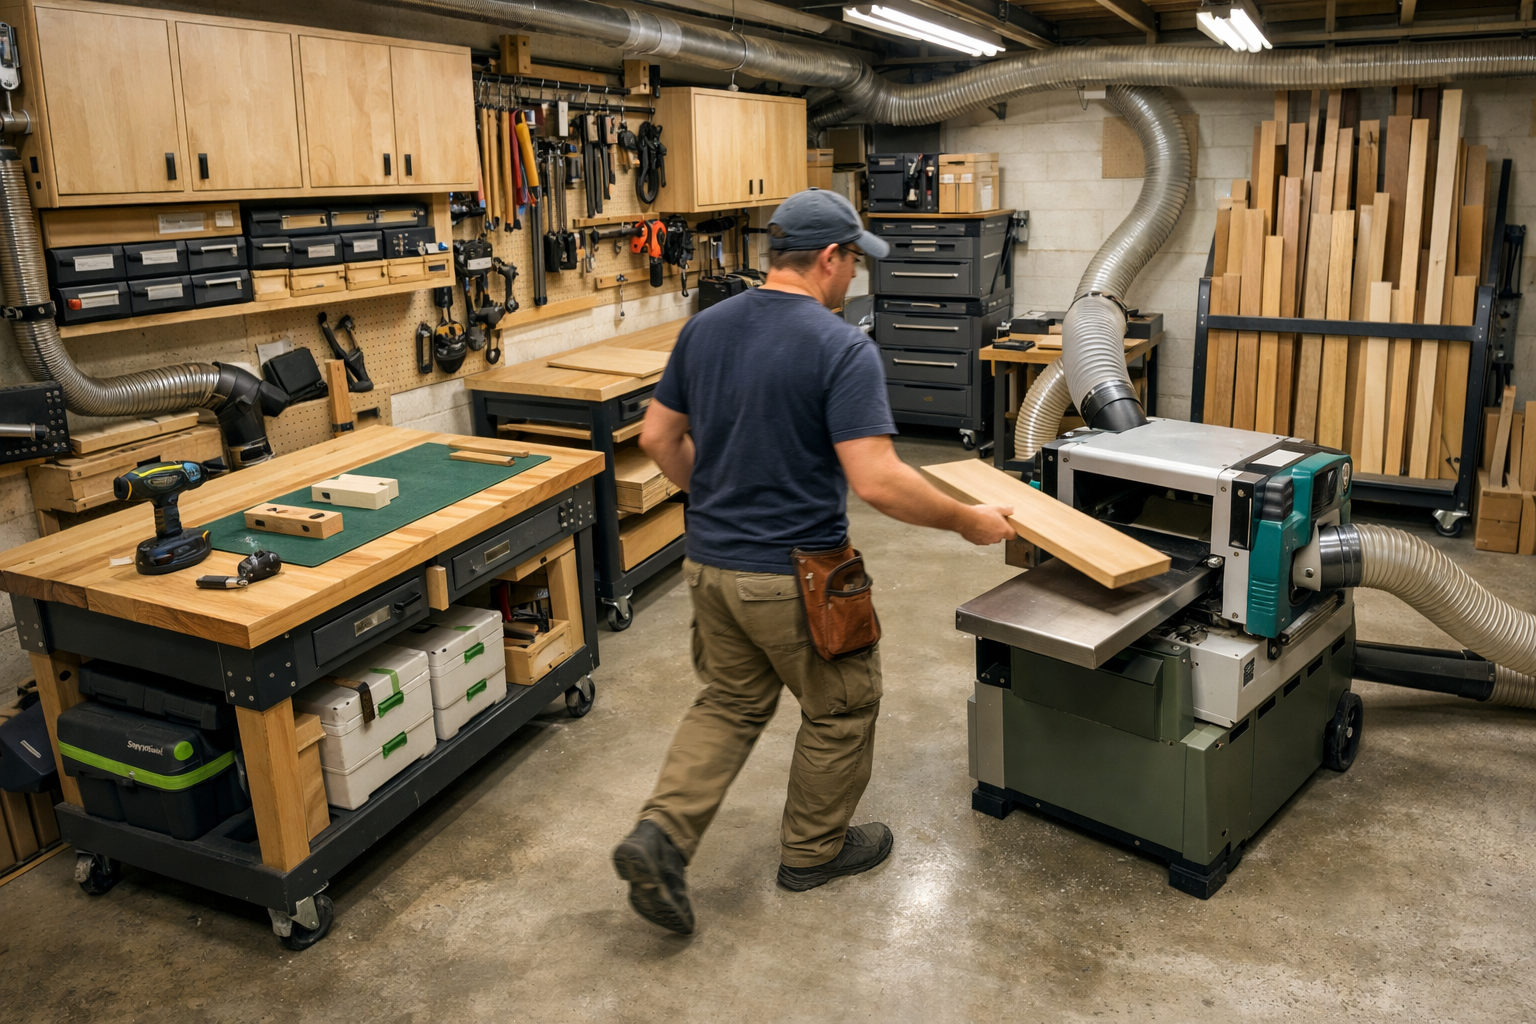
Embracing Mobility and Modularity
In small and medium-sized shops, flexibility is king.
- Mobile Tool Bases: Put all stationary tools (table saw, band saw, router table, etc.) on heavy-duty mobile bases. This allows you to reconfigure your shop for different tasks or move tools out of the way when not in use. This is particularly useful for maximizing your effective work area. For router table usage, check out Choosing and Using Router Tables.
- Multi-purpose Workbenches: A workbench that can serve multiple functions – assembly, sanding, or even as an outfeed table for your table saw – can save significant space. Consider building a workbench with integrated storage or casters.
- Modular Storage Systems: Wall-mounted French cleat systems, customizable shelving units, and rolling cabinets offer incredible adaptability. They allow you to organize tools and materials efficiently and change configurations as your needs evolve. Explore options for building modular wood storage systems and smart workshop storage solutions.
Vertical Storage and Dedicated Organization
Don’t neglect your walls and ceiling. Vertical space is often underutilized.
- Wall-mounted Tool Storage: Pegboards, French cleats, and custom racks keep hand tools visible and accessible, freeing up valuable bench space.
- Overhead Storage: For long, lighter lumber or rarely used items, overhead racks can be a lifesaver. Ensure they are safely secured and within reach via a sturdy step stool.
- Dedicated Lumber Racks: Store lumber vertically or on cantilever racks to keep it organized and off the floor. Consider different storage methods for various lengths and types of wood.
- Hardware and Fastener Organizers: Clear bins, drawer systems, and wall-mounted dispensers keep small items sorted and easily found.
- Jig and Template Storage: Build specific holders for jigs and templates to protect them and ensure they are ready when needed. This prevents clutter and damage.
👷 Tip: Regularly declutter and reorganize. An ergonomic layout is a living system that requires periodic maintenance to remain efficient.
Ergonomic Principles and Safety Integration in Your Workshop
Even the most optimized layout can fall short if it doesn’t prioritize the woodworker’s health and safety. Creating Ergonomic Workshop Layouts: Maximizing Space and Workflow in Small to Medium-Sized Woodworking Shops must include thoughtful ergonomic considerations.

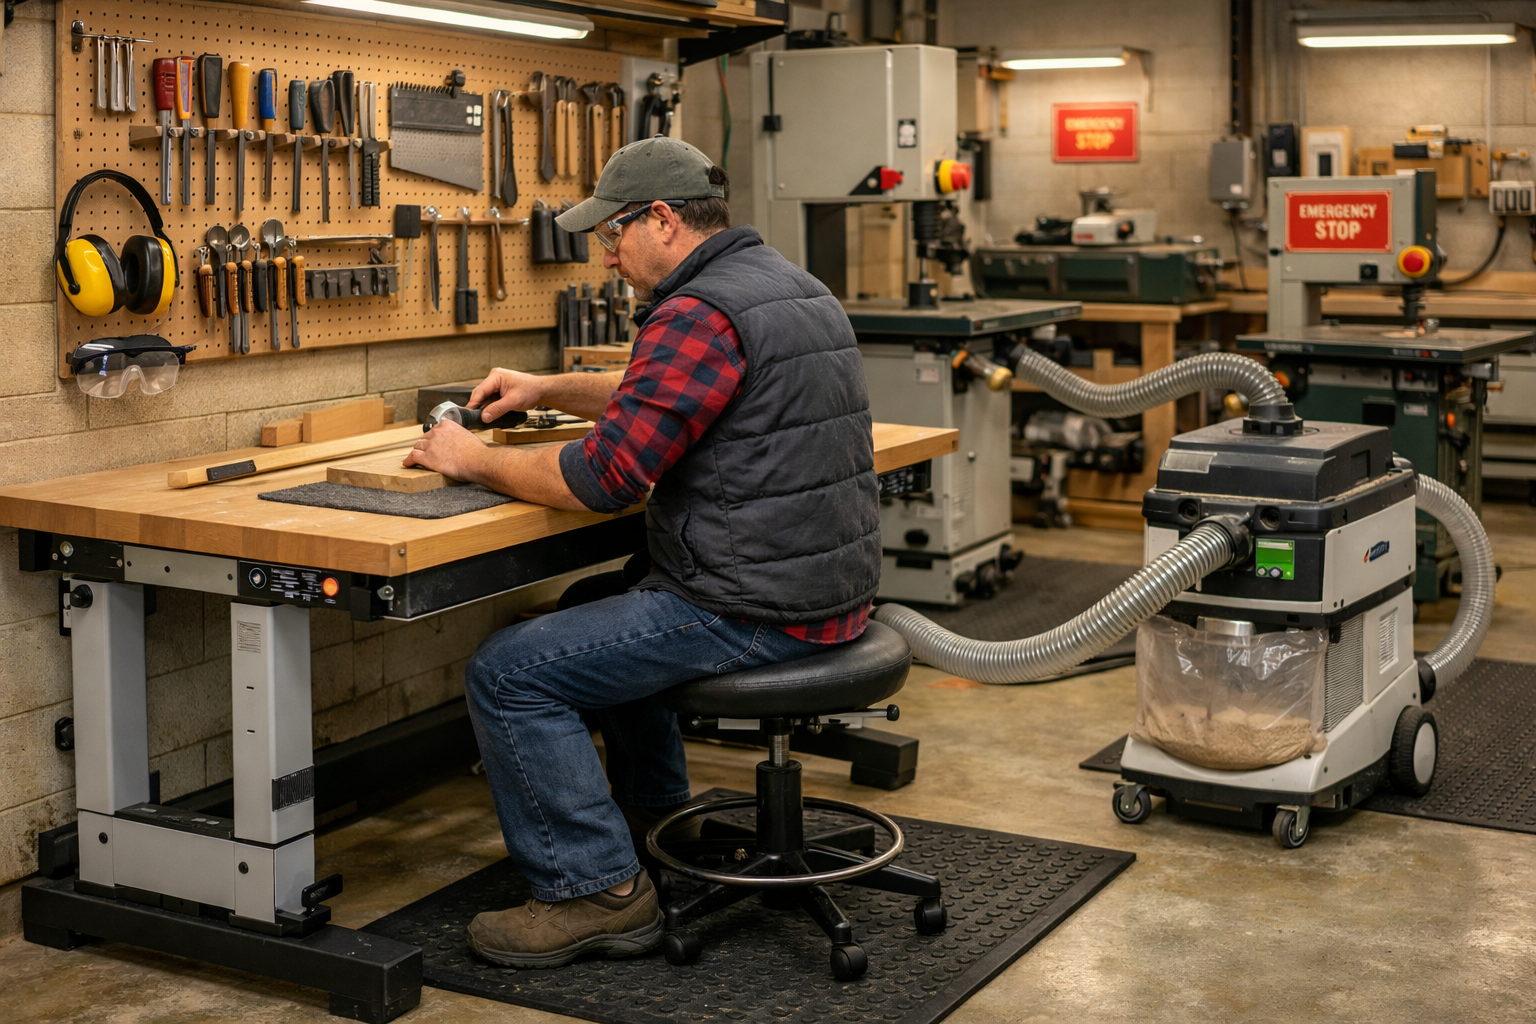
Adjustable Work Surfaces and Seating
Repetitive bending, reaching, and awkward postures contribute to musculoskeletal disorders.
- Adjustable-Height Workbenches: These are a game-changer. They allow you to set the perfect working height for various tasks, whether it’s fine detail work, heavy assembly, or power tool operation. This reduces strain on your back and shoulders. For those who enjoy DIY ergonomics at home, consider making a DIY Home Office Ergonomics.
- Anti-Fatigue Mats: Place these in front of stationary tools where you stand for extended periods. They absorb shock and reduce leg and back fatigue.
- Proper Seating: For tasks that require sitting, use an adjustable stool or chair that provides good lumbar support.
Lighting and Environmental Control
Good lighting and air quality are critical for safety and comfort.
- Layered Lighting: Combine ambient (general overhead), task (focused light over workbenches and machines), and accent lighting. Minimize shadows and ensure sufficient brightness for detail work without glare. LED lighting is energy-efficient and provides excellent illumination.
- Dust Collection Systems: A robust dust collection system is non-negotiable for health. Connect stationary tools, use ambient air filters, and have a shop vacuum with appropriate attachments for cleanup. Fine dust is a serious respiratory hazard.
- Ventilation: Ensure good airflow, especially if you do any finishing with volatile organic compounds (VOCs). Cross-ventilation or exhaust fans are vital.
- Climate Control: If possible, regulate temperature and humidity to protect both your health and your wood stock.
Tool Accessibility and Point-of-Use Storage
Tools should be where you need them, when you need them.
- Zone-Specific Tool Placement: Store tools closest to where they are primarily used. Hand planes near the workbench, router bits near the router table, saw blades near the table saw.
- Visual Organization: Keep tools visible. Pegboards, open shelving, and clear drawer fronts help you quickly locate what you need without rummaging.
- Dedicated Small Tool Stations: Create small, self-contained stations for tasks like sharpening, drilling, or routing. This keeps specialized tools grouped and ready.
Safety Features and Practices
Ergonomics inherently includes safety.
- Clear Pathways: Ensure all aisles and paths are free from obstructions. This prevents tripping hazards and allows for safe movement of large materials.
- Emergency Stops: Know where the emergency stop buttons are on your machinery and ensure they are easily accessible.
- Personal Protective Equipment (PPE) Storage: Have dedicated, visible storage for safety glasses, hearing protection, dust masks, and gloves. Make it easy to grab and use.
- First-Aid Station: A well-stocked first-aid kit should be readily available and clearly marked.
- Fire Extinguisher: Keep a fire extinguisher (rated for wood and electrical fires) in an accessible location.
By incorporating these ergonomic and safety principles, your workshop will not only be more efficient but also a much healthier and more enjoyable place to work on your woodworking projects.
Conclusion
Creating Ergonomic Workshop Layouts: Maximizing Space and Workflow in Small to Medium-Sized Woodworking Shops is an investment that pays dividends in productivity, safety, and personal enjoyment. By thoughtfully planning your space, optimizing workflow zones, embracing mobility, and integrating smart storage solutions, you transform a potentially chaotic environment into a streamlined creative sanctuary. Prioritizing adjustable work surfaces, layered lighting, robust dust collection, and dedicated safety measures ensures that your passion for woodworking remains a source of pleasure, not strain or injury.
Take the time in 2026 to assess your current setup, draw out your ideal layout, and implement these strategies incrementally. Even small changes can yield significant improvements. Remember, your workshop is an extension of your craft – make it work for you.
Actionable Next Steps:
- Measure and Map: Accurately diagram your current shop and inventory all tools and materials.
- Analyze Workflow: Identify common movement patterns and bottlenecks in your project process.
- Sketch New Layouts: Experiment with different zone configurations on paper or with digital software.
- Implement Gradually: Start with mobile bases for key tools and simple vertical storage solutions.
- Review and Adjust: Regularly evaluate your layout and make adjustments as your projects and tools evolve.
By following these steps, you’ll be well on your way to a highly functional, ergonomic woodworking workshop that supports your creativity and well-being for years to come.
