

Tired of working in an echo chamber or dealing with muddy sound in your home studio? Imagine a space where every saw cut is crisp, every strum of a guitar string rings true, and conversations are clear and comfortable. The good news is that you don’t need to break the bank to achieve this. Craft effective wooden acoustic panels and diffusers to reduce noise and improve sound quality in your workshop, or extend your skills to create stylish, functional decor for home recording studios or media rooms. This comprehensive guide will walk you through the process of creating DIY Acoustic Panels and Diffusers: Improving Workshop Sound and Creating Home Studio Decor, transforming your challenging acoustic environments into serene and sonically pleasing spaces in 2026.
Key Takeaways
- DIY acoustic treatments offer a cost-effective solution for improving sound quality and reducing echo in workshops and home studios.
- Acoustic panels primarily absorb sound, reducing reverberation, while diffusers scatter sound, making a space sound larger and more natural.
- Common materials like rock wool or rigid fiberglass, plywood, and breathable fabric form the core of effective DIY panels.
- Understanding your room’s acoustic challenges is crucial before deciding on the type and placement of panels and diffusers.
- Building these treatments is a rewarding woodworking project that significantly enhances both functionality and aesthetics.
Understanding Acoustics: Absorption vs. Diffusion in DIY Acoustic Panels and Diffusers
Before diving into construction, it’s essential to grasp the fundamental principles of acoustic treatment. Sound in any enclosed space behaves in complex ways, bouncing off hard surfaces, creating echoes, and muddying the overall sound experience. Effective acoustic treatment addresses these issues through two primary mechanisms: absorption and diffusion.

The Problem: Unwanted Reflections and Reverberation
Every room, especially those with many hard, flat surfaces like a typical workshop or a sparse studio, suffers from excessive sound reflections. When sound waves hit these surfaces, they bounce back, creating echoes (discrete reflections) and reverberation (a collection of reflections that prolong the sound). This leads to:
- In workshops: Increased noise levels, difficulty hearing spoken instructions or safety alerts, and a generally fatiguing environment. Imagine trying to use your power tools for decorative wood projects with a constant drone and echo.
- In home studios: Poor recording quality, inaccurate monitoring, and a “boxy” or “muddy” sound that makes mixing difficult.
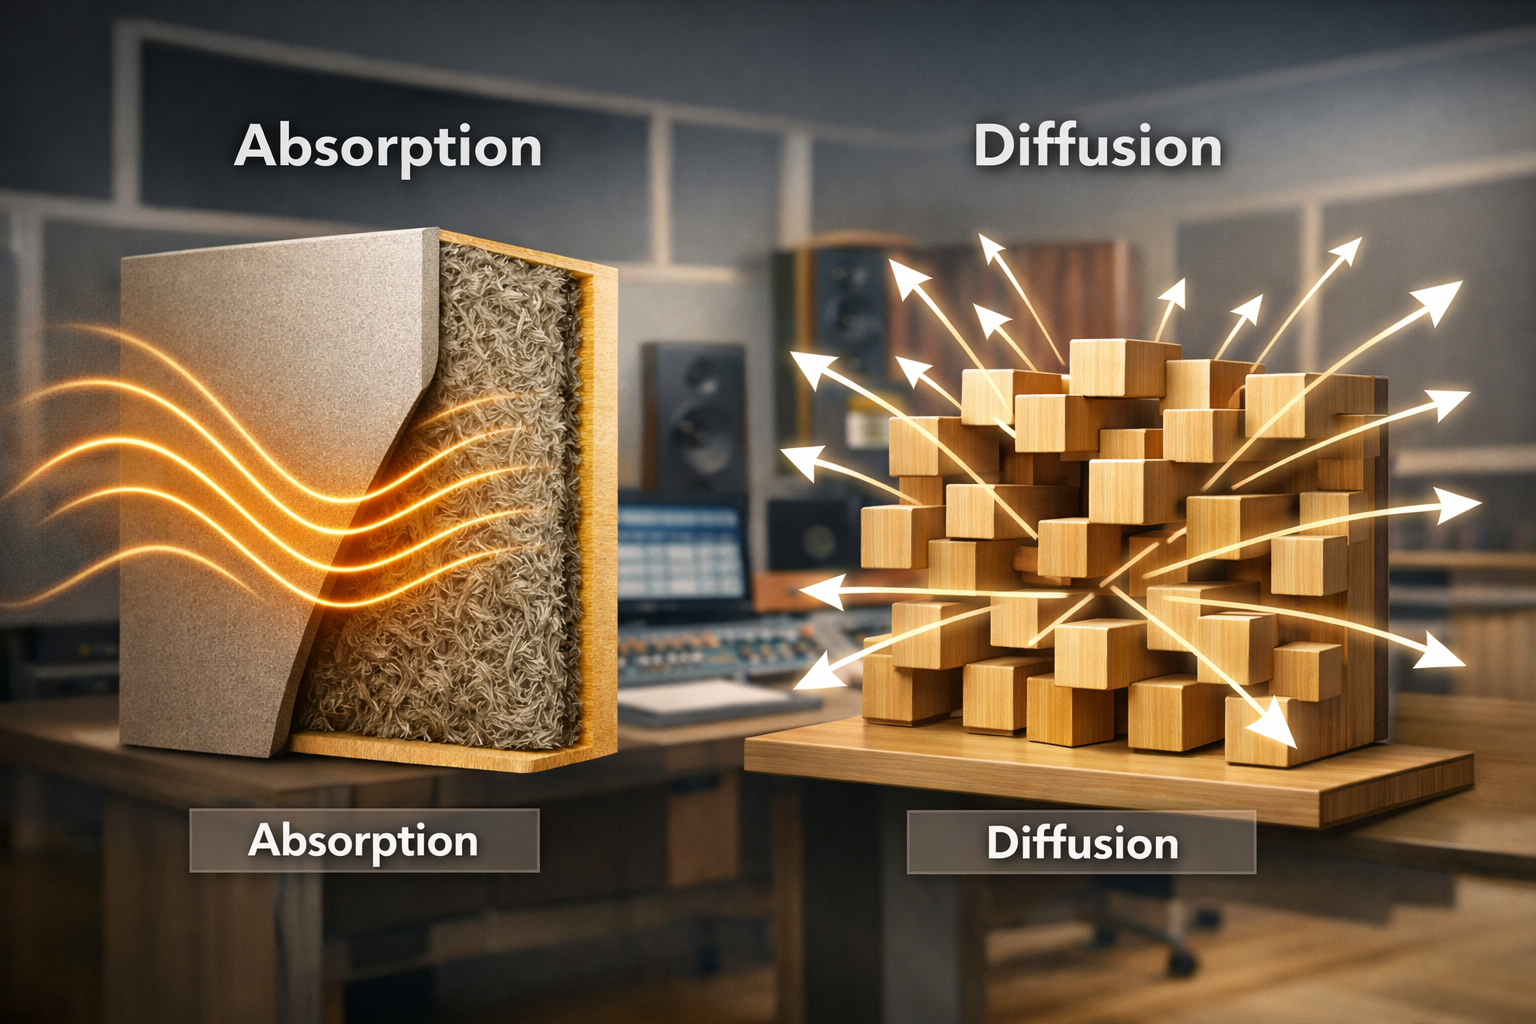
Absorption: Taming the Echo
Acoustic panels are designed for sound absorption. They convert sound energy into a small amount of heat energy, preventing it from reflecting back into the room. This effectively reduces reverberation time and controls echoes.
Key characteristics of absorbent materials:
- Porous and fibrous, allowing sound waves to penetrate and get trapped.
- Density plays a role; materials like rock wool or rigid fiberglass are highly effective.
- Thickness is crucial, especially for absorbing lower frequencies. Thicker panels absorb a broader range of frequencies.
In a workshop, absorption panels help to quiet down machinery noise and improve speech intelligibility. In a studio, they are vital for controlling primary reflections and reducing overall room decay, leading to cleaner recordings and more accurate monitoring.
Diffusion: Spreading the Sound
While absorption “kills” sound reflections, diffusion “scatters” them. Diffusers work by breaking up sound waves and redirecting them in multiple directions, rather than absorbing them entirely. This has several benefits:
- Maintains “liveliness”: Unlike too much absorption, which can make a room sound “dead,” diffusers help maintain a sense of space and natural ambiance.
- Widens the soundstage: In a listening environment, diffusion can make the room sound larger than it actually is, creating a more enveloping and accurate stereo image.
- Reduces flutter echoes: Diffusers are excellent for breaking up repetitive reflections between parallel surfaces.
The most common type of DIY diffuser is the Quadratic Residue Diffuser (QRD), which uses wells of varying depths to scatter sound effectively.
“A well-treated room balances absorption and diffusion, creating an environment that is both quiet enough for focused work and lively enough for natural sound reproduction.”
Building DIY Acoustic Panels: Materials, Design, and Construction
Creating your own acoustic panels is a straightforward woodworking project that yields significant results. Here’s how to tackle DIY Acoustic Panels and Diffusers: Improving Workshop Sound and Creating Home Studio Decor.
Essential Materials for Acoustic Panels
The beauty of DIY panels lies in using readily available and affordable materials.
- Acoustic Insulation: This is the heart of your panel.
- Rock Wool (Mineral Wool): Excellent sound absorption properties, especially for lower frequencies. Brands like Roxul Safe’n’Sound are popular.
- Rigid Fiberglass Board: Similar performance to rock wool, often comes in densities like 703 or 705.
- Avoid common batt insulation (like pink fiberglass for home walls); it’s typically too flimsy and less dense for effective broadband acoustic absorption.
- Wood for Frames:
- 1×4 or 2×4 Lumber: Pine or spruce works perfectly for the frame. For a 2-inch thick panel, 1×4 (which is actually 0.75″ x 3.5″) is suitable. For thicker panels (4 inches), 2×4 (1.5″ x 3.5″) is better.
- Plywood/OSB (optional backing): A thin sheet (1/4″) can be used as a backer for structural integrity, though not strictly necessary for acoustic performance.
- Fabric:
- Acoustically Transparent Fabric: Important that the fabric allows sound to pass through to the insulation. Burlap, linen, speaker grill cloth, or open-weave upholstery fabrics are good choices. Avoid heavy, dense fabrics like velvet or pleather.
- Fire Retardant: Consider fire-retardant fabric for safety, especially in a workshop environment.
- Hardware & Tools:
- Staple gun and staples
- Wood glue
- Drill and screws (for frame assembly)
- Saw (miter saw or circular saw for cutting lumber)
- Measuring tape, ruler, pencil
- Dust mask, gloves, eye protection (essential when handling rock wool/fiberglass)
- Picture frame hangers or Z-clips for mounting
Step-by-Step Acoustic Panel Construction
- Cut Frame Pieces: Decide on your panel dimensions (e.g., 2’x4′, 2’x2′). Cut four pieces of lumber for each frame: two longer sides and two shorter cross-members. For a 2’x4′ frame using 1×4 lumber:
- Two pieces at 48 inches (long sides)
- Two pieces at 22.5 inches (short sides, for inside fit between long sides)
- Use wood glue and screws to assemble the frame, ensuring it’s square.
- Insert Insulation: Wear gloves, a dust mask, and eye protection. Cut your acoustic insulation to fit snugly inside the wooden frame. Aim for a thickness that matches your frame depth (e.g., 3.5 inches for a 1×4 frame if using a 4-inch thick insulation piece). Gently compress if needed.
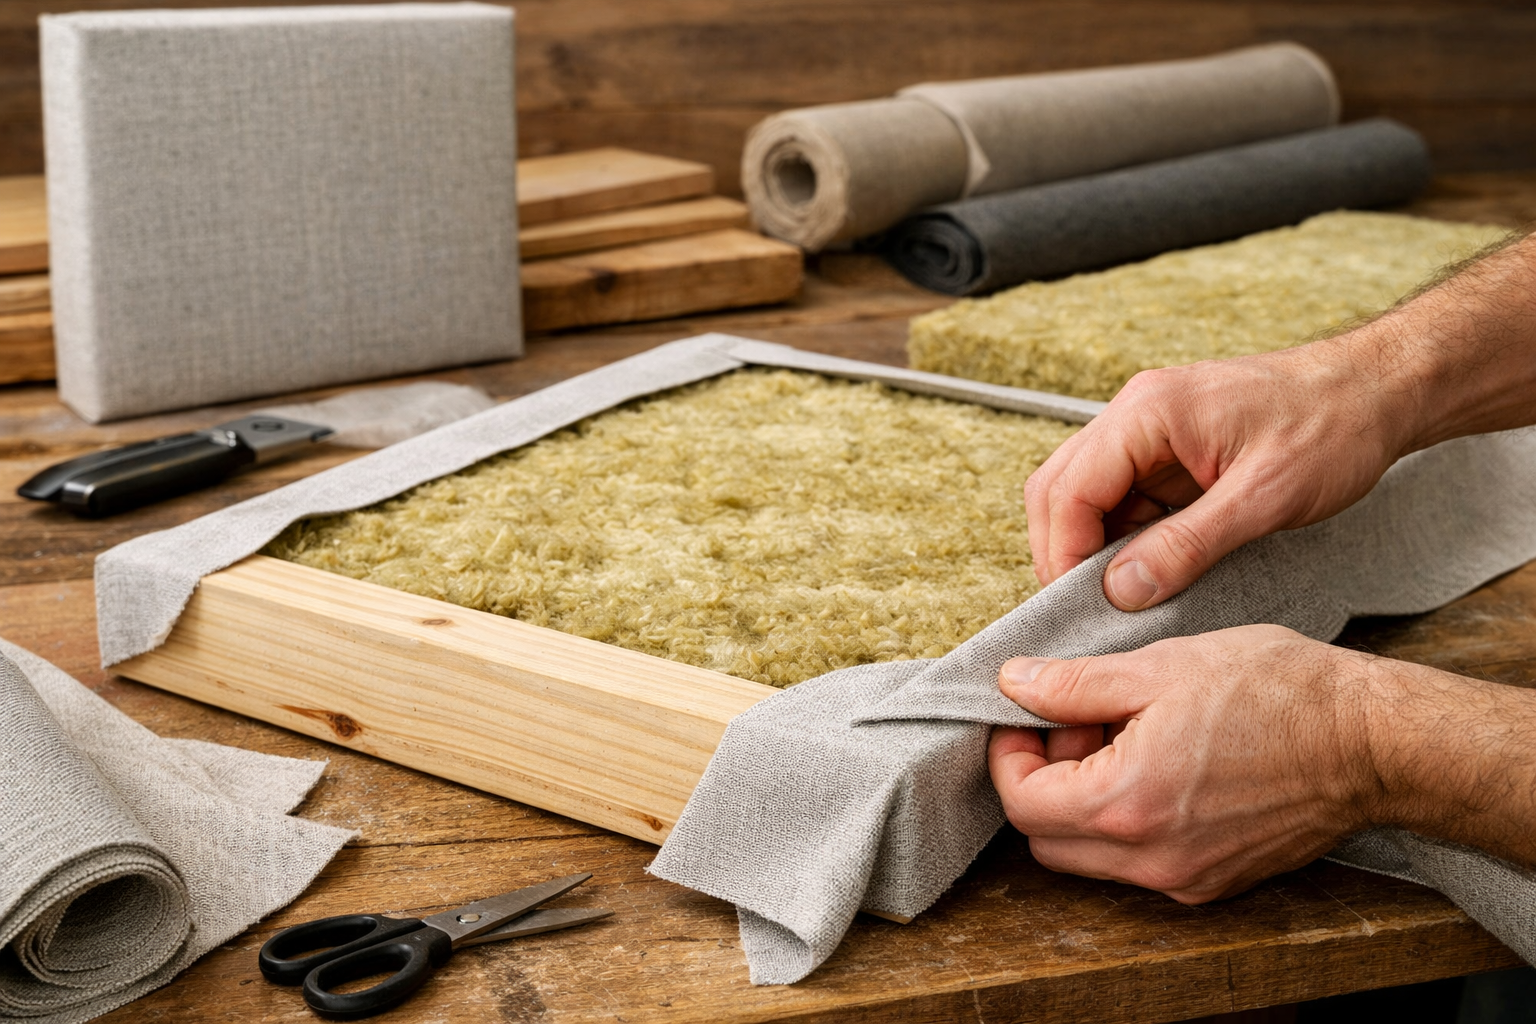
- Wrap with Fabric:
- Lay your chosen fabric face-down on a clean surface.
- Center the wooden frame with the insulation inside onto the fabric. Ensure you have enough fabric overlap on all sides to pull taut and staple to the back of the frame.
- Start stapling one long side, pulling the fabric taut. Then move to the opposite long side, pulling it firmly across the insulation and stapling. Repeat for the short sides.
- Carefully fold and staple the corners neatly, similar to wrapping a gift. The goal is a smooth, wrinkle-free front surface.
- Add a Backer (Optional): If you want a cleaner look or added protection for the insulation, cut a piece of plywood or thin hardboard to the outer dimensions of your frame and screw it onto the back.
- Mounting Hardware: Attach picture frame wire, Z-clips, or French cleat systems to the back for easy hanging. For heavy panels, use robust mounting hardware. Building modular wood storage systems for small workshops can also inspire clever mounting solutions for panels.
| Material | Purpose | Key Considerations |
|---|---|---|
| Rock Wool/Fiberglass | Sound Absorption | Density, thickness (2″ minimum, 4″ for bass traps) |
| 1×4/2×4 Lumber | Frame Construction | Straightness, appropriate depth for insulation |
| Acoustically Transparent Fabric | Aesthetic Cover, Sound Pass-Through | Open weave, durability, color/pattern, fire retardant |
| Screws, Staples | Assembly | Strong hold, rust-resistant |
| Mounting Hardware | Hanging | Weight capacity, ease of installation |
Enhancing Your Workshop: Placement for Functionality
In a workshop, focus absorption panels on walls opposite major noise sources (e.g., table saw, planer, dust collector). Placing panels at first reflection points (where sound from a tool first hits a wall) is also highly effective. Consider covering a significant portion of wall space, especially in corners, where bass frequencies tend to build up. This approach also integrates well with DIY smart workshop storage solutions by making panels part of the overall wall design.
Crafting DIY Acoustic Diffusers: Design, Materials, and Aesthetic Integration
While absorption panels are crucial, diffusers add a layer of sophistication to acoustic treatment, making a room sound more natural and spacious. Crafting DIY Acoustic Panels and Diffusers: Improving Workshop Sound and Creating Home Studio Decor allows for both functional improvement and creative expression.
Types of Diffusers and Their Applications
The most common and effective DIY diffuser is the Quadratic Residue Diffuser (QRD). QRDs use a sequence of wells of different depths to scatter sound waves. The specific depths are calculated based on mathematical sequences, ensuring even scattering across a broad frequency range.
- Workshop applications: Diffusers are less common in workshops focused purely on noise reduction. However, in larger workshops where communication is important or where a more “natural” sound is desired, they can be beneficial. They help prevent flutter echoes between large parallel walls.
- Home Studio/Media Room applications: This is where diffusers truly shine. Placed on the rear wall, ceiling, or even side walls, they scatter reflections, creating a wider, more immersive soundstage and reducing unwanted coloration from reflections.
Materials for QRD Diffusers
Building a QRD diffuser is more labor-intensive than an absorption panel but offers a rewarding challenge for any woodworker.
- Wood for Wells:
- Plywood or MDF: Excellent choices for the base and the individual “fins” that create the wells. They offer stability and can be cut precisely.
- Solid Wood Scraps: For a more artisanal look, you can use various types of wood for the well blocks, especially if you’re turning shop scraps into design features.
- Backer Board: Plywood or MDF (1/2″ or 3/4″ thick) for the main structural base.
- Wood Glue: Strong, reliable wood glue is essential.
- Clamps: Many clamps will be needed during assembly.
- Saw: A table saw with a good blade for accurate, repeatable cuts is ideal. A router with a straight bit can also be used for creating grooves. Choosing and using router tables can significantly speed up this process.
Designing and Building a QRD Diffuser
The core of a QRD diffuser is its prime number sequence. The most common prime number used is 7, resulting in a sequence like 0, 1, 4, 2, 2, 4, 1. This sequence determines the relative depth of each “well.”

- Determine Dimensions & Calculation:
- Choose a prime number (e.g., 7, 11, 13).
- Calculate the well depths. This involves knowing the design frequency (the lowest frequency you want to diffuse) and the speed of sound. Online QRD calculators can simplify this.
- Decide on the width of each well. Aim for something between 1.5 to 3 inches.
- This will give you the number of wells, their widths, and their depths.
- Prepare the Base: Cut a piece of plywood or MDF to your desired overall diffuser dimensions. This will be the backer.
- Cut the Fins/Blocks:
- Cut strips of plywood or MDF to the chosen well width.
- Then, cut these strips into individual blocks corresponding to the calculated well depths. You’ll have many pieces of varying lengths. Accuracy is key here.
- Assemble the Wells:
- Draw a grid on your backer board indicating the position of each well.
- Starting with the first column (or row, depending on your design), glue the cut blocks onto the backer board according to your depth sequence. Ensure they are perfectly perpendicular and straight.
- Use clamps generously and wipe away excess glue.
- Repeat for all columns/rows until the entire diffuser is assembled. This process is time-consuming but crucial for performance.
- Finishing:
- Once the glue is completely dry, sand the diffuser lightly.
- You can leave it as natural wood, stain it, paint it, or apply a clear coat. Consider finishes that complement your handcrafted wooden wall art or other decor.
- Attach sturdy mounting hardware.
“A precisely constructed QRD diffuser is a testament to woodworking skill, offering both exceptional acoustic performance and striking visual appeal.”
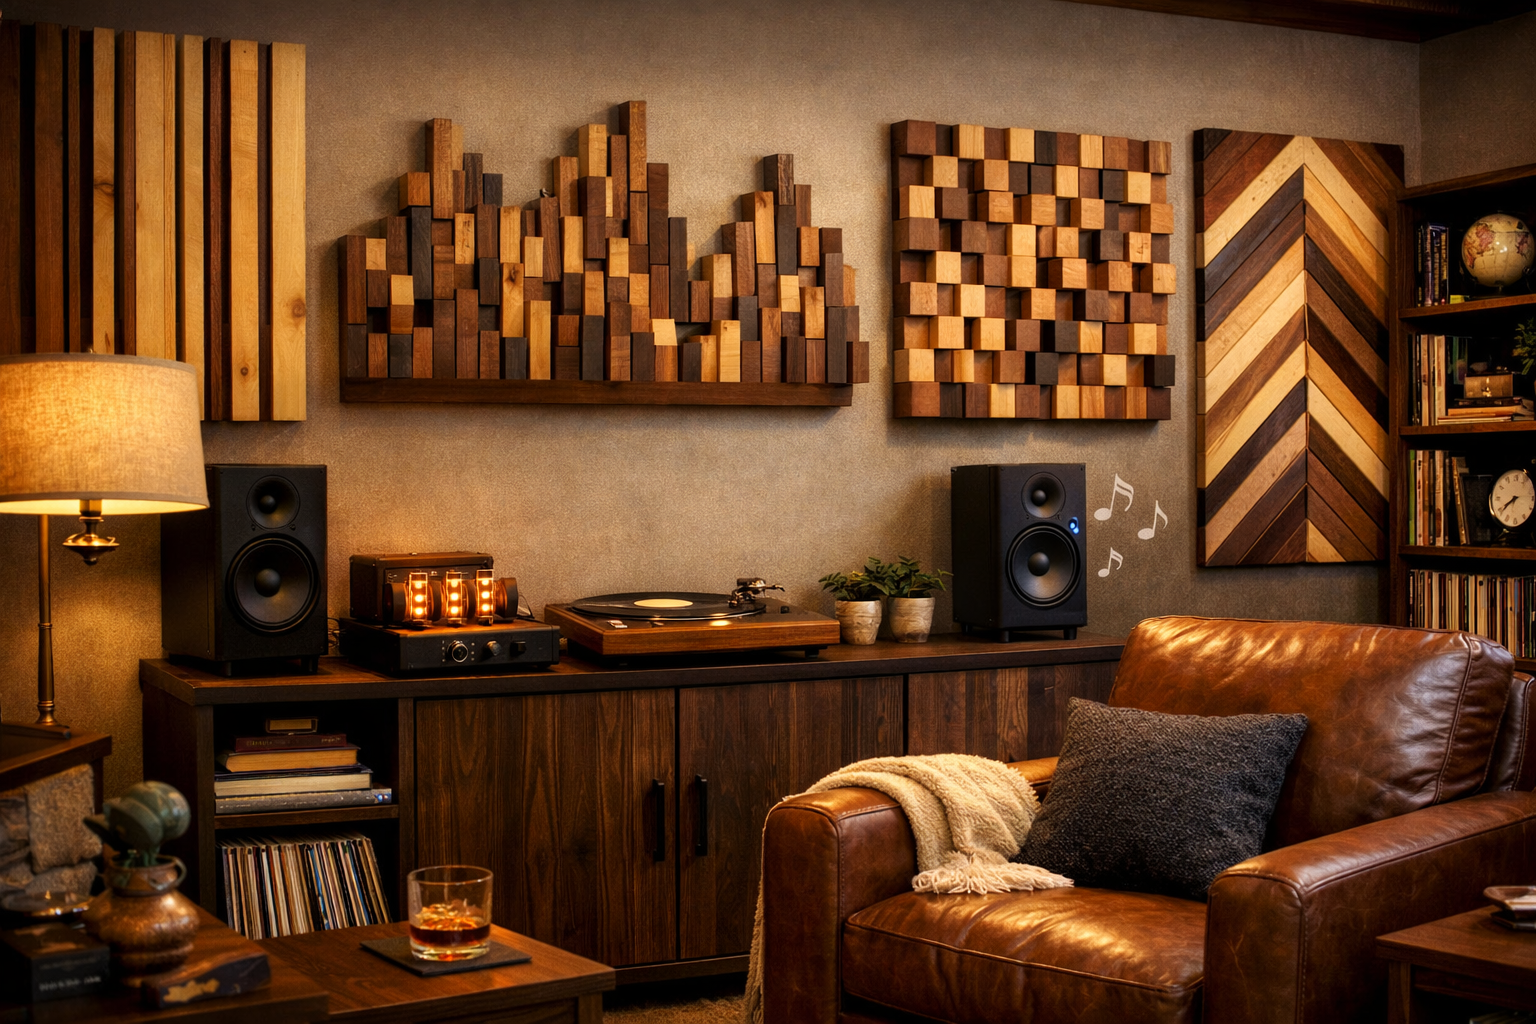
Aesthetic Integration for Home Studio Decor
The wooden nature of both absorption panels and diffusers makes them ideal for blending with home decor.
- Fabric Choices: For absorption panels, select fabrics that match your room’s color scheme and style. Think about textures that add warmth, aligning with concepts like warm minimalism in woodworking.
- Wood Finishes: For diffuser wells or panel frames, stains, paints, or clear coats can be used to match existing furniture or create a focal point. Using different wood species for diffuser wells can create beautiful patterns.
- Modular Designs: Create sets of panels and diffusers that can be arranged in artistic patterns on your walls. Think about how they interact with other wooden elements like custom floating shelves or console tables.
- Integrated Lighting: Consider adding LED strip lighting behind panels for a dramatic effect, especially in a home studio.
By thoughtfully designing and crafting these elements, your acoustic treatments become an integral and beautiful part of your space.
Conclusion
Improving the acoustics of your workshop or home studio doesn’t require a professional audio engineer or an exorbitant budget. With the principles of sound absorption and diffusion in hand, and a commitment to quality woodworking, you can craft effective DIY Acoustic Panels and Diffusers: Improving Workshop Sound and Creating Home Studio Decor. These projects not only enhance the functionality of your space by reducing noise and improving sound clarity but also provide an opportunity to create custom, aesthetically pleasing decor that integrates seamlessly with your environment.
Taking on these projects in 2026 offers a rewarding experience, blending practical skills with the science of sound. The results—a quieter workshop, clearer recordings, and a more comfortable listening experience—are well worth the effort.
Actionable Next Steps:
- Assess Your Space: Identify the primary acoustic issues (e.g., excessive echo, booming bass).
- Gather Materials: Source high-density acoustic insulation and appropriate wood and fabric.
- Start with Panels: Begin with building absorption panels, as they often provide the most significant initial improvement.
- Consider Diffusers: Once absorption is addressed, explore building diffusers for further sound refinement and aesthetic impact.
- Experiment with Placement: The effectiveness of panels and diffusers can vary with placement. Experiment to find the optimal arrangement for your specific room.
References
- Everest, F. A. (2009). Master Handbook of Acoustics (5th ed.). McGraw-Hill Professional.
- Alton, R. (2014). Home Recording Studio: Build It Like the Pros. Course Technology PTR.
- Newell, P. (2007). Recording Studio Design. Focal Press.
