


A persistent ringing in the ears after a productive day in the shop is not a badge of honor; it’s a warning. Over half of all woodworkers experience some form of hearing impairment by retirement age, largely due to prolonged exposure to machinery noise (CDC, 2021). The good news? You don’t have to sacrifice your hearing or your sanity for your craft. Learning how to build effective and aesthetically pleasing DIY Acoustic Panels for Your Woodworking Shop: Reducing Noise and Improving Focus can significantly transform your workspace. These panels absorb sound waves, reducing echo, reverberation, and overall decibel levels, creating a more comfortable, safer, and ultimately more productive environment.
Key Takeaways
- Acoustic panels effectively absorb sound, reducing noise levels and improving speech clarity in a woodworking shop.
- Understanding basic acoustic principles like absorption and reverberation is crucial for effective panel placement.
- DIY acoustic panels are a cost-effective alternative to commercial solutions, allowing customization.
- Mineral wool or rigid fiberglass are the most effective insulation materials for sound absorption.
- Strategic placement of panels, particularly at first reflection points, maximizes their noise reduction benefits.
Understanding the Science of Sound in a Woodworking Shop: Why DIY Acoustic Panels for Your Woodworking Shop: Reducing Noise and Improving Focus are Essential
The harsh reality of a woodworking shop is that it’s a cacophony of sound. Saws, planers, sanders, and dust collectors generate a significant amount of noise, which bounces off hard, reflective surfaces like concrete floors, bare walls, and ceilings. This creates a phenomenon known as reverberation – the persistence of sound in an enclosed space after the sound source has stopped. High reverberation times lead to increased overall noise, making it difficult to concentrate, communicate, and even hear potential safety warnings.

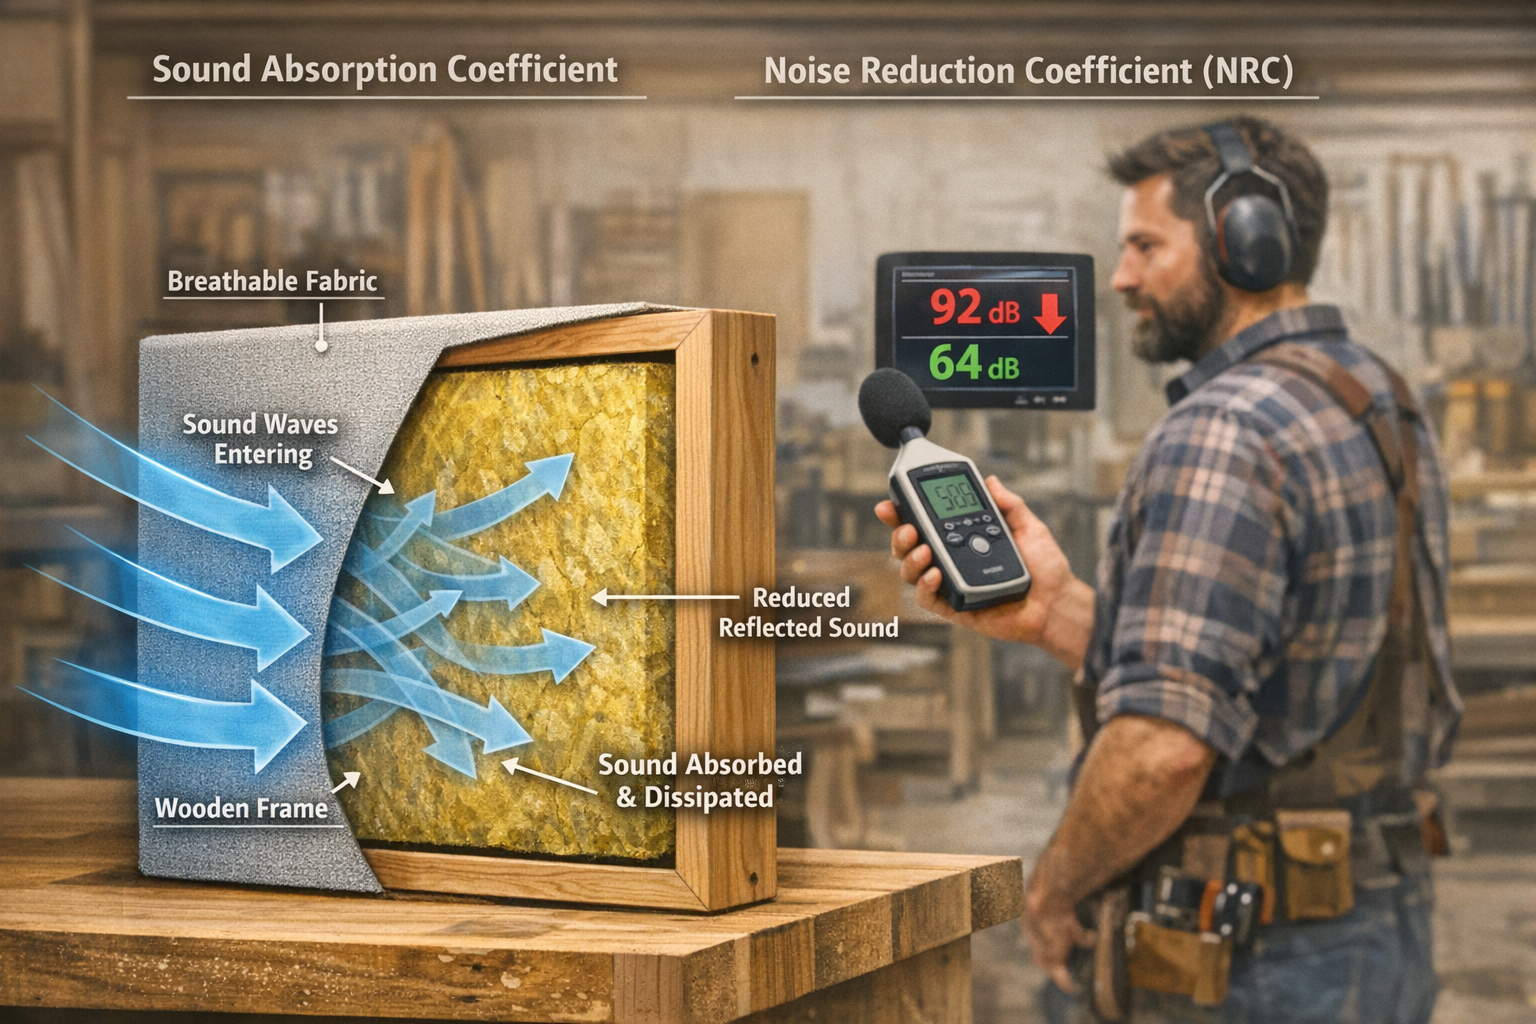
Acoustic panels work by introducing porous, sound-absorbing materials into the environment. When sound waves strike these materials, a portion of the sound energy is converted into heat, rather than being reflected back into the room. This process reduces the “liveness” of a space, making it sound much quieter and clearer.
Sound Absorption vs. Soundproofing
It’s important to distinguish between sound absorption and soundproofing.
- Sound Absorption: Focuses on improving the acoustics within a room by reducing reflections and reverberation. This is what acoustic panels achieve.
- Soundproofing: Aims to prevent sound from entering or leaving a room. This typically involves structural modifications like adding mass to walls, sealing gaps, and using specialized construction techniques.
While soundproofing a woodworking shop entirely is often impractical and expensive, sound absorption is a highly effective and achievable goal for any DIY enthusiast. By deploying DIY Acoustic Panels for Your Woodworking Shop: Reducing Noise and Improving Focus, you tackle the internal noise problem directly.
The Impact of Noise on Focus and Safety
Beyond mere annoyance, excessive noise has tangible negative effects:
- Reduced Focus: Constant noise pollution forces your brain to work harder to filter out distractions, leading to fatigue and decreased concentration. This directly impacts the precision and quality of your woodworking projects.
- Hearing Damage: Prolonged exposure to decibel levels common in workshops can cause permanent hearing loss. While hearing protection is essential, reducing ambient noise further minimizes risk.
- Communication Challenges: It becomes difficult to converse with apprentices, colleagues, or even hear warning signals from machinery.
- Increased Stress: A noisy environment is inherently more stressful, diminishing the enjoyment of your craft.
By addressing these issues with strategically placed DIY acoustic panels, you invest in your health, safety, and the overall quality of your woodworking experience in 2026.
Materials and Construction for DIY Acoustic Panels
Building your own acoustic panels is a straightforward woodworking project, making it a perfect fit for any shop owner. The primary components are a rigid frame, an absorbent core material, and a breathable fabric covering.
Essential Materials
- Frame Material:
- Wood: Common choices include 1×4 or 1×2 lumber (pine, spruce, or poplar). The thicker the frame, the more space for insulation. For more advanced projects or if you’re looking to utilize offcuts, consider using techniques discussed in Turning Shop Scraps into Design Features.
- Plywood or MDF: Can be used for backing if desired, though often not strictly necessary for absorption.
- Absorbent Core: This is the most critical component for sound absorption.
- Mineral Wool (Rockwool/Roxul): Highly recommended for its excellent sound absorption properties (high NRC rating), fire resistance, and relative affordability. It’s dense and effective across a broad frequency range.
- Rigid Fiberglass (Owens Corning 703/705): Similar to mineral wool in performance, often slightly more expensive but very easy to work with.
- Denim Insulation (Recycled Cotton): An eco-friendly alternative with good absorption, though typically not as effective per inch as mineral wool or rigid fiberglass.
- ❌ Avoid using common fiberglass batt insulation (like for attics) – it’s too floppy and has a much lower density, offering minimal acoustic benefits.
- Fabric Covering:
- Acoustically Transparent Fabric: Crucial for allowing sound waves to pass through to the absorbent core. Jute, burlap, linen, and certain speaker grille cloths work well. Avoid heavy, dense fabrics like denim or canvas, which will reflect sound.
- Color and Texture: Choose a fabric that complements your shop’s aesthetic.
Tools Required
- Miter saw or circular saw (for cutting frame pieces)
- Drill/driver (for assembling frames)
- Staple gun (manual or electric)
- Utility knife (for cutting insulation)
- Measuring tape
- Straightedge
- Personal protective equipment (gloves, dust mask, safety glasses – especially when handling mineral wool or fiberglass).
Step-by-Step Construction Guide for DIY Acoustic Panels for Your Woodworking Shop: Reducing Noise and Improving Focus
Follow these steps to construct your own custom acoustic panels:
- Design and Measure:
- Determine the size and number of panels needed. Common sizes are 2’x4′ or 2’x2′. Consider wall space and areas of highest noise reflection.
- A good starting point for coverage is 15-20% of your total wall area, focusing on primary reflection points.
- Measure and mark your frame pieces according to your desired panel dimensions.
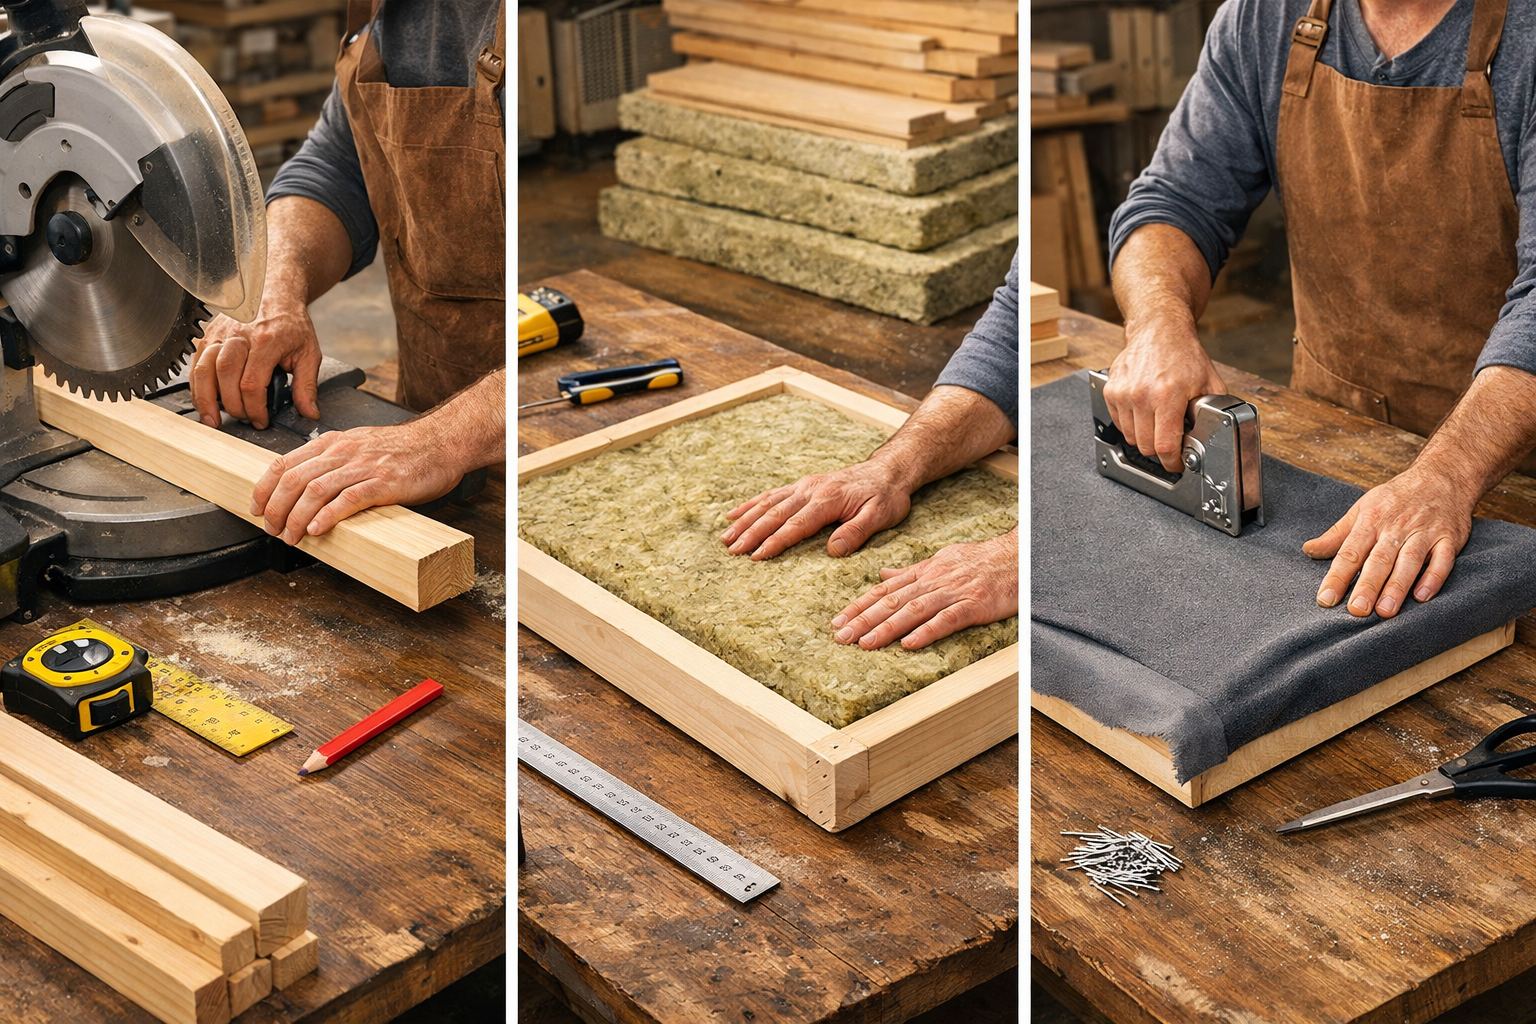
- Cut Frame Pieces:
- Cut your 1×4 or 1×2 lumber to length. For a 2’x4′ panel, you’ll need two 4′ pieces and two 2′ pieces for the outer dimensions, joined with butt joints or dado joints if you want to get fancy (see our Beginner’s Guide to Essential Woodworking Joints for joint ideas).
- If you’re making a thicker panel (e.g., 4 inches deep), you might need additional internal bracing or a deeper frame.
- Assemble the Frame:
- Drill pilot holes and then secure the frame pieces together using wood screws. Wood glue can also be used for added strength. Ensure the frame is square.
- Optional: If you want to make the panel easily removable or reusable, consider creating a simple rabbet joint to hold the insulation in place without a full backer.
- Cut and Insert Absorbent Core:
- Wearing gloves, a long-sleeved shirt, and a dust mask, carefully cut the mineral wool or rigid fiberglass to fit snugly inside your wooden frame. A utility knife and a straightedge work best.
- Press the insulation firmly into the frame. It should be flush or slightly recessed from the front edge of the frame.
- Wrap with Fabric:
- Lay your chosen fabric face down on a clean, flat surface.
- Place the assembled frame with the insulation inside, face down, onto the fabric. Ensure there’s enough fabric overlap on all sides to wrap around the frame (typically 3-4 inches).
- Start by stapling the fabric to the back of one long side of the frame, pulling it taut.
- Move to the opposite long side, pull the fabric tightly, and staple it down. Ensure there are no wrinkles.
- Repeat for the short sides, folding the corners neatly like wrapping a present before stapling. Trim any excess fabric.
- Add Hanging Hardware:
- Attach Z-clips, French cleat hangers, or picture wire/D-rings to the back of your completed panel. Consider the weight of the panel and the mounting surface. For heavier panels, French cleats are an excellent option for secure mounting, a technique also useful for Smart Workshop Storage Solutions.
Strategic Placement and Installation in Your Workshop
The effectiveness of your DIY Acoustic Panels for Your Woodworking Shop: Reducing Noise and Improving Focus depends as much on their placement as on their construction. Simply scattering them around randomly won’t yield optimal results.
Identifying First Reflection Points
The most impactful places to put acoustic panels are at the “first reflection points.” These are the spots on your walls and ceiling where sound from your machinery (or even your voice) hits first before reaching your ears.
How to find them:
- Mirror Trick (for walls): Have a friend hold a mirror flat against your workshop wall. Sit in your primary working position. Have your friend move the mirror along the wall. Any point where you can see a reflection of a primary noise source (e.g., table saw, planer) in the mirror is a first reflection point. Mark these spots.
- Ceiling Reflection: Similarly, imagine sound traveling from your tools to the ceiling and then back down to your ears. Panels directly above noisy workstations or above your main work area are often highly effective.
General Placement Guidelines
- Walls: Prioritize first reflection points on side walls and the wall behind your primary work area. Don’t be afraid to put panels directly behind loud machines.
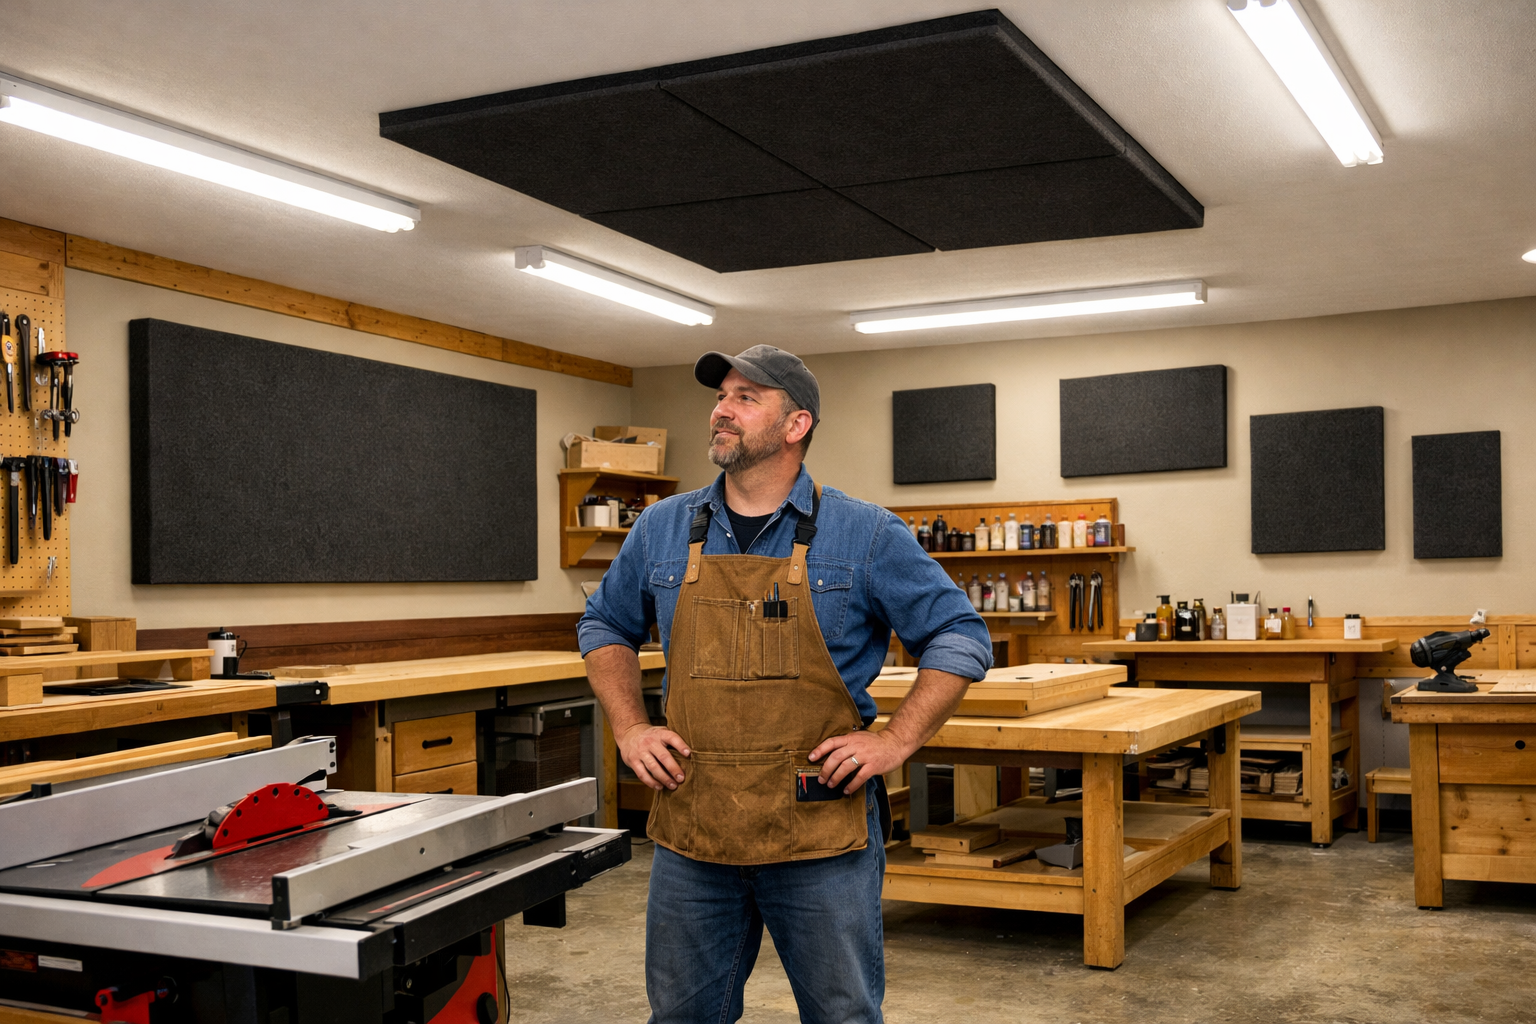
- Ceiling: Bare ceilings are major culprits for sound reflection. Consider hanging panels horizontally above workspaces or creating a “cloud” of panels.
- Corners: While absorption panels are great for walls, corners are typically best treated with bass traps, which are thicker, specialized acoustic panels designed to absorb low-frequency sounds. You can find more information on building complementary acoustic diffusers and absorbers in this article on Crafting Acoustic Diffusers and Absorbers from Scrap Wood.
- Distribution: Aim for a balanced distribution rather than clumping all panels in one area. Spread them across different walls to break up reflections more evenly.
- Avoid Over-Treatment: While beneficial, too many panels can make a room sound “dead.” Start with a moderate number (15-20% of wall surface area) and add more if needed. The goal is to reduce harsh echoes, not eliminate all natural reverberation.
Installation Tips
- Secure Mounting: Given the vibration in a woodworking shop, ensure all panels are securely mounted to studs or with appropriate wall anchors.
- Aesthetics: Consider the color and arrangement of your panels to make them an integrated part of your shop’s design. They don’t have to be purely functional; they can also contribute to the visual appeal.
- Proximity to Noise Sources: Placing panels closer to major noise sources can sometimes offer more direct benefits, as they absorb sound before it has a chance to fully disperse and reflect.
- Don’t Forget the Door: If your shop door is solid and reflective, consider a panel mounted on its interior surface to further reduce sound bouncing within the room.
By carefully planning and installing your DIY Acoustic Panels for Your Woodworking Shop: Reducing Noise and Improving Focus, you will create a dramatically quieter, safer, and more pleasant workspace. This improvement will not only protect your hearing but also allow for greater precision and enjoyment in your craft for years to come. For improving other aspects of your workshop, consider building a Building a Mobile Dust Collection Cart for Any Workshop to manage airborne dust, which also contributes to a healthier environment.
Conclusion
Investing time in creating DIY Acoustic Panels for Your Woodworking Shop: Reducing Noise and Improving Focus is one of the most impactful upgrades you can make to your workspace. From mitigating the risks of hearing damage and enhancing mental clarity to fostering a more enjoyable and productive environment, the benefits are profound. By understanding the basics of sound absorption, selecting the right materials, and strategically placing your handcrafted panels, you can transform a noisy, fatiguing shop into a sanctuary of focused creation. Embrace this project not just as a means to reduce decibels, but as an investment in your well-being and the longevity of your woodworking passion. Start planning your panel layout today, gather your materials, and build your way to a quieter, more concentrated workshop in 2026.
