
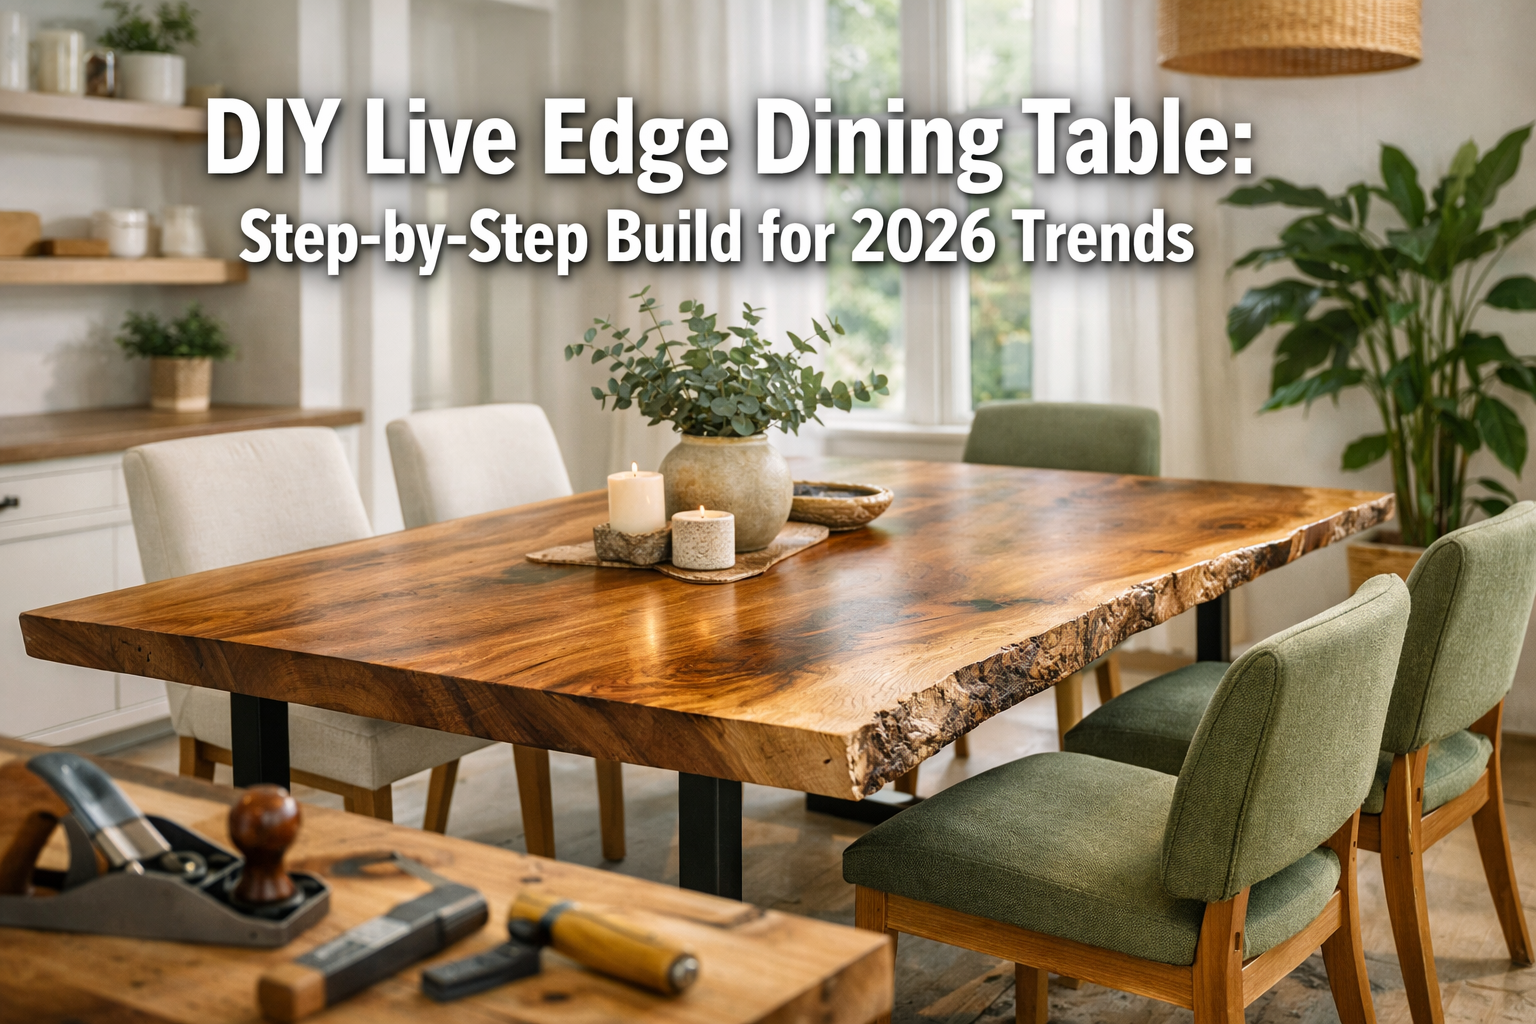

The allure of nature, brought indoors with a touch of modern craftsmanship, is a trend that continues to capt skyrocket. In 2026, the demand for live edge slabs as room centerpieces, particularly for dining tables, has reached unprecedented heights. This comprehensive guide will equip even beginners with the knowledge and confidence to embark on their own DIY Live Edge Dining Table: Step-by-Step Build for 2026 Trends. Imagine a unique, conversation-starting piece of furniture that seamlessly blends raw, organic beauty with contemporary durability – a testament to your own skill and vision. This article provides a detailed roadmap from selecting your slab to applying the final protective finish, ensuring your custom table not only looks stunning but also stands the test of time, perfectly aligning with current design aesthetics.
Key Takeaways
- Slab Selection is Crucial: Choose a dry, stable slab with good character and appropriate dimensions to prevent future issues.
- Safety First: Always wear appropriate personal protective equipment (PPE) and understand your tools before starting.
- Precision is Paramount: Proper flattening, sanding, and joinery are essential for a professional-looking and durable table.
- Finishing Protects & Enhances: A well-chosen and expertly applied finish will protect your table and highlight the wood’s natural beauty.
- Trends Embrace Customization: 2026 trends emphasize unique, personalized pieces that tell a story, making a DIY live edge table a perfect fit.
Part 1: Sourcing Your Slab and Initial Preparations for Your DIY Live Edge Dining Table
Building a magnificent live edge dining table begins long before any tools are picked up. The foundation of your project lies in the quality and character of your chosen wood slab, coupled with meticulous preparation. This section will guide you through sourcing the perfect raw material and getting it ready for its transformation.

Understanding Live Edge Wood Slabs
A “live edge” refers to the natural edge of the wood, complete with bark or its natural undulations, preserved along one or more sides of the slab. This organic feature provides a distinct, rustic, yet elegant aesthetic that is highly sought after in modern and traditional interiors alike. Each slab is unique, a one-of-a-kind piece of art crafted by nature.
Types of Wood Ideal for Live Edge Dining Tables
The choice of wood greatly influences the final look, durability, and workability of your table. In 2026, popular choices continue to include:
- Black Walnut: Prized for its rich, deep brown color, beautiful grain patterns, and excellent workability. It’s a premium choice that offers a luxurious feel.
- Oak (White or Red): Known for its strength, durability, and distinctive grain. White oak is particularly popular for its lighter tones and excellent water resistance.
- Maple: Offers a lighter, often creamy tone with subtle grain patterns. Hard maple is incredibly durable and resistant to dents.
- Cherry: Features a reddish-brown hue that deepens beautifully with age, providing a warm and inviting look.
- Sycamore: Often displays unique, mottled grain patterns, making it an interesting choice for those seeking a more distinctive look.
- Elm: Known for its interlocking grain, which can create beautiful, swirling patterns, though it can be slightly more challenging to work with.
When considering your choice, think about the existing decor of your dining space and the desired ambiance.
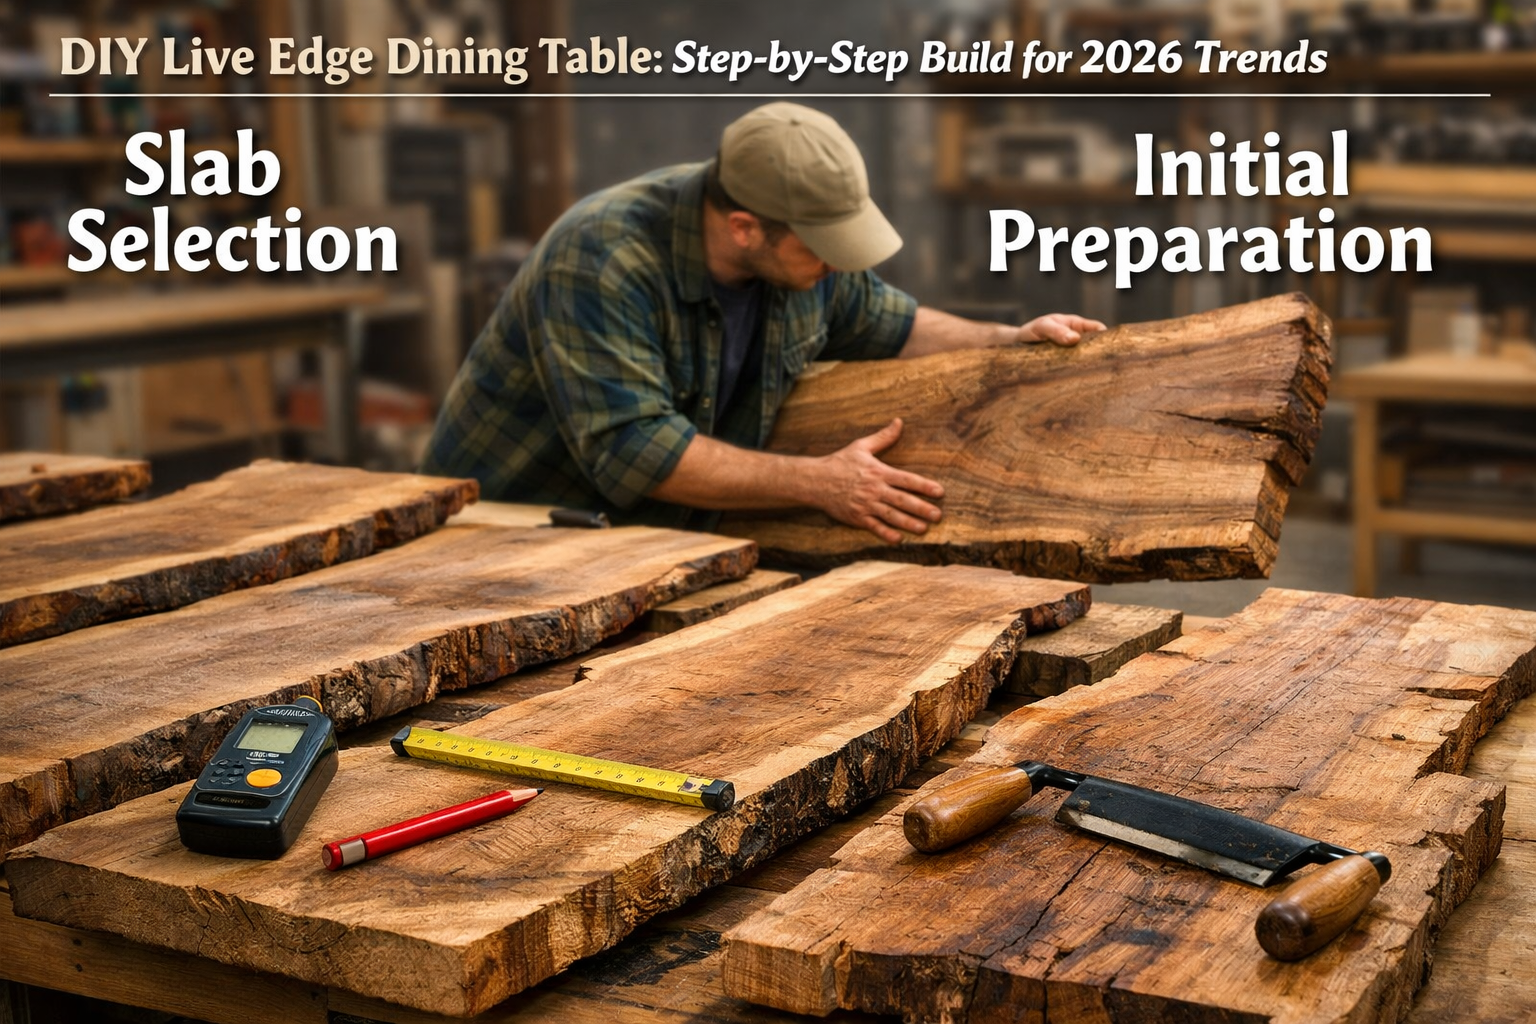
Sourcing Your Perfect Live Edge Slab
Finding the right slab is perhaps the most critical step in your DIY Live Edge Dining Table: Step-by-Step Build for 2026 Trends. Quality and condition are paramount.
- Local Sawmills and Specialty Wood Retailers: These are your best bets. They typically have a wide selection, often air-dried or kiln-dried, and can offer valuable advice. Visiting in person allows you to inspect the slabs thoroughly.
- Online Marketplaces: While convenient, buying online requires careful scrutiny of photos and detailed descriptions. Request multiple angles and close-ups, and inquire about moisture content.
- Arborists or Tree Removal Services: Sometimes, you can find recently felled trees that an arborist might mill for you. This often requires more processing on your end (drying), but can be cost-effective for larger, unique pieces.
What to Look for When Selecting a Slab
- Moisture Content (MC): This is non-negotiable. The slab must be adequately dried to prevent warping, cracking, and movement after you build the table. For indoor furniture, aim for an MC between 6-8%. Always use a reliable moisture meter.
- Dimension: Ensure the slab is thick enough (typically 2-3 inches for a dining table) and long/wide enough to comfortably accommodate your desired table size, allowing for some trim.
- Flatness: While you will flatten the slab, excessive warping or cupping can be challenging to correct. Look for a relatively flat piece.
- Character: This is where the beauty lies! Look for interesting grain patterns, knots, unique bark inclusions, or small natural voids that can be filled with epoxy. Avoid large, loose knots or significant cracks that compromise structural integrity.
- Soundness: Check for insect damage, rot, or soft spots. Tap the slab; a solid sound indicates good density.
Initial Slab Preparation: Cleaning and Debarking
Once you’ve brought your prized slab home, it’s time for the first hands-on steps.
Debarking
Most live edge tables feature the wood’s natural edge without the bark. Bark is typically removed because it can harbor insects, crack, and eventually fall off, creating a mess and an uneven edge.
Tools Needed:
- Drawknife
- Chisel
- Stiff wire brush
- Mallet (optional)
Process:
- Secure the Slab: Place the slab on a stable workbench or saw horses.
- Score the Bark: Use a utility knife to score a line along the natural seam where the bark meets the wood, if visible.
- Peel with a Drawknife: Using a drawknife, carefully peel the bark away. Work with the grain whenever possible. For stubborn areas, a chisel and mallet can help.
- Clean Up: Once the bulk of the bark is removed, use a wire brush to clean any remaining fibrous material or loose debris from the live edge.
Initial Cleaning
Give the entire slab a good cleaning to remove dirt, dust, and any superficial grime. A stiff brush and a damp cloth will usually suffice. For tougher spots, a mild detergent solution can be used, but ensure the wood dries thoroughly afterward.
Part 2: Flattening, Shaping, and Base Construction for Your DIY Live Edge Dining Table: Step-by-Step Build for 2026 Trends
With your slab cleaned and debarked, the next phase involves turning that raw material into a functional, beautiful tabletop. This requires precision in flattening, careful shaping, and robust base construction, all contributing to a successful DIY Live Edge Dining Table: Step-by-Step Build for 2026 Trends.
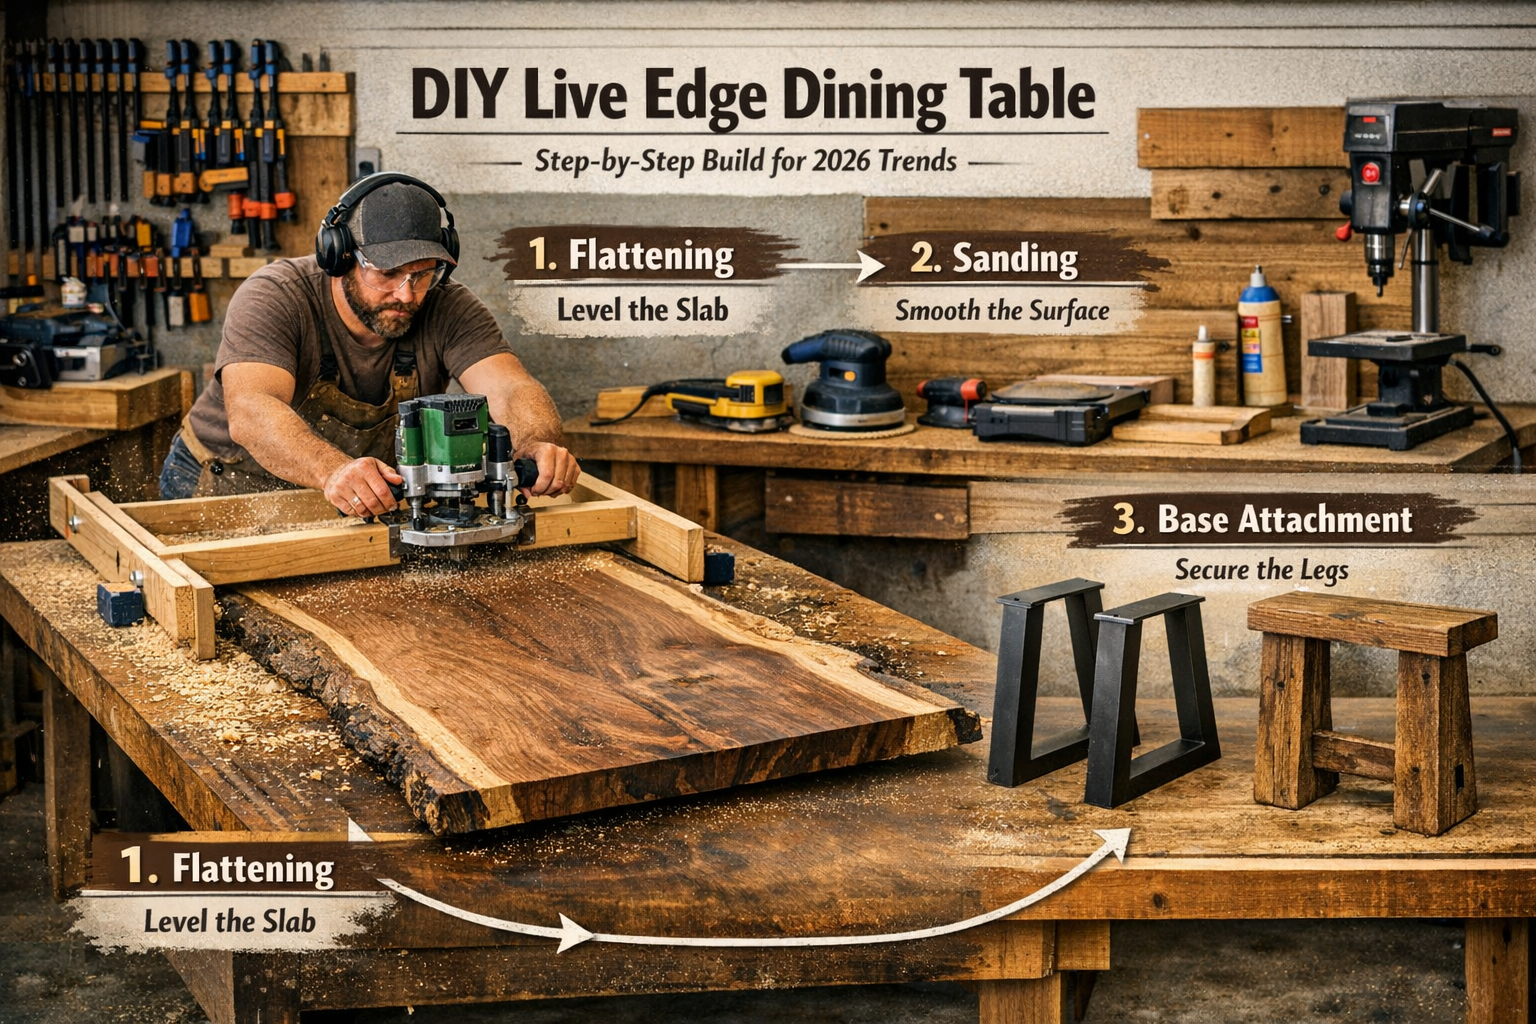
Flattening the Slab
Raw wood slabs are rarely perfectly flat. They often have twists, cups, and bows from the drying process. Flattening is crucial for a stable and level dining surface. This is one of the most important, and often the most challenging, steps.
Methods for Flattening
- Router Sled (Recommended for DIYers): This is the most common and accessible method for those without access to a large planer.
- Build a Sled: Construct a sturdy jig or “sled” for your router. This typically involves two parallel rails that extend beyond the width of your slab, and a carriage that holds your router and slides along these rails.
- Secure the Slab: Fasten your slab securely to a flat workbench. Use shims to support any high spots and prevent rocking.
- Route Passes: Using a large-diameter surfacing bit, make successive passes across the slab, slowly removing material until a flat plane is achieved. Flip the slab and repeat on the other side.
- Large Planer/Drum Sander: If you have access to a commercial-sized planer or drum sander (e.g., at a community woodworking shop or through a local mill), this is the fastest and most efficient method.
- Hand Planes: For the traditionalist or those with smaller slabs, skilled use of hand planes can achieve a perfectly flat surface, but it requires significant practice and physical effort.
Important Note: Aim for even material removal from both faces to maintain stability. For insights into powerful planers, consider resources like the guide on the Delta 22-560 Planer.
Squaring and Shaping the Slab
Once flattened, you’ll need to define the dimensions of your tabletop.

- Squaring the Ends: Use a large T-square or a straight edge and clamps to mark a clean, square line across each end of the slab. Cut using a track saw, circular saw with a guide, or a straight-line rip saw. If you’re building a farmhouse-style table, you might also find inspiration in guides like “Craft Your Dream Farmhouse Dining Table: The Ultimate 2025 DIY Guide 🏡✨ – Wood Craft Wiz” (https://woodcraftwiz.com/craft-your-dream-farmhouse-dining-table-the-ultimate-2025-diy-guide-%f0%9f%8f%a1%e2%9c%a8-2/).
- Edge Treatment: Decide if you want to keep one or both live edges. If one side is particularly unappealing, you might rip it straight using a table saw or a track saw. For a versatile woodworking workspace, our guide on The Ultimate Guide to Wooden Work Tables can be helpful.
Filling Voids and Cracks
Live edge slabs often come with natural voids, knot holes, or small cracks. These are part of the wood’s character and can be filled for both aesthetic and functional purposes.
- Epoxy Resin: This is the most popular method for filling voids.
- Preparation: Clean out any loose debris from the void. Tape off the underside of the void with strong tape to prevent epoxy from leaking.
- Mixing: Mix a clear or tinted epoxy resin according to the manufacturer’s instructions. Adding a small amount of metallic pigment (e.g., black, bronze) can create stunning effects that are very much in line with 2026 trends.
- Pouring: Slowly pour the epoxy into the void, allowing it to self-level. You may need to do multiple pours for deep voids, allowing each layer to partially cure.
- Curing & Finishing: Once fully cured, sand the epoxy flush with the wood surface.
- Wood Putty/Filler: For smaller, less significant cracks or holes, a color-matched wood putty or filler can be used.
Sanding to Perfection
Achieving a smooth, lustrous finish requires meticulous sanding. This is not a step to rush.
- Start Coarse: Begin with a coarse grit sandpaper (e.g., 60 or 80 grit) to remove any marks from flattening or previous steps.
- Progress Gradually: Work your way up through progressively finer grits (100, 120, 150, 180, 220, and optionally 320-400 for a very smooth finish).
- Orbital Sander: An orbital sander is essential for efficiency. Pay close attention to the live edge, hand-sanding with appropriate care to preserve its natural contours.
- Dust Removal: Between each grit, thoroughly remove all sanding dust from the slab surface using a vacuum and tack cloth. This prevents coarser grit particles from scratching the surface when you move to a finer grit.
Constructing the Table Base
The base of your live edge dining table needs to be sturdy, aesthetically pleasing, and complement the natural beauty of the slab. 2026 trends lean towards minimalist metal bases or robust wooden trestle/pedestal designs.
Popular Base Options
- Metal Legs (Steel, Cast Iron):
- Types: X-legs, U-legs, A-frame, spider legs, or custom designs.
- Advantages: Provide a modern, industrial contrast to the organic slab. Extremely strong and stable.
- Sourcing: Purchase pre-fabricated metal legs from online retailers or local fabricators. Ensure they are designed for dining table weight and height (typically 28-29 inches).
- Wooden Bases:
- Types: Trestle bases, pedestal bases, or simple square/rectangular legs.
- Advantages: Offers a cohesive, all-wood look. Can be custom-built to perfectly match the table’s aesthetic.
- Materials: Use hardwoods like oak, maple, or walnut for strength and durability.
- Construction: Requires precise joinery. Consider using mortise and tenon, dado, or sturdy M&T joinery with appropriate fasteners. For complex joinery, a reliable miter saw or even a miter saw table can be invaluable.
Attaching the Top to the Base
The method of attachment is crucial to allow for the wood’s natural expansion and contraction with changes in humidity. Never rigidly attach a solid wood top directly to a base using screws from the top.
- Z-Clips/Table Top Fasteners: These metal clips slot into a dado cut on the underside of the tabletop and screw into the apron or top of the base. They allow for lateral movement.
- Figure 8 Fasteners: Similar to Z-clips, these are routed into the underside of the top and provide secure, yet flexible, attachment.
- Elongated Screw Holes: If screwing directly into a wooden apron, drill oversized holes in the apron (not the tabletop) and use washers under the screw heads to allow for movement.
Ensure your chosen base provides ample stability for the heavy live edge slab. Reinforce joints as necessary.
Part 3: Finishing and Final Touches for Your DIY Live Edge Dining Table: Step-by-Step Build for 2026 Trends
The final stage of your DIY Live Edge Dining Table: Step-by-Step Build for 2026 Trends is perhaps the most satisfying: applying the finish. A well-chosen and expertly applied finish not only enhances the wood’s natural beauty but also provides crucial protection against daily wear and tear. This is where your table truly comes to life.
Choosing the Right Finish
The finishing process is vital for durability and aesthetics. 2026 trends favor finishes that highlight natural wood grain and offer a balance of protection and tactile appeal.
Popular Finish Types for Live Edge Dining Tables
Oil Finishes (e.g., Tung Oil, Linseed Oil, Rubio Monocoat):
- Appearance: Penetrates the wood, creating a natural, matte to semi-gloss finish that enhances the grain and provides a warm, tactile feel.
- Durability: Good resistance to water and stains, but generally less durable than polyurethane or epoxy. Easier to repair scratches and refresh over time.
- Application: Wiped on with a cloth, multiple coats usually required.
- Consideration: Requires more frequent reapplication than film finishes.
- Internal Link: For specific oil finishes, refer to our guide on Formbys Tung Oil Discontinued: Finding Alternatives and DIY Mixes.
Polyurethane (Oil-Based or Water-Based):
- Appearance: Forms a durable, clear film on the wood surface. Available in matte, satin, or gloss.
- Durability: Excellent protection against scratches, moisture, and heat. Oil-based is generally more durable and ambering, while water-based is clearer and faster drying.
- Application: Applied with a brush, foam applicator, or sprayer. Multiple thin coats are recommended with light sanding between coats.
- Internal Link: Learn more about application methods in Spray Polyurethane vs Brush: Pros, Cons, and Tips. Also, explore Mixing Stain and Polyurethane: A Step-by-Step Guide for combination products.
Epoxy Resin (Tabletop Epoxy):
- Appearance: Creates a thick, glass-like, incredibly durable, and often high-gloss surface. Can be poured thick (flood coat) or applied as a thin seal coat.
- Durability: Unmatched protection against scratches, water, chemicals, and heat.
- Application: Mixed and poured onto the surface, self-levels. Requires careful attention to mixing ratios, temperature, and dust-free environment.
- Consideration: Can be more challenging for beginners; once applied, it’s difficult to remove.
Varnish (Spar Varnish, Marine Varnish):
- Appearance: Similar to polyurethane, forms a durable film, often with a slightly warmer tone.
- Durability: Excellent for high-wear areas and often contains UV inhibitors, making it good for pieces exposed to sunlight.
- Application: Brushed or wiped on, multiple coats.
Testing Your Finish
Always test your chosen finish on a scrap piece of the same wood before applying it to your tabletop. This allows you to see the true color and sheen, and practice your application technique.
Step-by-Step Finishing Process
Regardless of the finish you choose, the preparation remains critical.
- Final Sanding and Cleaning: Ensure the table is perfectly sanded to your desired grit (at least 220 grit) and utterly free of dust. Use a vacuum, then a tack cloth or a rag dampened with mineral spirits (for oil-based finishes) or water (for water-based finishes). Let it dry completely.
- Apply First Coat:
- Oils: Apply liberally with a clean cloth, allow it to penetrate for the recommended time (check product instructions), then wipe off all excess.
- Polyurethane/Varnish: Apply a thin, even coat with a high-quality brush or foam applicator, working with the grain. Avoid drips and puddles.
- Epoxy: Carefully mix Part A and Part B according to instructions. Pour onto the table and spread evenly with a squeegee. Use a heat gun or torch to pop bubbles (carefully and quickly!).
- Drying/Curing: Allow ample time for the first coat to dry or cure fully. This is crucial for proper adhesion of subsequent coats.
- Light Sanding (for film finishes): For polyurethane and varnish, lightly sand between coats with a fine-grit sandpaper (e.g., 320-400 grit) to de-nib the surface. This removes any dust motes and creates a mechanical bond for the next layer. Do not sand oil finishes between coats unless specifically instructed. For detailed finishing knowledge, explore our general wood finishing techniques.
- Apply Subsequent Coats: Repeat the application and sanding process until you achieve the desired level of protection and sheen. Most film finishes require 2-4 coats.
- Final Cure: Allow the finish to fully cure before heavy use. This can take days or even weeks, depending on the product. During this time, the finish reaches its maximum hardness.
Care and Maintenance of Your Live Edge Dining Table
A live edge dining table is an investment and a centerpiece. Proper care ensures its longevity and beauty.
- Cleaning: Wipe spills immediately. Clean with a damp cloth and mild soap. Avoid harsh chemical cleaners.
- Protection: Use coasters for drinks and placemats for hot dishes. Avoid dragging sharp objects across the surface.
- Humidity Control: Maintain stable indoor humidity (ideally 35-55%) to minimize wood movement.
- Re-finishing: Oil finishes may require reapplication every few years. Film finishes are more durable but may eventually require sanding and re-coating in areas of heavy wear.
Integrating Your New Table into 2026 Design Trends
Your DIY live edge dining table is more than just furniture; it’s a statement piece. In 2026, interior design trends continue to emphasize:
- Biophilic Design: Connecting indoor spaces with nature. Your live edge table perfectly embodies this by bringing the raw beauty of wood indoors.
- Sustainability and Craftsmanship: Handcrafted, unique pieces are valued over mass-produced items. Your DIY creation stands out.
- Warm Minimalism: Clean lines, uncluttered spaces, but with warmth added through natural materials and textures.
- Mixed Materials: The combination of a natural wood slab with a sleek metal base (steel, brass) or a different species of wood for the base is highly fashionable.
- Customization: Personalization is key. Your choice of wood, finish, and base makes your table truly unique.
Consider pairing your table with complementary seating – perhaps upholstered chairs in earthy tones, or sleek, modern chairs that create a compelling contrast. Add a simple, elegant centerpiece to complete the look without detracting from the table’s inherent beauty.

Conclusion
Creating your own DIY Live Edge Dining Table: Step-by-Step Build for 2026 Trends is a deeply rewarding project that culminates in a truly unique and breathtaking piece of furniture. From the careful selection and preparation of your wood slab to the meticulous flattening, shaping, and base construction, every step contributes to the table’s structural integrity and aesthetic appeal. The final finishing process, chosen to both protect and enhance the wood’s natural character, brings your vision to life, integrating seamlessly with the highly sought-after biophilic and custom design trends of 2026.
This journey, while requiring patience and attention to detail, offers an unparalleled opportunity to craft a functional work of art that will be the centerpiece of your dining space for years to come. You’re not just building a table; you’re creating a conversation starter, a testament to natural beauty, and a functional heirloom infused with your own craftsmanship.
Actionable Next Steps
- Research & Plan: Refine your design vision. What wood, size, and base style best suit your home?
- Source Materials: Begin the search for your perfect live edge slab, prioritizing proper moisture content and character.
- Gather Tools: Ensure you have all necessary tools or plan access to them, including a router sled setup for flattening.
- Practice: If new to woodworking or finishing, practice techniques on scrap wood before working on your main slab.
- Build with Confidence: Follow this guide, take your time, and enjoy the process of bringing your unique live edge dining table to life!
.
