
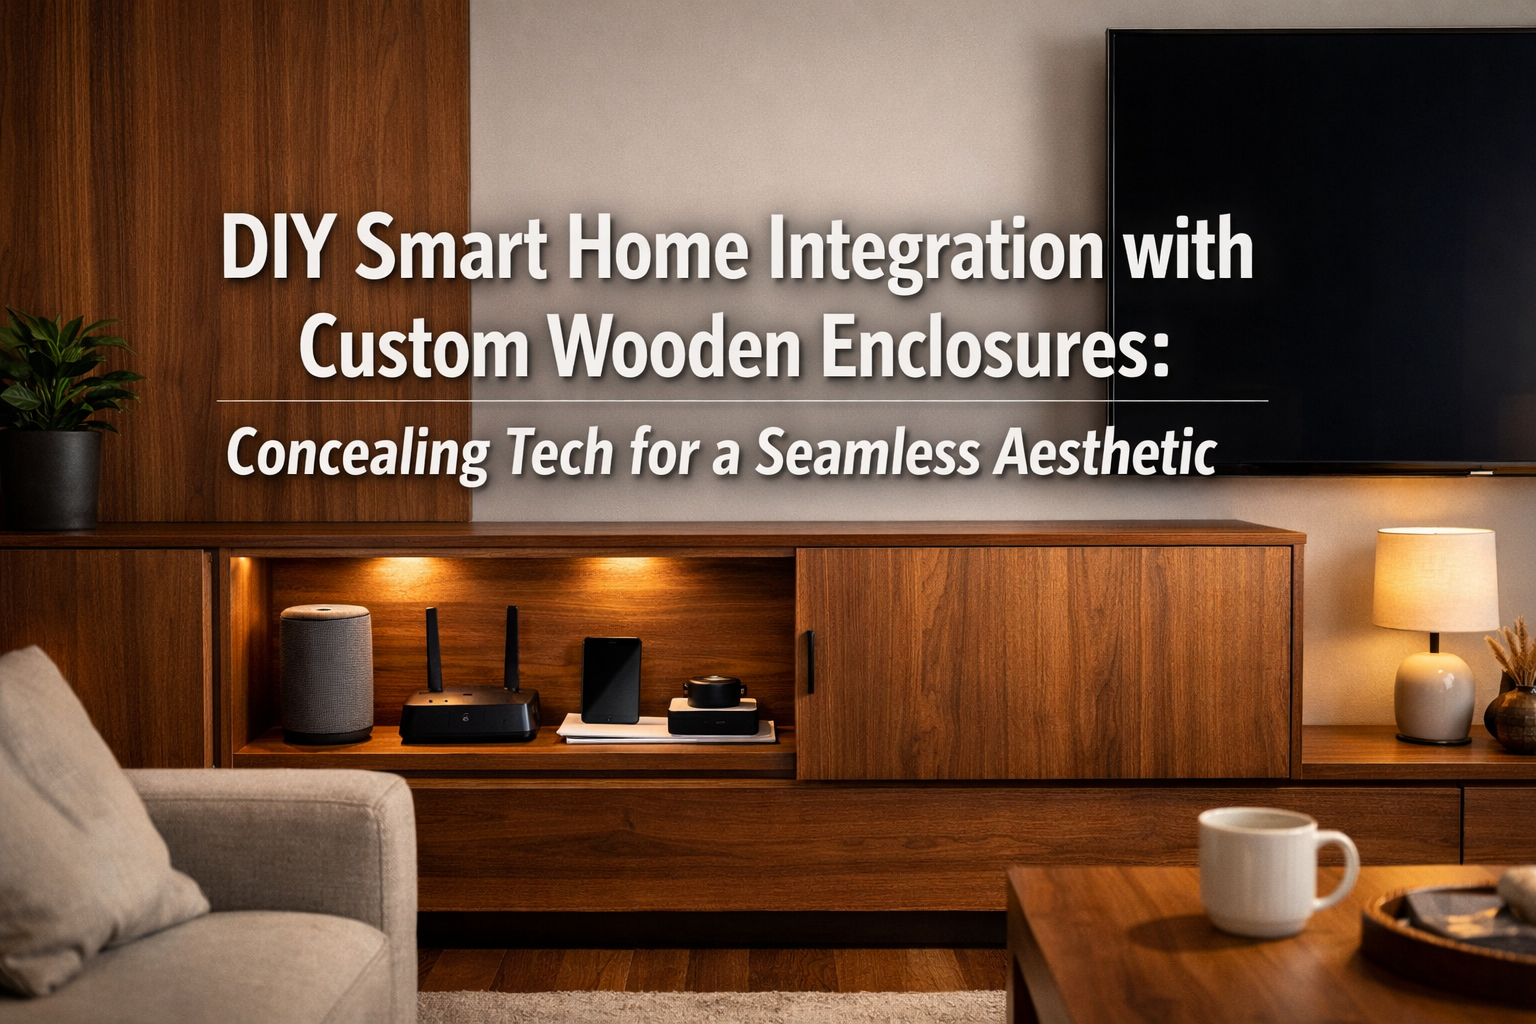

In 2026, smart home technology has become ubiquitous, offering unparalleled convenience and efficiency. However, the proliferation of devices—from voice assistants and Wi-Fi routers to charging hubs and smart displays—often introduces a visual clutter that can disrupt a carefully curated home aesthetic. The solution lies in a harmonious blend of modern technology and timeless craftsmanship: DIY Smart Home Integration with Custom Wooden Enclosures: Concealing Tech for a Seamless Aesthetic. This article explores how to design, build, and integrate custom wooden enclosures that not only hide your tech but also enhance your home’s natural beauty, creating a truly seamless and sophisticated living space.
This approach transforms unsightly gadgets into architectural details, turning functional necessity into an opportunity for personalized design. By taking a DIY approach, homeowners gain full control over materials, finishes, and dimensions, ensuring a perfect fit and a cohesive look that off-matches mass-produced alternatives.

Key Takeaways
- Elevate Aesthetics: Custom wooden enclosures transform unsightly tech into beautiful, integrated design elements, reducing visual clutter.
- Personalized Solutions: DIY projects allow for exact customization in size, wood type, and finish to perfectly match your home’s decor.
- Improved Functionality: Thoughtful design incorporates features like ventilation, cable management, and easy access for maintenance.
- Enhanced Home Value: High-quality, integrated solutions can add a bespoke touch and perceived value to your property.
- Sustainable Choice: Utilizing quality wood and building durable enclosures aligns with sustainable home practices.
Planning Your Custom Wooden Enclosures: The Foundation of Seamless Integration
The journey to successful DIY Smart Home Integration with Custom Wooden Enclosures: Concealing Tech for a Seamless Aesthetic begins with meticulous planning. This initial phase is crucial for ensuring that your enclosures are both functional and visually appealing, blending effortlessly into your home’s existing design. Consider both the technology you wish to conceal and the specific locations where these enclosures will reside.
Identifying Devices and Locations
Start by cataloging all the smart devices you intend to enclose. This might include:
- Voice Assistants: Amazon Echo, Google Nest Hub, Apple HomePod
- Networking Gear: Wi-Fi routers, mesh network nodes, modems
- Charging Hubs: Multi-device charging stations for phones, tablets, smartwatches
- Small Smart Displays: Devices like Google Nest Hub Max or Amazon Echo Show
- Media Devices: Streaming boxes, soundbars, or smaller home theater components
For each device, note its dimensions, power requirements, and connectivity needs (e.g., Wi-Fi signal, Ethernet ports). Next, identify the ideal location for each enclosure. Will it be integrated into existing furniture, mounted on a wall, or built as a standalone piece?
| Device Type | Typical Location | Key Considerations |
|---|---|---|
| Voice Assistant | Bookshelf, Side Table, Wall | Microphone sensitivity, speaker output, ventilation |
| Wi-Fi Router | Central Location, High Up | Signal strength, heat dissipation, cable access |
| Charging Hub | Nightstand, Desk, Entryway | Multiple outlets, device access, cable management |
| Small Smart Display | Kitchen Counter, Desk | Screen visibility, ventilation, touch access |
Design Principles for Aesthetic Concealment
When designing your enclosures, prioritize both form and function.
- Aesthetic Harmony: The enclosure should complement your home’s style. For a modern minimalist look, consider clean lines and subtle finishes. For a rustic or traditional aesthetic, incorporate details like decorative trim or a more distressed finish.
- Material Selection: The type of wood you choose significantly impacts the final look.
- Walnut: Rich, dark, elegant.
- Cherry: Warm, reddish-brown, ages beautifully.
- Maple: Light, strong, takes stains well.
- Oak: Durable, distinctive grain.
Consider exploring options like those found in our guide to Premium Wood Selection for 2026 Projects: Walnut, Cherry, and Exotic Alternatives to Pine.
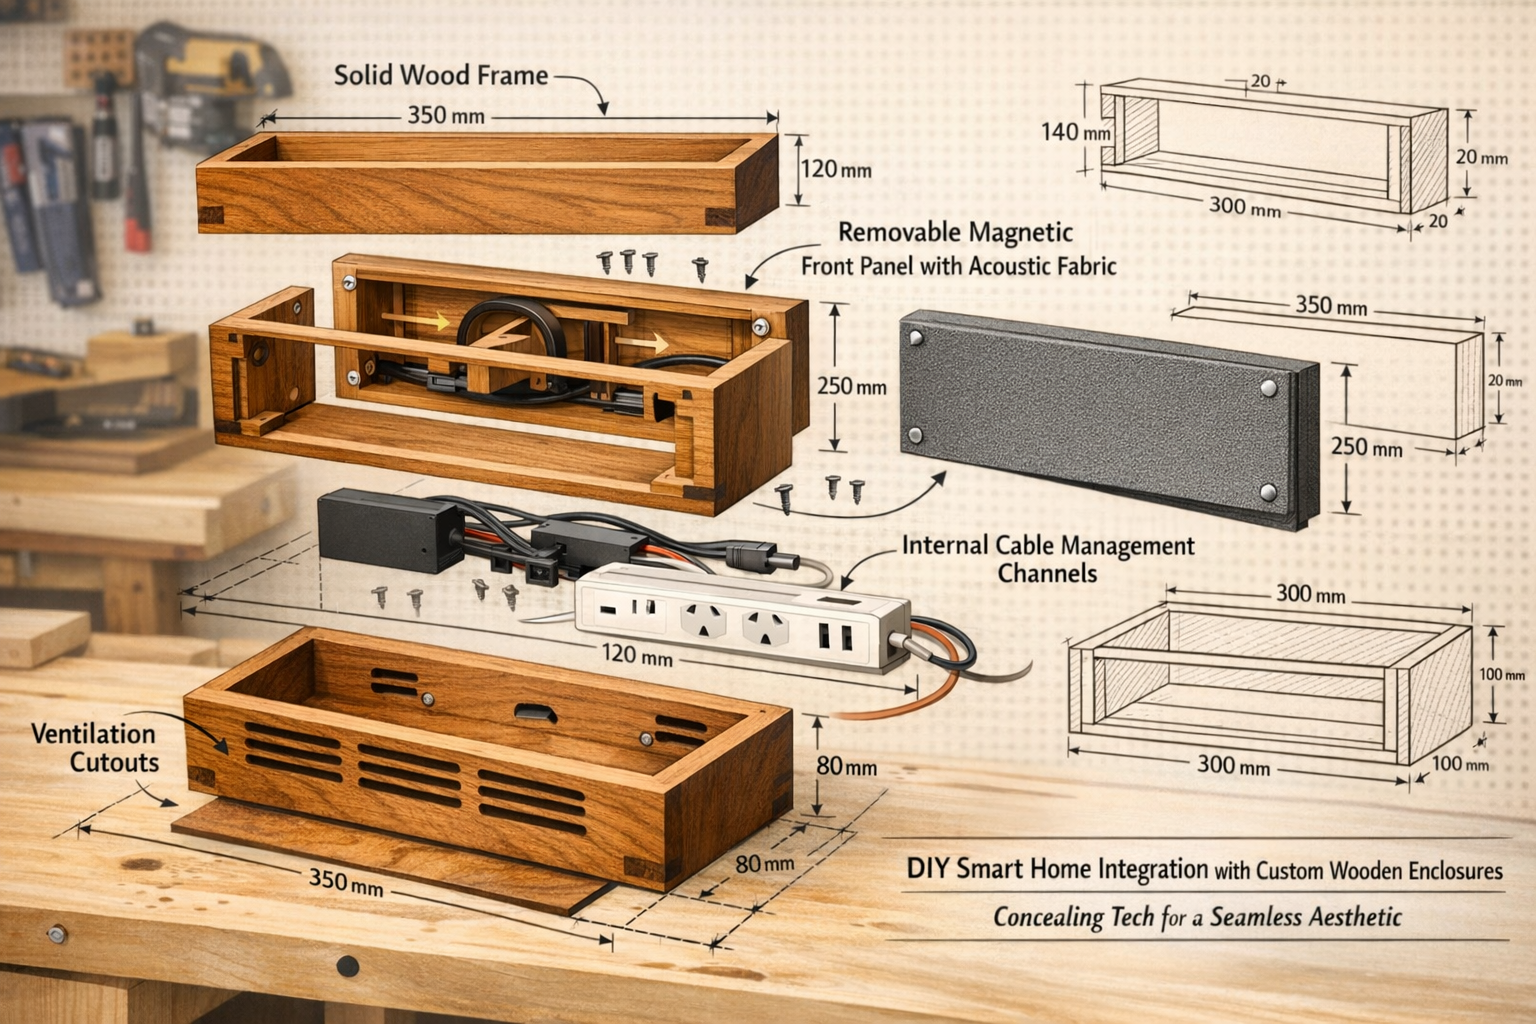
- Ventilation: Smart devices generate heat. Proper airflow is critical to prevent overheating and ensure device longevity. Design discreet vents, slotted panels, or use internal fans if necessary.
- Cable Management: This is key to a truly seamless aesthetic. Include internal channels, cutouts, and tie-down points to neatly route power and data cables, keeping them hidden from view.
- Accessibility: While concealing devices, ensure they remain accessible for maintenance, reboots, or updates. Magnetic panels, hinged doors, or slide-out trays are excellent solutions.
“A well-designed wooden enclosure doesn’t just hide technology; it elevates it, turning functional necessity into a statement of intentional design and craftsmanship.”
Sketching and Prototyping
Begin with rough sketches to conceptualize your designs. Consider various angles and how the enclosure will interact with its surroundings. Move to more detailed drawings, including measurements for the internal space needed for each device, as well as for the wood thickness and joinery. For complex designs, a cardboard or foam core prototype can help you visualize the final product and identify potential issues before committing to wood.
Building Your Custom Wooden Enclosures: Techniques and Tips
With a solid plan in place, the next step in DIY Smart Home Integration with Custom Wooden Enclosures: Concealing Tech for a Seamless Aesthetic is bringing your designs to life. This phase combines woodworking skill with careful attention to the specific needs of smart home devices.
Essential Woodworking Techniques
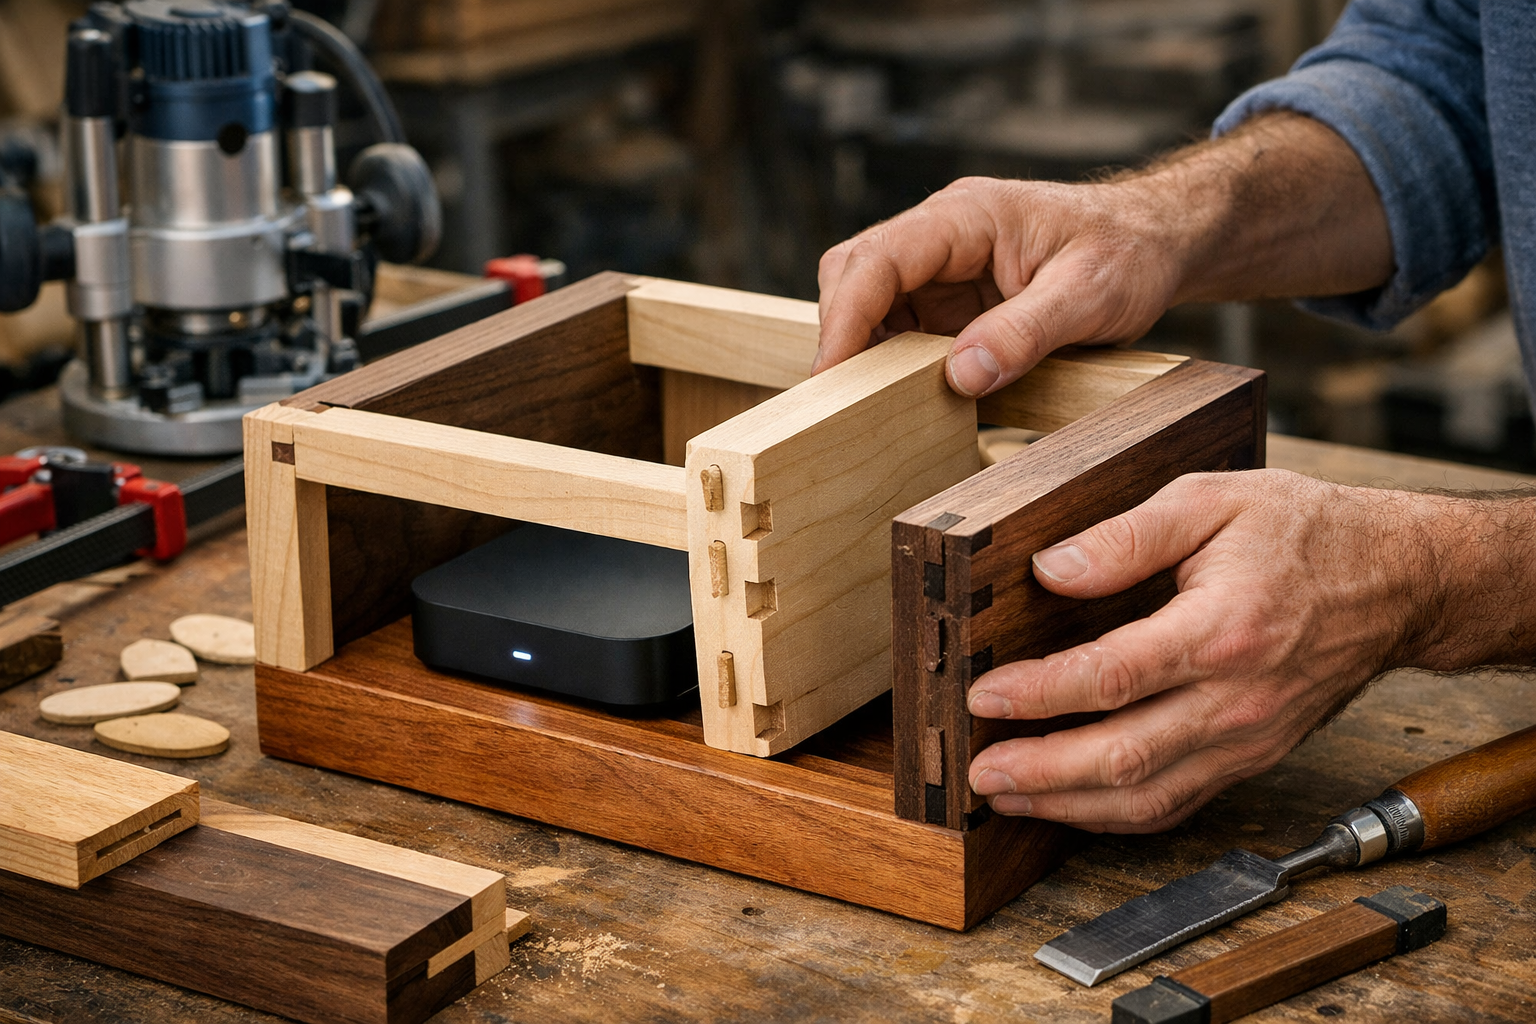
To create durable and aesthetically pleasing enclosures, several woodworking techniques will be invaluable:
- Accurate Cutting: Precision is paramount. Use a table saw for straight cuts, a miter saw for angles, and a jigsaw or scroll saw for intricate shapes and ventilation slots.
- Joinery: The strength and appearance of your enclosure depend on the joinery.
- Butt Joints with Reinforcement: Simple, but often requires screws or dowels.
- Dadoes and Rabbets: Excellent for creating strong, clean connections for shelves and panels.
- Dovetail Joints: While more advanced, they offer exceptional strength and a beautiful, traditional aesthetic, especially useful for smaller, high-visibility enclosures like those for Wooden Storage Chests with Hinged Lids: Techniques for Dovetail Joints and Rustic Finishes.
- Biscuit or Domino Joints: Provide strong, invisible connections, ideal for flush panels.
- Sanding and Finishing: Proper sanding is key to a professional finish. Start with a coarser grit (e.g., 80 or 100) and gradually move to finer grits (e.g., 180 or 220).
- Stain: To match existing furniture or achieve a desired color.
- Clear Coat (Polyurethane, Lacquer, Oil): Protects the wood and enhances its natural beauty. Consider options like those discussed in Sustainable Finishes for Reclaimed Wood: Low-VOC Recipes and.
Incorporating Device-Specific Features
Each enclosure should be tailored to the device it holds.
- For Voice Assistants:
- Acoustic Transparency: The front panel should allow sound to pass freely. Fabric grilles (speaker cloth), thin slats, or strategically placed holes work well.
- Microphone Access: Ensure microphones are not obstructed. Test the enclosure after construction to confirm voice commands are still picked up effectively.
- For Wi-Fi Routers:
- Signal Strength: Avoid thick metal components within the enclosure, as these can interfere with Wi-Fi signals. Wood generally does not pose a significant issue.
- Optimal Placement: Position the enclosure where it will provide the best signal coverage for your home.
- Cable Pass-Throughs: Large enough openings for power, Ethernet, and coaxial cables are essential.
- For Charging Hubs:
- Internal Power Strip: Integrate a small power strip inside the enclosure to connect all charging cables.
- Device Holders: Design slots, shelves, or dividers to keep devices organized while charging.
- Access Ports: Ensure easy access to charging ports without having to open the entire enclosure every time. For example, a discreet slot on the top or side can allow charging cables to extend outwards.
Tool Recommendations
For a project like this, having the right tools makes all the difference:
- Measuring Tools: Tape measure, combination square, marking knife/pencil.
- Cutting Tools: Table saw, miter saw, jigsaw, hand saw.
- Drilling Tools: Cordless drill, drill bits (various sizes), Forstner bits for larger holes.
- Shaping Tools: Router with various bits (e.g., round-over, dado, rabbeting), sandpaper, orbital sander.
- Clamping: Bar clamps, pipe clamps, quick-grip clamps for assembly.
- Safety Gear: Safety glasses, ear protection, dust mask.
Advanced Integration and Aesthetics: Beyond Simple Concealment

Taking DIY Smart Home Integration with Custom Wooden Enclosures: Concealing Tech for a Seamless Aesthetic to the next level involves thoughtful additions and creative solutions that go beyond merely hiding devices. This is where your woodworking artistry truly shines, creating pieces that are both highly functional and stunning.
Smart Lighting and Power Management
Integrate internal LED strip lighting within your enclosures, particularly for charging stations or areas where devices need to be easily visible. These can be motion-activated or controlled via your smart home system, adding both practicality and a touch of modern flair.
For devices that require constant power, consider integrating a smart plug inside the enclosure. This allows you to remotely power cycle devices (like a router) without having to open the enclosure, adding convenience and advanced control.
Incorporating Unique Design Elements
Don’t be afraid to experiment with different design elements to make your enclosures stand out:

- Mixed Wood Techniques: Utilize contrasting wood species or turning shop scraps into design features: mixed-wood techniques and offcut utilization for zero-waste woodworking to create visually interesting patterns or inlays.
- Decorative Hardware: Choose hinges, pulls, and fasteners that complement the wood and your home’s style. Magnetic catches provide a clean, handle-free look for access panels.
- Hidden Compartments: Design secret drawers or compartments within larger enclosures for storing small accessories, remote controls, or other items you wish to keep out of sight.
- Interactive Surfaces: For smart displays, consider a hinged panel that allows the screen to be revealed when needed and tucked away when not in use. You could even integrate a touchscreen into a custom panel that mirrors your smart home app.
Examples of Integrated Solutions
Consider these advanced integration ideas for your home in 2026:
- Integrated Media Console: Build a custom entertainment center that has dedicated, ventilated bays for your streaming devices, soundbar, and gaming consoles. Panels with acoustic fabric can conceal speakers while allowing sound to pass through.
- Smart Kitchen Hub: Create a built-in wooden cabinet for a smart display or tablet in the kitchen. This can include a concealed charging area for phones and a small speaker for music or recipes. Ensure it’s treated with a durable, moisture-resistant finish.
- Bedroom Charging & Control Station: A custom nightstand or headboard integration that includes hidden charging ports, a small shelf for a voice assistant, and even a discreet light switch or fan control panel.
- Wall-Mounted Router/Hub Enclosures: Instead of letting your router sit on a shelf, create a slim, wall-mounted wooden box that completely encloses it, leaving only a small, decorative access point for cables. This can also house mesh network nodes, blending them seamlessly into your decor. For design inspiration, consider styles similar to Handcrafted Wooden Wall Art: 3D Layered Panels and Geometric.
- Smart Entryway Bench: Incorporate a charging station and perhaps a small smart hub into a custom-built entryway bench. This not only provides a place to sit but also a discreet spot for keeping devices charged and accessible upon entering or leaving the home, similar to concepts for Crafting Profitable Wooden Benches: Indoor-Outdoor Designs w.
Safety and Maintenance Considerations
- Heat Management: Always prioritize ventilation, especially for power-intensive devices. If an enclosure feels warm to the touch, add more ventilation or consider a small, quiet fan.
- Wireless Performance: Test Wi-Fi and Bluetooth signal strength after devices are enclosed. While wood typically doesn’t cause significant interference, extremely dense woods or tight spaces might have a minimal impact.
- Future-Proofing: Design with some flexibility. Use modular components or slightly oversized internal dimensions to accommodate future device upgrades. Removable back panels simplify access for maintenance or swapping out devices.
By embracing these advanced integration techniques, your DIY Smart Home Integration with Custom Wooden Enclosures: Concealing Tech for a Seamless Aesthetic projects will move beyond simple concealment to become true statements of personalized design and thoughtful functionality within your home.
Conclusion
The journey of DIY Smart Home Integration with Custom Wooden Enclosures: Concealing Tech for a Seamless Aesthetic is a rewarding endeavor that transforms a modern necessity into an artistic expression. By carefully planning, skillfully building, and thoughtfully integrating custom wooden solutions, you can eliminate visual clutter and elevate the elegance of your living spaces in 2026. This approach not only personalizes your home but also creates a more tranquil and cohesive environment where technology serves you discreetly and beautifully.
As you embark on these projects, remember that patience and attention to detail are your best tools. Experiment with different wood types, joinery techniques, and finishes to find what best suits your aesthetic and functional needs. The satisfaction of crafting something beautiful and truly integrated into your home is immense.
Actionable Next Steps:
- Audit Your Tech: Identify all smart devices causing visual clutter and their ideal concealed locations.
- Sketch Your Visions: Draw preliminary designs for each enclosure, considering device dimensions and aesthetic goals.
- Source Your Materials: Select the right wood and hardware that complement your home’s decor.
- Build with Care: Apply appropriate woodworking techniques, prioritizing ventilation, cable management, and accessibility.
- Test and Refine: Ensure optimal device performance and make any necessary adjustments for perfect integration.
