
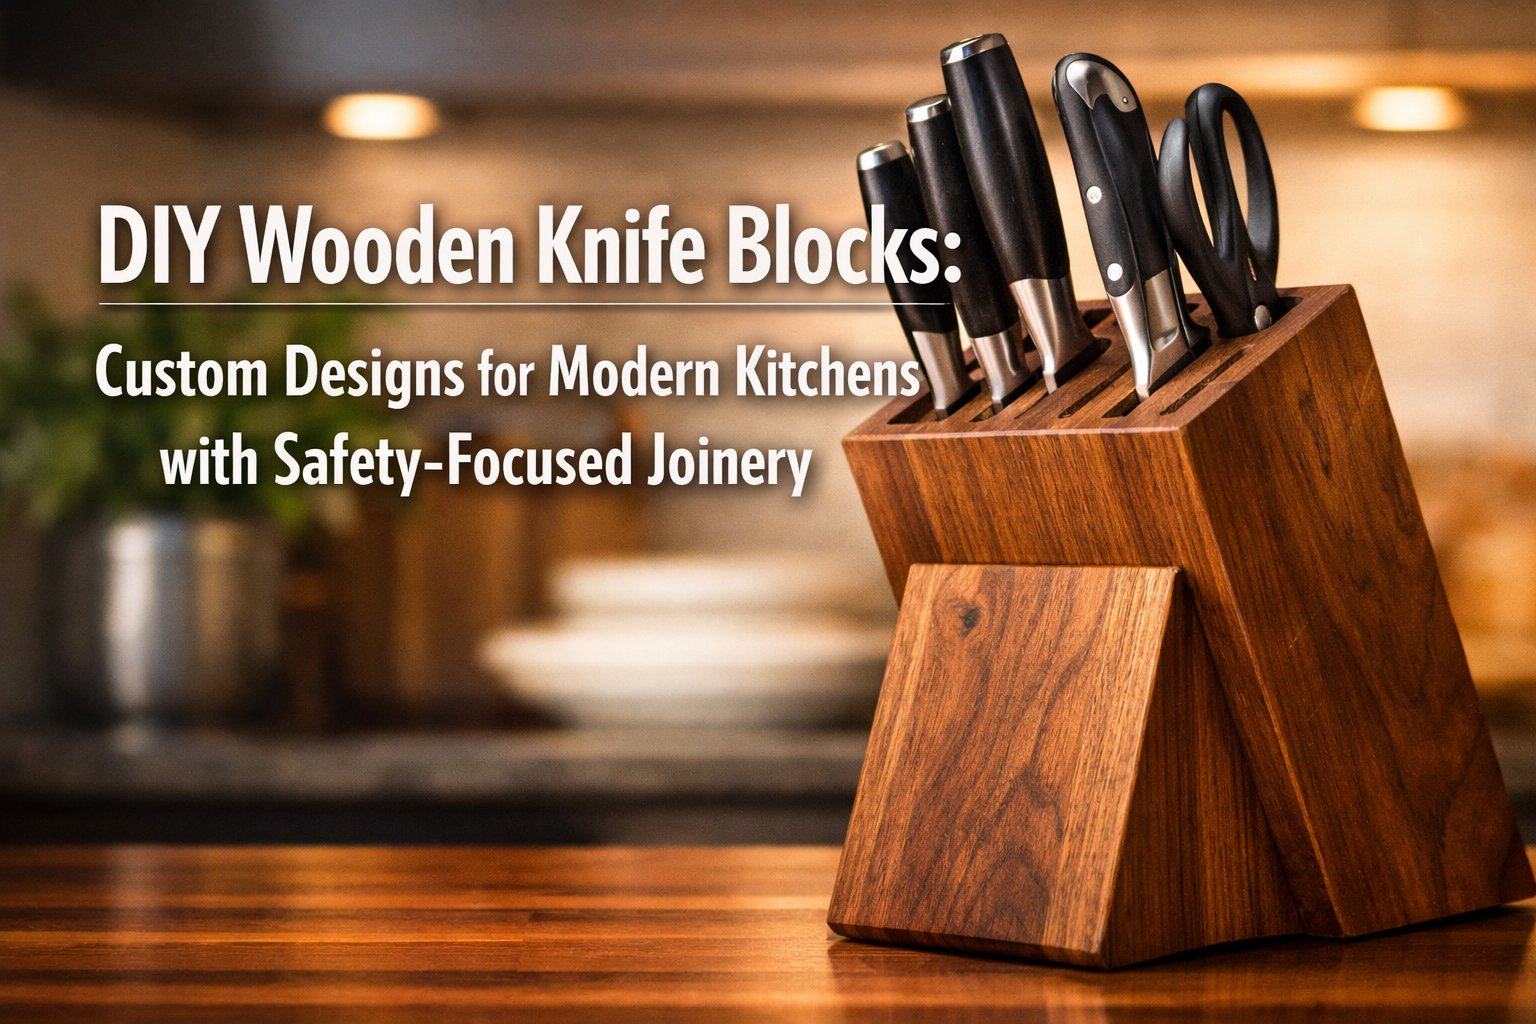

The kitchen, often called the heart of the home, deserves tools and accessories that are both functional and beautiful. Among these, a knife block stands as an essential, protecting valuable blades and keeping them safely accessible. While mass-produced options exist, nothing quite matches the satisfaction and precise utility of crafting your own. This article delves into the exciting world of DIY Wooden Knife Blocks: Custom Designs for Modern Kitchens with Safety-Focused Joinery, guiding you through step-by-step builds using power tools and intricate joinery techniques like dovetails for secure blade slots. We’ll emphasize ergonomic grips and customizable finishes, ensuring your creation is not just a storage solution, but a statement piece for everyday use in 2026. This comprehensive guide caters to woodworkers ranging from beginners eager to scale their skills to advanced artisans seeking fresh inspiration, complete with essential material selection tips for hardwoods.
Key Takeaways
- Customization is Key: Tailor your knife block’s size, design, and wood choice to perfectly match your kitchen’s aesthetic and your knife collection.
- Safety First Design: Implement safety-focused joinery, such as individually routed slots or dovetail construction, to protect both knives and users.
- Hardwood Selection Matters: Choose durable hardwoods like walnut, maple, or cherry for longevity and aesthetic appeal.
- Power Tools for Precision: Utilize tools like routers, table saws, and drill presses for accurate cuts and efficient construction.
- Ergonomics and Finish: Consider how the block will be handled and choose finishes that protect the wood and enhance its natural beauty.
Designing Your Custom DIY Wooden Knife Blocks: Blending Aesthetics with Practicality
Crafting DIY Wooden Knife Blocks: Custom Designs for Modern Kitchens with Safety-Focused Joinery begins with thoughtful design. Before making a single cut, envision how your knife block will integrate into your kitchen, how many knives it needs to hold, and what style best suits your aesthetic. Modern kitchens often lean towards clean lines, natural materials, and efficient use of space. Your custom knife block can perfectly complement this by reflecting minimalist principles or adding a touch of rustic warmth, depending on your chosen wood and finish.

Initial Design Considerations and Sketching
Start by assessing your knife collection. Lay out all the knives you intend to store: chef’s knives, paring knives, bread knives, cleavers, and even sharpening steels. Measure their lengths and blade widths at their widest points. This step is crucial for determining the dimensions of your block and the spacing of the slots.
Consider the following design elements:
- Footprint: How much counter space can you dedicate? Will it be a slim, upright block, or a broader, angled one?
- Capacity: How many knives do you need to store? Factor in potential future additions.
- Orientation: Vertical, horizontal, or angled? Vertical blocks are common, but angled designs can offer easier access and a unique aesthetic.
- Style: Does your kitchen lean modern, traditional, industrial, or farmhouse? Your wood choice and finish will heavily influence the block’s perceived style. For inspiration on pairing wood types with modern aesthetics, explore Premium Wood Selection for 2026 Projects: Walnut, Cherry, and Exotic Alternatives to Pine.
- Special Features: Do you want a slot for kitchen shears, a magnetic strip for small utensils, or a built-in sharpener?
Once you have these measurements and ideas, grab a pencil and paper or use a digital design program. Sketch multiple concepts. Don’t be afraid to experiment with different shapes, angles, and slot arrangements. This preliminary phase is where creativity flourishes and practical challenges are identified before wood dust starts flying.
Pull Quote: “A well-designed knife block isn’t just storage; it’s a display case for your culinary tools and a testament to personalized craftsmanship.”
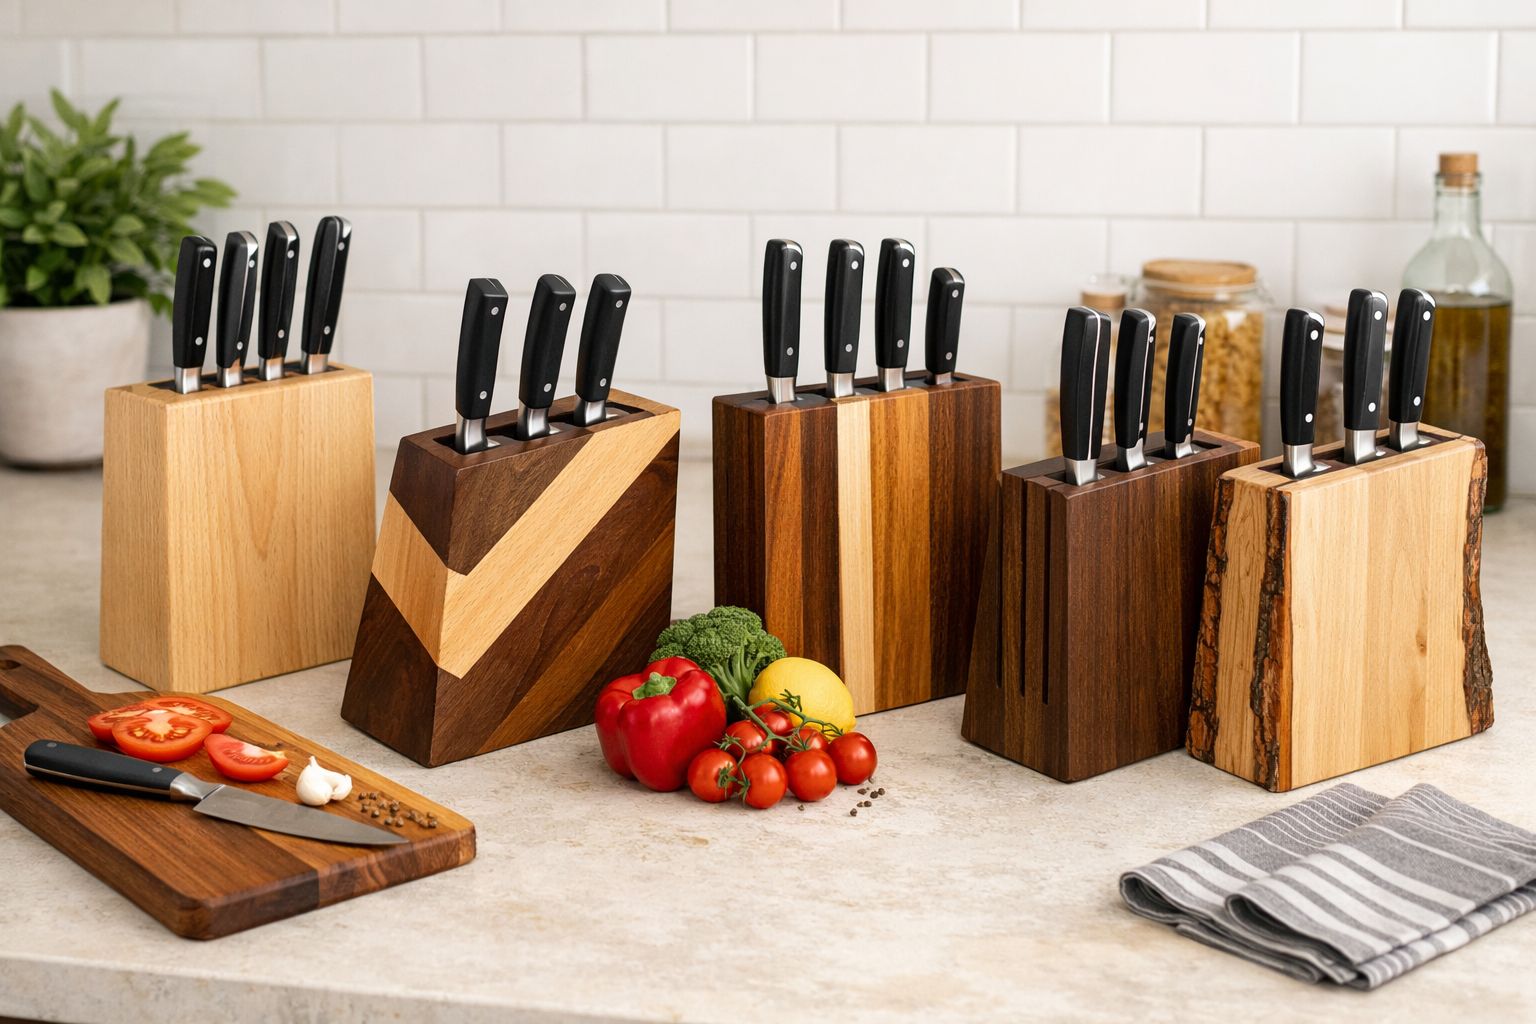
Selecting the Right Wood for Your Knife Block
The choice of wood is paramount, affecting not only the appearance but also the durability and safety of your knife block. For DIY Wooden Knife Blocks: Custom Designs for Modern Kitchens with Safety-Focused Joinery, hardwoods are generally preferred due to their strength, stability, and aesthetic appeal.
Here’s a comparison of popular hardwood choices:
| Wood Type | Characteristics | Pros | Cons |
|---|---|---|---|
| Walnut | Rich, dark brown with purplish undertones; open grain. | Elegant appearance, good stability, easy to work with. | Can be more expensive. |
| Maple | Light, creamy color; fine, even grain. | Very durable, excellent for a bright, modern look. | Can be hard to stain evenly; sometimes prone to burning. |
| Cherry | Pale pinkish-brown, darkens to reddish-brown with age; fine grain. | Beautiful aging process, easy to work, moderate hardness. | Can be prone to blotching when stained. |
| Oak | Prominent grain patterns; available in red and white varieties. | Very strong, durable, classic look. | Can be heavier and harder to cut cleanly. |
For a unique aesthetic, consider using mixed wood techniques, perhaps incorporating lighter maple for the body and a darker walnut for a base or accent strip. This can add visual interest and allows you to utilize Turning Shop Scraps into Design Features: Mixed-Wood Techniq for a more sustainable project. Ensure the wood is well-seasoned and free of defects like large knots or cracks that could compromise the block’s integrity.
Ergonomic Considerations and User Experience
A custom knife block should not only look good but also be a pleasure to use. Ergonomics plays a vital role here. Think about:
- Knife Insertion/Removal: Slots should be wide enough to allow knives to slide in and out smoothly without binding or scraping the blade, yet snug enough to hold them securely.
- Blade Protection: The interior of the slots should be smooth to prevent dulling or scratching the knife edges. Consider sanding thoroughly or even lining slots with thin felt (though this can harbor moisture if not properly maintained).
- Stability: The block must be heavy and wide enough at the base to prevent tipping, especially when removing or inserting heavier knives. Adding non-slip feet to the base is a simple but effective safety measure.
- Accessibility: Ensure all knives are easily reachable without awkwardly maneuvering around others. Angled slots or staggered heights can improve access.
By incorporating these design elements from the outset, your DIY Wooden Knife Blocks: Custom Designs for Modern Kitchens with Safety-Focused Joinery will be both a functional necessity and a cherished handcrafted item.
Safety-Focused Joinery and Construction Techniques for Secure Blade Storage

Building DIY Wooden Knife Blocks: Custom Designs for Modern Kitchens with Safety-Focused Joinery requires precision and attention to detail, especially when it comes to creating secure and blade-friendly slots. The core of this project lies in selecting appropriate joinery methods that are both robust and prevent blades from shifting or contacting each other. Power tools will be your best friend for achieving the accuracy needed.
Essential Power Tools and Setup
Before diving into joinery, ensure your workshop is set up safely and your tools are ready. Proper setup enhances both efficiency and accuracy.
- Table Saw: Essential for precise ripping of stock to thickness and cross-cutting to length. Use a sharp, fine-toothed blade for clean cuts. For optimal safety, especially with smaller pieces, always use a push stick and ensure your fence is parallel to the blade.
- Router Table: Indispensable for creating the individual blade slots. A plunge router can also be used, but a router table offers greater control and consistency for repetitive slots. Select straight router bits that match the desired slot width (typically 1/8″ to 1/4″).
- Drill Press: Useful for drilling pilot holes or creating stopped holes for specialized slots, ensuring they are perfectly perpendicular.
- Sander (Orbital or Belt): For preparing surfaces and achieving smooth finishes.
Familiarize yourself with your tools and always prioritize safety by wearing appropriate personal protective equipment (PPE), such as safety glasses and hearing protection. Ensure your workspace is clean and well-lit. For more on power tool mastery, consider reviewing guides like Power Tool Mastery for Building Console Tables: Modern Entryway Furniture for Small Spaces.
Creating Secure Blade Slots: Techniques and Best Practices
The most critical aspect of a knife block is how it protects and holds the blades. There are several effective methods for creating secure slots.

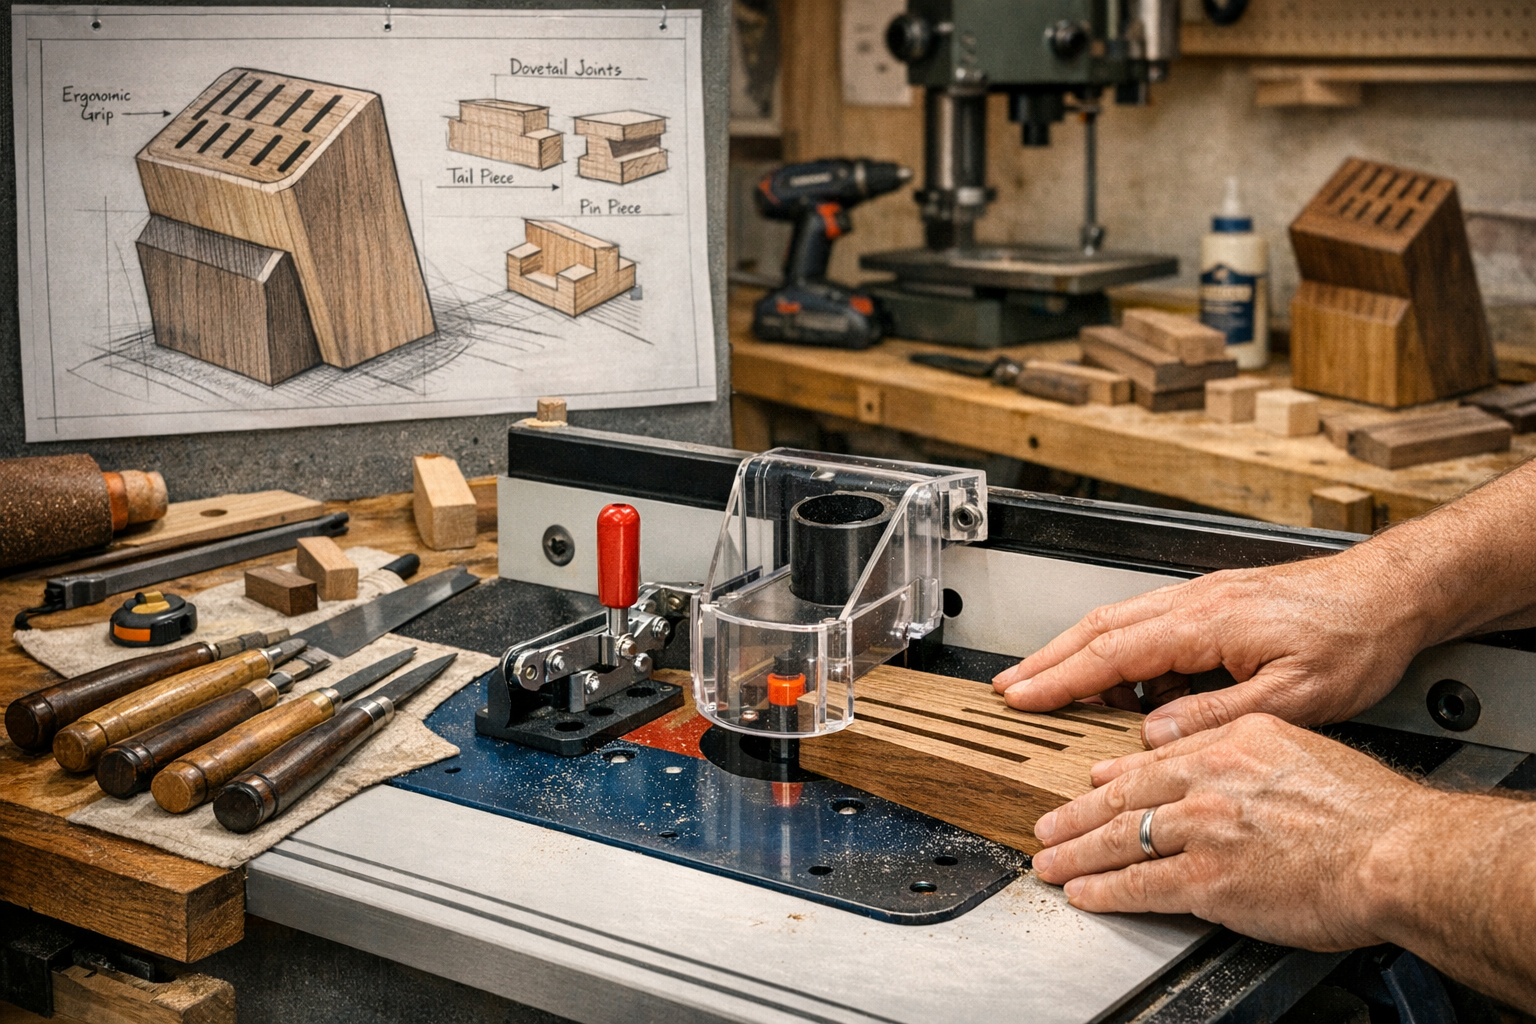
1. Individual Routed Slots
This is perhaps the most common and effective method for DIY Wooden Knife Blocks: Custom Designs for Modern Kitchens with Safety-Focused Joinery.
- Laminating Blanks: The block is typically constructed from several pieces of wood glued together. For instance, you might use three layers: a thick base, a thinner middle layer where the slots are routed, and a top cap.
- Routing the Middle Layer: The middle layer is where you’ll route the individual slots.
- Marking: Carefully mark the center line and desired width for each knife slot on the middle piece of wood.
- Jig Construction: For consistency, build a simple jig for your router table. This might be a fence with stop blocks to ensure each slot is routed to the exact depth and length required.
- Routing: With a straight bit, rout each slot individually. Ensure the depth is sufficient to house the knife blade fully but not so deep that the knife handle sits too low. A common depth is 3/4″ to 1″.
- Angled Slots: For an angled block, the routing process remains similar, but the middle piece might be cut at an angle beforehand.
- Assembly: Once all slots are routed and sanded smooth, glue the layers together using strong wood glue and clamps. Ensure proper alignment.
2. Dovetail Joinery for Stability
While not directly used for the blade slots, dovetail joinery can be incorporated into the overall construction of a multi-piece knife block for superior strength and aesthetic appeal. For example, if you’re building a box-style knife block with separate compartments or an angled stand, dovetail joints would provide exceptional durability. Learning dovetail techniques not only enhances the stability of your knife block but also elevates your woodworking skills.
Table: Comparison of Slot Creation Methods
| Method | Description | Pros | Cons |
|---|---|---|---|
| Individual Routed Slots | Routing channels into a middle layer that is then laminated. | Excellent blade protection, custom fit, clean look. | Requires careful marking and routing, potential for tear-out. |
| Magnetic Strips (Inlay) | Embedding strong magnets into the wood. | Visually appealing, hygienic, versatile. | Requires precise routing for magnets, can be costly. |
| Pin Slots (Dowels) | Drilling holes and inserting dowels to create separations. | Simple, rustic aesthetic. | Less precise fit, knives can sometimes shift. |
Ensuring Blade Protection and Hygiene
Regardless of the slot method chosen, several steps are crucial for safety and knife longevity:
- Smooth Interiors: After routing, thoroughly sand the inside of each knife slot. Any rough edges can dull a blade over time. Use small sanding sticks or folded sandpaper.
- Dust Removal: Before final assembly and finishing, ensure all sawdust is removed from the slots. A vacuum or compressed air works well.
- Breathability: While a snug fit is good, ensure there’s enough air circulation to prevent moisture buildup, which can lead to rust on blades or mold within the wood. Some designs incorporate small ventilation holes at the bottom of the slots.
- Non-Contact Design: The goal is for knife blades to rest in their slots without touching other blades or the bottom of the slot excessively, which can happen with open-ended slots. Fully enclosed, individually routed slots are ideal for this.
By focusing on these safety-focused joinery and construction techniques, your custom knife block will not only be a beautiful addition to your kitchen but also a highly functional and safe storage solution for your valuable knives.
Finishing Your DIY Wooden Knife Blocks for Longevity and Modern Appeal
The final stage of creating your DIY Wooden Knife Blocks: Custom Designs for Modern Kitchens with Safety-Focused Joinery is the finishing process. A well-applied finish not only enhances the wood’s natural beauty but also provides crucial protection against moisture, food stains, and general wear and tear in a busy kitchen environment. The choice of finish can dramatically alter the block’s appearance, allowing you to perfectly match your modern kitchen aesthetic.
Sanding: The Foundation of a Flawless Finish
Before any finish is applied, meticulous sanding is essential. This step removes imperfections, tool marks, and prepares the wood fibers to accept the finish evenly.
- Progressive Grits: Start with a coarser grit sandpaper (e.g., 100 or 120-grit) to remove any major marks. Gradually move to finer grits (e.g., 150, 180, 220-grit). For very fine finishes, you can go up to 320 or even 400-grit.
- Direction: Always sand with the grain of the wood to avoid visible scratches.
- Edges and Slots: Pay special attention to edges, corners, and, most importantly, the interior of the knife slots. Use folded sandpaper or small sanding sticks to smooth out any rough spots within the slots, as these could dull knife blades over time.
- Dust Removal: After each grit, thoroughly clean the surface to remove all sanding dust. A tack cloth or compressed air works well. Dust left on the surface can embed in the finish, creating a bumpy texture.
Choosing the Right Finish for Kitchen Use
Given the kitchen environment, the finish needs to be durable, water-resistant, and ideally, food-safe once cured. Several options are suitable for DIY Wooden Knife Blocks: Custom Designs for Modern Kitchens with Safety-Focused Joinery.
1. Food-Safe Oils (e.g., Mineral Oil, Tung Oil, Danish Oil)
- Description: These oils penetrate the wood, enhancing its natural color and providing a soft, natural-looking finish. They are generally easy to apply and repair.
- Pros: Highly food-safe (especially mineral oil), natural look and feel, easy to reapply, penetrates deeply for protection. For specific applications and comparisons, consider reviewing Danish Oil vs. Linseed: The Ultimate Wood Finishing Guide.
- Cons: Requires more frequent reapplication than film finishes, offers less abrasion resistance.
- Application: Apply generously with a clean cloth, allow to soak in for 15-30 minutes, then wipe off excess. Repeat several coats over a few days until the wood is saturated.
2. Polyurethane (Water-Based or Oil-Based)
- Description: Polyurethane creates a durable, protective film on the surface of the wood. Available in various sheens (matte, satin, semi-gloss, gloss). Water-based polyurethanes are low-VOC and dry quickly.
- Pros: Excellent durability, water resistance, good abrasion resistance, wide range of sheens.
- Cons: Can alter wood color (oil-based yellows over time), can be challenging to repair localized damage, not considered food-safe for direct food contact (but fine for a knife block).
- Application: Apply thin, even coats with a brush or sprayer, sanding lightly between coats with fine-grit sandpaper (e.g., 320-grit). Follow manufacturer’s drying times. For detailed guidance, see wood finishing techniques – Wood Craft Wiz.
3. Waxes (e.g., Beeswax, Carnauba Wax)
- Description: Waxes provide a very natural, low-sheen finish that feels smooth to the touch. Often used over oil finishes for added protection.
- Pros: Enhances natural wood feel, provides some water resistance, easy to apply.
- Cons: Less durable than oil or polyurethane, requires regular reapplication.
- Application: Apply a thin layer of paste wax, allow it to haze, then buff to a sheen with a clean cloth.
Customizing the Finish for Modern Kitchens
Beyond the type of finish, how you apply it and what you aim for visually can define its suitability for a modern kitchen.
- Natural Look: For a timeless modern appeal, many prefer finishes that let the wood’s natural grain and color shine through. Clear oils or satin-sheen polyurethanes are excellent choices. This complements the warmth often found in modern Scandinavian or minimalist designs.
- Staining: If you want to alter the wood’s color, staining is an option. For example, a dark stain on maple can mimic walnut, or a light grey stain can suit an industrial modern aesthetic. Always test stains on scrap pieces of the same wood first. For specific wood types, refer to resources like mahogany wood finishing techniques – Wood Craft Wiz or maple wood finishing techniques – Wood Craft Wiz.
- Non-Slip Feet: As a final touch, apply small rubber or cork feet to the base of your knife block. This protects your countertops, prevents the block from sliding, and allows air circulation underneath.
By carefully selecting and applying the finish, your DIY Wooden Knife Blocks: Custom Designs for Modern Kitchens with Safety-Focused Joinery will not only be protected but also serve as a beautiful, custom-made focal point in your kitchen for years to come. Remember to allow adequate curing time for any finish before introducing knives, typically a few days to a week, depending on the product.
Conclusion
Embarking on the journey of crafting DIY Wooden Knife Blocks: Custom Designs for Modern Kitchens with Safety-Focused Joinery is a rewarding endeavor that blends practicality with artistic expression. From the initial design sketches and careful wood selection to the precise execution of safety-focused joinery and the application of a durable finish, each step offers an opportunity to create a truly personalized kitchen essential. This guide has aimed to equip you with the knowledge and confidence to tackle this project, emphasizing the importance of ergonomic considerations, robust construction techniques, and an understanding of suitable finishes for the kitchen environment.
By choosing the right hardwoods, utilizing power tools effectively for accurate blade slots, and implementing secure joinery methods like individual routing or even decorative dovetails for structural components, you ensure your knife block is not only aesthetically pleasing but also a safe haven for your valuable culinary tools. The customizable nature of this project means your finished piece will perfectly integrate into your modern kitchen, reflecting your style and meeting your specific needs in 2026.

Actionable Next Steps
- Assess Your Collection: Lay out all your kitchen knives and measure them to finalize the dimensions and slot requirements for your custom block.
- Sketch and Plan: Create detailed drawings of your desired knife block, considering its footprint, capacity, and aesthetic style.
- Source Your Wood: Select a high-quality hardwood like walnut, maple, or cherry. Consider Sourcing and Restoring Urban-Harvested and Reclaimed Wood for a sustainable option.
- Gather Your Tools: Ensure you have access to a table saw, router (preferably a router table), drill press, and various sanders.
- Build with Precision: Follow the construction techniques for creating safe, individual blade slots, always prioritizing safety in your workshop.
- Finish Strong: Apply a durable, food-safe finish that complements your kitchen’s decor, ensuring proper sanding and curing. Explore Sustainable Finishes for Reclaimed Wood: Low-VOC Recipes and Application Tutorials for eco-friendly options.
Your custom-made wooden knife block will stand as a testament to your woodworking skill and an invaluable asset in your modern kitchen for years to come.
