


The allure of gracefully curved wood in furniture and art has captivated artisans for centuries. Unlike carving or laminating, which can be wasteful or compromise structural integrity, steam bending offers a method to transform straight lumber into flowing, organic shapes while preserving the wood’s strength and natural beauty. This Introduction to Steam Bending Wood: Shaping Techniques for Unique Furniture and Art will delve into this ancient, yet highly relevant, craft, empowering woodworkers of all levels to unlock new creative possibilities in 2026. From the practicalities of setting up a steam box to mastering the art of bending, prepare to discover how this technique can elevate your woodworking projects.
Key Takeaways
- Steam bending is a method to create strong, curved wooden components by softening wood fibers with heat and moisture.
- Understanding wood species, grain orientation, and moisture content is crucial for successful bending.
- A well-designed steam box and sturdy bending forms are essential tools for this technique.
- The process involves steaming, quickly bending, and then clamping the wood into a form until dry.
- Steam bending allows for unique, flowing designs in furniture and art that are difficult to achieve otherwise.
The Fundamentals of Steam Bending Wood: Science and Selection
Steam bending relies on a fascinating scientific principle: the softening of lignin, the natural glue that binds wood fibers together, when exposed to high heat and moisture. This allows the wood to become pliable and conform to a desired shape. Once cooled and dried in place, the lignin re-hardens, locking the wood into its new form. This section of our Introduction to Steam Bending Wood: Shaping Techniques for Unique Furniture and Art will explore the optimal wood characteristics and the setup of a basic steam box.

Choosing the Right Wood Species
Not all wood species are created equal when it comes to steam bending. Some woods are naturally more cooperative due to their cellular structure. Generally, hardwoods with straight, clear grain and low resin content are preferred.
Excellent Choices for Steam Bending:
- Oak (White and Red): Widely regarded as the king of bending woods.
- Ash: Very flexible and strong.
- Hickory: Exceptionally tough and bends well.
- Walnut: Bends surprisingly well for a darker wood.
- Cherry: Good bending characteristics.
- Beech: A traditional choice in many cultures.
- Maple: Often successful with proper preparation.
Woods to Approach with Caution (or Avoid):
- Softwoods (Pine, Fir, Spruce): Tend to splinter and crush easily.
- Ring-Porous Woods (some Elm, Locust): Can be challenging due to distinct earlywood/latewood differences.
- Woods with Irregular Grain: Knots or cross-grain can lead to breakage.
It’s vital to select wood that is green (freshly cut) or air-dried to a higher moisture content (around 20-30%). Kiln-dried wood, with its permanently set lignin, is notoriously difficult to bend and often cracks.
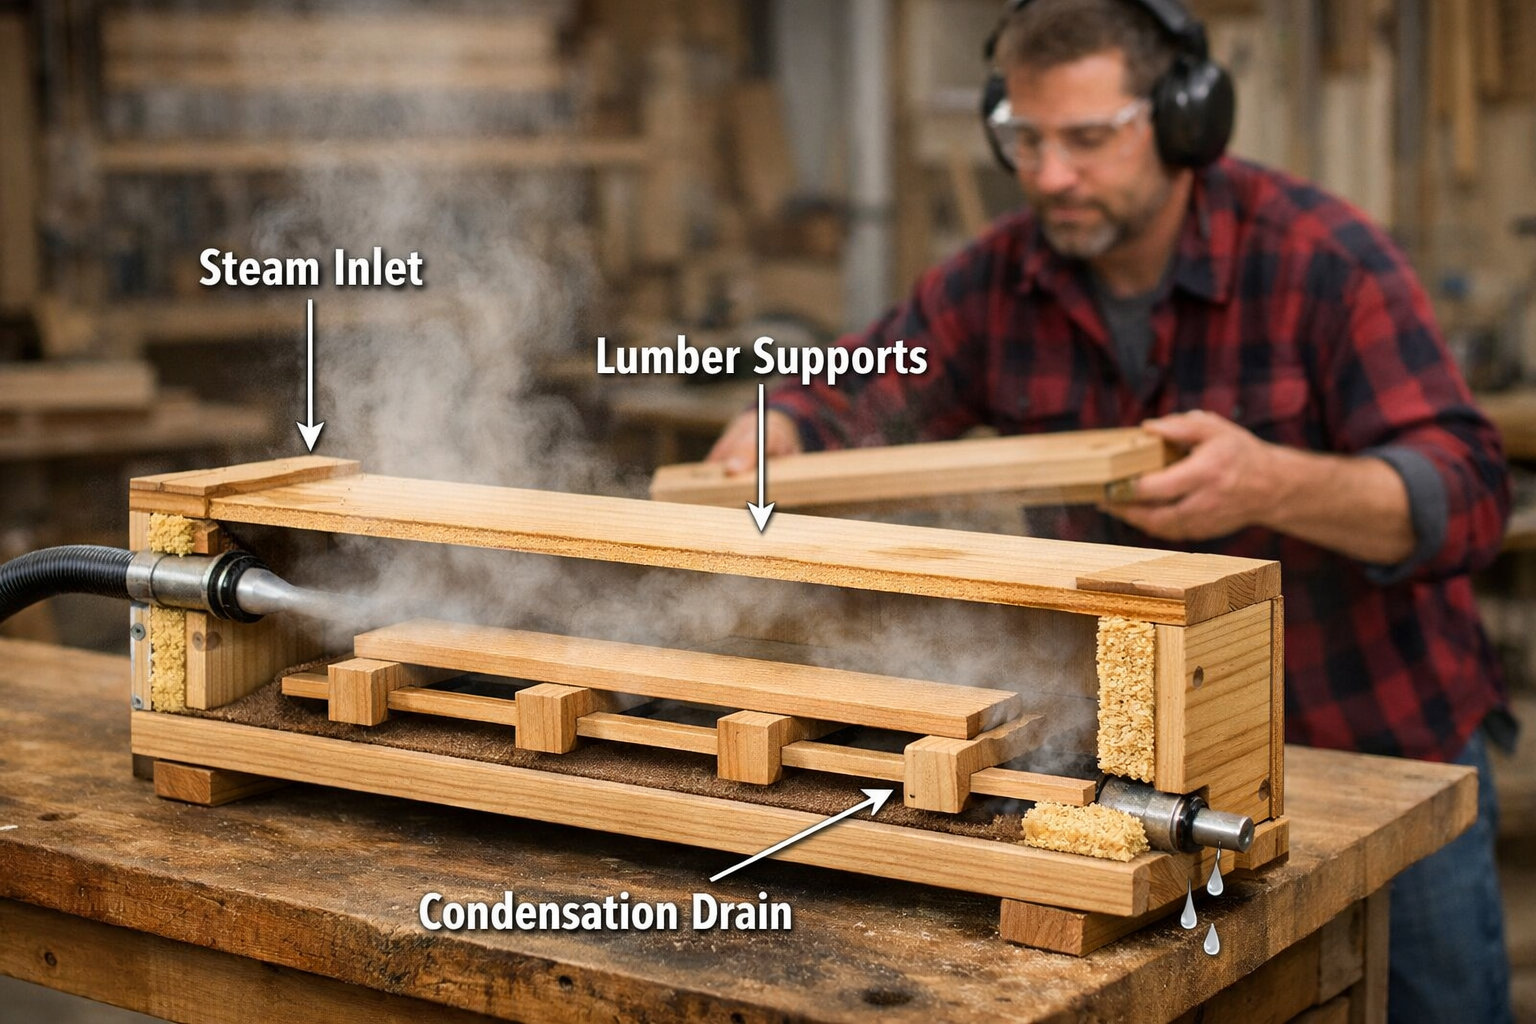
Designing and Building Your Steam Box
A steam box is a critical piece of equipment for this technique. It’s essentially an insulated chamber where wood is exposed to saturated steam at atmospheric pressure.
Key Components of a Steam Box:
- Chamber: A long, airtight box made from plywood, PVC, or metal. Dimensions depend on the size of the wood you plan to bend. Insulation (like rigid foam) helps maintain heat.
- Steam Source: A wallpaper steamer, electric kettle, or even a converted pressure cooker can generate sufficient steam. Ensure the steam hose connects securely.
- Wood Supports: Dowels or battens inside the box keep the wood elevated, allowing steam to circulate freely around all surfaces.
- Condensation Drain: A small hole at the bottom of one end allows water to escape without creating a vacuum or soaking the wood in hot water.
- Door/Lid: Must be tightly sealing but easy to open quickly.

💡 Pro Tip: A simple “test piece” of the same wood and thickness can be steamed alongside your main stock. This allows you to check for pliability before risking your main piece.
For those interested in building their own workshop essentials, considering a steam box project can be a rewarding addition to your skills, much like mastering “DIY Smart Workshop Storage Solutions: Maximizing Space and Organization for Every Tool” or “Building a Mobile Dust Collection Cart for Any Workshop: Design, Filtration, Portability”.
Mastering the Bending Process: Techniques and Tips for Success
Once your wood is properly selected and your steam box is ready, the next step in our Introduction to Steam Bending Wood: Shaping Techniques for Unique Furniture and Art is the actual bending process. This requires speed, proper technique, and the right forms.
The Steaming Phase
The general rule of thumb for steaming is approximately 1 hour per inch of wood thickness. So, a 1-inch thick piece of wood would steam for about an hour. Thicker pieces will require longer.
- Load the Wood: Place the wood in the steam box, ensuring it’s elevated for even steam distribution.
- Heat It Up: Turn on your steam source. Wait for visible steam to escape from the ends of the box, indicating it’s fully saturated.
- Monitor Temperature: Aim for a consistent internal temperature of around 200-212°F (93-100°C).
- Patience is Key: Resist the urge to open the box frequently. Each opening releases heat and extends steaming time.
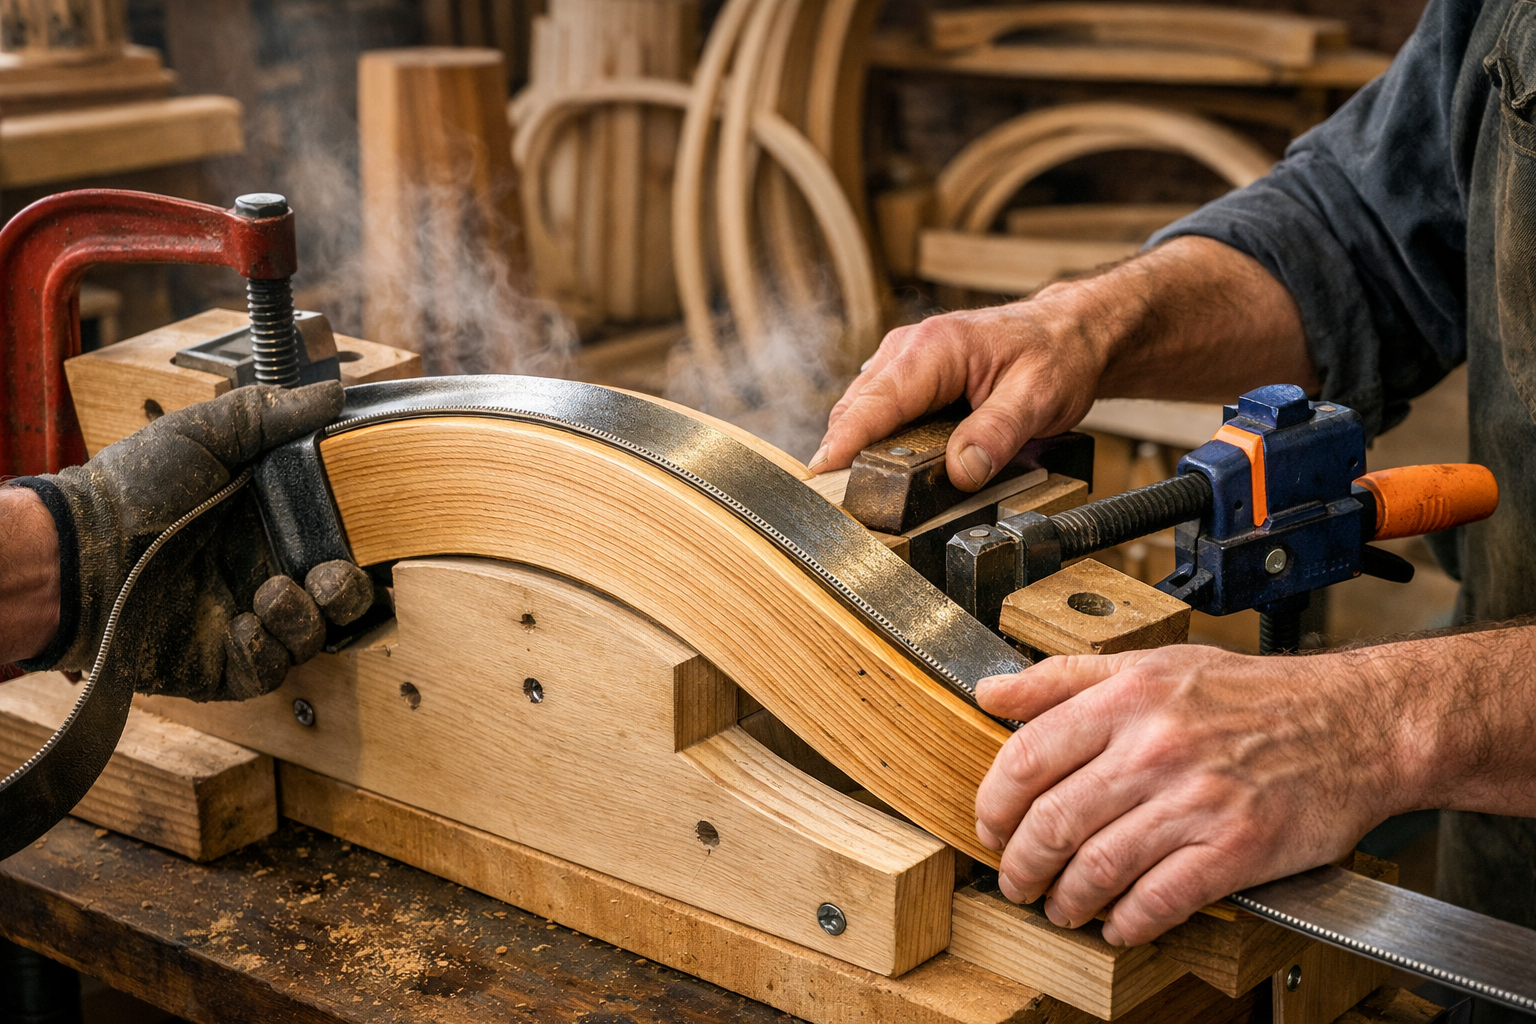
Bending Forms and Straps
Successful bending relies heavily on sturdy bending forms. These are templates or jigs that dictate the final curve of your wood.
- Materials: Forms can be made from plywood, MDF, or even solid lumber. They need to be strong enough to withstand significant clamping pressure without deforming.
- Design: The form should be slightly over-bent from your desired final curve, as wood will spring back slightly (springback) after drying. The amount of springback varies by wood species and bend radius.
- Bending Straps: For tighter bends, a steel bending strap is almost indispensable. This strap, usually with end blocks, prevents the outer fibers of the wood from stretching and tearing. The strap compresses the inner fibers, making the bend possible without fracture.
The Bending and Clamping Sequence
This is where the action happens, and speed is paramount!
- Prepare Your Station: Have your bending form, strap (if using), and clamps ready and organized. The moment the wood leaves the steam box, it starts to cool and stiffen.
- Retrieve Wood: Carefully remove the hot, steamed wood from the box. Handle with gloves.
- Position and Bend: Immediately place the wood against your bending form. If using a strap, position the wood within it. Begin to apply pressure, slowly and steadily, bending the wood around the form. Work from one end to the other, or from the center outwards, depending on the bend.
- Clamp Securely: Once the wood is fully conformed to the mold, use ample clamps to hold it tightly in place. The more clamps, the better the pressure distribution.
- Dry Thoroughly: Allow the wood to dry completely while still clamped to the form. This can take several days to weeks, depending on wood thickness, ambient humidity, and species. A slow, steady drying process minimizes the risk of cracking.

⭐ Important Note: Always work safely! Hot steam can cause severe burns. Wear heat-resistant gloves and eye protection.

For more advanced woodworking techniques that demand precision, consider exploring resources on “Mastering Dovetail Drawers for Cabinets: Hand-Cut and Router Jigs for Seamless Furniture Integration” or “The Essential Guide to Router Bits: Choosing the Right Profile, Material, and Technique for Every Woodworking Task”.” These skills complement the artistry of steam bending by allowing for seamless integration of curved elements into larger projects.
Creative Applications and Finishing Steam-Bent Wood
The beauty of steam bending lies not just in its structural integrity but in the incredible design freedom it offers. This final section of our Introduction to Steam Bending Wood: Shaping Techniques for Unique Furniture and Art explores innovative uses and how to finish your unique creations.
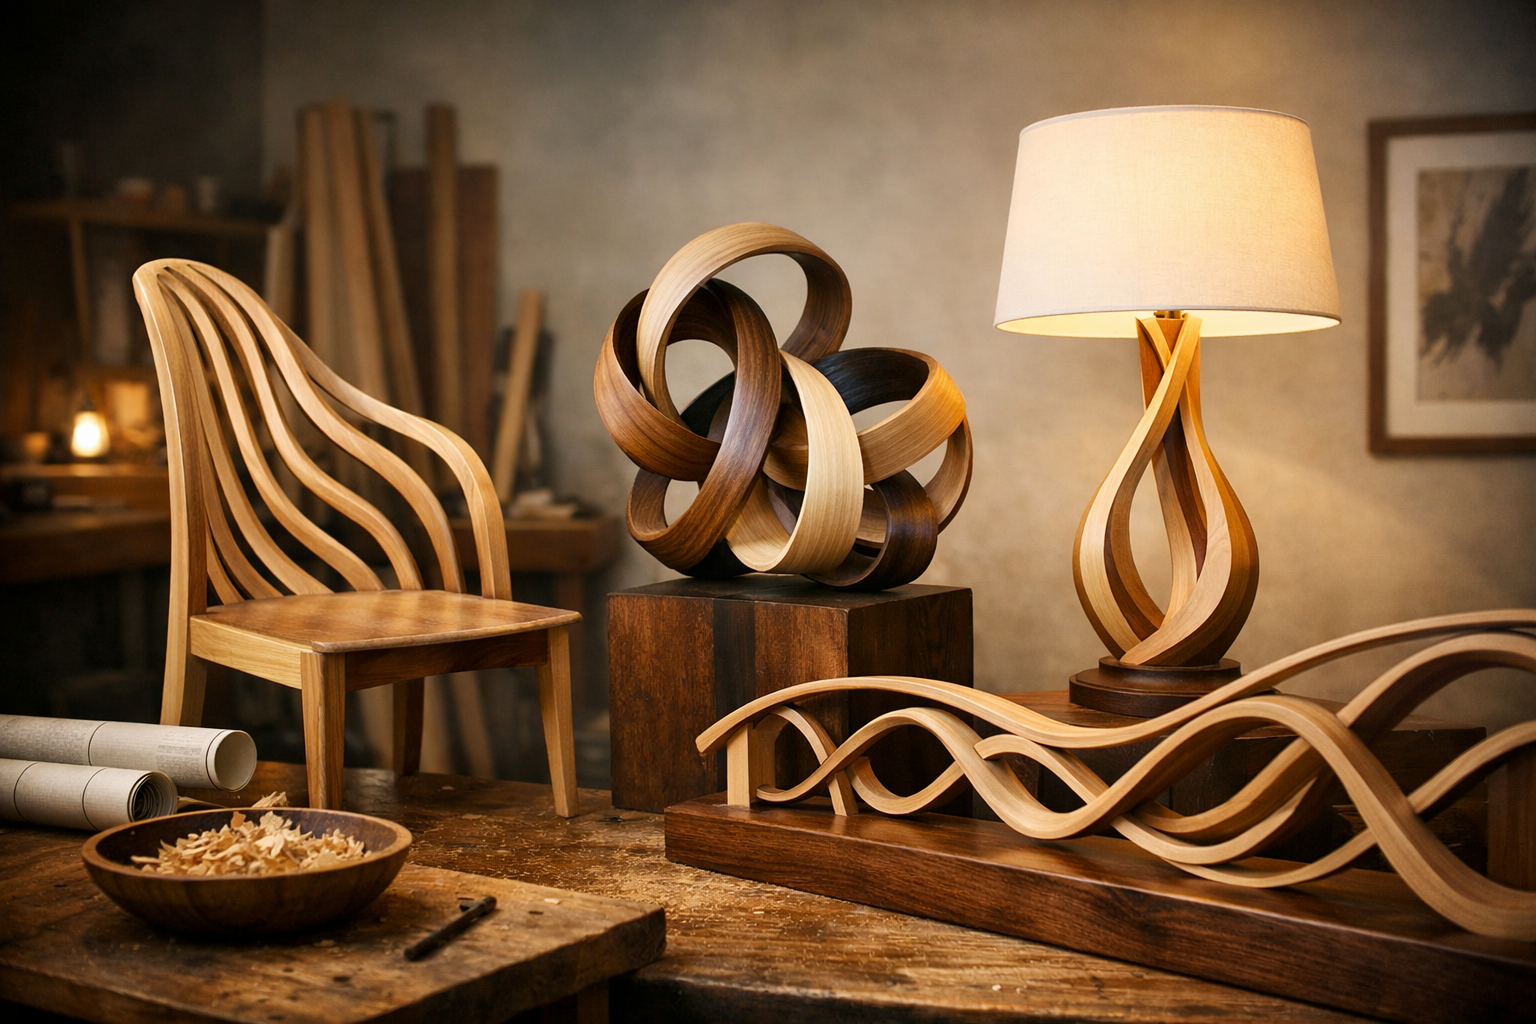
Unique Furniture and Art Designs
Steam bending opens a world of possibilities for creating organic, flowing shapes that are otherwise impossible or impractical.
- Furniture Components: Imagine gracefully curved chair backs, elegant armrests, fluid table legs, or sculptural elements in a cabinet door. Steam-bent components can add a touch of sophisticated craftsmanship to any piece. For example, a curved accent in a DIY Wooden Wall Clock could elevate its design.
- Sculptural Art: Artists can use steam-bent wood to create dynamic, three-dimensional sculptures that evoke movement and nature. The natural grain of the wood enhances the organic feel of these pieces.
- Decorative Items: From unique lamp shades to flowing handrails, custom picture frames, or even abstract wall art, steam bending allows for truly bespoke decorative items. Consider adding a subtle curve to a DIY Wooden Wine Rack for a distinctive touch.
Pull Quote:
“Steam bending transforms rigid lumber into a liquid form, allowing the woodworker to sculpt with grain and create pieces that truly flow.”
Finishing and Integrating Bent Wood
Once your steam-bent piece is thoroughly dry and removed from its form, it can be worked like any other piece of wood.
- Sanding: Begin sanding with a coarser grit and progressively move to finer grits to smooth out any imperfections and prepare the surface for finishing.
- Shaping and Trimming: The bent piece can be further shaped, trimmed, or joined to other components using traditional woodworking techniques.
- Finishing: Apply your chosen finish – whether it’s oil, wax, varnish, or paint. The finish will protect the wood and enhance its natural beauty. For guidance, explore various Natural Wood Finishing Techniques to complement your bent creations.

The ability to create strong, curved elements is a hallmark of high-level woodworking. This technique can set your creations apart, whether you’re building a Custom Floating Shelf that subtly curves upwards or a Handcrafted Wooden Wall Clock with a uniquely shaped frame. Embrace the challenge, and you’ll discover a rewarding new dimension to your craft.
Conclusion
The journey into Introduction to Steam Bending Wood: Shaping Techniques for Unique Furniture and Art reveals a timeless craft that combines science, patience, and artistic vision. By understanding the properties of wood, constructing an effective steam box, and meticulously executing the bending process, woodworkers can unlock unparalleled creative freedom. The ability to transform rigid lumber into graceful curves without compromising strength opens new avenues for designing unique furniture, captivating sculptures, and bespoke decorative items. In 2026, as the demand for distinctive, handcrafted pieces continues to grow, mastering steam bending offers a significant advantage, allowing you to create truly original works that stand out.
Actionable Next Steps:
- Research Wood Sources: Identify local suppliers for green or air-dried lumber suitable for bending (e.g., oak, ash, hickory).
- Plan Your Steam Box: Design and build a basic steam box based on your project needs and available resources.
- Start Small: Begin with smaller, thinner pieces of wood and simpler curves to practice the technique before tackling larger or more complex projects.
- Experiment with Forms: Create a variety of bending forms to understand how different radii and shapes affect the outcome and springback.
- Explore Projects: Look for inspiration in existing steam-bent furniture and art, then conceptualize your own unique designs.
