
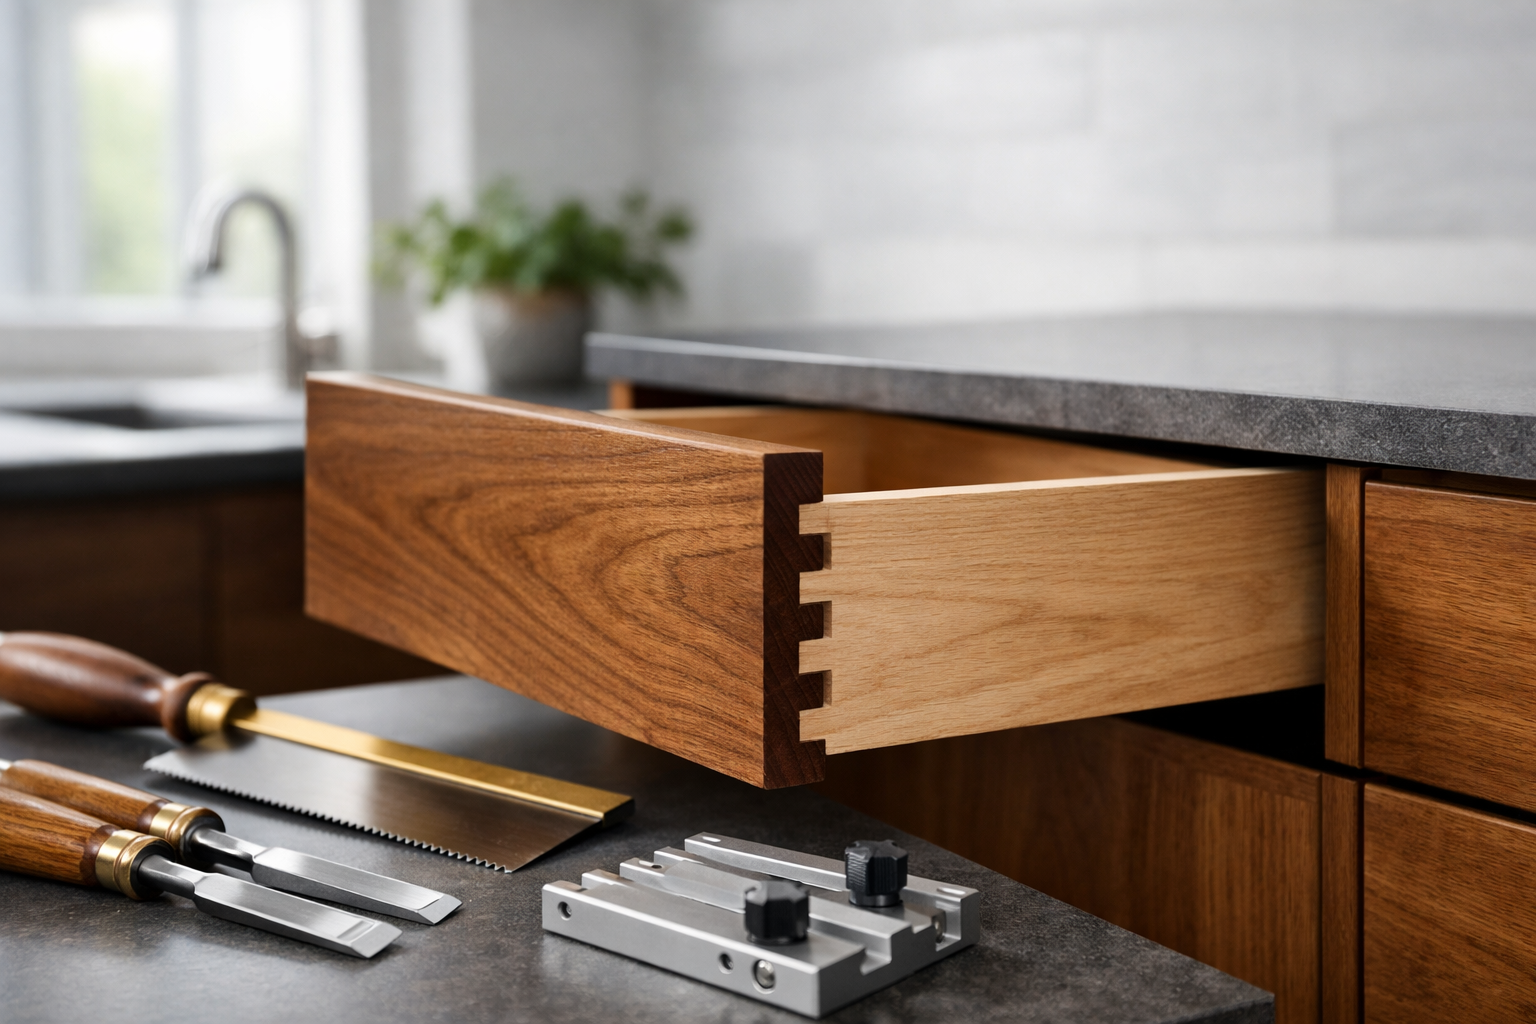

In the ever-evolving landscape of woodworking, the dovetail joint remains a cornerstone of exceptional craftsmanship and structural integrity. As we move into 2026, there’s a growing demand for substantial, functional storage solutions in warm minimalist kitchens and living spaces, making the mastery of dovetail drawers more relevant than ever. This article delves into Mastering Dovetail Drawers for Cabinets: Hand-Cut and Router Jigs for Seamless Furniture Integration, exploring both traditional hand-cut methods and efficient router jig techniques to achieve impeccable results. Whether you’re a seasoned artisan or an aspiring woodworker, understanding these techniques is crucial for creating furniture that stands the test of time and embodies true quality.
The dovetail joint, with its distinctive interlocking pins and tails, offers unparalleled strength and a timeless aesthetic. It prevents drawer fronts from pulling away, a common failure point in less robust joinery. Achieving that clean, tight fit, however, requires precision, patience, and the right approach.

Key Takeaways
- Dovetail joints provide superior strength and aesthetic appeal for cabinet drawers.
- Both hand-cut and router jig methods offer distinct advantages, catering to different skill levels and project requirements.
- Precision in measurement, marking, and cutting is paramount for successful dovetail joinery.
- Router jigs offer speed and consistency, ideal for multiple drawers, while hand-cutting delivers unmatched craftsmanship.
- Proper material selection and troubleshooting common issues ensure a seamless, professional finish.
The Art of Hand-Cutting Dovetail Joints for Cabinet Drawers
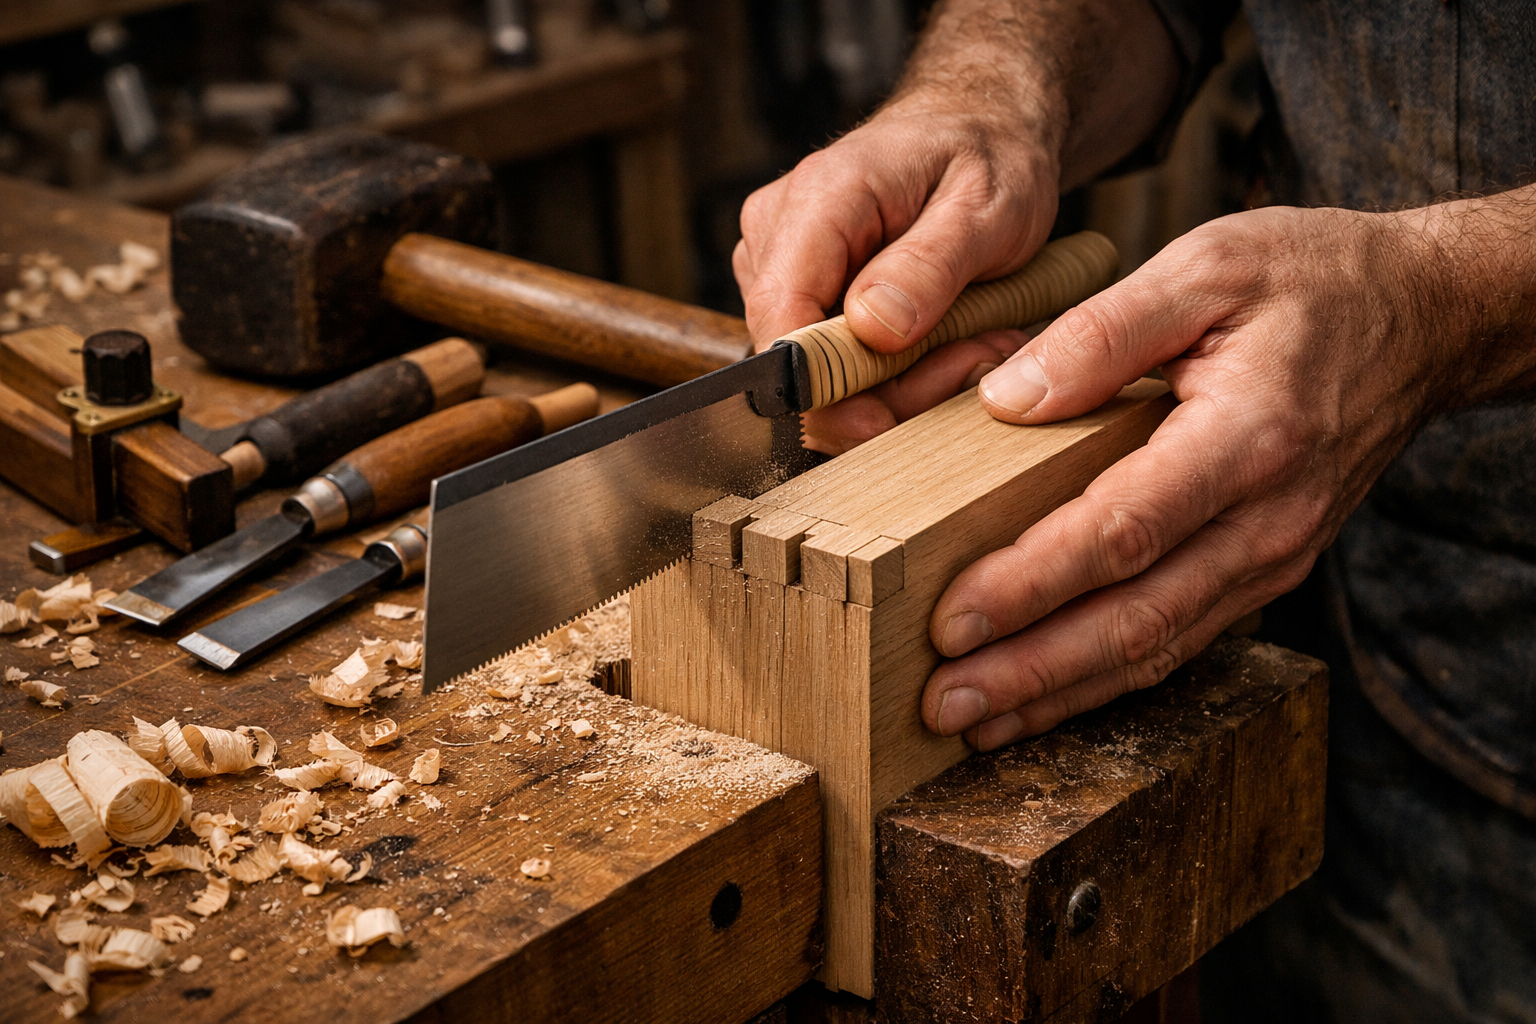
Hand-cutting dovetail joints is a revered skill in woodworking, often seen as the ultimate test of a craftsman’s ability. It offers a unique connection to the material and results in joints with a subtle, organic beauty that machine-made alternatives often lack. For those focused on Mastering Dovetail Drawers for Cabinets: Hand-Cut and Router Jigs for Seamless Furniture Integration through traditional means, this section provides a comprehensive guide.
Essential Tools for Hand-Cutting Dovetails
To embark on the journey of hand-cut dovetails, having the right tools is non-negotiable. Quality tools not only make the process easier but also yield superior results.
- Dovetail Saw: A fine-toothed saw with a thin plate, specifically designed for accurate, delicate cuts. Japanese pull saws are popular for their precision.
- Chisels: A set of sharp chisels, ranging from 1/8″ to 1/2″, is essential for waste removal. A dovetail chisel with beveled edges can be particularly useful.
- Marking Gauge/Knife: For precise layout lines. A marking knife leaves a finer, more accurate line than a pencil, crucial for tight joints.
- Mallet: To drive chisels for waste removal.
- Coping Saw (Optional): Useful for removing bulk waste between tails.
- Clamps: To secure your workpieces firmly.
- Dovetail Marker/Gauge: To lay out the angles for your tails.
Step-by-Step Hand-Cut Dovetail Process
Creating hand-cut dovetails involves a series of meticulous steps. Consistency and accuracy at each stage are key.
- Prepare Your Stock: Ensure all drawer components are perfectly square, planed to final thickness, and sanded to at least 150-grit. Flat, square stock is fundamental.
- Mark the Baselines: Using a marking gauge, scribe a line across the end grain of all drawer sides, indicating the depth of the pins/tails. This line represents the thickness of the adjoining piece.
- Lay Out the Tails (Drawer Front/Back):
- Decide on the number and spacing of your tails. Typically, aesthetic dictates fewer, wider tails for larger drawers, while narrower, more numerous tails offer increased strength.
- Use a dovetail marker or protractor to scribe the tail angles onto the end grain. Common angles are 1:6 for hardwoods and 1:8 for softwoods.
- Mark the waste areas clearly with an “X” to avoid cutting the wrong sections.
- Cut the Tails: Carefully cut along the marked lines with your dovetail saw. Angle the saw precisely to stay on the line. Stop cuts at the baseline.
- Remove Waste: Using chisels and a mallet, remove the waste material between the tails. Start with larger chisels, then refine with smaller ones, paring down to the baseline. A coping saw can help remove bulk waste.
- Transfer Tails to Pins (Drawer Sides): This is where precision is paramount.
- Clamp the drawer side (where pins will be) vertically in a vise.
- Carefully align and clamp the cut tail piece on top of the pin piece, ensuring the baselines align perfectly.
- Use a marking knife to trace the exact shape of the tails onto the end grain of the pin piece. This transfers the pattern.
- Mark the Pins: Use a square to extend the knife lines down the face of the pin board to the baseline. Mark the waste areas.
- Cut the Pins: Saw carefully along the marked pin lines, angling your saw slightly to relieve the inside of the joint for a tighter fit. Stop cuts at the baseline.
- Remove Pin Waste: As with the tails, use chisels to remove the waste material, paring precisely to the baseline and your knife lines.
- Test Fit: Gently test fit the joint. It should be snug but not require excessive force. If too tight, carefully pare small amounts of wood from the pins or tails. If too loose, unfortunately, the joint will not be as strong, but minor gaps can sometimes be addressed with filler or by recutting.
- Assemble and Glue: Once satisfied, apply a thin, even coat of wood glue to the joint surfaces and gently tap together with a mallet. Clamp until dry.
💡 For an in-depth look at enhancing traditional woodworking skills, consider exploring Mastering Modern Hand-Cut Joinery: Adapting Classics for Liv.
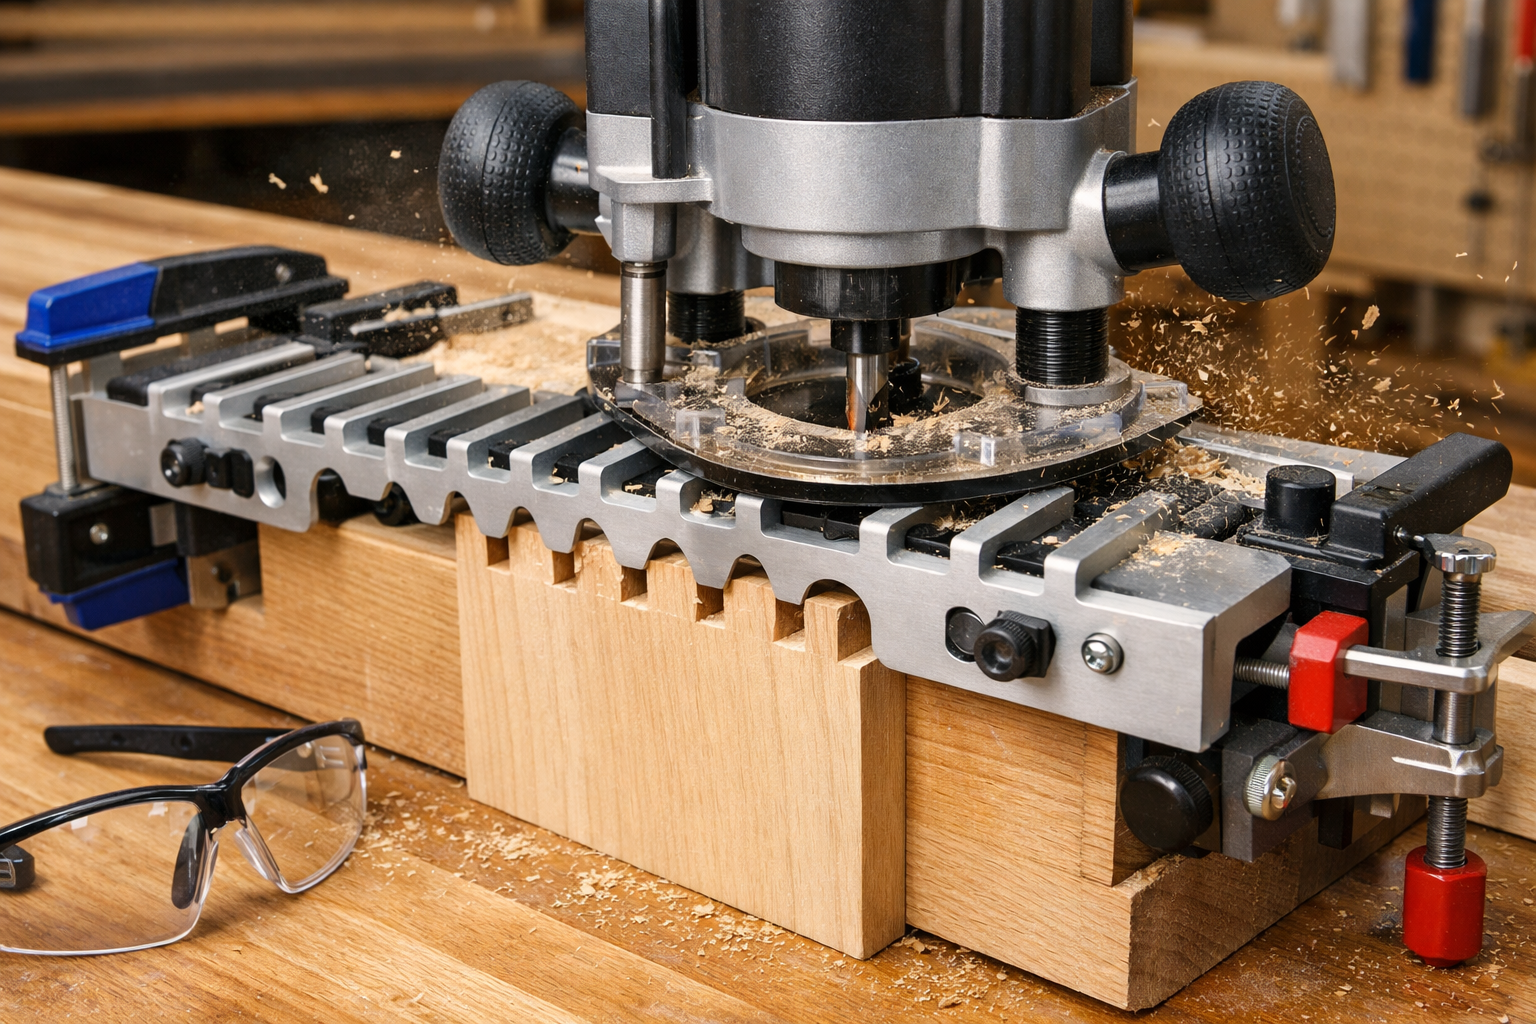
Router Jigs for Efficient Dovetail Drawers
While hand-cutting offers unparalleled craftsmanship, router jigs provide a significantly faster and more consistent method for creating dovetail joints, especially when producing multiple drawers for cabinets. This approach is highly effective for those seeking efficiency in Mastering Dovetail Drawers for Cabinets: Hand-Cut and Router Jigs for Seamless Furniture Integration without compromising on quality.
Types of Dovetail Router Jigs
Several types of router jigs are available, each offering distinct advantages:
- Half-Blind Dovetail Jigs: Most common for drawer construction. They cut pins on one board and tails on another simultaneously, creating a joint where the dovetails are only visible from one side (typically the drawer side, hiding the joint from the drawer front). These are ideal for exposed drawer fronts where you want the solid wood look without visible end grain.
- Through Dovetail Jigs: Creates dovetails visible on both sides of the joint. Less common for drawers but used for boxes or casework where both faces are exposed.
- Sliding Dovetail Jigs: Used for connecting shelves or dividers into grooves, offering strong mechanical locking.
- Variable-Spaced Dovetail Jigs: Offer more flexibility in pin and tail spacing, allowing for a more “hand-cut” aesthetic, but require more setup.
| Jig Type | Visibility | Best Use Case | Skill Level (Setup) | Speed |
|---|---|---|---|---|
| Half-Blind Dovetail | One side | Drawer fronts, cabinet doors | Intermediate | High |
| Through Dovetail | Both sides | Boxes, casework, where both sides are visible | Intermediate | High |
| Sliding Dovetail | Hidden in groove | Shelves, dividers, carcases | Intermediate | Moderate |
| Variable-Spaced | Depends on technique | Custom aesthetic, mimicking hand-cut | Advanced | Moderate |
Router Jig Setup and Operation
Using a router jig for dovetails requires careful setup and a systematic approach.
- Read the Manual: Each jig has specific instructions regarding router bit selection, router base plate setup, and board alignment. Always refer to your jig’s manual.
- Select the Right Bit: Dovetail bits come in various angles (e.g., 8°, 10°, 14°). Ensure your bit matches the jig’s requirements. Straight bits are also often needed for certain jigs to cut the pin boards.
- Router Setup:
- Install the correct dovetail bit and a guide bushing on your router. The guide bushing diameter must match your jig’s template slot.
- Set the bit depth according to the jig’s instructions, usually relative to the material thickness.
- Perform test cuts on scrap material to fine-tune depth and fit. This step is critical! 🧪
- Clamping the Workpieces:
- Securely clamp the drawer front (or back) and drawer side into the jig simultaneously. Most jigs are designed to cut both mating pieces at once.
- Ensure the boards are flush with the jig’s registration surfaces. Any misalignment will result in a poor fit.
- Routing the Joint:
- With the router running at the appropriate speed, carefully guide the router, ensuring the guide bushing stays in constant contact with the jig’s template.
- Make smooth, consistent passes. Avoid dwelling in one spot.
- For half-blind dovetails, the drawer front is often cut with a dovetail bit, and the drawer side with a straight bit, creating the pins that fit into the routed tails.
- Test Fit and Adjust:
- Remove the pieces from the jig and test fit them.
- If the joint is too tight, slightly increase the bit depth (or adjust the jig’s offset). If too loose, slightly decrease the bit depth. Make small, incremental adjustments.
- Once a perfect fit is achieved with scrap, you can confidently cut your drawer components.
💡 For general router techniques that can enhance your joinery skills, take a look at our article on Handcrafted Wooden Wall Art: 3D Layered Panels and Geometric.
Crafting Seamless Furniture Integration: Best Practices and Troubleshooting
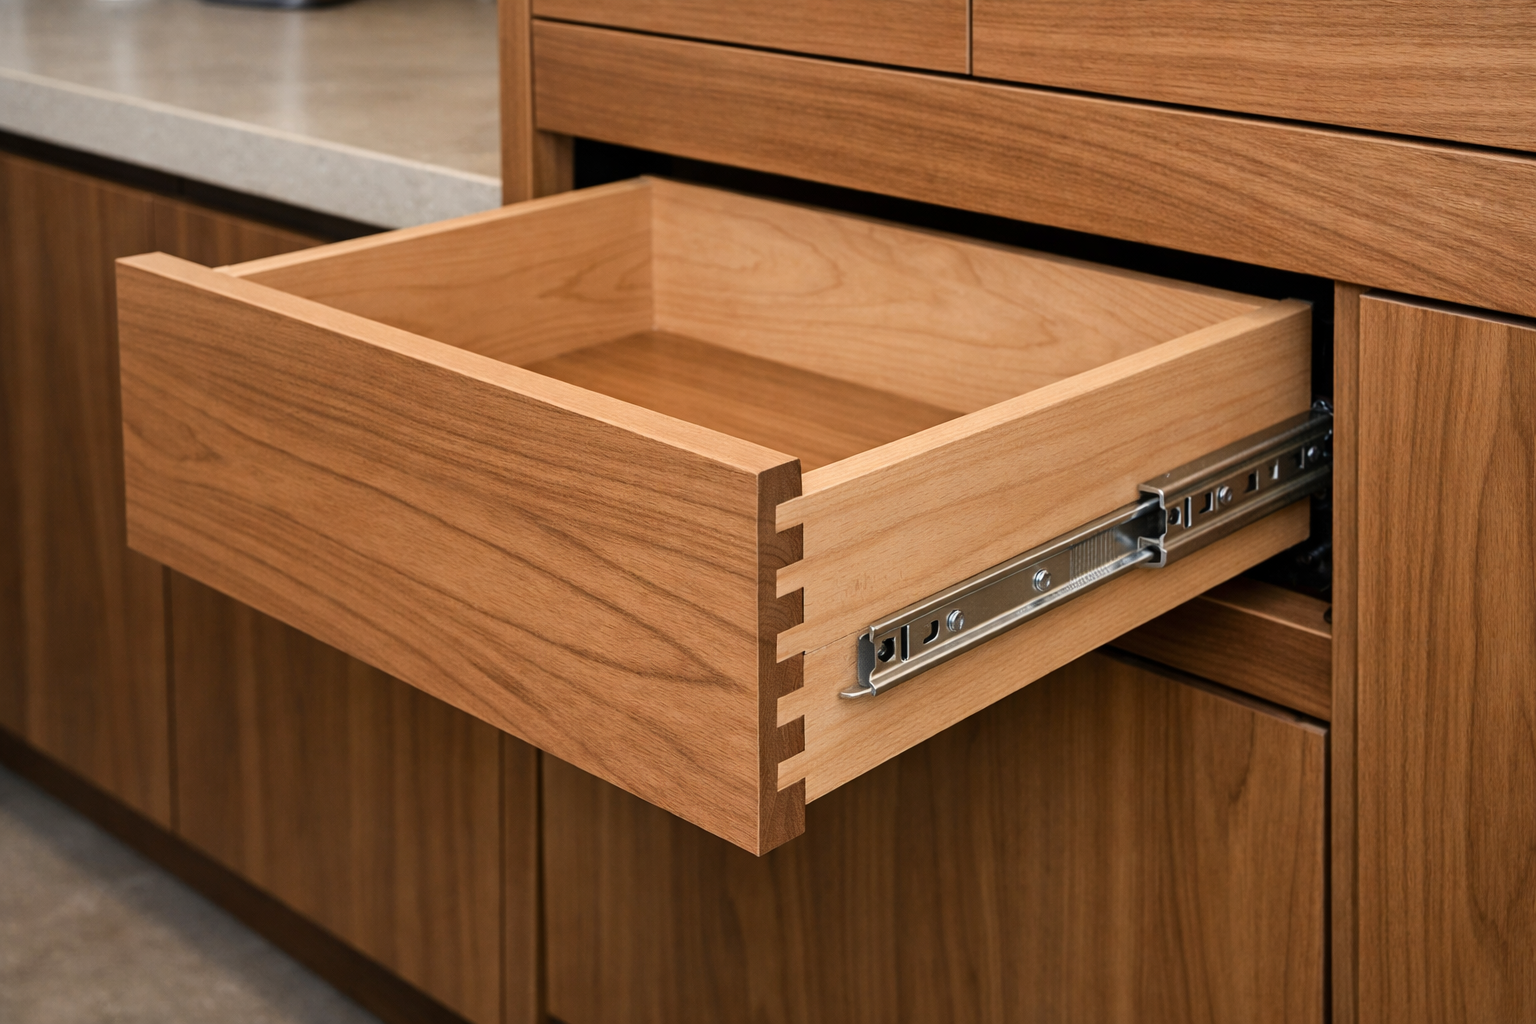
Achieving seamless integration of dovetail drawers into your cabinet designs goes beyond just cutting the joints. It involves careful planning, material selection, and attention to detail throughout the entire build process. For those dedicated to Mastering Dovetail Drawers for Cabinets: Hand-Cut and Router Jigs for Seamless Furniture Integration, this final section provides crucial insights into best practices and how to tackle common challenges.
Material Selection for Dovetail Drawers
The choice of wood greatly influences both the appearance and durability of your dovetail drawers.
- Hardwoods: Oak, maple, cherry, and walnut are excellent choices for drawer boxes due to their strength and stability. They hold the joint well and offer a beautiful finish. Consider Wood Species Selection for Visible Joinery: Choosing Materia for more specific guidance.
- Softwoods: Pine and poplar are easier to work with, especially for hand-cutting, but are less durable and more prone to tear-out.
- Plywood: While dovetails can be cut in plywood, the alternating grain structure can make clean cuts challenging, especially with hand tools. Opt for high-quality Baltic birch plywood if choosing this route.
- Drawer Bottoms: Typically made from 1/4″ or 1/2″ plywood or solid wood panels, fitted into grooves routed into the drawer sides.
Drawer Design Considerations
When designing your drawers, keep these points in mind for optimal function and aesthetics:
- Drawer Slides: Choose appropriate drawer slides based on the intended use and weight capacity. Full-extension slides are popular for easy access. Undermount slides offer a hidden, cleaner look.
- Gap Consistency: Plan for small, consistent gaps around your drawer fronts for smooth operation and a professional appearance. Typically, 1/16″ to 3/32″ (1.5mm to 2.5mm) gaps are common.
- Drawer Box Dimensions: Precisely measure your cabinet openings. Subtract the thickness of your drawer slides and any required clearance to determine the exact width of your drawer boxes.
Common Troubleshooting Tips
Even with careful planning, issues can arise. Here’s how to troubleshoot common dovetail problems:
- Joints too Loose:
- Hand-Cut: Indicates inaccurate marking or cutting. Practice on scrap. For slight looseness, glue can fill minor gaps, but a truly loose joint lacks strength.
- Router Jig: Usually means the router bit depth is too shallow or the guide bushing/bit combination isn’t correct for the jig. Adjust incrementally on scrap.
- Joints too Tight:
- Hand-Cut: Often due to not paring precisely to the scribe lines, or the angle is slightly off. Carefully pare down pins or tails in small amounts.
- Router Jig: Router bit depth is too deep. Adjust incrementally on scrap.
- Tear-out on Ends:
- Ensure chisels are razor sharp (hand-cut).
- Use a sacrificial backer board when routing or sawing across end grain.
- Take shallow passes with the router.
- Uneven Pin/Tail Spacing:
- Hand-Cut: Re-evaluate your marking technique. Use a divider or carefully measured marks.
- Router Jig: Check that boards are clamped flush and square in the jig.
- Gaps at the Baseline:
- Hand-Cut: Not chiseling down to the baseline or having an uneven baseline. Always re-scribe if the original line is obscured.
- Router Jig: Incorrect bit depth.
Finishing and Integration
Once your dovetail drawers are assembled and glued, proper finishing ensures longevity and beauty.

- Sanding: Sand all surfaces to a fine grit (220-320) before applying finish.
- Finishing: Choose a finish that complements your cabinet. For warm minimalist aesthetics, clear oils or low-sheen varnishes work well to highlight the wood grain and the dovetail craftsmanship. For example, explore rustic wood finishing techniques or natural wood finishing techniques.
- Installation: Install your chosen drawer slides and test the drawer’s movement. Adjust as needed to ensure smooth, quiet operation.
- Drawer Pulls/Hardware: Select hardware that matches the overall cabinet design, completing the seamless integration.
By mastering these techniques and paying close attention to detail, you can create dovetail drawers that not only provide essential storage but also elevate the entire aesthetic of your furniture, meeting the demanding quality standards of 2026 and beyond. Consider building an entire ultimate woodworking storage bench to practice your skills on various storage solutions.
Conclusion
Mastering Dovetail Drawers for Cabinets: Hand-Cut and Router Jigs for Seamless Furniture Integration is a rewarding endeavor that significantly enhances the quality and longevity of your woodworking projects. Whether you choose the meticulous path of hand-cutting, embracing the rich tradition of fine craftsmanship, or opt for the efficiency and consistency offered by router jigs, the fundamental principles of precision, careful measurement, and sharp tools remain constant.
The demand for high-quality, functional storage in modern homes continues to grow in 2026, making the ability to produce exceptional dovetail drawers an invaluable skill. By understanding the nuances of both traditional and modern techniques, you are equipped to tackle any cabinet project with confidence, creating drawers that are not only structurally superior but also aesthetically pleasing. Dedicate time to practice, refine your techniques on scrap material, and always strive for that perfect, tight-fitting joint. Your efforts will be rewarded with furniture pieces that exemplify durability, beauty, and true craftsmanship.
Actionable Next Steps:
- Invest in Quality Tools: Ensure your hand saws, chisels, and router bits are sharp and suitable for dovetail joinery.
- Practice on Scrap Wood: Before cutting your final drawer components, make several test joints on scrap material to refine your technique and adjust your jig settings.
- Read and Re-Read Instructions: Always consult the manual for your specific router jig, as setup details can vary significantly.
- Embrace Patience: Dovetail joinery, especially hand-cutting, rewards patience and precision. Don’t rush the process.
- Explore Advanced Techniques: Once comfortable with basic dovetails, research decorative or specialized dovetail variations to expand your skill set.
