


The pursuit of excellence in woodworking often leads to the mastery of iconic joinery techniques. Among these, dovetails stand supreme, not just for their undeniable strength and durability, but also for the aesthetic beauty they impart to fine furniture. As cabinet builders navigate the demands of 2026, the ability to produce strong, attractive drawers is more critical than ever, marrying authentic craftsmanship with the efficiency required for modern projects. This comprehensive guide delves into Mastering Dovetail Joinery for Drawers: Hand and Router Methods for Cabinet Builders, offering detailed tutorials on both traditional hand-cut and modern router-driven techniques for crafting sturdy and elegant drawers in tables and cabinets.
Whether you’re a seasoned professional looking to refine your skills or an aspiring artisan eager to elevate your craft, understanding both manual precision and machine-aided efficiency in dovetail cutting is indispensable. From the satisfying rhythm of hand-sawing to the speed of a well-calibrated router jig, this article bridges the gap between old-world techniques and contemporary demands.

Key Takeaways
- Dovetail Joinery is Essential: Dovetails provide superior mechanical strength and aesthetic appeal for drawer construction, crucial for durable cabinetry.
- Two Primary Methods: Cabinet builders can achieve dovetails using traditional hand tools for ultimate precision and craft, or specialized router jigs for speed and consistency.
- Through Dovetails: Ideal for carcass construction or drawers where both ends of the joint are visible, showcasing the artisan’s skill.
- Half-Blind Dovetails: Perfect for drawer fronts, concealing the joint from the exterior while maintaining strength and preventing the end grain from showing.
- Practice is Paramount: Regardless of the method, consistent practice and attention to detail are key to achieving strong, tight-fitting dovetail joints.
The Art of Hand-Cut Dovetails: Precision and Tradition
[[wysiwyg_imageupload: ]]
Hand-cut dovetails are often considered the pinnacle of woodworking craftsmanship. They offer unparalleled precision, allowing for incredibly tight-fitting joints that are not only robust but also visually stunning. For cabinet builders aiming for authentic, high-end pieces, mastering this method is a badge of honor. This section will guide you through the process, focusing on both through dovetails and half-blind dovetails, essential for various drawer applications.
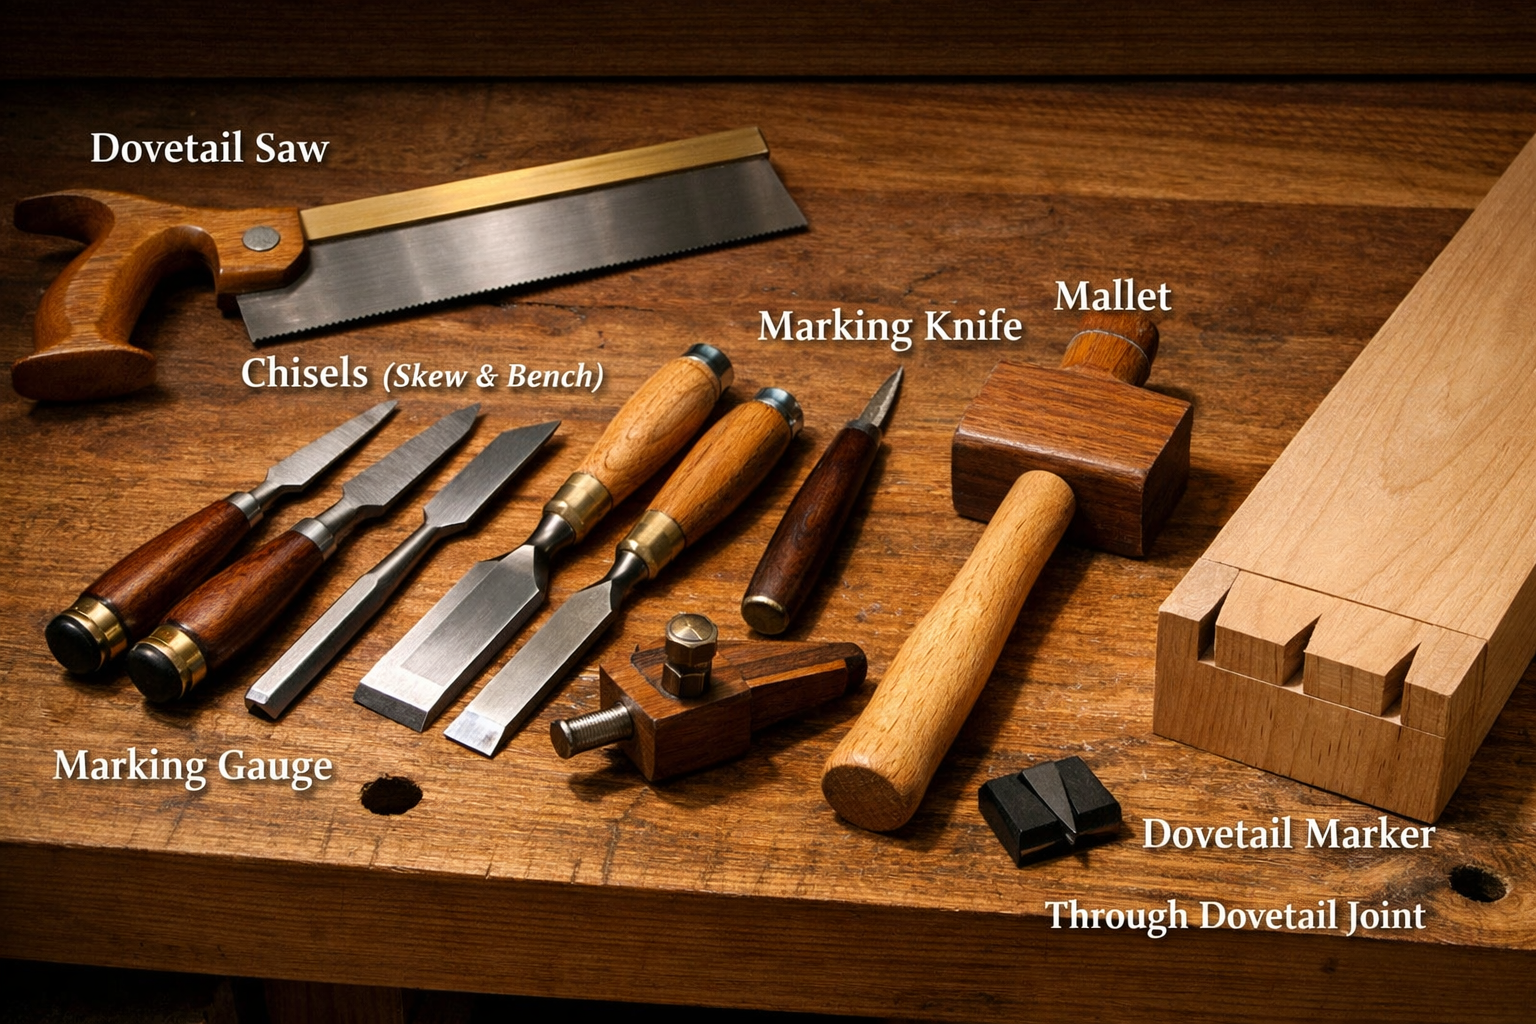
Essential Tools for Hand-Cut Dovetails
Before diving into the cuts, gather the right tools. Sharpness and quality are paramount for successful hand-cut joinery.
- Dovetail Saw: A fine-toothed backsaw designed for precise cross-grain and rip cuts.
- Chisels: A set of sharp chisels, including a small 1/8″ or 1/4″ chisel for cleaning waste, and perhaps a skew chisel for tight corners.
- Marking Gauge: For accurately scribing shoulder lines and pin/tail depths.
- Marking Knife: Essential for precise layout lines that guide your saw and chisel.
- Dovetail Marker/Gauge: Helps in laying out consistent angles for pins and tails (e.g., 1:6 for hardwoods, 1:8 for softwoods).
- Mallet: For driving chisels.
- Bench Vise: A sturdy vise is crucial for holding your workpieces securely.
Step-by-Step: Hand-Cutting Through Dovetails
Through dovetails expose the joint on both faces of the wood, making them excellent for carcass construction or visible drawer sides where the aesthetic is celebrated.
- Prepare the Stock: Mill your drawer components to exact dimensions. Ensure the ends are perfectly square.
- Mark the Baselines: Using a marking gauge, scribe a line on the end grain and inside face of both workpieces, matching the thickness of the opposing piece. These are your pin and tail baselines.
- Lay Out the Tails (First Piece): Decide whether to cut tails or pins first. Cutting tails first is often easier for beginners.
- On the end grain of the “tail board” (typically the drawer side), mark out your tail spacing. Use a dovetail marker for consistent angles.
- Extend these lines down to the baseline on the inside face with a marking knife.
- Cut the Tails:
- Secure the tail board in your vise with the end grain facing up.
- Carefully saw down to the baseline, staying just on the waste side of your marked lines.
- Remove the waste between the tails with a coping saw or by chopping with a chisel. Pare to the baseline with sharp chisels for a clean, flat surface.
- Transfer the Tails to Pins (Second Piece):
- Place the cut tail board precisely on the end grain of the “pin board” (typically the drawer front or back).
- Align the baselines and ends perfectly.
- Using a sharp marking knife, carefully trace around the tails onto the end grain of the pin board.
- Lay Out and Cut the Pins:
- Extend the transferred pin lines down to the baseline on the inside face of the pin board.
- Identify the waste areas.
- Saw down to the baseline, again staying just on the waste side.
- Chop out the waste with chisels, paring meticulously to the baseline.
- Test Fit and Refine: Gently bring the two pieces together. They should slide with light pressure. If too tight, carefully pare small amounts of wood from the pins or tails. If too loose, unfortunately, you’ve learned a valuable lesson – try again!
Step-by-Step: Hand-Cutting Half-Blind Dovetails
Half-blind dovetails are commonly used for drawer fronts, as they hide the end grain of the drawer side from the exterior, presenting a clean, finished look. The pins are blind, meaning they don’t go all the way through the drawer front.
- Prepare Stock and Mark Baselines: Same as through dovetails, but the baseline on the drawer front (pin board) will be shallower, typically 1/2 to 2/3 the thickness of the drawer side. This creates the ‘blind’ effect.
- Lay Out and Cut Tails (Drawer Side): This process is identical to cutting through tails, but remember these tails will be received by the blind pins.
- Transfer Tails to Pins (Drawer Front):
- Position the tail board onto the end grain of the drawer front. Crucially, the end of the drawer front that will be visible (the ‘show face’) should be facing up when you transfer.
- Carefully scribe the outline of the tails onto the end grain of the drawer front, ensuring precise alignment.
- Cut the Blind Pins:
- Extend the transferred lines down to the blind baseline on the drawer front.
- Using a dovetail saw, make the shoulder cuts for the pins, sawing down to the blind baseline. Be very careful not to cut through the show face.
- Remove the waste within the pin sockets. This requires a combination of drilling out the bulk of the waste with a small drill bit (staying within the baseline) and then carefully paring with chisels. A mortise chisel or a small, very sharp bench chisel is ideal for this. The bottom of the pin sockets must be flat and parallel to the end grain.
- Test Fit: Carefully fit the joint. The challenge here is ensuring the pins seat fully into the blind sockets without cutting through the drawer front.
💡 Pro Tip: When cutting by hand, always cut on the waste side of your knife lines. This ensures the line itself becomes part of the tight-fitting joint.
For more projects utilizing drawers, consider exploring how to build Ultimate DIY End Tables: Versatile Designs from Nightstands.
Mastering Dovetail Joinery with a Router: Speed and Consistency
[[wysiwyg_imageupload: ]]
While hand-cutting dovetails offers immense satisfaction, modern cabinet builders often turn to routers for efficiency and consistency, especially when building multiple drawers or working on production runs. Router-cut dovetails, particularly half-blind, are exceptionally strong and can be produced with remarkable speed and accuracy using the right jig. This section focuses on achieving professional results with router methods.
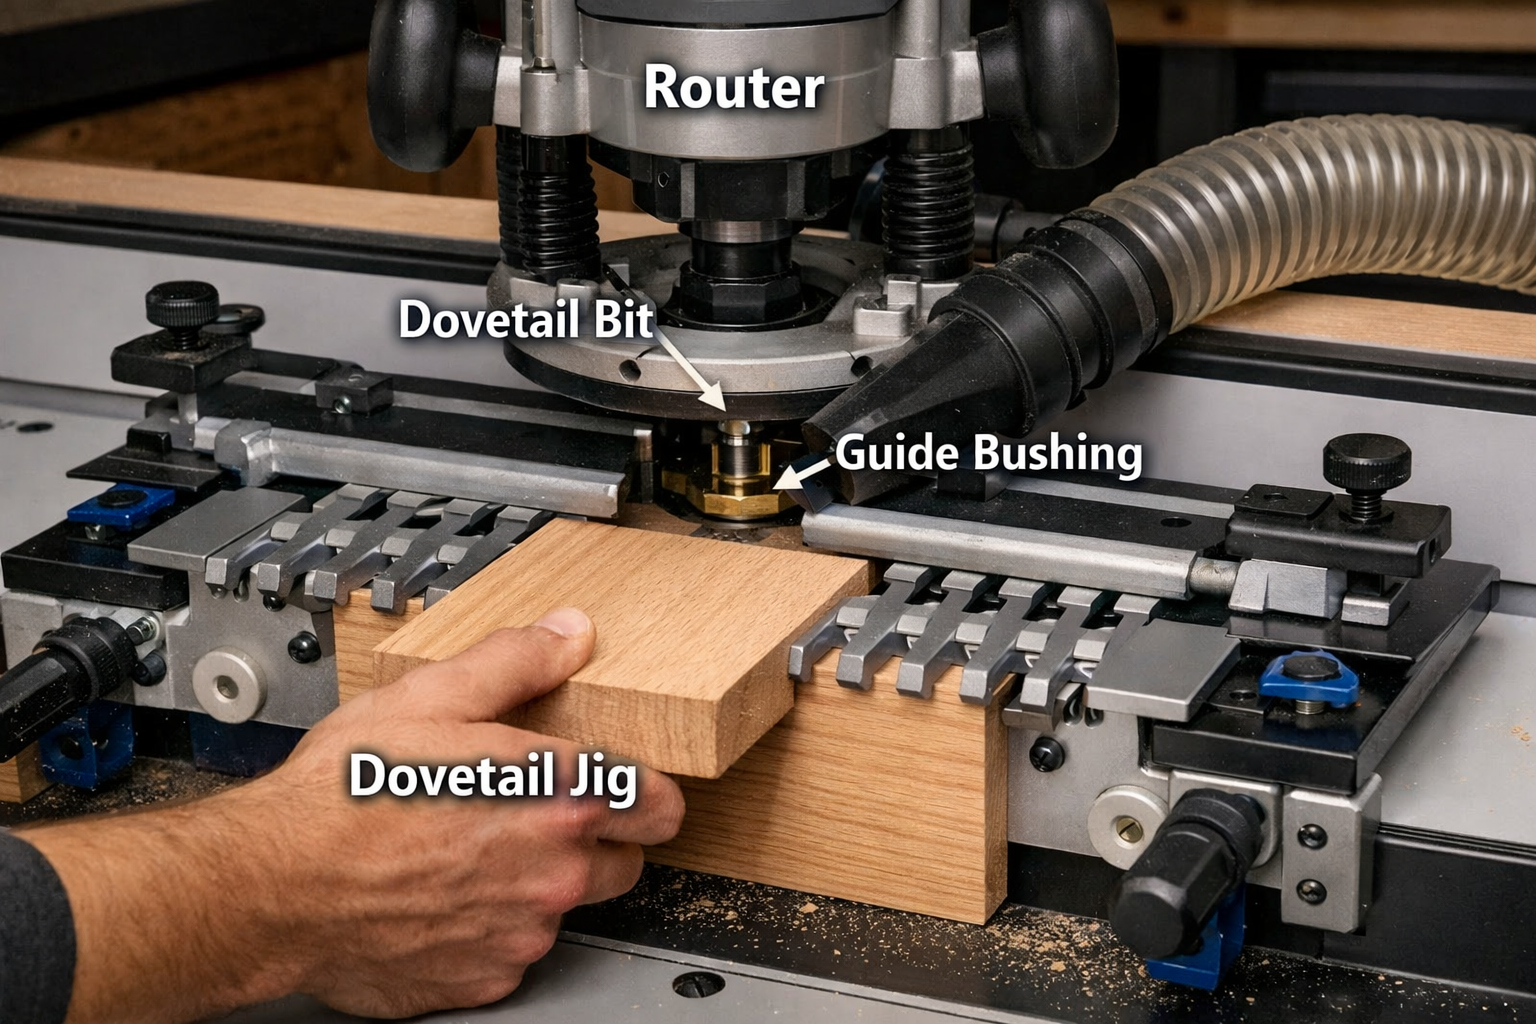
Essential Tools for Router-Cut Dovetails
- Router: A powerful router (plunge or fixed base) capable of handling dovetail bits.
- Dovetail Jig: This is the heart of router-cut dovetails. Popular jigs include those from Leigh, Porter-Cable, Incra, and Rockler.
- Dovetail Bits: Specific bits with the correct angle for your jig (e.g., 14-degree or 7-degree).
- Straight Bits: For cutting the pins in some jig systems.
- Guide Bushing (Template Guide): Matches your jig’s template and router base.
- Router Table (Optional but Recommended): Provides a stable platform and often better dust collection.
- Clamps: To secure workpieces firmly to the jig.
- Dust Collection: Essential for safety and visibility.
Understanding Dovetail Jigs
Dovetail jigs come in various forms, each with its own advantages:
- Fixed-Template Jigs: These are often simpler and more affordable, designed to cut a specific size and spacing of dovetails (usually half-blind). They are great for repeatable drawer production.
- Adjustable Jigs: More versatile, allowing for variable spacing, through dovetails, half-blind, and even box joints. Leigh Jigs are a prime example of high-precision adjustable jigs.
- Sliding or “Through” Jigs: Designed for cutting through dovetails, often involving multiple passes or specific templates.
Always read and understand the manual for your specific dovetail jig, as setup and operation vary significantly between brands.
Step-by-Step: Router-Cutting Half-Blind Dovetails with a Jig
Half-blind dovetails are the most common application for router jigs in drawer construction.
- Prepare the Stock: Mill your drawer components accurately. Consistency in thickness is crucial for tight-fitting joints.
- Install the Router Bit: Secure the correct dovetail bit in your router. Set the bit depth according to your jig’s instructions. This depth is critical for the fit.
- Set Up the Jig:
- Mount the template guide to your router base plate.
- Install the appropriate template into your jig.
- Adjust the finger spacing on the template, if applicable, to match your desired dovetail pattern.
- Secure the Workpieces:
- Drawer Front (Pin Board): Secure the drawer front vertically in the jig’s front clamp, ensuring the show face is against the template fingers. The top edge of the board should be precisely aligned with the top of the template.
- Drawer Side (Tail Board): Secure the drawer side horizontally in the jig’s top clamp, with its end flush against the guide block. Ensure the inside face of the drawer side is facing the template.
- Both pieces must be perfectly square and held firmly.
- Cut the Joint:
- With the router running at the appropriate speed, carefully guide it along the template fingers.
- The router bit will cut both the pins in the vertical piece (drawer front) and the tails in the horizontal piece (drawer side) simultaneously.
- Make several shallow passes rather than one deep pass to reduce tear-out and motor strain. Ensure the bit clears all waste.
- Test Fit and Adjust:
- Remove the pieces from the jig and test the fit.
- If the joint is too loose or too tight, adjust the bit height or the jig’s template position according to your jig’s instructions. A small adjustment can make a big difference. Repeat the cut on scrap pieces until the fit is perfect.
- For excellent results, ensuring your 1/2 plywood for cabinets is cut precisely is vital for any router jig work.
Router-Cutting Through Dovetails
Some advanced jigs and methods allow for router-cut through dovetails. These often involve:

- Special Templates: Different templates are used for pins and tails, requiring separate setups.
- Multiple Passes: The router may need to be guided in specific patterns or depths for each component.
- Router Table: Many through-dovetail jigs are designed to be used with a router table for added stability and control.
While router-cut dovetails offer efficiency, they require careful setup and calibration. Always use sharp bits and maintain good dust collection for optimal results.
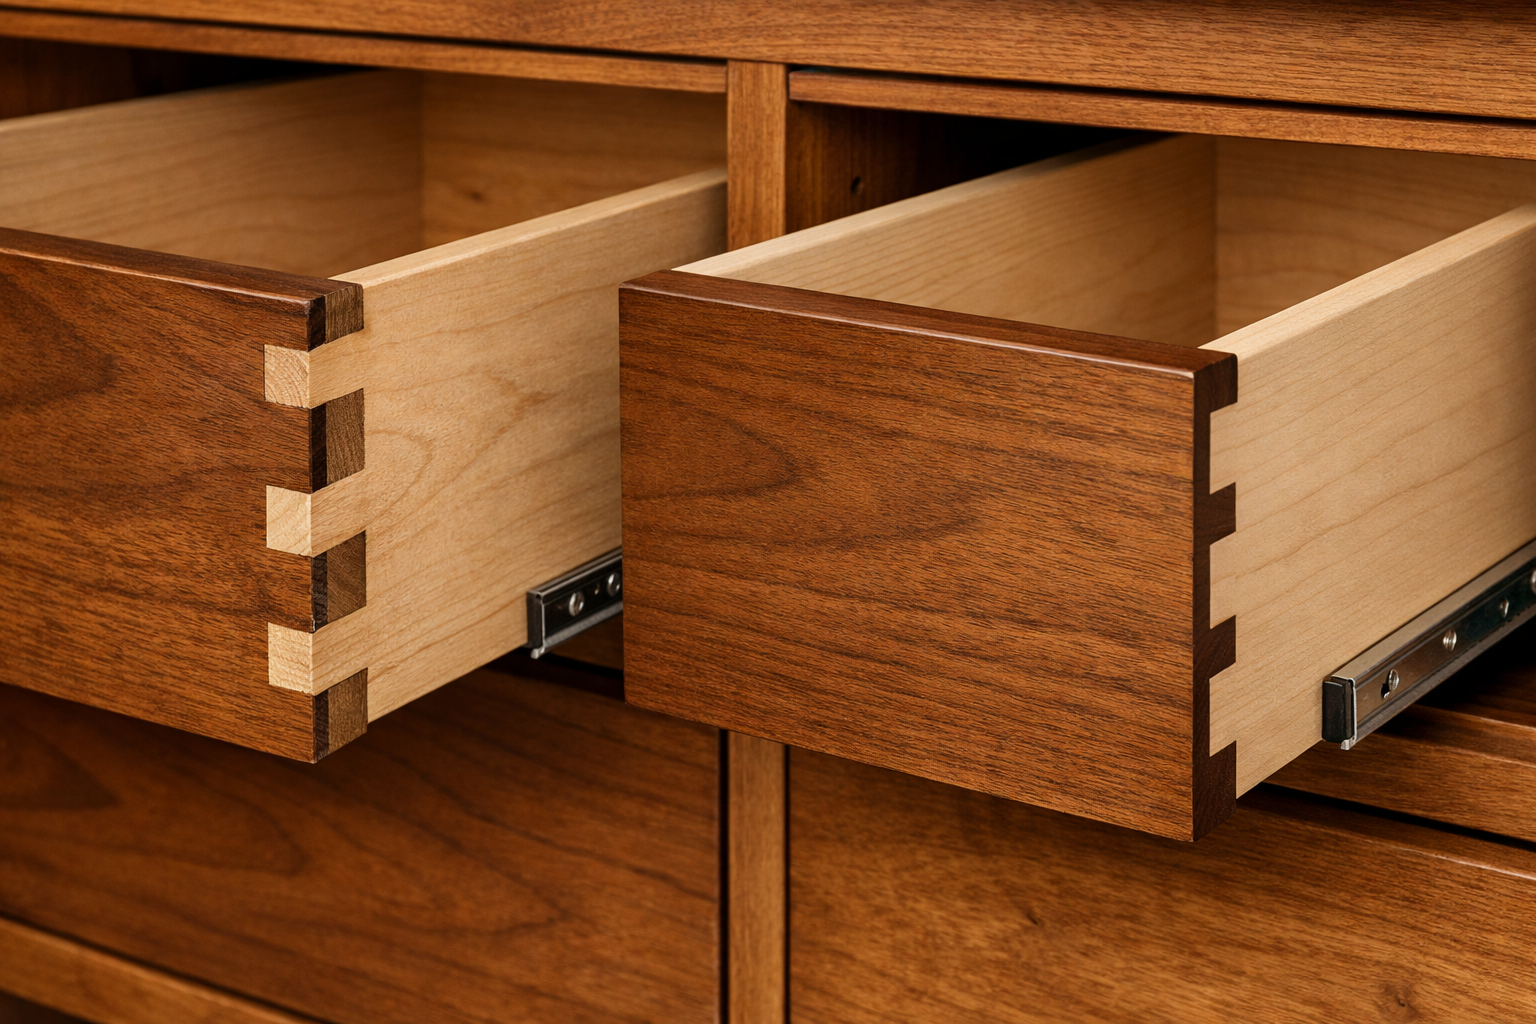
Choosing Your Method: Hand vs. Router for Cabinet Builders
[[wysiwyg_imageupload: ]]
Deciding between hand-cut and router-cut dovetails often comes down to a balance of project requirements, personal skill, and available time. Both methods have distinct advantages and suitable applications for cabinet builders in 2026.
Advantages of Hand-Cut Dovetails
- Unparalleled Craftsmanship: Hand-cut dovetails showcase a higher level of skill and artistry, often desired in bespoke or heirloom quality furniture.
- Customization and Flexibility: Allows for unique spacing, varied tail widths, and complex patterns not easily achieved with standard jigs.
- Quiet Operation: No loud machinery, making it ideal for home shops or late-night work sessions.
- Lower Initial Tool Cost: Basic hand tools are generally less expensive than a good router and dovetail jig.
- Educational Value: Develops a deeper understanding of wood grain, cutting mechanics, and precision.
- Connection to Tradition: Links the craftsman to centuries of woodworking heritage.
Advantages of Router-Cut Dovetails
- Speed and Efficiency: Once set up, a router jig can produce multiple identical dovetail joints very quickly, making it ideal for production work or multiple drawers.
- Consistency and Repeatability: Jigs ensure uniform pin and tail sizes, resulting in highly consistent joints.
- Accuracy (with proper setup): A well-calibrated jig can produce extremely tight and precise joints with minimal effort.
- Reduced Learning Curve for Consistency: While setup can be tricky, achieving consistent results is often easier for beginners compared to mastering hand-cutting.
- Less Physical Exertion: The machine does the heavy cutting.
When to Choose Which Method
| Feature | Hand-Cut Dovetails | Router-Cut Dovetails |
|---|---|---|
| Project Type | Heirloom furniture, bespoke cabinets, visible joints, artistic pieces. | Production runs, utility drawers, contemporary cabinets, projects with many identical joints. |
| Desired Aesthetic | Unique, artisanal, showing subtle variations as a mark of craftsmanship. | Uniform, machine-perfect, clean, modern. |
| Time Investment | Slower per joint, more time for layout and careful cutting. | Faster per joint after initial setup, efficient for batches. |
| Skill Required | High precision, patience, understanding of wood, developing muscle memory. | Careful setup, understanding of jig mechanics, consistent feeding, tool calibration. |
| Cost | Lower initial tool cost, but significant time investment. | Higher initial tool cost (router + jig), but time savings can offset. |
| Best For | Crafting Your Perfect Woodworking Nightstand | Kitchen Islands from Scratch: Adding Storage Drawers |
Ultimately, the best approach for Mastering Dovetail Joinery for Drawers: Hand and Router Methods for Cabinet Builders may involve learning both. Many experienced woodworkers use hand tools for unique pieces and router jigs for efficiency on larger projects. Both methods, when executed with care and precision, result in strong, beautiful drawers that will stand the test of time.
Conclusion
Mastering Dovetail Joinery for Drawers: Hand and Router Methods for Cabinet Builders is a journey that enhances both your technical skills and the overall quality of your woodworking projects. Whether you choose the path of traditional hand tools, relishing the precision and artistry of each cut, or embrace the efficiency and consistency offered by modern router jigs, the result is a drawer joint of superior strength and undeniable beauty.
In 2026, as the demand for both bespoke craftsmanship and efficient production continues to grow, having a command of both hand and router dovetail methods positions you as a versatile and skilled cabinet builder. The ability to select the right technique for the right project—be it a delicate Mastering the Woodworking Box Lid or a robust set of kitchen drawers—is a hallmark of expertise.
Your next steps should involve practice. Start with scrap wood. Don’t be discouraged by initial imperfections; every cut refines your eye and hand. Invest in quality tools, keep them sharp, and meticulously follow the steps outlined. Over time, the satisfying “clack” of a perfectly fitting dovetail will become a testament to your dedication and skill, adding lasting value to every piece of furniture you create.
