


In the vibrant world of woodworking in 2026, there’s a profound, renewed appreciation for the enduring strength and beauty of traditional hand-cut joinery. This article, “Mastering Modern Hand-Cut Joinery: Adapting Classics for Live Edge and Modular Furniture,” delves into how woodworkers are embracing time-honored techniques like mortise-and-tenon and dovetails, not just for their inherent durability, but also for their aesthetic harmony with contemporary designs, especially in live-edge and modular furniture. We’ll explore how modern craftspeople are integrating digital tools for unparalleled precision, offering step-by-step insights for creating tables and cabinets that impeccably balance tradition with efficient workflow.
The demand for unique, high-quality furniture pieces that tell a story has never been higher. Live-edge slabs, with their organic forms and natural imperfections, require joinery that can accommodate irregular shapes while ensuring structural integrity. Similarly, modular furniture, designed for adaptability and easy assembly, benefits immensely from robust, precisely cut joints that facilitate repeated breakdown and setup without compromising stability. This guide provides a comprehensive roadmap for woodworkers looking to elevate their craft by mastering these essential skills.

Key Takeaways
- Renewed Focus on Durability and Aesthetics: 2026 sees a strong emphasis on hand-cut joinery for its superior strength and visual appeal, especially in modern live-edge and modular furniture.
- Integrating Digital Precision: Contemporary woodworkers are blending traditional techniques with digital design and measurement tools to achieve extraordinary accuracy.
- Adapting Classic Joints: Traditional joints like mortise-and-tenon, dovetails, and bridle joints are being modified to suit the unique challenges of irregular live-edge forms and the assembly requirements of modular pieces.
- Essential Tools and Techniques: A combination of sharp hand tools, precise marking gauges, and strategic jigs are crucial for executing clean, tight, and structurally sound joinery.
- Balancing Tradition with Efficiency: Modern approaches focus on optimizing workflow while preserving the integrity and beauty of hand-cut joints, proving that craftsmanship can be both artful and productive.
The Resurgence of Hand-Cut Joinery in 2026: A Blend of Art and Engineering
The landscape of woodworking in 2026 is witnessing a powerful resurgence of hand-cut joinery. This isn’t just about nostalgia; it’s a practical and artistic choice driven by the unique demands of modern furniture design. As consumers increasingly value authenticity, durability, and sustainability, the visible, strong connections created by hand-cut joints resonate deeply. For projects involving live-edge slabs and modular components, these traditional methods offer distinct advantages that power tools often cannot replicate with the same finesse or structural integrity.
Why Hand-Cut Joinery Matters Today
- Superior Strength and Longevity: Properly executed hand-cut joints, such as a well-fitted mortise-and-tenon or a through-dovetail, offer mechanical strength that often surpasses glued butt joints or fasteners alone. This is critical for furniture expected to last generations. For more on ensuring strong connections, consider reviewing our guide on Mastering Woodworking Screws: Your Ultimate Guide for 2026, although screws often play a secondary role to a strong mechanical joint.
- Aesthetic Appeal: The exposed end grain and interlocking patterns of hand-cut joints become integral design elements, celebrating the craftsmanship and adding a layer of visual interest that machine-made joints often lack.
- Adaptability to Organic Forms: Live-edge wood presents irregular surfaces and varying thicknesses. Hand-cutting allows for precise fitting to these unique contours, creating seamless transitions that honor the wood’s natural shape.
- Reduced Stress on Wood: Hand tools remove wood more gently than many power tools, minimizing tear-out and reducing stress on the surrounding fibers, especially important for delicate or highly figured woods.
- Sustainable Practice: Embracing hand tools can reduce reliance on electricity and create less dust, contributing to a more sustainable and healthier workshop environment.
Integrating Digital Tools for Precision
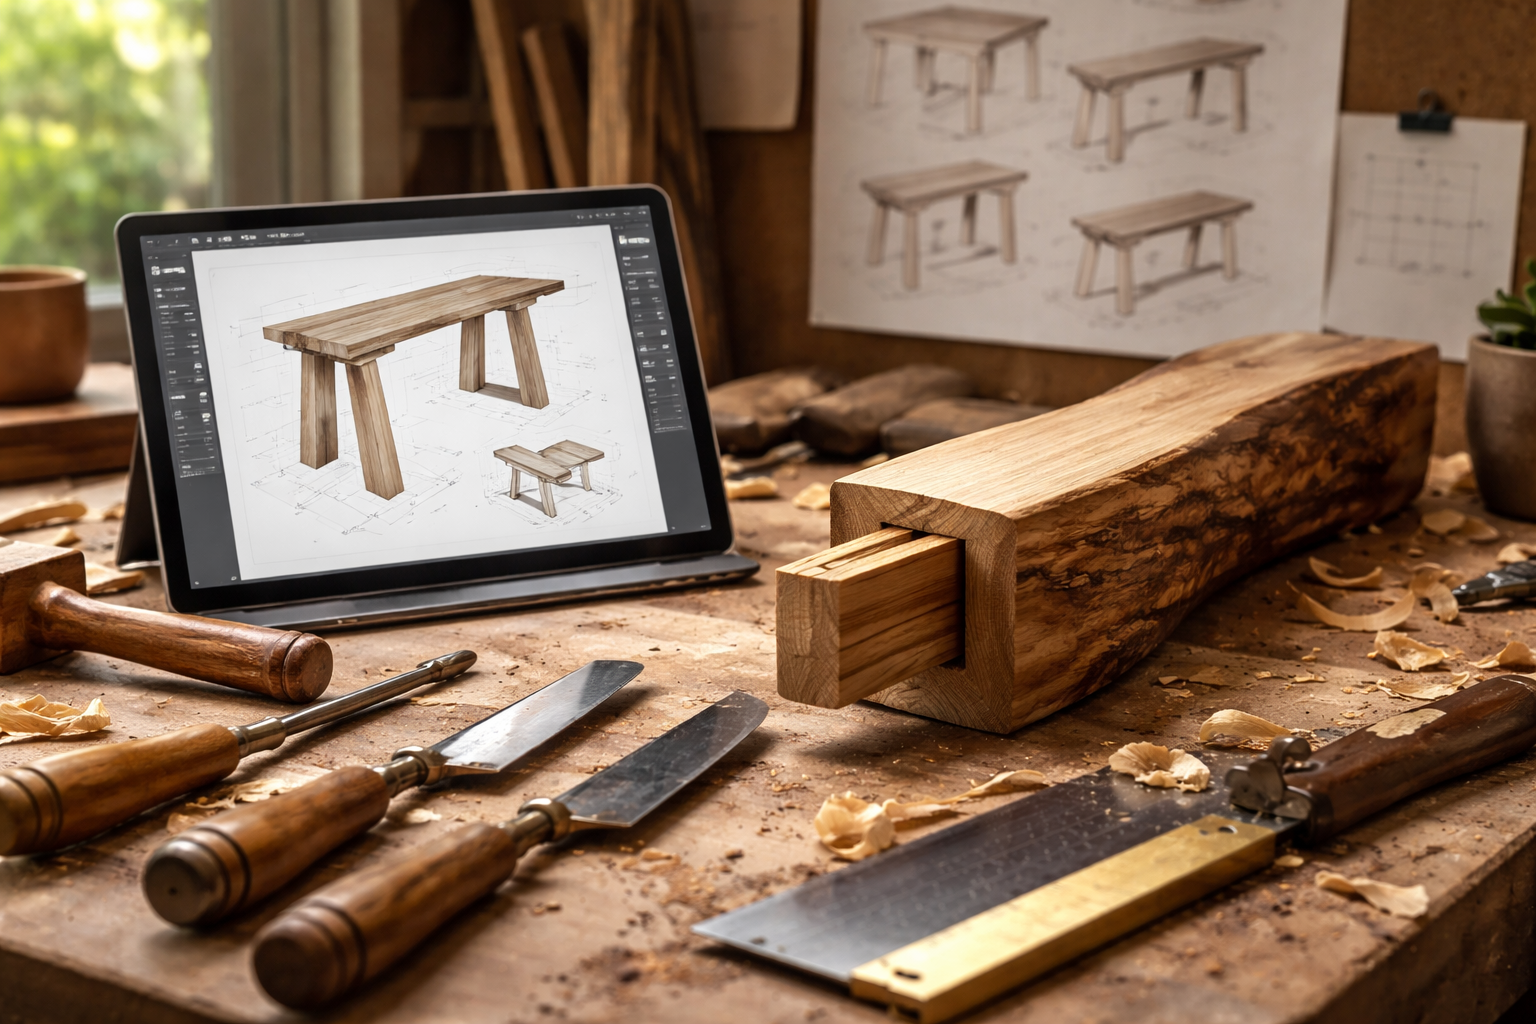
While the methods are traditional, the preparation in 2026 is often anything but. Modern woodworkers are leveraging digital design software (CAD/CAM) to plan complex joinery with incredible accuracy.
- 3D Modeling: Software allows for visualizing how joints will interact, especially with irregular live-edge pieces. This helps in anticipating challenges and optimizing cuts before a single piece of wood is touched.
- Accurate Layout: Digital calipers and laser measures provide exact dimensions. Some even use CNC routers for initial roughing out of waste areas in mortises, which are then precisely finished by hand. This hybrid approach significantly speeds up the process without sacrificing the hand-finished quality.
- Templates and Jigs: Digital designs can be used to create precise templates for marking out joints, ensuring consistency, especially in modular furniture where repeatable components are key.
Imagine a stunning live-edge dining table where the legs are joined to the slab with through-wedged mortise-and-tenons. The initial layout for the irregular tenons and mortises might be mapped using a laser projector directly onto the wood from a digital model, providing a perfect guide for the hand tools that follow. This is the essence of “Mastering Modern Hand-Cut Joinery: Adapting Classics for Live Edge and Modular Furniture” in the current era.
“The beauty of modern woodworking lies in its ability to marry centuries of craftsmanship with the precision of digital technology, creating pieces that are both timeless and perfectly executed.”
Classic Joinery Techniques Reimagined for Live Edge and Modular Furniture
“Mastering Modern Hand-Cut Joinery: Adapting Classics for Live Edge and Modular Furniture” requires not just knowing how to cut a joint, but understanding which joint to use and how to adapt it. Live-edge pieces demand creativity due to their natural, often irregular forms, while modular furniture necessitates precise, strong, and sometimes easily disassembled connections. Let’s explore some classic joints and their modern adaptations.
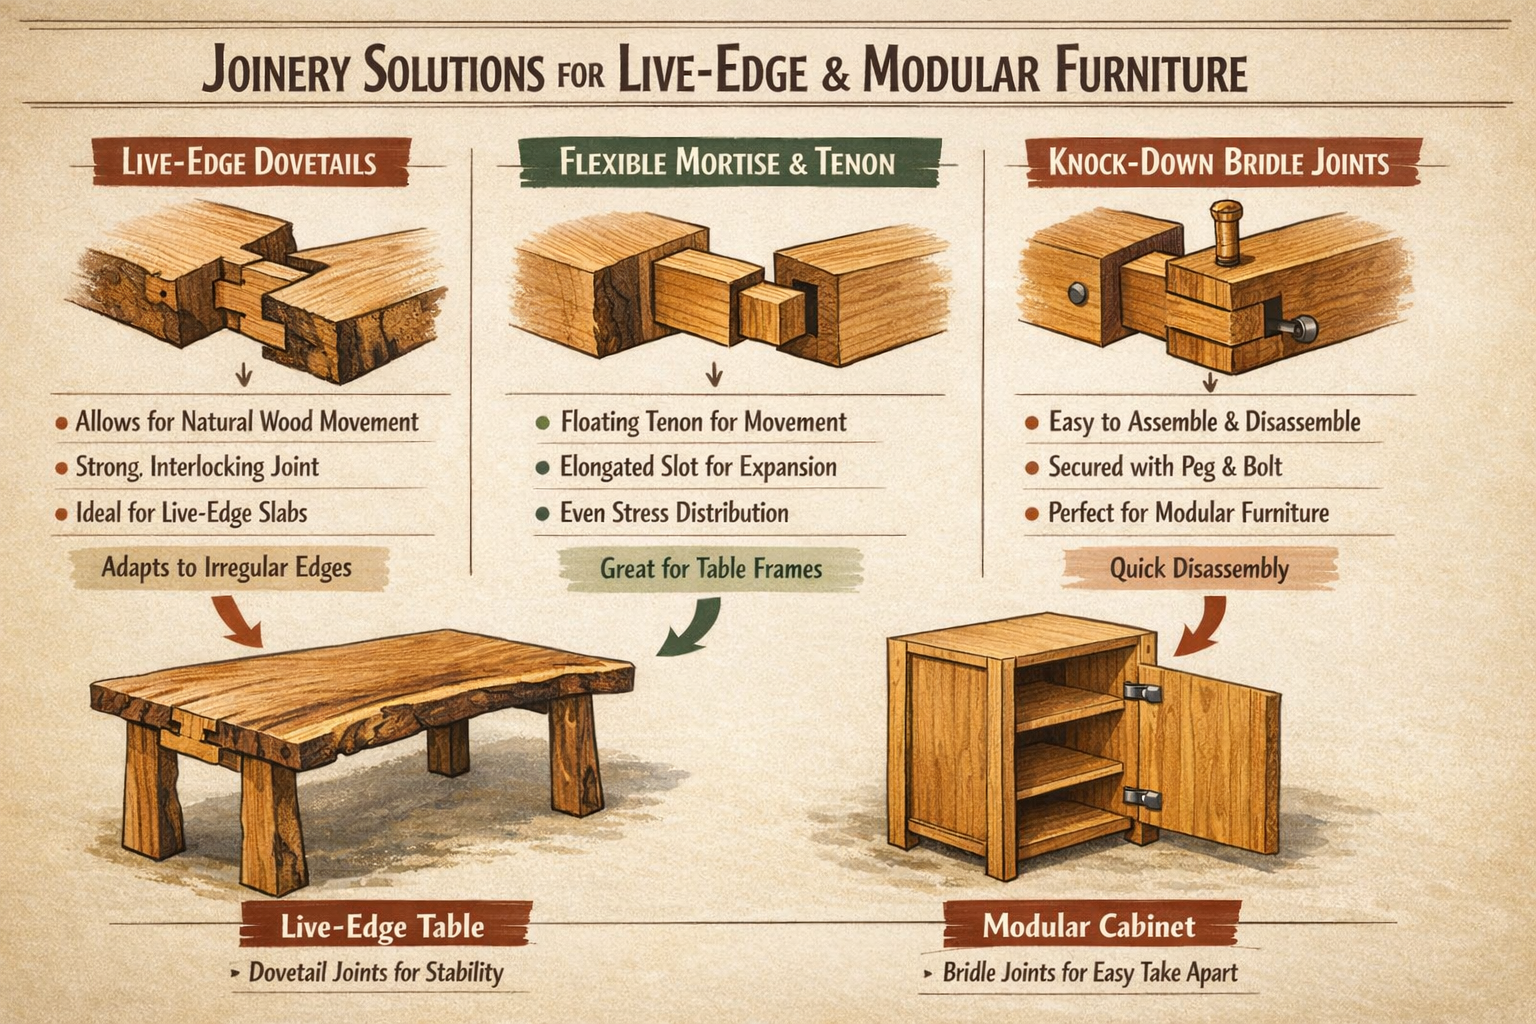
Mortise-and-Tenon Joint
The mortise-and-tenon is arguably the strongest and most versatile joint, ideal for frame construction, attaching legs to tabletops, and general structural integrity.
- Traditional Use: Commonly found in chairs, tables, and doors, providing excellent resistance to racking.
- Adaptation for Live Edge:
- Irregular Tenons: For live-edge slabs, the tenon might need to be shaped to match the undulating surface of the live edge where the leg connects. This involves careful tracing and shaping of the tenon shoulder.
- Through Mortises: Often preferred for live-edge designs, a through mortise allows the tenon to pass completely through the slab, often wedged for added strength and visual appeal. This highlights the joint as a design feature.
- Haunched Tenons: Useful when only a portion of the joint is exposed, providing increased glue surface area while accommodating irregular edges.
- Adaptation for Modular Furniture:
- Drawboring: Using a slightly offset hole for the peg ensures the joint pulls tight, making it incredibly strong for modular frames that need to withstand movement.
- Knock-down Fittings: While often associated with hardware, the basic mortise-and-tenon can be combined with knock-down connectors for modular units that require frequent assembly/disassembly, providing mechanical strength while allowing for separation.
- Tapered Tenons: A slightly tapered tenon can be driven into a corresponding mortise for a friction fit, then secured with a removable key or peg for modularity.
Table: Mortise-and-Tenon Joint Variations for Modern Furniture
| Joint Variation | Live Edge Application | Modular Furniture Application | Benefits |
|---|---|---|---|
| Through-Wedged | Legs into irregular slab, emphasizing visual joinery | High-strength, visible joinery for permanent modules | Maximum strength, aesthetic impact, easy inspection |
| Tapered/Keyed | Connecting supports to organic curves | Easily disassembled/reassembled, visually distinctive | Strong mechanical lock, ideal for movable components |
| Haunched | Joining apron to leg at irregular top edge | Strong corner connections in modular casework | Prevents twisting, strong, can be concealed |
| Floating Tenon | Joining two irregular live-edge pieces end-to-end | Creates strong butt joint for panels in modular cabinets | Good for wide panels, strong, less complex to cut than full tenons |
Dovetail Joint
The dovetail is renowned for its exceptional tensile strength and elegant appearance, making it perfect for drawers, boxes, and carcass construction. Explore different methods for creating strong joints in our Mastering the Woodworking Box Lid: A Comprehensive Guide for 2026.
- Traditional Use: Primarily used for joining sides of boxes or drawers, resisting pulling forces.
- Adaptation for Live Edge:
- Asymmetrical Dovetails: Pins and tails can be subtly altered in size or spacing to accommodate the unique grain patterns or slight variations in thickness of live-edge components.
- Exposed through-dovetails: Often featured on the ends of live-edge console tables or benches, showcasing the beautiful joinery as a design element.
- Adaptation for Modular Furniture:
- Sliding Dovetails: Excellent for joining shelves to cabinet sides in a modular system. They allow for easy assembly and disassembly while providing robust support and preventing racking.
- Half-Blind Dovetails: Can be used where a strong, concealed joint is desired for modular drawer fronts or carcass construction.
- Through Dovetails with Removable Keys: Similar to tapered mortise-and-tenons, keys can be used to lock through dovetails, making them modular and easily taken apart.
Bridle Joint
The bridle joint is a strong and visually appealing joint, often used in frame construction where a clean, exposed corner is desired.
- Traditional Use: Joining rails to stiles in frames, offering good strength in two directions.
- Adaptation for Live Edge:
- Matched to Irregularities: The open mortise and tenon of a bridle joint can be shaped to flow with the organic lines of a live-edge component, for instance, a leg joining a stretcher with a natural curve.
- Adaptation for Modular Furniture:
- Mitered Bridle Joint: This variation provides a clean, mitered corner while retaining the strength of the bridle joint, ideal for modern, minimalist modular frames.
- Cross Bridle Joint: Perfect for intersecting rails or stretchers in modular bases, offering significant strength and a distinct aesthetic.
Finger Joint (Box Joint)
While often machine-cut, hand-cut finger joints offer precision and strength, particularly for larger boxes or carcasses. For more on tools for this, see our article on Best Router Bit for Box Joints: A Comprehensive Guide, though here we’re focusing on hand-cutting.
- Adaptation for Modular Furniture: Easily replicated for modular box units or cabinet carcasses. The numerous glue surfaces provide exceptional strength, and if cut precisely, components can fit snugly for easy assembly.
The key to “Mastering Modern Hand-Cut Joinery: Adapting Classics for Live Edge and Modular Furniture” lies in thoughtfully selecting and meticulously executing the right joint for the right application, always considering the specific characteristics of the wood and the functional requirements of the finished piece.
The Modern Woodworker’s Toolkit and Workflow for Joinery Excellence
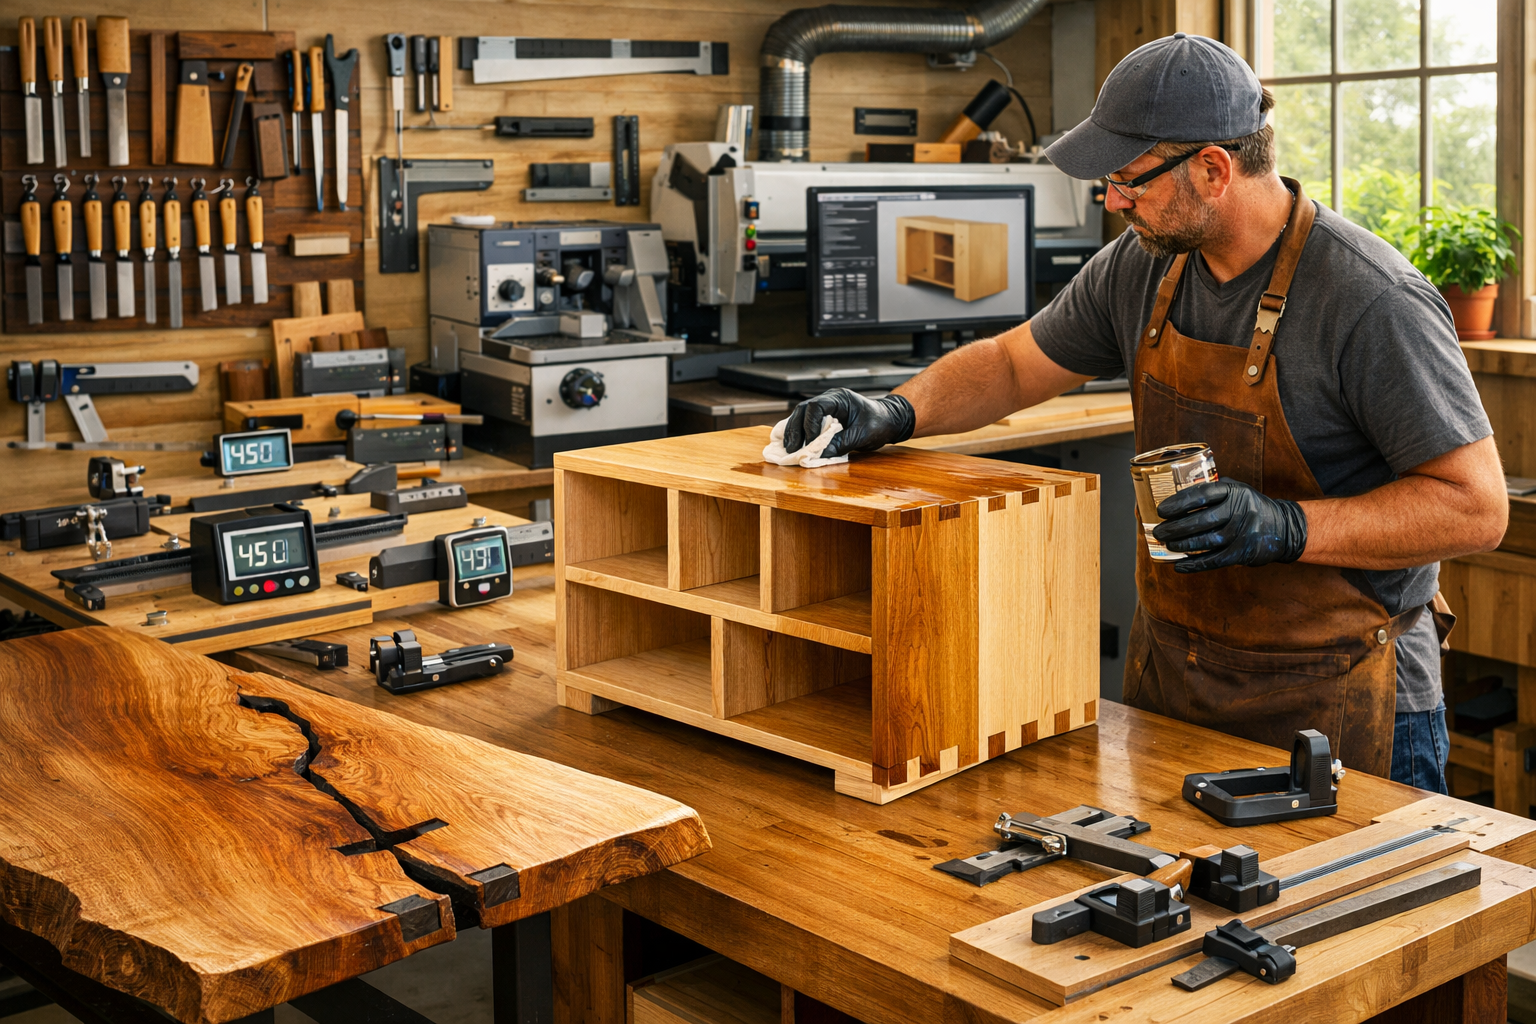
Achieving precision and efficiency in “Mastering Modern Hand-Cut Joinery: Adapting Classics for Live Edge and Modular Furniture” hinges on two critical elements: a well-curated toolkit of sharp, high-quality hand tools and a streamlined workflow that embraces both traditional methods and modern insights.
Essential Hand Tools for Joinery
While the romantic image of a woodworker often involves a shop full of hand tools, the reality is that a focused selection of sharp and well-maintained tools is more important than sheer quantity.
- Chisels: A set of bench chisels (1/8″ to 1″) is indispensable. Pair them with mortise chisels for heavy-duty mortising and paring chisels for fine-tuning. Sharpness is paramount. A dull chisel is more dangerous and less effective than no chisel at all.
- Hand Saws:
- Dovetail Saw: A fine-toothed saw for precise cuts in small joinery.
- Tenon Saw: A slightly larger saw for cutting tenon cheeks and shoulders.
- Carcass Saw: For cutting cross-grain shoulders on wider panels.
- For general cutting, a reliable hand miter saw can be incredibly useful for initial stock preparation.
- Marking and Measuring Tools:
- Marking Gauge: Essential for marking parallel lines for mortises, tenons, and shoulders. A mortise gauge with two pins is ideal for setting mortise width.
- Cutting Gauge: For scoring grain to prevent tear-out when cutting shoulders.
- Square (Combination and Try): For checking perpendicularity and laying out lines.
- Bevel Gauge: For transferring angles, especially useful with live-edge pieces that might not have perfect 90-degree references.
- Pencils and Knives: A sharp pencil for initial layout, but a marking knife for precise, definitive lines that guide your saw and chisel.
- Digital Calipers and Rulers: For incredibly accurate measurements and transfers, bridging the gap between traditional and modern precision.
- Mallet: For driving chisels and seating joints. A wooden or rawhide mallet is preferred to avoid damaging chisel handles.
- Sharpening Station: Crucial for maintaining all cutting tools. This includes sharpening stones, strops, and honing guides. You cannot achieve tight, clean joinery with dull tools.
Optimizing the Joinery Workflow
An efficient workflow for hand-cut joinery involves meticulous planning, precise marking, and a systematic approach to cutting.

- Design and Planning:
- Start with a clear vision and detailed drawings, whether hand-sketched or digitally rendered using CAD software.
- Consider wood movement for the chosen joinery type, especially with wide live-edge slabs.
- Plan the sequence of cuts and the order of assembly.
- Stock Preparation:
- Ensure all stock is perfectly dimensioned and square (unless working with intentional live-edge irregularities). Flat, true surfaces are the foundation of accurate joinery. Tools like a planer are invaluable here – for instance, a Delta 22-560 Planer can ensure consistent thickness.
- Acclimate your wood to your shop environment to minimize future movement.
- Layout and Marking:
- This is the most critical step. “Measure twice, cut once” applies profoundly here.
- Use a sharp marking knife to score lines, which provides a clean edge for chisels and saws to follow and reduces tear-out.
- Gauge lines for mortises and tenons should be precise.
- For dovetails, transfer lines accurately from one component to the other.
- Cutting the Joints:
- Pare with the Grain: When chiseling, always cut with the grain to avoid splitting.
- Work in Stages: Remove waste progressively, especially in deep mortises.
- Test Fit Frequently: Continuously test the fit of your joint. It should be snug, requiring light mallet taps to seat, but not so tight that it stresses the wood. Never force a joint.
- Jigs and Fixtures: Employ jigs to ensure repeatable accuracy, especially for modular components. A simple bench hook or a specialized dovetail jig can make a huge difference. For more ideas on shop efficiency, consider optimizing your storage unit for woodworking.
- Assembly and Finishing:
- Dry-fit all components before applying glue to ensure a perfect fit.
- Apply glue carefully and clamp evenly. Use cauls to protect finished surfaces.
- Once the glue is dry, clean up any squeeze-out.
- The beauty of exposed hand-cut joinery means the finish needs to be impeccable. Techniques like those discussed in natural wood finishing techniques or Danish Oil vs Linseed: The Ultimate Wood Finishing Guide can highlight the wood and the joinery.
By honing these skills and establishing a disciplined workflow, woodworkers in 2026 can confidently approach “Mastering Modern Hand-Cut Joinery: Adapting Classics for Live Edge and Modular Furniture,” creating stunning, durable, and truly unique pieces that stand the test of time.
Conclusion
“Mastering Modern Hand-Cut Joinery: Adapting Classics for Live Edge and Modular Furniture” is more than just a technique; it’s a philosophy that combines the timeless artistry of woodworking with the pragmatic demands of contemporary design. In 2026, the discerning woodworker understands that the strength, longevity, and inherent beauty of hand-cut joints are unparalleled, particularly when crafting pieces with the organic individuality of live-edge wood or the versatile utility of modular designs.
We’ve explored how classic joints like the mortise-and-tenon and dovetail are being reimagined and precisely adapted to meet these specific challenges. The integration of modern digital tools for planning and layout ensures accuracy, while the meticulous work of sharp hand tools brings these designs to life with a level of craftsmanship unmatched by purely mechanical means. This hybrid approach allows for efficiency without sacrificing the soul of the craft.
The journey to joinery excellence demands patience, precision, and continuous practice. It requires a deep understanding of wood, an unwavering commitment to sharp tools, and a methodical workflow. For those willing to invest the time and effort, the rewards are immense: furniture pieces that are not only structurally superior but also profoundly beautiful, telling a story of dedication and skill.
Actionable Next Steps
- Invest in Quality Tools: If your current hand tools are lacking, prioritize acquiring high-quality chisels, saws, and marking gauges. Remember, sharpness is key; a good sharpening system is a non-negotiable investment.
- Practice Fundamental Joints: Start with basic mortise-and-tenons and dovetails on scrap wood. Focus on achieving tight, square, and consistent cuts before moving to complex projects.
- Embrace Digital Planning: Experiment with 3D modeling software to plan your joinery, especially for irregular live-edge pieces. This can save significant material and time in the long run.
- Study Joinery Mechanics: Understand not just how to cut a joint, but why certain joints are chosen for specific applications, considering forces, wood movement, and aesthetic intent.
- Start Small: Begin with a simple live-edge shelf with a few hand-cut joints, or a small modular storage box, to build confidence before tackling larger projects like tables or cabinets. For inspiration, consider crafting a beautiful and strong woodworking nightstand featuring visible joinery.
By committing to these steps, you will not only master the techniques of modern hand-cut joinery but also contribute to a growing movement that values enduring craftsmanship in the heart of the 21st century.
