
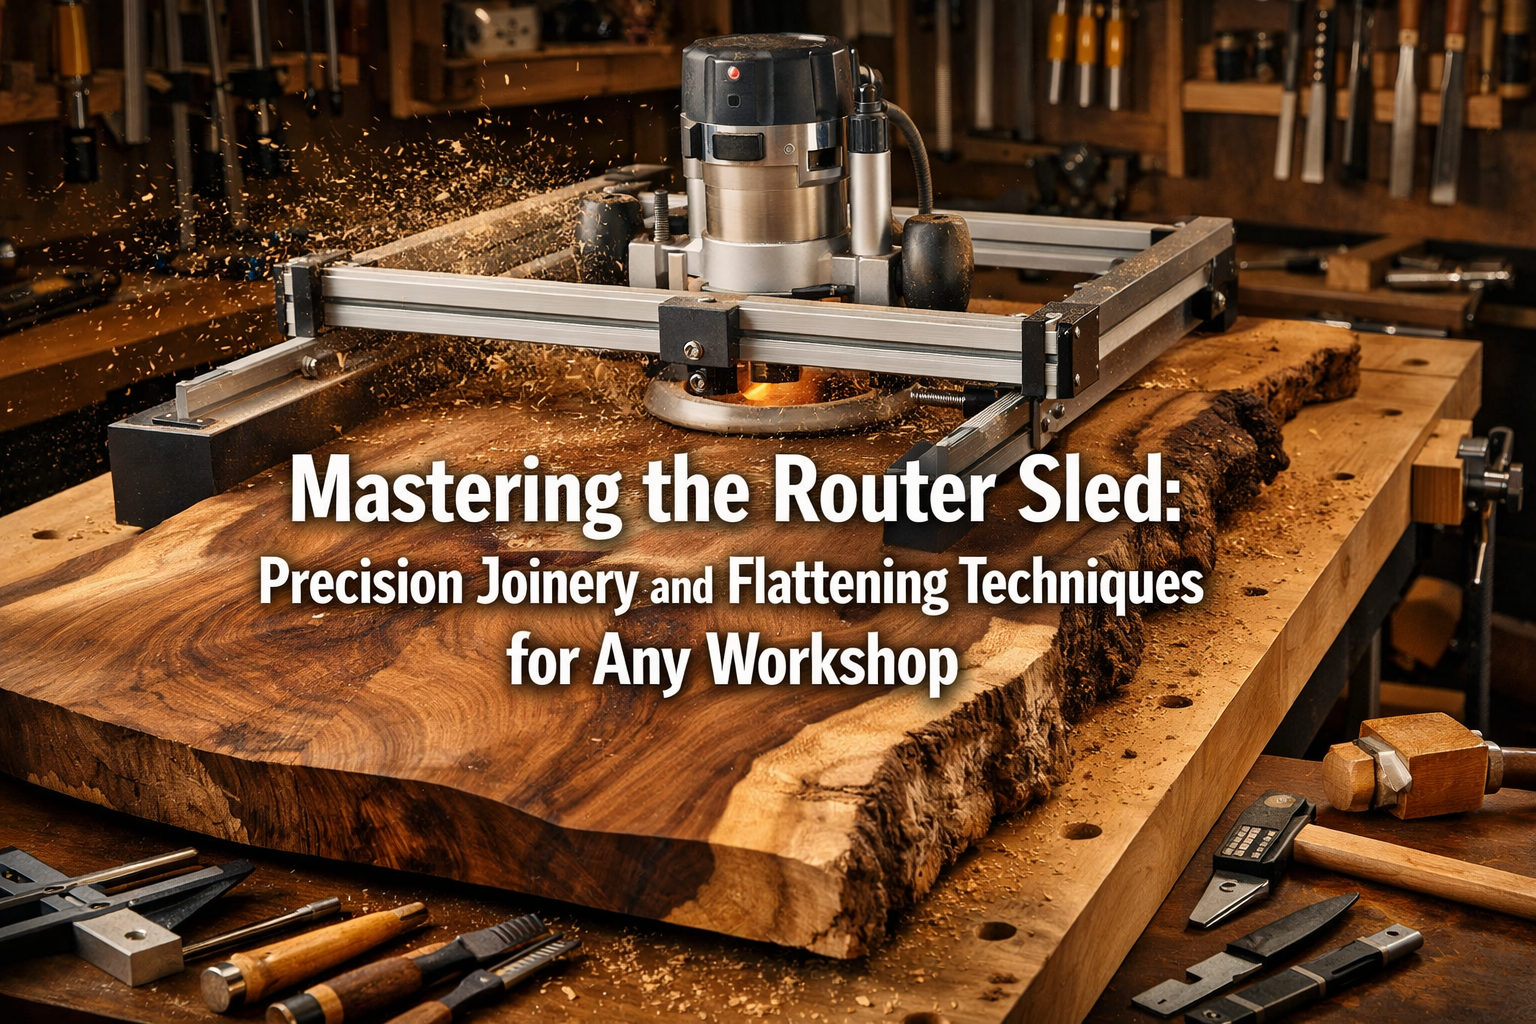

In the dynamic world of woodworking, achieving perfectly flat surfaces and precise joints can be the difference between an amateur project and a masterpiece. Many woodworkers, especially those without access to large, expensive jointers or planers, often struggle with warped, twisted, or cupped lumber. This is where mastering the router sled becomes an invaluable skill. This comprehensive guide will unlock the versatility of a DIY router sled, providing detailed instructions for building one and exploring its numerous applications for achieving perfectly flat surfaces and precision joinery, making it an essential tool for any workshop in 2026.
A router sled, at its core, is a simple jig that allows a router to travel across a workpiece in a controlled, consistent manner. This precision allows woodworkers to mill rough lumber, flatten wide slabs, create dead-flat panels for glue-ups, and even perform advanced joinery operations with unparalleled accuracy. By harnessing the power and precision of your router in this clever jig, you can transform otherwise unusable material into high-quality stock, elevating the caliber of all your woodworking projects.

Key Takeaways
- Cost-Effective Solution: A router sled provides a budget-friendly alternative to expensive jointers and planers for flattening large or wide lumber.
- Achieve Perfect Flatness: Essential for creating truly flat surfaces, which are critical for strong, gap-free glue-ups and precision joinery.
- Versatile Applications: Beyond flattening, router sleds can be adapted for various joinery tasks, custom grooves, and even sanding.
- Customizable for Any Workshop: The design can be scaled and modified to fit different router sizes, workpiece dimensions, and workshop layouts.
- Enhance Project Quality: Leads to higher quality, more professional-looking finished projects by ensuring foundational components are precisely milled.
Understanding the Router Sled: Design and Construction for Precision
The foundation of “Mastering the Router Sled: Precision Joinery and Flattening Techniques for Any Workshop” begins with understanding its design and constructing a robust, accurate sled. While various designs exist, the most common and effective consists of two parallel rails and a movable gantry that holds the router.
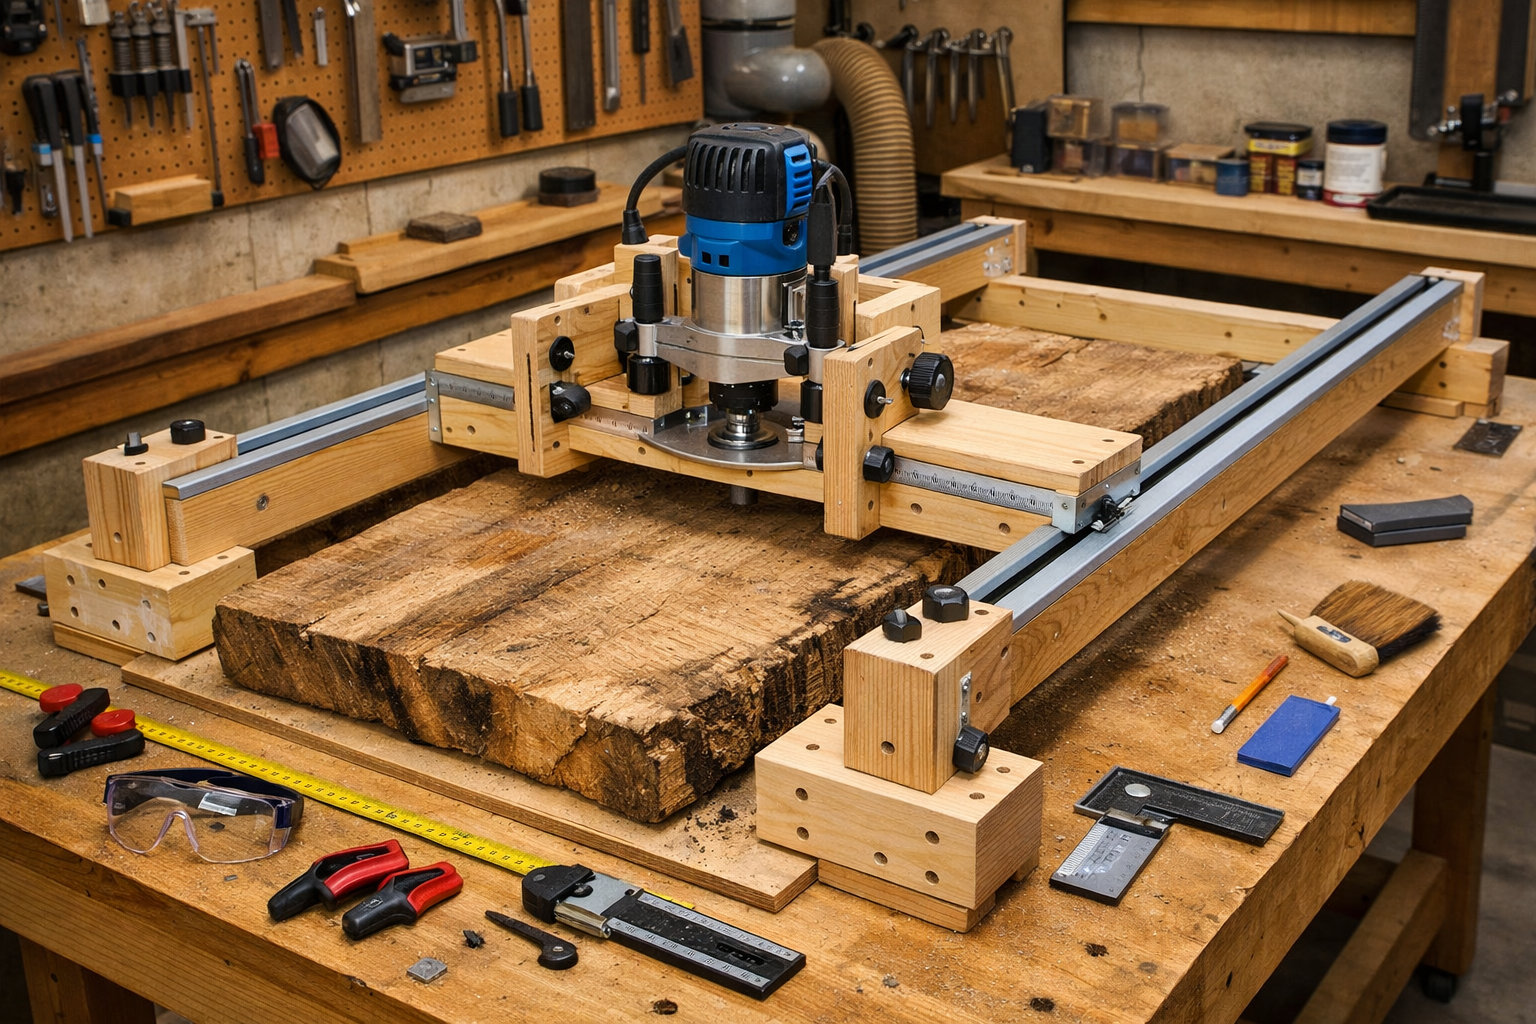
Components of a Router Sled
A well-designed router sled typically includes the following parts:
- Base/Workpiece Support: This is the surface on which your workpiece rests. It must be perfectly flat and stable. Often, sacrificial strips or clamps are used to secure the workpiece.
- Parallel Rails: Two long, straight pieces (usually plywood, MDF, or aluminum extrusions) that run parallel to each other. These define the path of the router gantry. They must be perfectly co-planar and parallel to ensure an even cut.
- Gantry/Bridge: A movable assembly that spans across the rails. Your router is mounted securely to this gantry. It should slide smoothly along the rails without any wobble or play.
- Router Mounting Plate: A flat plate, typically made from acrylic or robust plywood, attached to the gantry, to which your router is fastened. It allows the router to slide back and forth across the workpiece.
Choosing Materials
The quality of your router sled depends heavily on the materials used.
- Rails: Opt for dimensionally stable materials. Laminated plywood, thick MDF, or aluminum T-track extrusions are excellent choices. Ensure they are perfectly straight.
- Gantry: Sturdy plywood or MDF for the main bridge. For the router mounting plate, consider 1/2″ or 3/4″ acrylic for transparency and durability, or high-quality plywood.
- Fasteners: High-quality screws, bolts, and possibly T-nuts for securing the router and ensuring smooth operation.
- Glides/Bearings: UHMW plastic strips or roller bearings can be incorporated into the gantry for exceptionally smooth travel along the rails.
Step-by-Step Construction Guide
Building your own router sled is a rewarding project that pays dividends in accuracy.
- Prepare the Base: Select a flat, stable workbench or construct a dedicated base from thick MDF or torsion box construction for maximum stability.
- Cut and Mill the Rails: Cut two identical, long, straight pieces for your rails. If using wood, ensure they are perfectly straight and dimensionally consistent. Consider laminating thinner strips for added rigidity.
- Mount the Rails: Securely attach the rails to your base, ensuring they are perfectly parallel and co-planar. Use shims if necessary to achieve perfect alignment. This is a critical step for precision.
- Construct the Gantry: Build a bridge that spans the width of your rails, allowing enough clearance for your widest anticipated workpiece. Attach a router mounting plate to the underside of this bridge.
- Router Mounting: Create a precise opening in your mounting plate for your router’s base. Secure the router firmly to this plate, ensuring the bit can be adjusted vertically through the plate.
- Test and Refine: Perform test cuts on scrap material. Check for any play in the gantry, unevenness in the cut, or issues with smooth travel. Make adjustments as needed.
“A well-built router sled can replicate the performance of industrial machinery, bringing dead-flat surfaces and joinery precision within reach of every woodworker.” — Woodcraft Wiz Editorial Team
For those interested in delving deeper into other precision tools, exploring Mastering the Router Table: Beyond Basic Edges for Precision Joinery offers complementary insights into router applications.
Essential Techniques for Flattening and Precision Cuts
Once your router sled is constructed, the next phase in “Mastering the Router Sled: Precision Joinery and Flattening Techniques for Any Workshop” involves learning the techniques for optimal performance. This includes preparing your workpiece, selecting the right router bits, and executing passes effectively.
Workpiece Preparation
Before using the router sled, proper workpiece preparation is crucial:
- Secure the Workpiece: The wood must be immovably secured to the base of the sled. Use double-sided tape, hot glue, or clamps to prevent any movement during routing. For irregular slabs, shims might be needed underneath to prevent rocking.
- Identify High Spots: Visually inspect the workpiece or use a straightedge to identify the highest points. The first passes will aim to remove these.
- Plan the Passes: Decide on the direction of your passes. Generally, routing with the grain is preferred for a smoother finish, but cross-grain passes might be necessary for the initial flattening of very rough surfaces.
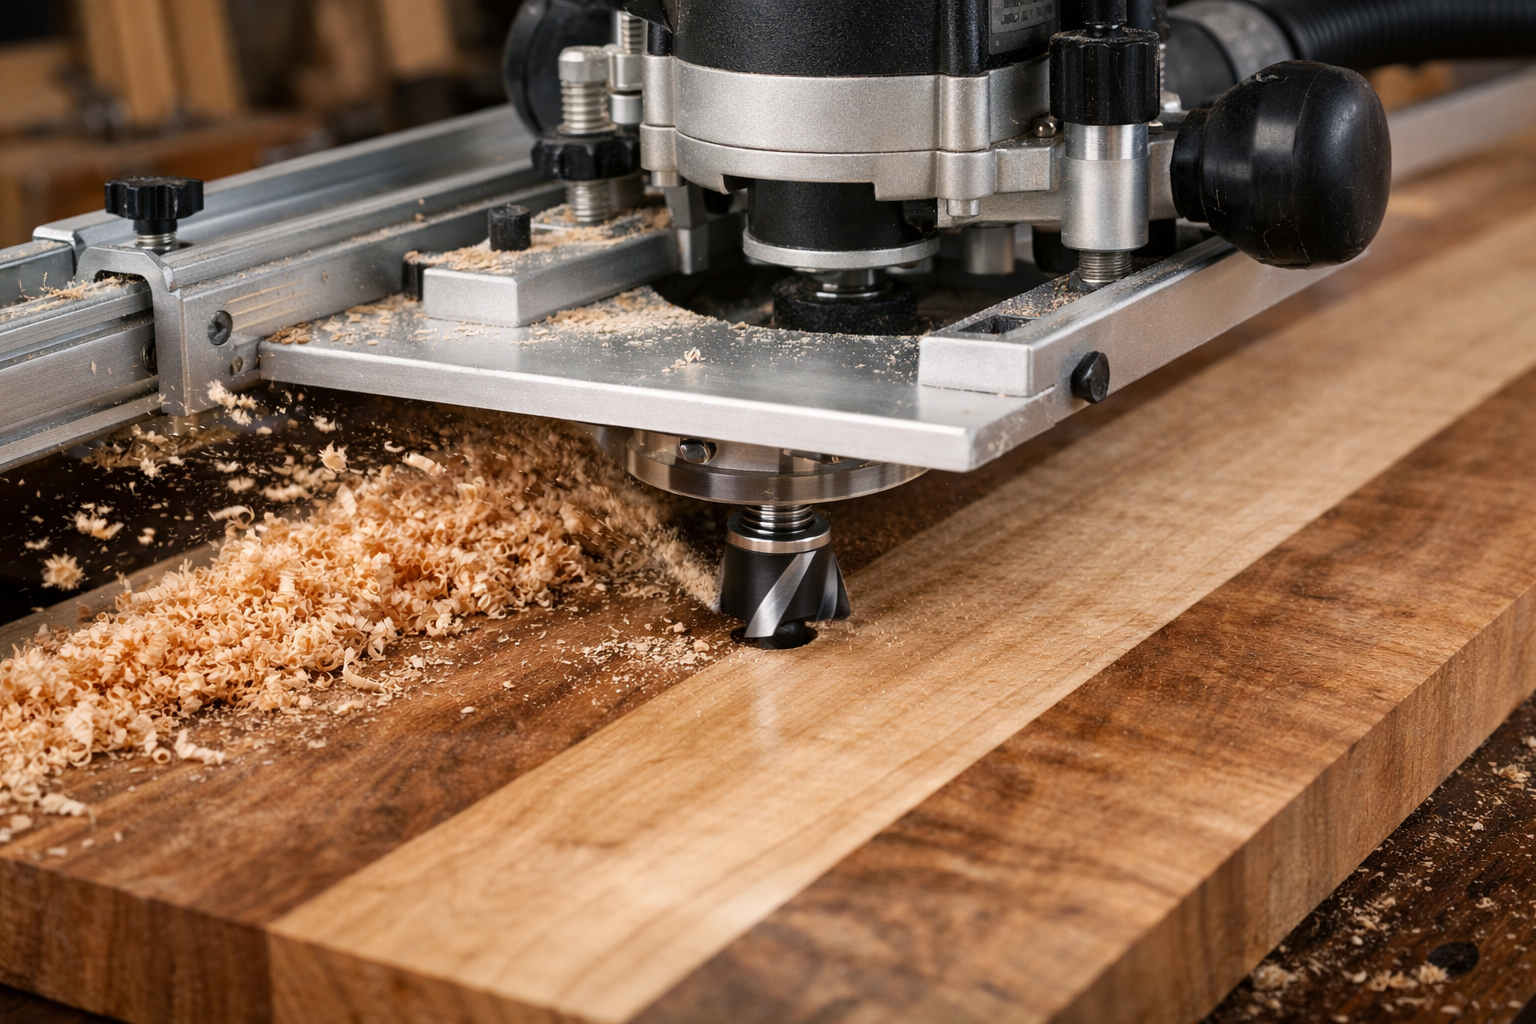
Router Bit Selection and Speed
Choosing the correct router bit is paramount for efficiency and finish quality.
- Surfacing Bits (Planer Bits): These large-diameter, flat-bottomed bits are ideal for flattening wide surfaces. They ensure a consistent depth of cut across the entire width. 📏
- Straight Bits: For smaller workpieces or specific joinery tasks, a large-diameter straight bit can also be used.
- Router Speed: Adjust your router’s speed according to the bit diameter and wood type. Larger bits and harder woods generally require lower RPMs to prevent burning and excessive tear-out.
| Bit Type | Recommended Use | RPM Setting (Approx.) |
|---|---|---|
| Surfacing (2-3″) | General flattening, wide slabs | Low-Medium (10k-15k) |
| Straight (3/4-1″) | Smaller flattening, joinery | Medium (15k-20k) |
| V-Groove/Dado | Specific joinery, decorative cuts | Medium-High (18k-24k) |
Executing Flattening Passes
- Shallow Cuts: Always take shallow passes, typically 1/16″ to 1/8″ at a time. This reduces stress on the router and bit, minimizes tear-out, and yields a smoother finish.
- Overlap: Overlap each pass by about 1/4 to 1/2 of the bit’s diameter to ensure complete coverage and a smooth transition between passes.
- Direction: Work methodically across the workpiece. Start at one end and move across, or work from the center outwards.
- Dust Collection: Router sleds generate a significant amount of dust and chips. Ensure you have effective dust collection connected to your router or a shop vacuum nearby. 💨
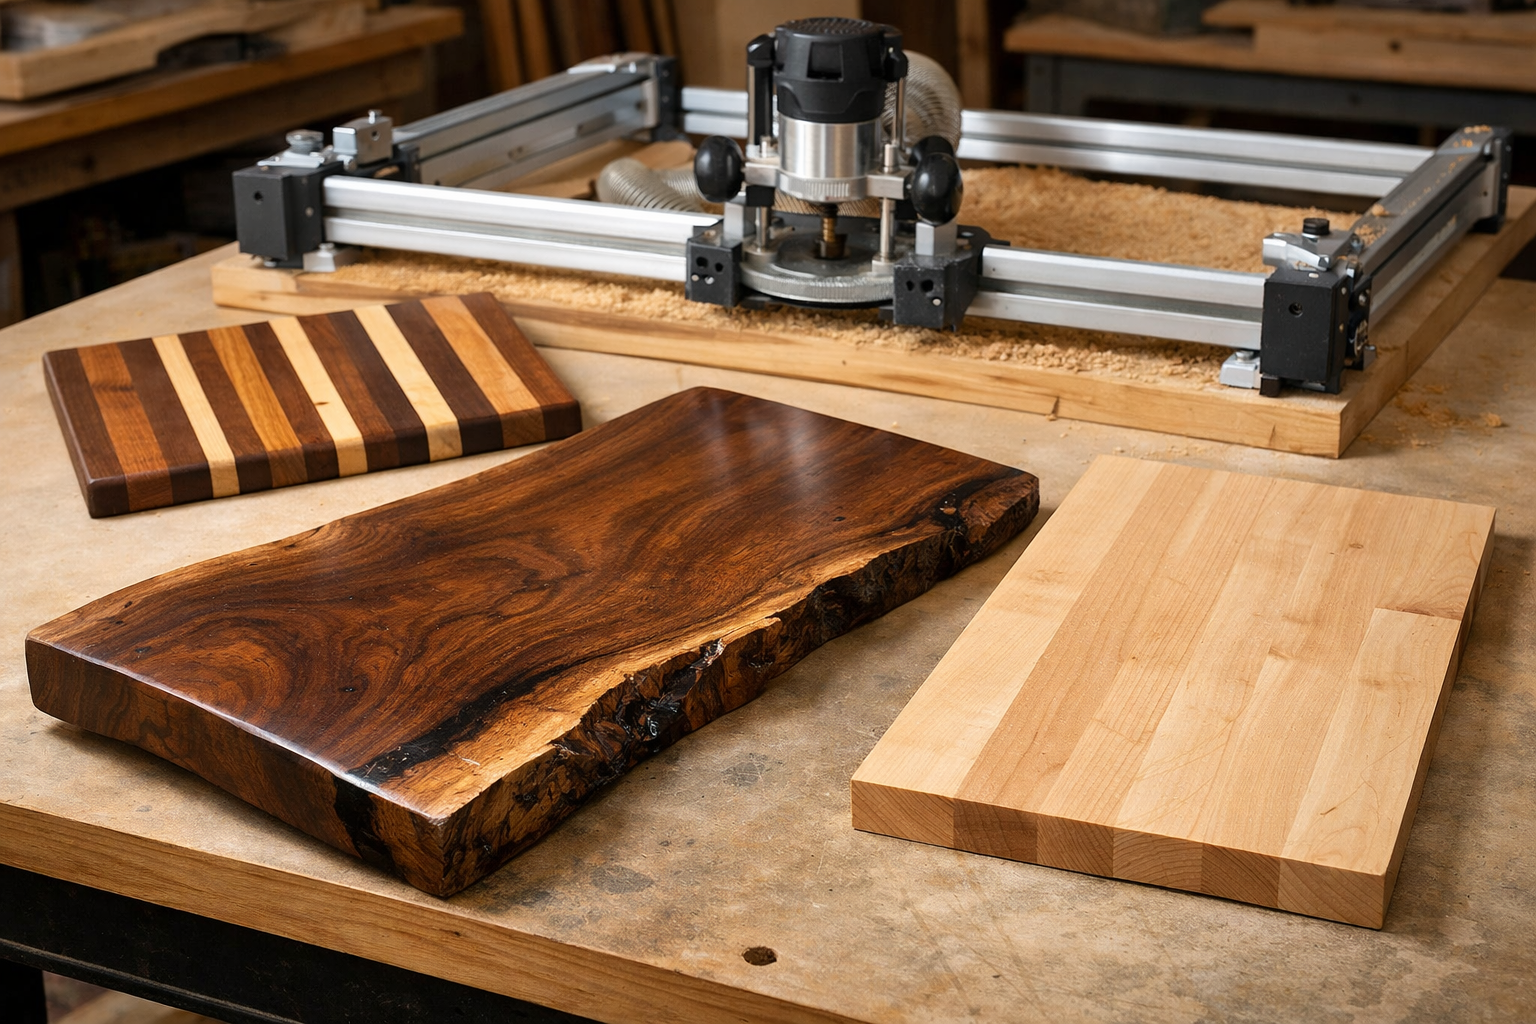
Beyond Flattening: Precision Joinery and More
The router sled’s capabilities extend far beyond simply flattening lumber. It can be a powerful jig for various precision operations:
- Perfectly Flat Panels for Glue-Ups: By ensuring all mating surfaces are dead flat, you can achieve incredibly strong and virtually invisible glue joints. This is especially vital for projects like tabletops, doors, or cabinet panels. Learn more about critical joints in our Beginner’s Guide to Essential Woodworking Joints: When to Use Which.
- Creating Dados and Grooves: With careful setup and jigs, the router sled can create perfectly straight and consistent dados or grooves across wide panels, essential for shelves or cabinet construction.
- Tenon Cheeks: For large mortise and tenon joints, the sled can precisely mill the cheeks of tenons on wide stock, ensuring a perfect fit.
- Chamfers and Bevels: By shimming the workpiece or tilting the base, specific angles can be cut across the surface of large pieces.
- Sanding Sled: With an appropriate sanding attachment for your router, the sled can even be used for initial large-scale sanding, saving time and effort.
Consider exploring Mastering the Band Saw: Essential Techniques for Resawing, Curve for rough stock preparation before bringing it to the router sled for final flattening. This combination can greatly improve efficiency.
Advanced Applications and Maintenance of Your Router Sled
As you become more comfortable with “Mastering the Router Sled: Precision Joinery and Flattening Techniques for Any Workshop,” you’ll discover advanced applications and critical maintenance practices to ensure its longevity and continued accuracy.
Maximizing Versatility with Jigs and Fixtures
The basic router sled design is a starting point. Its true potential is unleashed through clever modifications and supplementary jigs:
- Adjustable Rail System: Implement a rail system that allows you to easily adjust the width, accommodating both narrow and extremely wide workpieces. This might involve clamping rails to a larger base or using T-track systems.
- Vacuum Hold-Down: For workpieces that are difficult to clamp or are prone to warping under clamping pressure, integrating a vacuum hold-down system into your sled’s base can provide superior stability.
- Indexable Stops: For repeatable precision joinery, add indexable stops or a fence system to the base to accurately position workpieces for multiple identical cuts, such as dadoes for shelving units in a Building Modular Wood Storage Systems for Small Workshops: Maximizing.
- Router Bit Depth Stop: While routers have depth adjustments, an external, highly accurate depth stop on your sled can provide unparalleled control for critical joinery.
- Double-Sided Flattening: For extremely warped or twisted slabs, flattening one side, flipping the piece, shimming it to prevent rocking, and then flattening the second side can often yield better results than trying to flatten in one go.
Router Sled Maintenance for Enduring Accuracy
Like any precision tool, your router sled requires regular maintenance to retain its accuracy and smooth operation.

- Cleanliness is Key: Regularly clean dust, chips, and resin buildup from the rails, gantry, and router mounting plate. This prevents binding and ensures smooth travel. A quick wipe down after each use is recommended.
- Check for Wear: Inspect the rails and gantry for any signs of wear, particularly if using wooden components. Worn spots can introduce play and inaccuracy.
- Lubrication: If your gantry uses glides or bearings, apply appropriate lubrication sparingly to maintain smooth movement. Avoid over-lubricating, which can attract dust.
- Router Inspection: Ensure your router’s collet is clean and undamaged, and that the bit is securely tightened. Routinely check the router’s base for flatness.
- Bit Sharpening/Replacement: A dull router bit will lead to burning, tear-out, and increased effort. Keep your bits sharp or replace them when performance degrades.
Safety First
Operating a router sled involves powerful machinery and sharp cutting tools. Always prioritize safety:
- Eye and Ear Protection: Essential for every operation.
- Dust Mask: Protect your lungs from fine wood dust.
- Secure Workpiece: Never operate the sled with an unsecured workpiece.
- Clear Work Area: Keep your workspace clean and free of obstructions.
- Unplug Router: Always unplug the router when changing bits or performing maintenance.
By adhering to these maintenance guidelines and safety protocols, your router sled will remain a reliable and precise tool in your workshop for years to come. This dedication to precision extends to all aspects of woodworking, including specialized projects like Building Robust Floating Shelves: Advanced Fastening Systems, where perfectly flat and square components are absolutely essential.
Conclusion
Mastering the router sled is a transformative skill for any woodworker. It democratizes access to precision flattening and milling, capabilities once exclusive to well-equipped professional shops. By investing the time to build a sturdy router sled and learning its proper use, you can confidently tackle projects involving warped lumber, wide slabs, and intricate joinery that demand perfectly flat and square components.
In 2026, the DIY router sled continues to be a go-to solution for woodworkers seeking professional results without the prohibitive cost or space requirements of dedicated milling machinery. From creating dead-flat panels for seamless glue-ups to preparing thick stock for complex joints, the router sled empowers you to elevate the quality and accuracy of all your woodworking endeavors. Embrace this versatile jig, and unlock new levels of precision in your workshop.
Actionable Next Steps:
- Plan Your Build: Sketch out a design for your router sled, considering the maximum size of workpieces you anticipate flattening.
- Gather Materials: Source high-quality, straight materials for your rails, gantry, and base.
- Construct with Care: Take your time during construction, focusing on accuracy, especially when establishing parallel and co-planar rails.
- Practice on Scraps: Before tackling a valuable project, practice your flattening and joinery techniques on scrap wood to fine-tune your approach.
- Explore Accessories: Consider building or purchasing additional jigs and fixtures to enhance your sled’s versatility for various joinery tasks.
References
- Fine Woodworking Magazine. (2023). Router Jigs & Fixtures: Smart Solutions for the Router. Taunton Press.
- Schwarz, C. (2011). The Anarchist’s Workbench. Lost Art Press.
- Wood Magazine. (2021). The Essential Guide to Routers. Meredith Corporation.
