

Mastering Veneering Techniques: Elevating Furniture with Exotic Woods and Complex Patterns for a Premium Finish
In the world of fine woodworking, few techniques offer the transformative power and aesthetic versatility of veneering. It’s an ancient art, refined over centuries, that allows artisans to bestow breathtaking beauty upon furniture, turning ordinary pieces into extraordinary statements. For those looking to take their craft to the next level, mastering veneering techniques opens up a universe of design possibilities, from utilizing rare and exotic woods economically to crafting intricate patterns that would be impossible with solid lumber. This comprehensive guide delves into the essential knowledge and skills required for Mastering Veneering Techniques: Elevating Furniture with Exotic Woods and Complex Patterns for a Premium Finish in 2026.
Beyond mere surface application, veneering is about smart resource management, creating visual depth, and achieving levels of artistic detail that command attention. It’s an indispensable skill for any woodworker aspiring to produce truly high-end, premium furniture.

Key Takeaways
- Veneering offers aesthetic and practical advantages: Achieve stunning visual effects with exotic woods and intricate patterns while conserving valuable timber and minimizing wood movement.
- Careful material selection is crucial: Choosing the right veneer, substrate, and adhesive forms the foundation of a successful project.
- Precision is paramount: Accurate cutting, matching, and layout are essential for flawless patterns and tight seams.
- Proper pressing and finishing are key: Techniques like hammer veneering, vacuum pressing, and meticulous finishing ensure durability and a professional aesthetic.
- Advanced techniques unlock creativity: Marquetry, parquetry, and banding allow for complex and unique decorative elements.
The Foundation of Fine Veneering: Selection and Preparation
The journey to Mastering Veneering Techniques: Elevating Furniture with Exotic Woods and Complex Patterns for a Premium Finish begins long before glue is applied. It starts with careful selection and meticulous preparation of both the veneer and the substrate. This foundational stage dictates the success and longevity of your veneered masterpiece.
Understanding Veneer Types and Cuts
Veneers come in an astonishing array of species, each with unique colors, grain patterns, and textures. Exotic woods like Macassar ebony, curly maple, figured anigre, pomelle sapele, and wenge are highly prized for their striking appearance. Veneers are typically cut in several ways, each producing a distinct visual effect:
- Rotary Cut: The log is rotated against a knife, peeling off a continuous sheet. This often produces a broad, sometimes wild grain pattern.
- Plain Sliced (Flat Cut): The log is sliced parallel to the center, yielding cathedral-like patterns.
- Quarter Sliced: The log is quartered and sliced perpendicular to the growth rings, resulting in straight, vertical grain.
- Rift Cut: Similar to quarter-sliced but at a slight angle, minimizing ray fleck and producing very straight grain.
Selecting the right cut is crucial for achieving your desired aesthetic, especially when working with complex patterns. Consider how the grain will flow across your design and if it complements or contrasts with other elements.
Choosing the Right Substrate
The substrate, or core material, is just as important as the veneer itself. It provides stability and a flat surface for the veneer. Common substrates include:
- Plywood: Stable and strong, but quality varies. Use cabinet-grade plywood with multiple thin plies.
- MDF (Medium Density Fiberboard): Exceptionally stable, flat, and uniform, making it an excellent choice for veneering. It has no grain direction, which eliminates concerns about wood movement.
- Particleboard: More economical but less stable than MDF, best for less demanding applications.
When selecting a substrate, always choose a material that is flat, smooth, and free of defects. Rough surfaces or irregularities will telegraph through the thin veneer, spoiling the finish. Properly preparing the substrate involves cleaning, sanding to a fine grit (180-220), and sometimes applying a sizing coat to reduce glue absorption and prevent telegraphing.
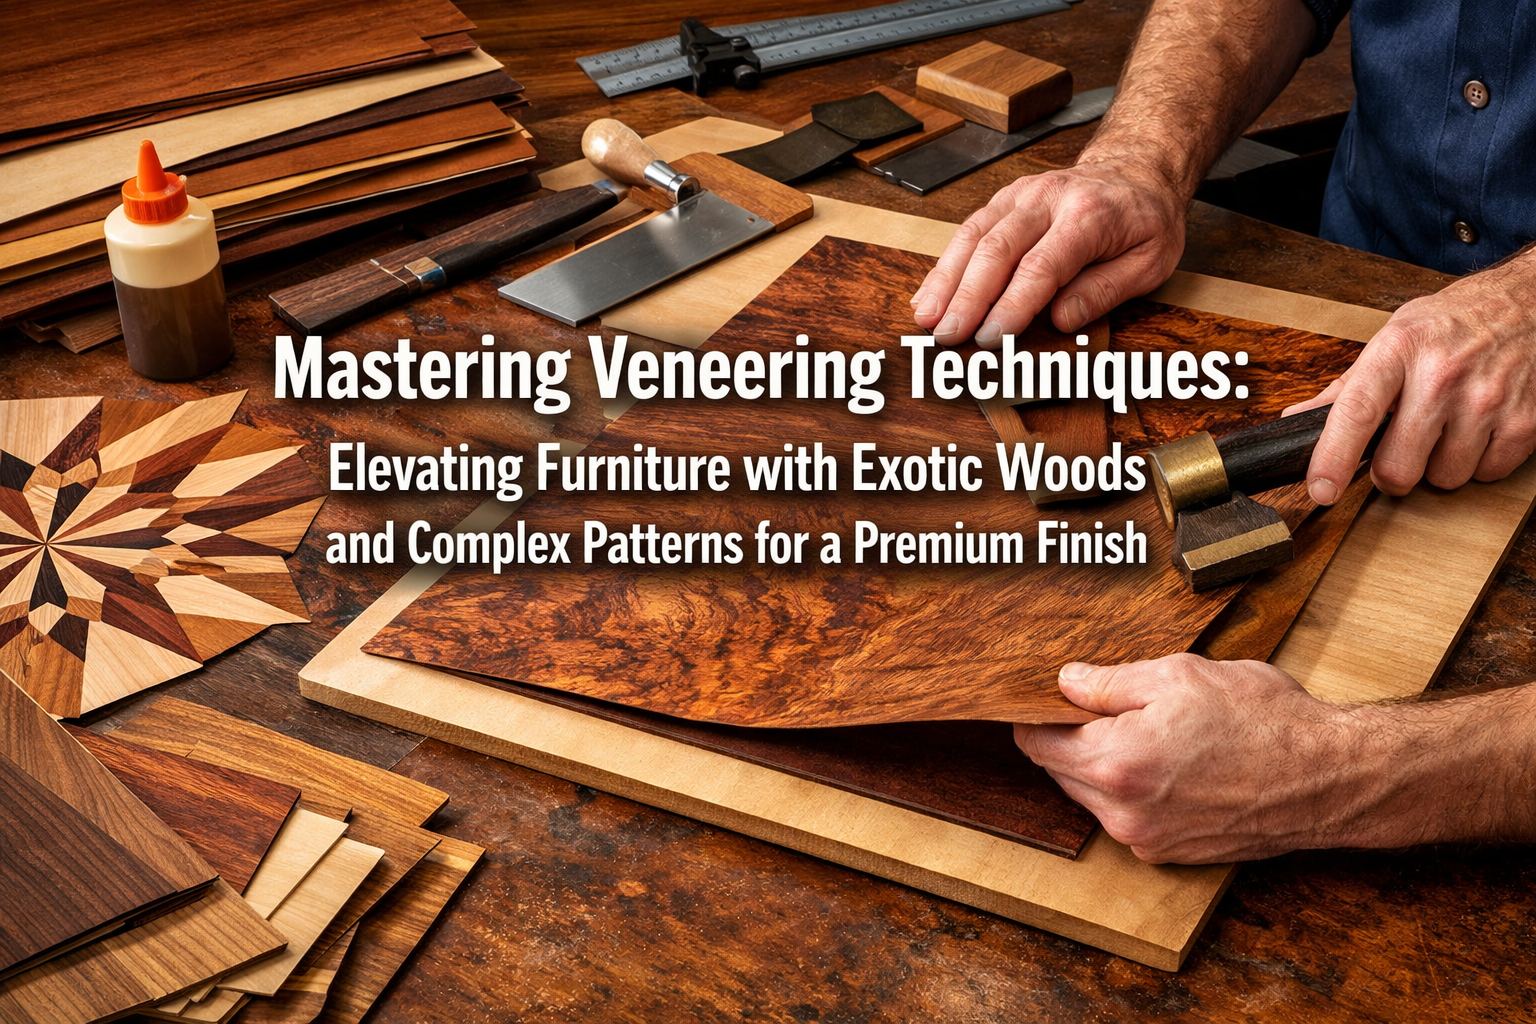
Essential Tools and Adhesives
A well-equipped veneering workspace is crucial. Key tools include:
- Veneer Saw or Knife: For precise cutting.
- Straightedges and Templates: For accuracy in complex patterns.
- Measuring Tools: Rulers, squares, and calipers.
- Veneer Tape: For holding pieces together during gluing.
- Veneer Hammer: Essential for traditional hammer veneering and ensuring good adhesion.
- Glue Spreader: For even adhesive application.
- Clamps, Cauls, or a Vacuum Press: For applying uniform pressure.
- Scrapers and Sanding Supplies: For final preparation and finishing.
For adhesives, Hide Glue is a traditional favorite for its reversible nature and long open time, especially for hammer veneering. Modern options like PVA (polyvinyl acetate) glues designed for veneering offer strong bonds and convenience. Urea-formaldehyde glues (plastic resin glue) provide excellent water resistance and a rigid glue line, ideal for permanent, high-stress applications. The choice of glue depends on your technique, project requirements, and desired open time.
 {{IMG_SLOT_1}}
Precision Application: Crafting Intricate Patterns and Premium Finishes
Once materials are selected and prepared, the art of applying veneer truly begins. This stage requires patience, precision, and a steady hand, particularly when you’re aiming for a premium finish or complex patterns as part of Mastering Veneering Techniques: Elevating Furniture with Exotic Woods and Complex Patterns for a Premium Finish.
Cutting and Matching Veneer for Patterns
Creating complex patterns like parquetry (geometric patterns) or marquetry (pictorial designs) demands meticulous cutting and matching.
- Bookmatching: Two consecutive sheets from the same flitch are opened like a book, creating a symmetrical mirror image. This is a classic technique for stunning effects on large surfaces.
- Slipmatching: Consecutive sheets are laid side-by-side, maintaining the original grain direction, creating a repeating pattern.
- Random Matching: Veneers are deliberately mismatched to create a rustic or unique aesthetic.
For intricate patterns, templates are often used. A sharp veneer saw or knife is guided along a straightedge or template to ensure clean, precise cuts. When assembling patterns, veneer tape is used on the “show” face to hold the pieces together tightly before gluing. Consider learning about Hand Tool Joinery for Visible Wood Joints: Dovetails, Mortis for similar precision principles in solid wood construction.
Veneer Application Methods
Several methods exist for applying veneer, each suited to different project scales and complexities:
- Hammer Veneering (Traditional Method): This technique, typically using hot hide glue, involves spreading glue on the substrate, laying the veneer, and then using a veneer hammer to press out air bubbles and excess glue while ensuring full contact. The hot hide glue allows for a relatively long open time and sets quickly as it cools, making it ideal for smaller projects or intricate work where precise alignment is needed.
- Clamping with Cauls: For larger surfaces, clamps and cauls (flat, rigid boards) are used to apply even pressure across the entire veneered surface. Waxed paper or plastic sheeting is placed between the cauls and the veneer to prevent sticking. This method is effective but requires many clamps to ensure uniform pressure.
- Vacuum Pressing: This is the most efficient and effective method for large or curved surfaces. The veneered panel is placed inside a vacuum bag, and a pump evacuates the air, creating uniform atmospheric pressure across the entire surface. This ensures perfect adhesion and is indispensable for complex curves.
Regardless of the method, proper glue spread, sufficient pressure, and adequate drying time are crucial. Inadequate pressure or uneven glue application can lead to bubbles, delamination, or weak spots.

Repairing Defects and Achieving Seamless Transitions
Even with the utmost care, minor defects can occur. Small tears or chips in the veneer can often be patched by cutting a precisely sized piece of matching veneer and inlaying it. Using contrasting woods for banding or inlay can also hide seams or add decorative elements, further elevating the finish. Understanding Natural Wood Finishing Techniques is vital for blending repairs seamlessly and enhancing the overall beauty of your veneered surface.
 {{IMG_SLOT_2}}
Finishing for Excellence: Durability and Visual Impact
The final stage in Mastering Veneering Techniques: Elevating Furniture with Exotic Woods and Complex Patterns for a Premium Finish is the finishing process. A well-chosen and expertly applied finish protects the delicate veneer, enhances its natural beauty, and ultimately determines the piece’s perceived value and longevity.
Sanding and Surface Preparation
Before any finish is applied, the veneered surface must be perfectly smooth. Start sanding with a grit appropriate for your veneer (typically 180-220 grit) and progress through finer grits (up to 320-400 for a glass-smooth surface). Always sand with the grain to avoid scratches. Be extremely careful not to sand through the thin veneer, especially on edges or highly figured areas. Dust removal is critical between sanding stages to prevent contamination of the finish.
For more insights into creating the perfect surface, review various wood finishing techniques that can be adapted for veneered surfaces.
Choosing the Right Finish
The type of finish dramatically impacts the appearance and durability of your veneered furniture:
- Oil Finishes (e.g., Danish Oil, Tung Oil): These penetrate the wood, enhancing its natural color and grain while offering a low-sheen, natural feel. They are relatively easy to apply and repair. For more, explore Danish Oil vs. Linseed: The Ultimate Wood Finishing Guide.
- Varnish/Polyurethane: These create a durable, protective film on the surface, offering excellent resistance to moisture and wear. Available in various sheens, from matte to high gloss.
- Shellac: A traditional finish that provides a beautiful, warm glow and is highly repairable. It’s often used as a sealer before other finishes.
- Lacquer: Dries quickly and builds a smooth, durable film. Requires spray application for best results.
- Epoxy Finishes: For extreme durability and a very deep, high-gloss appearance, often used on bar tops or river tables.
Consider the aesthetic you want to achieve, the expected use of the furniture, and your application capabilities when selecting a finish. Always test your chosen finish on a scrap piece of the veneered wood.
Advanced Decorative Techniques: Inlay, Marquetry, and Parquetry
To truly elevate furniture, incorporate advanced decorative veneering techniques:
- Inlay: Embedding contrasting strips or shapes of wood, metal, or other materials into the veneered surface. This can be as simple as a single border or as complex as a detailed motif.
- Marquetry: Creating pictorial designs by cutting and assembling individual pieces of veneer, often of different colors and grains, like a jigsaw puzzle. These intricate scenes can transform a plain surface into a work of art.
- Parquetry: Arranging individual pieces of veneer in geometric patterns, such as herringbone, chevron, or checkerboard, to create stunning textural and visual effects.
These techniques demand extreme precision in cutting, fitting, and gluing. They require careful planning, often involving scale drawings and templates, to ensure the final pattern is flawless. The result is furniture that is not just functional but a genuine masterpiece, showcasing the ultimate achievement in Mastering Veneering Techniques: Elevating Furniture with Exotic Woods and Complex Patterns for a Premium Finish.
 {{IMG_SLOT_3}}
Conclusion
Mastering Veneering Techniques: Elevating Furniture with Exotic Woods and Complex Patterns for a Premium Finish is a journey that blends traditional craftsmanship with modern innovation. From the careful selection of exotic woods and stable substrates to the precise execution of complex patterns and the application of a flawless finish, each step contributes to creating furniture that is both beautiful and enduring. Veneering not only allows for the economical use of rare timber but also unlocks unparalleled design possibilities, enabling woodworkers to craft pieces with intricate details, stunning visual depth, and a truly premium aesthetic.
By embracing the principles of patience, precision, and continuous learning, you can transform your woodworking projects from functional pieces into works of art. The skills acquired in veneering will enhance your overall craftsmanship and open new avenues for creative expression in your workshop in 2026 and beyond.

Actionable Next Steps
- Start Small: Begin with simple veneering projects on flat panels to build confidence and refine your technique.
- Experiment with Woods: Acquire small samples of various exotic veneers to understand their characteristics and potential applications.
- Invest in Quality Tools: Sharp veneer saws, good straightedges, and a reliable pressing method will significantly improve your results. Consider exploring Beginner’s Guide to Essential Woodworking Jigs: Improve Accuracy and for precision aids.
- Study Masterworks: Examine examples of fine veneered furniture to inspire your designs and understand historical techniques.
- Practice Finishing: Experiment with different finishes on veneered scraps to find what best enhances the specific woods you are using.
References
- Jackson, A. (2012). The Encyclopedia of Woodworking Techniques. Running Press.
- Pye, K. (1995). Veneering: A Complete Course. Guild of Master Craftsman Publications.
- Stickley, G. (2007). Craftsman Homes: Architecture and Furnishings of the American Arts and Crafts Movement. Dover Publications.
