


In the vibrant woodworking landscape of 2026, hobbyists and seasoned artisans alike are constantly seeking methods to elevate their craft. Gone are the days when simple, rustic finishes sufficed; today’s market demands impeccable quality and a professional sheen that transforms everyday wooden items into premium, sellable pieces. This article delves into the core principles of Power Tool Mastery for Decorative Wood Projects: Creating Professional Finishes on Cutting Boards, Serving Trays, and Wooden Clocks. By harnessing advanced techniques with sanders, routers, and specialized finishing tools, woodworkers can turn ordinary lumber into high-value creations that command higher prices and stand out in a competitive market. Whether you’re aiming to refine your personal projects or build a profitable woodworking venture, understanding these power tool applications is crucial for achieving truly professional finishes.
Key Takeaways
- Mastering power tools like sanders and routers is essential for achieving high-quality, professional finishes on decorative wood projects.
- Precision milling and shaping lay the foundation for flawless surfaces, reducing the effort required in subsequent finishing stages.
- Advanced sanding techniques, including sequential grit progression and dust management, are paramount for a smooth, ready-to-finish surface.
- Routers offer unparalleled versatility for adding decorative edges, inlay channels, and intricate details that elevate project aesthetics.
- Selecting and applying appropriate finishes (oils, lacquers, epoxies) with proper techniques ensures durability, beauty, and food safety where applicable.
Laying the Foundation: Precision Milling, Shaping, and Jointing
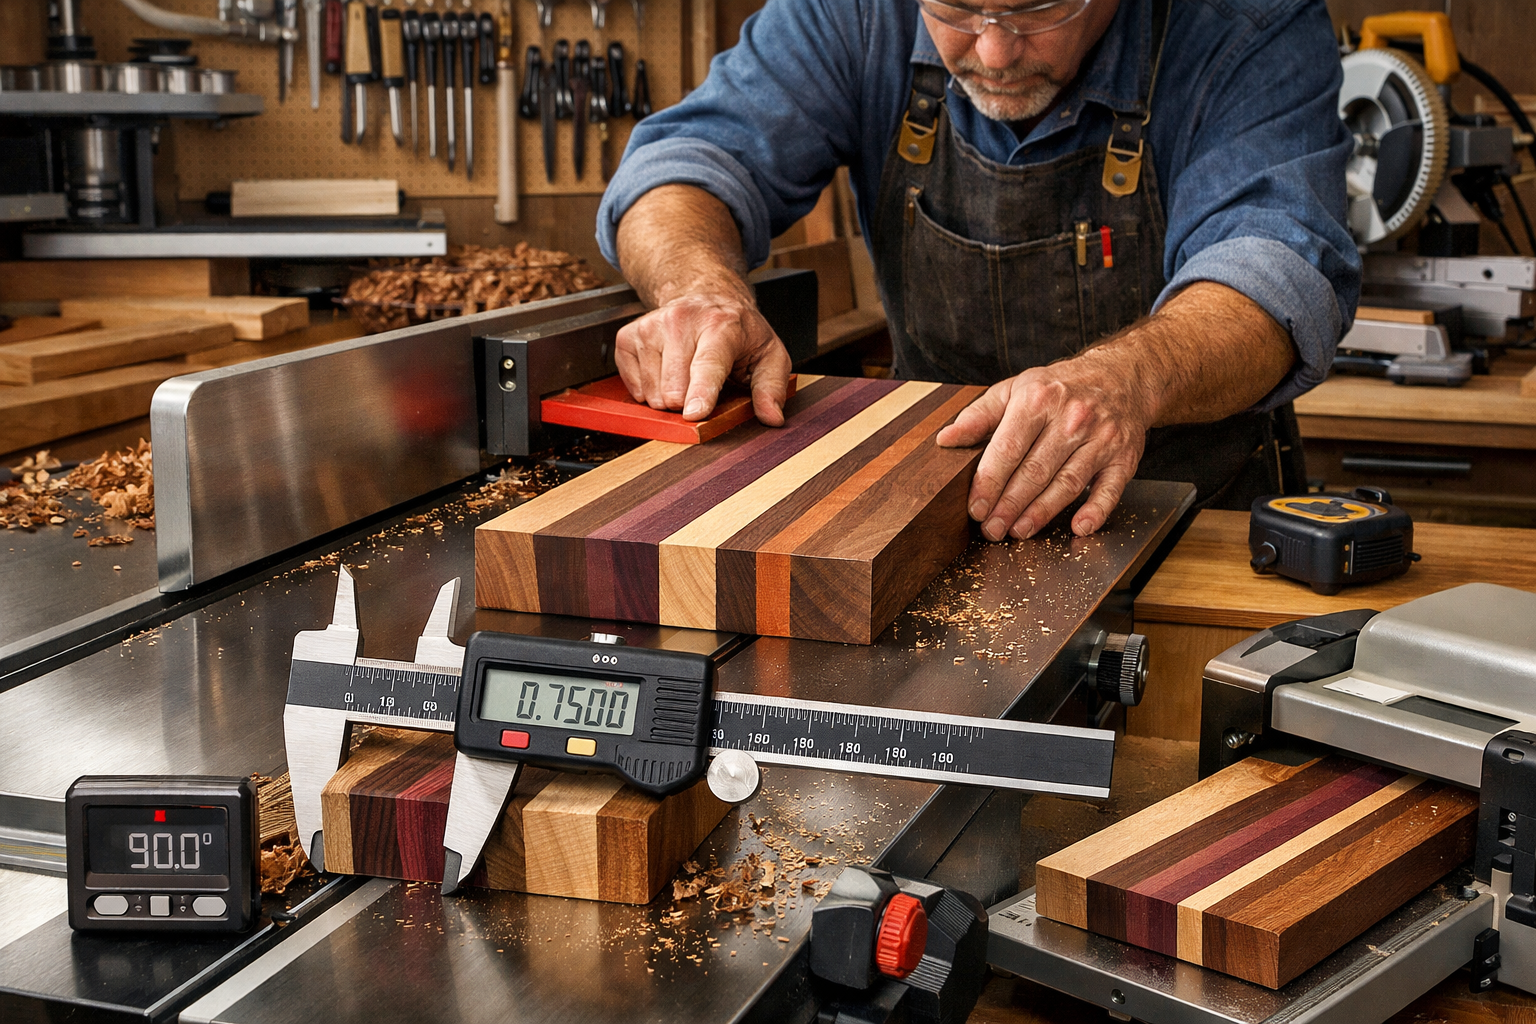
The journey to a professional finish begins long before any finish is applied. It starts with precision. In the realm of Power Tool Mastery for Decorative Wood Projects, the initial stages of milling, shaping, and jointing are critical. Even the slightest imperfection in these early steps can multiply into significant flaws by the time you reach the finishing stage, leading to frustrating rework or, worse, a compromised final product. For crafting items like cutting boards, serving trays, and wooden clocks, perfectly flat and square stock is non-negotiable.

The Planer and Jointer: Your Allies for Flatness and Squareness
Think of your planer and jointer as the gatekeepers to perfection. A jointer creates one perfectly flat face and one perfectly square edge on your rough lumber. This step is crucial for removing warps, twists, and bows that are common in raw wood. Without a truly flat reference face, subsequent cuts and operations will be inaccurate.
“A truly flat surface is the canvas for any masterpiece. Without it, your power tools are merely chasing ghosts.”
Once you have a flat face and a square edge, the planer comes into play. The planer takes the jointed face and mills the opposite side parallel to it, bringing your board to a consistent thickness. It’s often misunderstood that a planer flattens wood; in reality, it duplicates the flatness of the reference face. For projects like cutting boards, consistent thickness across all pieces is vital for strong, gap-free glue-ups.
Table 1: Essential Milling Tools and Their Primary Functions
| Power Tool | Primary Function | Key Benefit for Decorative Projects |
|---|---|---|
| Jointer | Flattens one face, squares one edge | Ensures perfectly flat surfaces for glue-ups; eliminates warp/twist |
| Planer | Mills parallel faces, consistent thickness | Creates uniform thickness across stock for seamless joins; smooths surfaces |
| Table Saw | Rips and crosscuts, dadoes, rabbets | Achieves straight, accurate cuts; sizing components; joinery preparation |
| Bandsaw | Resawing, curved cuts, rough shaping | Ideal for cutting curved clock components or resawing thicker stock |
For projects demanding intricate joinery, such as the frames of wooden clocks or the layered construction of certain cutting board designs, a precisely milled foundation is paramount. Using a well-tuned table saw for ripping and crosscutting ensures that all components fit together snugly, minimizing gaps that would later require excessive filling or sanding. For more on advanced techniques for cutting boards, consider exploring our guide on the Ultimate Guide to Wooden Cutting Boards: End-Grain Patterns.
Router Tables: Precision Shaping Beyond the Edge
While handheld routers are versatile, a router table elevates their precision and control, especially for decorative wood projects. On a router table, the bit is stationary, and the workpiece moves, allowing for safer, more consistent cuts when applying decorative edges to serving trays or creating dadoes and rabbets for wooden clock components.
For instance, creating a uniform chamfer or round-over edge on all four sides of a serving tray is significantly easier and more consistent with a router table fence guiding the workpiece. You can also use specific jigs on a router table to create precise grooves for inlay work or to form tongue and groove joints with high accuracy.
Choosing the Right Wood
The type of wood itself plays a significant role in the ease of achieving a professional finish. Hardwoods like walnut, cherry, and maple are often preferred for their dense grain, which sands smoothly and takes finishes beautifully. These woods are also less prone to tear-out during milling and routing operations compared to softer woods. For inspiration on selecting the best materials, see our article on Premium Wood Selection for 2026 Projects: Walnut, Cherry, an.
Advanced Power Sanding and Routing for Impeccable Surfaces
Achieving a truly professional finish isn’t just about applying a good topcoat; it’s about meticulous preparation, and that’s where advanced power sanding and routing techniques come into their own. For Power Tool Mastery for Decorative Wood Projects: Creating Professional Finishes on Cutting Boards, Serving Trays, and Wooden Clocks, these steps are non-negotiable for elevating your craftsmanship and market value.
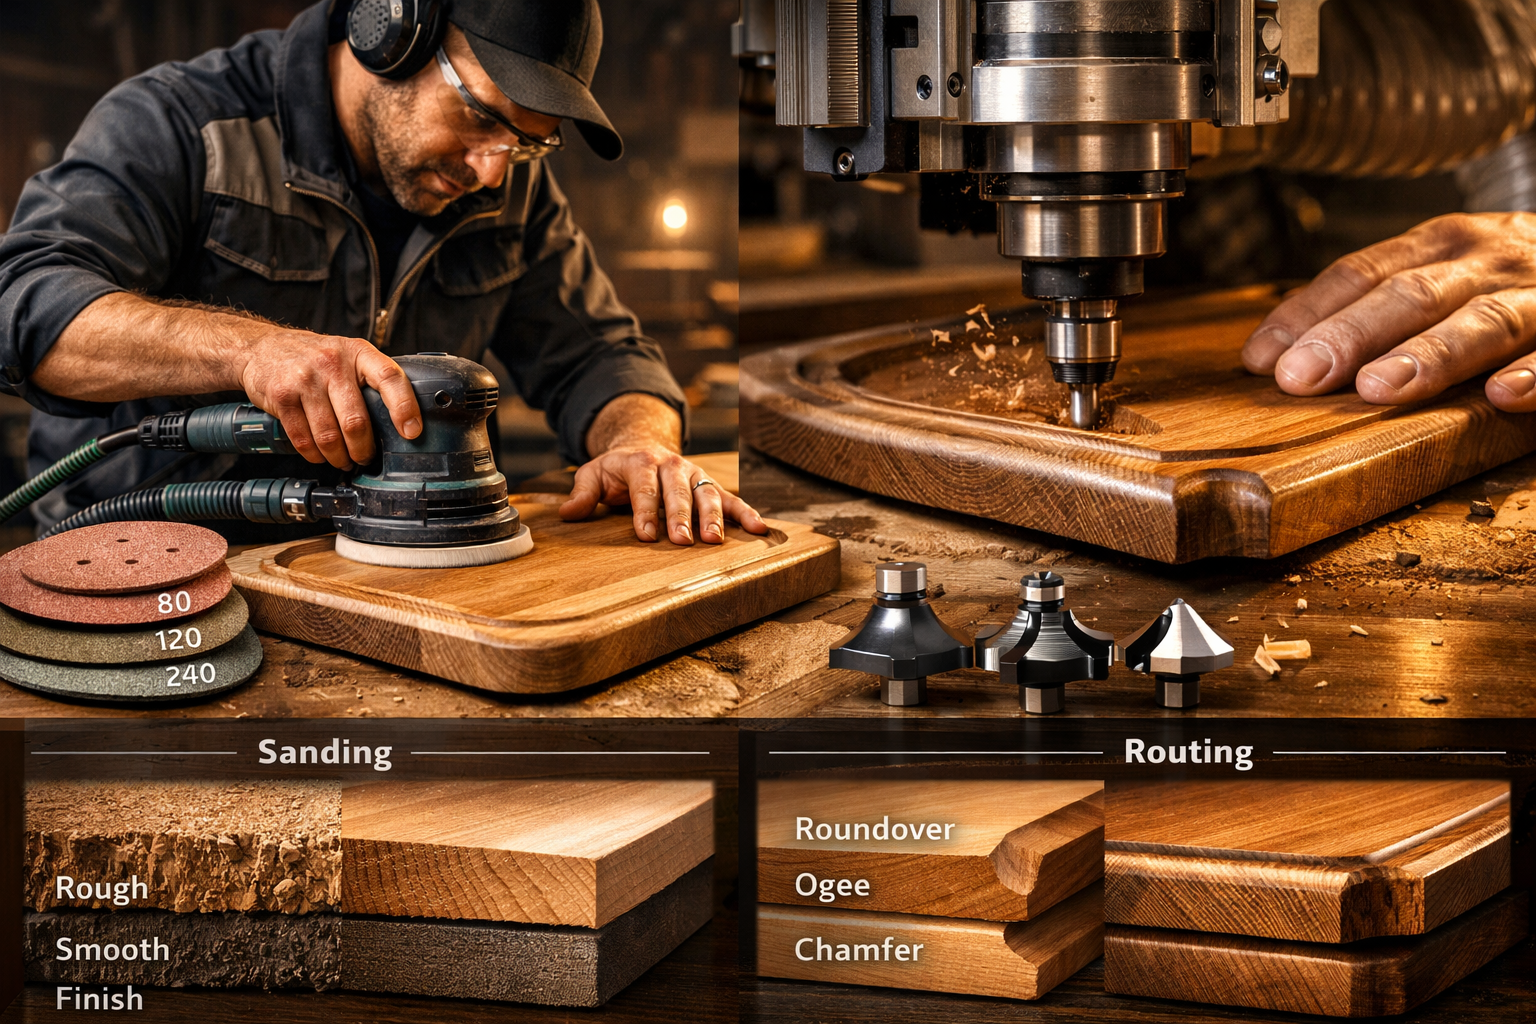
The Art of Power Sanding: Beyond Basic Smoothness
Many woodworkers underestimate the importance of proper sanding. It’s not just about making the surface feel smooth; it’s about systematically removing scratches from previous steps and preparing the wood fibers to accept the finish evenly.
Grit Progression is Key: Always start with a lower grit (e.g., 80 or 100) to remove milling marks, glue squeeze-out, or imperfections. Then, systematically move through finer grits (120, 150, 180, 220, and sometimes even 320 or 400 for ultra-smooth surfaces).
- Random Orbital Sanders (ROS): These are your workhorses. Their random orbit motion helps minimize swirl marks. Use a firm, even pressure and keep the sander moving. Avoid dwelling in one spot.
- Detail Sanders: For intricate areas, corners, or small crevices in wooden clock components, detail sanders (like mouse sanders) are invaluable.
- Belt Sanders: While aggressive, belt sanders can quickly flatten larger surfaces or remove significant material. Use them with caution and proper technique to avoid creating depressions.
- Spindle Sanders: For curved edges on serving trays or clock housings, a spindle sander provides consistent results without creating flat spots.
Dust Management: Effective dust extraction is crucial. Not only is it safer for your health, but dust can contaminate your sandpaper, causing it to clog and create scratches. Connect your sander to a shop vacuum or dust collector.
The “Wet Sanding” Trick (Water Popping Grain): After sanding to your final grit (e.g., 220), wipe the wood surface with a damp cloth to raise the grain. Let it dry completely. You’ll feel the surface become slightly rough again. Lightly sand again with your final grit. This process, known as “water popping,” helps prevent the grain from rising after the finish is applied, ensuring a smoother final result. This is especially important for cutting boards and serving trays where liquid contact is expected.
Edge and Corner Care: For decorative pieces, crisp edges and well-defined corners are paramount. Be careful not to round over sharp edges excessively unless it’s part of the design. Use sanding blocks or cork pads for hand-sanding edges after power sanding to maintain their shape.
Router Versatility: Adding Detail and Value
The router is perhaps the most versatile power tool for adding decorative elements and enhancing the functionality of your projects.
Decorative Edges for Cutting Boards and Serving Trays:
- Round-over Bit: Creates a smooth, radiused edge, comfortable to the touch, and prevents chipping. A common choice for cutting boards.
- Chamfer Bit: Produces a 45-degree angled edge, offering a crisp, modern look.
- Ogee Bit: Creates an elegant S-shaped profile, perfect for more traditional serving trays.
- Cove Bit: Forms a concave, recessed profile, often used in combination with other bits for complex edge treatments.
“A well-executed router profile transforms a simple edge into a statement of craftsmanship.”
Inlays and Engravings for Wooden Clocks and Trays:
With the right templates and bits, a router can create precise channels for decorative inlays (e.g., contrasting wood strips, metal, or resin). For wooden clocks, routers can carve out recessed numbers or design elements, adding depth and visual interest. A trim router is particularly useful for smaller, more detailed work and can achieve intricate results on elements like clock faces or delicate serving tray handles. For more advanced router techniques, particularly for decorative wall art, consider exploring our guide on Handcrafted Wooden Wall Art: 3D Layered Panels and Geometric.
Routing for Handles and Functional Elements:
For serving trays, a router with a specialized bit can create comfortable handholds or finger grooves directly into the sides. This not only adds functionality but also integrates the handle design seamlessly into the piece, avoiding the need for attached hardware.
Tip: Always make test cuts on scrap wood before routing your final piece to ensure the bit is set to the correct depth and the profile is as desired.

Professional Finishing Techniques for Durability and Aesthetics
The final stage in Power Tool Mastery for Decorative Wood Projects: Creating Professional Finishes on Cutting Boards, Serving Trays, and Wooden Clocks is applying the finish. This step seals the wood, protects it from moisture and wear, and brings out its natural beauty. The choice of finish and the application technique are critical for achieving a truly professional, durable, and aesthetically pleasing result that will command a premium in the 2026 market.
Choosing the Right Finish for the Job
Different projects demand different finishes. The primary considerations include:
- Food Safety: Crucial for cutting boards and serving trays.
- Durability: How much wear and tear will the item endure?
- Aesthetics: What look do you want (matte, satin, gloss)?
- Application Ease: Some finishes are more forgiving than others.
Table 2: Popular Finishes for Decorative Wood Projects
| Finish Type | Best For | Key Characteristics | Application Notes |
|---|---|---|---|
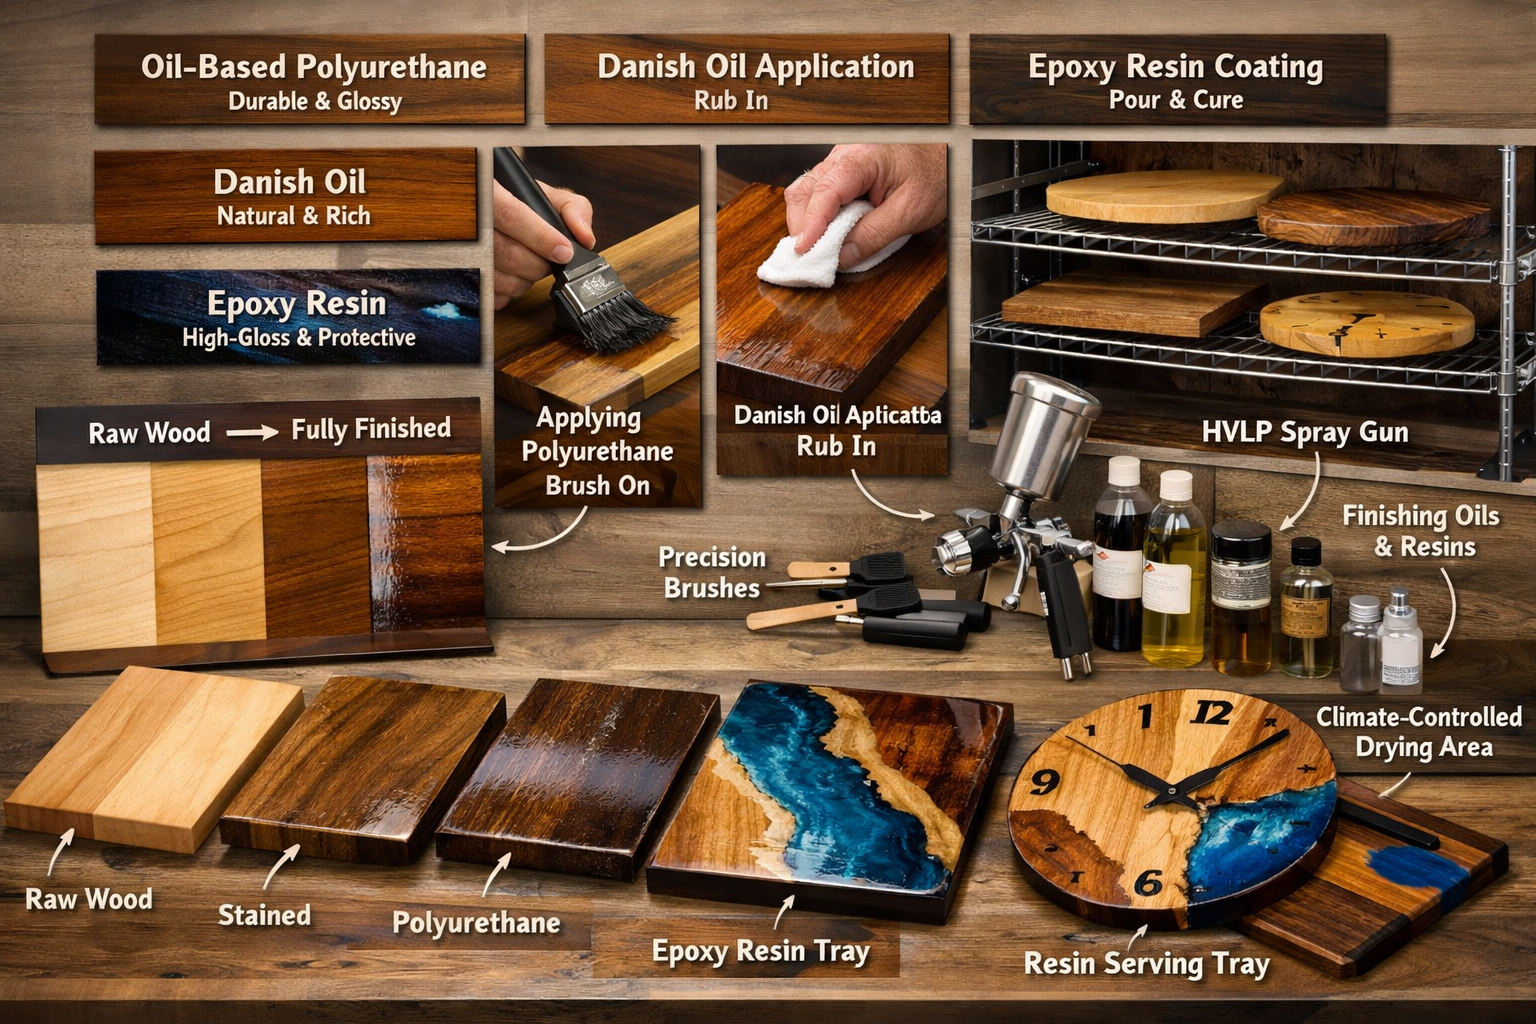
| Food-Safe Oils | Cutting Boards, Serving Trays | Penetrates, enhances grain, easy to reapply, food-safe | Multiple coats, liberal application, wipe off excess |
| Waxes (e.g., Beeswax) | Enhancing oil finishes, light protection | Natural feel, low sheen, light protection | Buff into surface, often used with oils |
| Lacquer | Wooden Clocks, decorative items | Dries fast, builds quickly, wide range of sheens | Spray application preferred, multiple thin coats |
| Polyurethane (Oil-based) | Serving Trays, Clocks (durable) | High durability, amber tone, good water resistance | Brush or wipe on, light sanding between coats |
| Polyurethane (Water-based) | Serving Trays, Clocks (clear finish) | Clear, low VOC, less odor, dries fast | Brush or wipe on, light sanding between coats |
| Epoxy Resin | Decorative Inlays, River Boards | Extremely durable, high gloss, waterproof, fills voids | Two-part mix, careful pouring, may require leveling |
For cutting boards and serving trays that come into contact with food, mineral oil, beeswax, or other specialized food-safe finishes are essential. These penetrate the wood, preventing drying and cracking, and are easily re-applied by the user. For a deeper dive into sustainable finishes, explore our guide on Sustainable Finishes for Reclaimed Wood: Low-VOC Recipes and.
Application Techniques: The Difference Between Good and Great
- Preparation, Preparation, Preparation: No matter the finish, a meticulously prepared surface is key. Ensure all sanding dust is removed using compressed air, tack cloths, or a damp cloth followed by drying. Any lingering dust will be trapped under the finish.
- Controlled Environment: Apply finishes in a clean, dust-free, and well-ventilated area. Temperature and humidity can also affect drying times and finish quality.
- Thin, Even Coats: Whether brushing, wiping, or spraying, apply multiple thin coats rather than one thick one. Thin coats dry more evenly, reduce drips and runs, and cure harder.
- Sanding Between Coats: For film-building finishes like lacquer or polyurethane, light sanding with fine-grit sandpaper (e.g., 320-400 grit) between coats is crucial. This creates “tooth” for subsequent layers to adhere to and removes any dust nibs or raised grain. Always clean thoroughly after sanding.
- Achieving a Mirror Finish (for Lacquer/Polyurethane):
- Apply several thin coats, sanding lightly between them.
- Once the final coat is cured (allow extra time beyond dry-to-touch), wet sand with progressively finer grits (e.g., 800, 1000, 1500, 2000, 3000) using water and a sanding block. This removes any orange peel or imperfections.
- Follow with rubbing compounds (medium and fine) and then a polishing compound using a clean cloth or a buffing wheel for a truly glass-like finish. This is particularly impactful on the faces of decorative wooden clocks.
Specific Considerations for Decorative Projects
- Cutting Boards: Apply liberal coats of food-safe mineral oil, allowing it to soak in for several hours or overnight. Wipe off any excess. Repeat until the wood no longer absorbs the oil. Finish with a beeswax/mineral oil blend for added protection. Re-application by the end-user is expected.
- Serving Trays: These need a more durable, water-resistant finish. Polyurethane (oil or water-based) or lacquer are excellent choices. Consider a two-part epoxy for an incredibly durable, high-gloss surface if the design allows. Ensure all edges and undersides are coated to prevent moisture absorption and warping.
- Wooden Clocks: Aesthetics are paramount here. Lacquer provides a beautiful, clear, and durable finish that can be buffed to a high sheen. For a more natural look, an oil/varnish blend can also be used, bringing out the wood’s grain. The finish should protect the wood while allowing the intricate details created by your router to shine. For those interested in historical finishing techniques, our article on antique wood finishing techniques offers valuable insights.
By following these advanced techniques in power tool mastery, from initial milling through to the final application of finish, your decorative wood projects—cutting boards, serving trays, and wooden clocks—will not only function beautifully but also possess a professional finish that truly stands out in the marketplace of 2026. This meticulous attention to detail is what transforms a simple piece of wood into a cherished, high-value item.
Conclusion
Achieving Power Tool Mastery for Decorative Wood Projects: Creating Professional Finishes on Cutting Boards, Serving Trays, and Wooden Clocks is a journey that integrates precision, technique, and patience. From the foundational steps of milling and shaping with planers and jointers, through the nuanced art of advanced power sanding and router work, to the meticulous application of the final finish, every stage contributes to the ultimate quality and market value of your creations.
The woodworking landscape in 2026 rewards craftsmanship that goes beyond the basic. By embracing the strategies outlined in this guide—meticulous surface preparation, strategic use of router profiles, and thoughtful application of appropriate finishes—woodworkers can transform raw lumber into premium, sellable pieces. These techniques not only elevate the aesthetic appeal and durability of your cutting boards, serving trays, and wooden clocks but also enhance your reputation as a skilled artisan. Investing time in mastering these power tool applications is an investment in your craft, ensuring your projects stand out and command the prices they deserve.
Actionable Next Steps:
- Assess Your Toolset: Identify any gaps in your power tool collection (e.g., a good random orbital sander, a versatile trim router, or a dust extraction system) and plan for acquisition.
- Practice on Scraps: Before tackling your next premium project, dedicate time to practicing sanding progressions, router profiles, and finish application on scrap pieces of the same wood species.
- Refine Your Workflow: Review your current project workflow and identify areas where precision milling, advanced sanding, or router detailing can be integrated more effectively.
- Experiment with Finishes: Test different finishes on sample boards to understand their characteristics, application quirks, and how they interact with your chosen wood species.
- Share Your Work: Document your process and final results. Sharing your professionally finished projects can help build your brand and attract potential buyers in 2026.
