

Mastering Reclaimed Wood Finishing Techniques in 2025: A Comprehensive Guide

The allure of reclaimed wood is undeniable. Each plank, beam, or piece of siding carries a story, a history etched into its grain by decades—sometimes centuries—of exposure to the elements. From rustic farmhouses to industrial lofts, reclaimed wood brings unparalleled character, warmth, and a touch of sustainable elegance to any space. However, harnessing its true beauty and ensuring its longevity requires more than just installation; it demands a mastery of reclaimed wood finishing techniques. In this comprehensive guide for 2025, we'll delve deep into the world of preparing, enhancing, and protecting this magnificent material, ensuring your projects stand the test of time and truly shine.

Whether you're a seasoned woodworker, a DIY enthusiast, or a homeowner looking to breathe new life into an antique find, understanding the right finishing approach is crucial. Reclaimed wood often presents unique challenges—nail holes, uneven surfaces, embedded dirt, and varying moisture content—that differ significantly from working with new timber. But with the right knowledge and techniques, these "imperfections" become the very characteristics that make reclaimed wood so special. I'm here to guide you through the journey of transforming raw, salvaged timber into a polished masterpiece.
Key Takeaways
- Preparation is Paramount: Thorough cleaning, sanding, and stabilization are the foundational steps for any successful reclaimed wood finish.
- Embrace the Imperfections: The beauty of reclaimed wood lies in its history; choose finishes that enhance, rather than hide, its unique character.
- Natural Oils for Authentic Appeal: Finishes like tung oil, linseed oil, and beeswax offer deep penetration and a natural, breathable look, perfect for preserving the wood's inherent charm.
- Protective Coatings for Durability: Polyurethane, lacquer, and epoxy provide robust protection against wear, moisture, and UV, ideal for high-traffic areas or outdoor applications.
- Sustainable Choices Matter: Opt for eco-friendly and low-VOC finishing products to align with the sustainable nature of reclaimed wood itself.
The Foundation: Preparing Your Reclaimed Wood for Finishing
Before any finish can be applied, the reclaimed wood needs meticulous preparation. This stage is often the most time-consuming but is absolutely critical for achieving a professional, long-lasting result. Skipping steps here will inevitably lead to frustration and a subpar finish.
Initial Inspection and Cleaning
When you first acquire reclaimed wood, it often comes with a rich tapestry of history, including dirt, grime, loose debris, and sometimes even remnants of old paint or plaster.
- Thorough Visual Inspection: Start by closely examining each piece. Look for any hidden nails, screws, staples, or metal fragments. These can wreak havoc on your sanding equipment and pose a safety risk. A metal detector can be incredibly useful here. I personally use one on all my reclaimed wood projects to avoid costly blade damage.
- Rough Cleaning: Use a stiff brush or a shop vacuum (a powerful one like a 14-gallon Ridgid Shop Vac is excellent for this) to remove loose dirt, dust, and spiderwebs.
- Washing (if necessary): For heavily soiled wood, a gentle wash may be required. Mix a mild detergent (like dish soap) with warm water. Apply with a soft brush, scrub gently, and rinse thoroughly with clean water. Crucially, allow the wood to dry completely and slowly in a well-ventilated area for several days or even weeks. Rushing this step can lead to warping or cracking.
- Scraping Old Finishes: If there are remnants of old paint or stubborn finishes, carefully scrape them off using a pull scraper or a paint stripper. Always test strippers on an inconspicuous area first.
Repairing and Stabilizing the Wood
Reclaimed wood often comes with character-filled imperfections. Deciding which to keep and which to fix is part of the artistic process.
- Filling Holes and Cracks: Small nail holes and minor cracks can be filled with wood filler that matches the wood's color or a contrasting epoxy for a more modern, intentional look. For larger voids, you might consider using wood patches cut from similar reclaimed wood, or even a clear epoxy resin to preserve the original look while stabilizing the piece.
- Addressing Warping and Cupping: Minor warping can sometimes be corrected by careful clamping and slow drying, or by resawing the wood. For more significant issues, you may need to plane the wood down to create a flat, stable surface. A craftsman table saw can be invaluable for precise cuts and flattening operations.
- Pest Treatment: If there's any sign of active wood-boring insects (e.g., powderpost beetles), proper treatment is essential to prevent future infestations. This might involve heat treatment, chemical treatments, or even professional fumigation, depending on the severity.
Sanding: Unveiling the Beauty of Reclaimed Wood
Sanding is where the true character of the reclaimed wood begins to emerge. The goal is to create a smooth, consistent surface while preserving the unique patina and texture that make it special.
- Coarse Sanding (80-100 grit): Start with a coarser grit to remove any remaining surface imperfections, milling marks, or stubborn stains. For larger surfaces, a belt sander or random orbital sander will save a lot of time.
- Medium Sanding (120-150 grit): Progress to a medium grit to remove the scratches left by the coarse sandpaper. This step starts to smooth the surface without making it too slick.
- Fine Sanding (180-220 grit): Finish with a fine grit for a silky-smooth feel. For most reclaimed wood projects, going beyond 220 grit isn't necessary, as it can sometimes "close" the grain too much, hindering absorption of certain finishes and diminishing the rustic appeal.
- Dust Removal: After each sanding stage, meticulously remove all sanding dust using a shop vacuum and then a tack cloth. Residual dust can create a cloudy or uneven finish.
Pro Tip: Always sand with the grain of the wood. Sanding against the grain will leave visible scratches that become more pronounced once a finish is applied.
Exploring Reclaimed Wood Finishing Techniques: Enhancing and Protecting
Once your reclaimed wood is meticulously prepared, it's time to choose the right finishing technique. The best choice depends on the desired aesthetic, the wood's intended use, and the level of protection required.
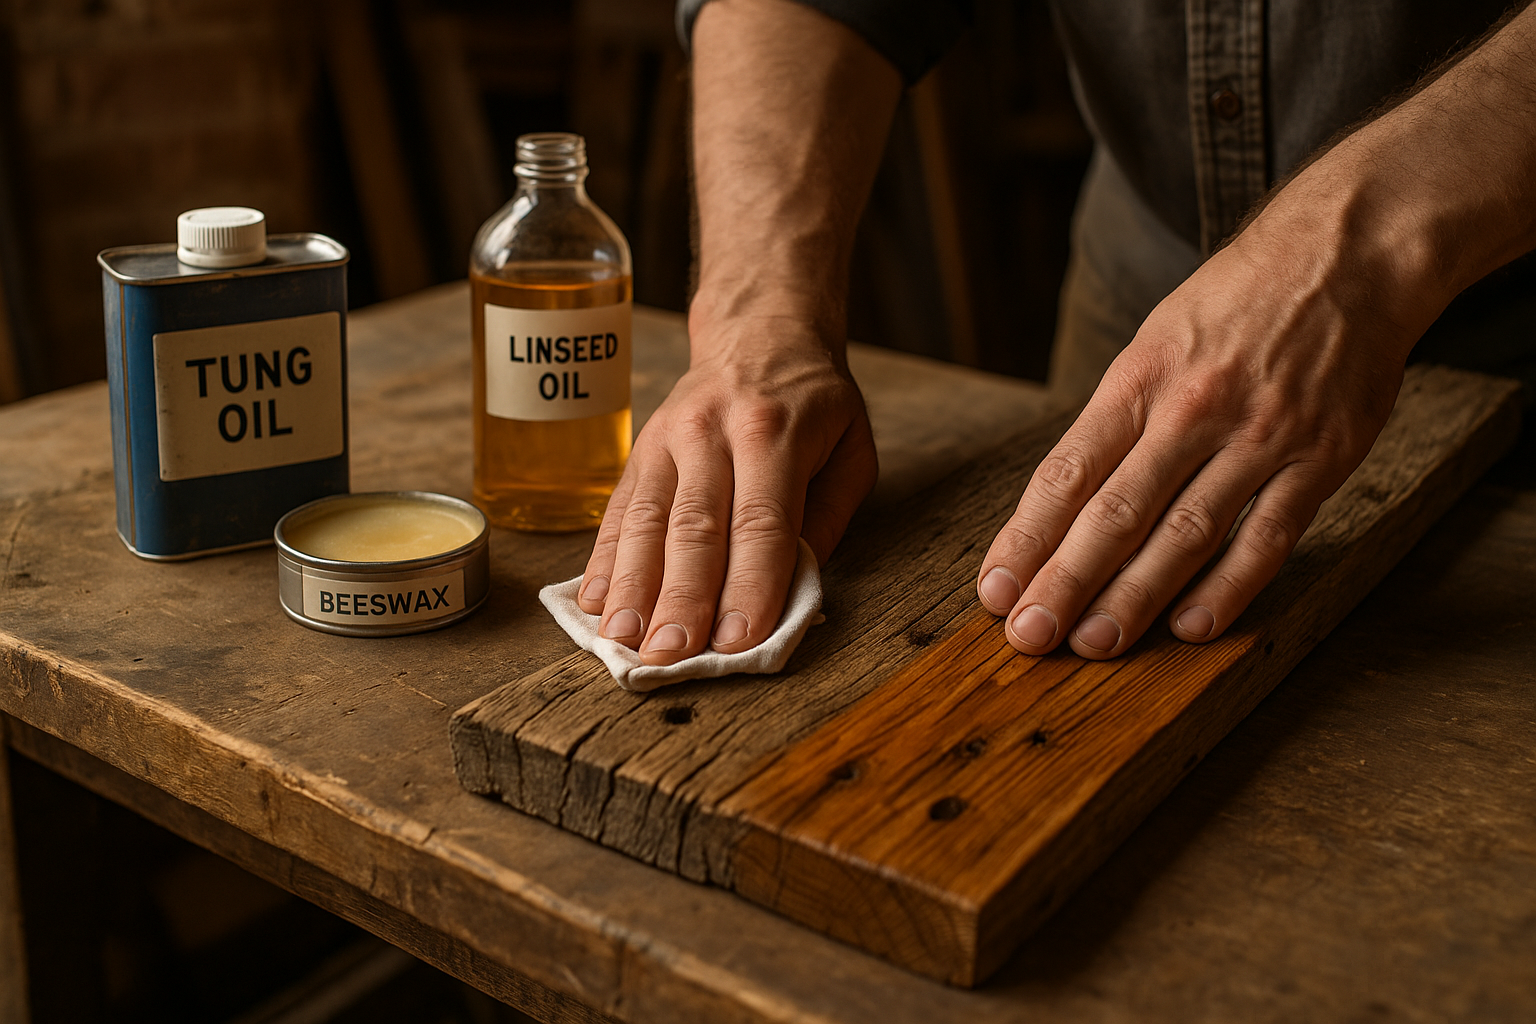
Natural Oil Finishes: Preserving Authentic Character
Natural oil finishes are incredibly popular for reclaimed wood because they penetrate deeply into the wood fibers, enhancing the natural grain and providing a warm, matte to semi-gloss luster. They are also easy to repair and maintain.
-
Tung Oil:
- Description: A natural, non-toxic drying oil derived from the seed of the tung tree. It penetrates deeply, hardens in the wood, and provides excellent water resistance.
- Application: Apply thin coats with a rag, allowing each coat to soak in for 15-30 minutes before wiping off excess. Multiple coats (3-7) are typically needed.
- Pros: Enhances natural color, durable, water-resistant, easy to repair, food-safe when fully cured.
- Cons: Slower drying time, can be expensive.
- Best for: Dining tables, countertops, cutting boards (like a basswood cutting board), furniture where a natural feel is desired.
-
Linseed Oil (Boiled Linseed Oil – BLO):
- Description: An oil extracted from flax seeds. BLO has metallic dryers added to speed up the curing process compared to raw linseed oil. It provides a warm, golden hue.
- Application: Similar to tung oil, apply thin coats, wipe off excess, and allow ample drying time between coats.
- Pros: Inexpensive, enhances grain, provides good protection, relatively easy to apply.
- Cons: Slower drying than some other finishes, can darken wood significantly over time, rags soaked in BLO can spontaneously combust if not properly disposed of.
- Best for: General furniture, decorative items, indoor applications.
-
Hardwax Oils:
- Description: A blend of natural oils (like linseed, tung, or sunflower oil) and waxes (carnauba, beeswax). They offer a combination of penetrating protection and a durable surface layer.
- Application: Typically applied in 1-2 thin coats with a brush or roller, then buffed.
- Pros: Excellent durability, water-resistant, fast drying compared to pure oils, easy to repair, satin to matte finish.
- Cons: Can be more expensive than pure oils.
- Best for: Flooring, high-traffic furniture, kitchen cabinets where a natural look is desired.
-
Beeswax/Wax Finishes:
- Description: Often used as a top coat over oil finishes or directly on lightly used wood. Provides a soft sheen and some protection, but less durable than oils or hardwax oils.
- Application: Rub on a thin layer with a cloth, allow to dry slightly, then buff to a shine.
- Pros: Natural, easy to apply and reapply, lovely soft feel and sheen.
- Cons: Less durable, offers minimal water resistance, requires frequent reapplication for high-use items.
- Best for: Decorative pieces, low-traffic furniture, or as a final layer over other finishes for added luster.
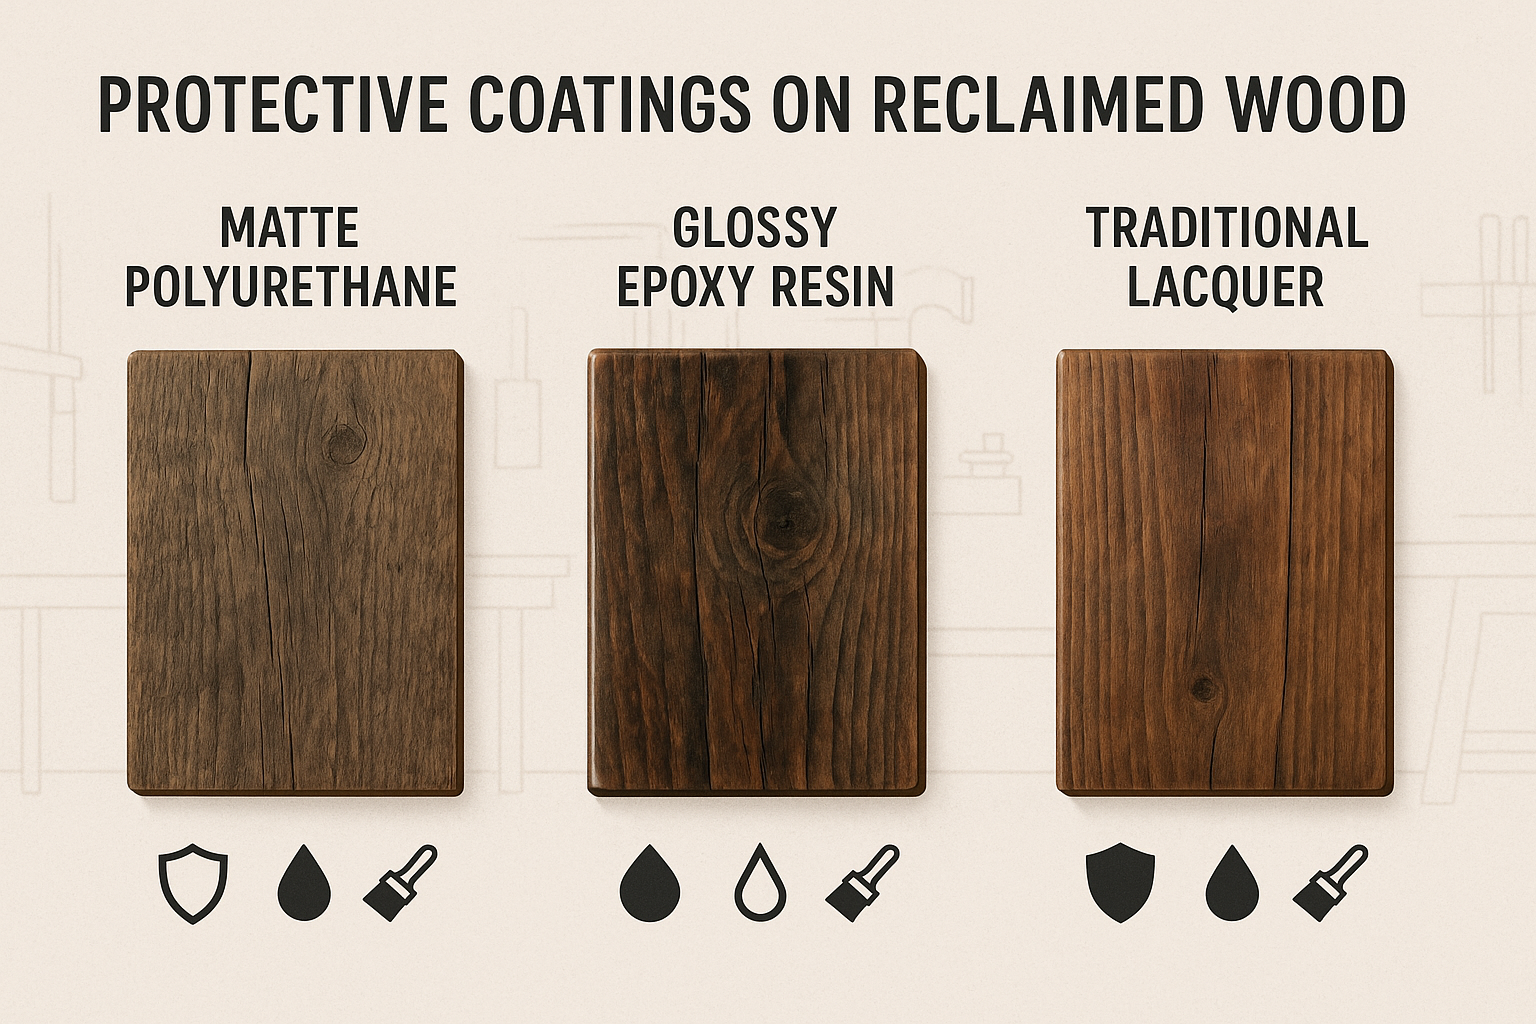
Protective Film Finishes: Durability and Sheen
For reclaimed wood projects that will endure heavy use, moisture exposure, or require a specific aesthetic, film-building finishes are often the go-to. These finishes create a durable barrier on the wood's surface.
-
Polyurethane:
- Description: A highly durable synthetic resin finish available in oil-based, water-based, and gel forms, offering various sheens from matte to high-gloss.
- Application: Apply thin, even coats with a brush, pad, or sprayer. Light sanding between coats improves adhesion.
- Pros: Excellent durability, scratch and water resistance, available in a wide range of sheens, relatively easy to apply. Check out our guide on aerosol polyurethane for spray applications or if you're working on projects like cornhole boards.
- Cons: Can sometimes look "plasticky" if applied too thickly, difficult to spot-repair, oil-based versions can yellow over time. Applying polyurethane in high humidity can be tricky, but we have tips for that.
- Best for: Tabletops, flooring, exterior doors, or anything needing robust protection.
-
Lacquer:
- Description: A fast-drying finish that creates a hard, durable, and often glossy film. It's known for its clarity and ability to produce a smooth, professional-looking surface.
- Application: Best applied with a sprayer due to its fast drying time. Multiple thin coats are applied quickly.
- Pros: Very fast drying, durable, produces a beautiful clear finish, easy to rub out to a high sheen.
- Cons: Strong fumes require excellent ventilation, requires specific application equipment (sprayer), less flexible than some other finishes.
- Best for: Furniture, cabinets (like 12 plywood for cabinets), musical instruments where a smooth, hard finish is desired.
-
Epoxy Resin:
- Description: A two-part liquid coating that cures into a very hard, durable, and often high-gloss plastic-like finish. It's excellent for creating a thick, protective layer over reclaimed wood, especially for river tables or highly damaged surfaces.
- Application: Mixed precisely according to manufacturer instructions and poured over the surface. Often requires careful leveling and degassing.
- Pros: Extremely durable, waterproof, high-gloss finish, can encapsulate imperfections for a unique look.
- Cons: Requires precise mixing, difficult to repair, can be costly, strong fumes.
- Best for: Bar tops, countertops, river tables, or projects where ultimate durability and a glass-like finish are paramount.
-
Varnish/Spar Urethane:
- Description: Varnish is a traditional clear film finish. Spar urethane (often called Spar Varnish) is a type of varnish specifically formulated with added UV inhibitors and flexibility for outdoor use, making it ideal for elements exposed to sun and moisture.
- Application: Brush or wipe on thin coats. Sand lightly between coats.
- Pros: Excellent outdoor durability, UV protection, good water resistance, flexible (spar urethane).
- Cons: Can be slower drying, may yellow over time (especially oil-based versions). You can put spar urethane over polyurethane, but it requires careful attention to compatibility.
- Best for: Outdoor furniture, boat parts, exterior doors, or any reclaimed wood project exposed to harsh weather.
Stains and Dyes: Altering and Enhancing Color
While many prefer to let the natural color of reclaimed wood shine, stains and dyes can be used to deepen the color, achieve a specific aesthetic, or unify the appearance of disparate pieces of wood.
-
Wood Stains:
- Description: Pigment-based or dye-based products that color the wood fibers without completely obscuring the grain. Available in many colors.
- Application: Apply with a brush, rag, or foam applicator, allow to penetrate, then wipe off excess.
- Pros: Can dramatically change the wood's color, easy to apply, allows grain to show through.
- Cons: Can look blotchy on certain woods (conditioner can help), can obscure some of the natural patina of reclaimed wood.
- Best for: Achieving a consistent color, matching existing finishes, or creating a specific design aesthetic. For example, achieving a super dark finish on birch.
-
Wood Dyes:
- Description: Penetrate deeply into the wood fibers, coloring them while leaving the grain more visible than with pigments. They tend to be more vibrant and uniform.
- Application: Best applied by spraying, wiping, or brushing, often requiring careful blending.
- Pros: Very vibrant colors, enhances grain, less prone to blotching than pigment stains.
- Cons: Can be more challenging to apply evenly, fades in direct sunlight (though some are formulated with UV inhibitors).
- Best for: Creating rich, uniform colors, especially on challenging woods, or when a very specific color is desired without obscuring grain.
Important Note on Staining Reclaimed Wood: Reclaimed wood often has varying porosity and sometimes residual chemicals from its past life. Always test stains on a scrap piece of the exact same reclaimed wood to ensure you achieve the desired color and penetration. The unique characteristics of reclaimed wood mean that a stain might react differently than it would on new timber.
Specialty Reclaimed Wood Finishing Techniques
-
White Washing/Pickling:
- Description: A diluted paint or specialty white wash product applied to wood and then partially wiped off, allowing the grain to show through while imparting a soft, translucent white hue.
- Pros: Creates a light, airy, coastal, or farmhouse aesthetic; softens the wood's natural color.
- Cons: Can be difficult to apply evenly, may require practice to achieve the desired translucency.
- Best for: Achieving a shabby chic, coastal, or distressed look on furniture or wall paneling.
-
Distressing/Aging:
- Description: Techniques used to intentionally add character, wear, and tear to wood, making it appear older than it is. This can involve gentle sanding, wire brushing, or even physically marking the wood with chains or hammers.
- Pros: Enhances rustic appeal, camouflages new damage, creates a unique, lived-in look.
- Cons: Requires an artistic eye to look natural; can be overdone.
- Best for: Complementing the existing character of reclaimed wood, or creating a consistent aged look across multiple pieces.
-
Bleaching:
- Description: Using wood bleach (often a two-part solution) to lighten the color of dark wood or to remove unwanted stains and inconsistencies.
- Pros: Can drastically lighten wood, remove stubborn water or chemical stains.
- Cons: Chemical process requires caution and proper ventilation, can alter wood's natural tone, requires careful neutralization.
- Best for: Lightening very dark reclaimed woods, or evening out color variations before applying a clear finish.
Maintenance and Care for Reclaimed Wood Finishes

Once your reclaimed wood project is beautifully finished, proper maintenance will ensure its beauty lasts for years to come.
- Regular Cleaning: For most finishes, a soft, damp cloth is sufficient for cleaning. Avoid harsh chemical cleaners, as they can damage or strip the finish.
- Protection from Heat and Moisture: Use coasters under drinks and trivets under hot dishes to prevent rings and heat damage, especially on oil or wax finishes.
- Reapplication of Finishes:
- Oil and Wax Finishes: These are easily reapplied as needed. For heavily used surfaces, reapply every 6-12 months. For less used items, every few years may suffice.
- Film Finishes (Polyurethane, Lacquer, Varnish): These are more durable but harder to repair. Minor scratches can sometimes be buffed out. Significant damage may require sanding and reapplying the finish to the affected area, or even the entire surface.
- Addressing Damage: Small scratches or dents on oil-finished wood can often be gently sanded and re-oiled. For film finishes, minor damage might be touched up with a fine brush, but color matching and blending can be challenging.
Conclusion
Working with reclaimed wood is a rewarding endeavor that combines creativity, craftsmanship, and a deep appreciation for history and sustainability. By understanding and applying the various reclaimed wood finishing techniques discussed in this guide, you can unlock the full potential of this remarkable material. Whether you opt for the deep, natural warmth of an oil finish, the robust protection of polyurethane, or a custom stain to highlight its unique character, the key is meticulous preparation and careful application.
Remember, the goal isn't always perfection in the traditional sense, but rather to enhance and celebrate the inherent beauty and story of each piece of wood. In 2025, as appreciation for sustainable and character-rich materials continues to grow, mastering these techniques will set your projects apart. So, roll up your sleeves, gather your tools, and embark on the satisfying journey of transforming reclaimed timber into stunning, enduring masterpieces.
Actionable Next Steps:
- Assess Your Wood: Begin by thoroughly inspecting your reclaimed wood for condition, desired aesthetic, and intended use.
- Choose Your Finish Wisely: Based on your assessment and the techniques outlined above, select the finish that best suits your project's needs and your personal style.
- Gather Your Supplies: Ensure you have all necessary cleaning, sanding, and finishing materials before you begin.
- Practice on Scraps: Always test your chosen finishing technique on a hidden area or a scrap piece of the same wood to ensure you achieve the desired results.
- Commit to Patience: Reclaimed wood often requires more time and care. Patience throughout the preparation and finishing stages will pay off with a truly exceptional final product.
SEO Meta
Meta Title: Reclaimed Wood Finishing Techniques: 2025 Expert Guide
Meta Description: Master reclaimed wood finishing techniques in 2025! Learn preparation, natural oils, durable coatings, and maintenance for stunning, long-lasting projects.
