


There’s a unique satisfaction that comes from working with tools that have a history, tools that have witnessed decades of craftsmanship. Modern workshops are often filled with advanced power tools, but for many woodworkers, the allure of vintage wooden hand tools remains strong. These beautifully crafted instruments, such as handplanes, chisels, and saws, offer unparalleled control, tactile feedback, and a connection to traditional woodworking techniques. However, many vintage tools found in antique shops, flea markets, or inherited from previous generations often come with a heavy coat of rust, dull edges, and damaged handles. The good news is that with patience and the right techniques, you can embark on the rewarding journey of Restoring Vintage Wooden Tools: Bringing Old Handplanes, Chisels, and Saws Back to Life for Modern Use.
This comprehensive guide will walk you through the essential steps, from initial assessment and rust removal to sharpening, handle repair, and final finishing, ensuring your reclaimed tools are not just museum pieces, but fully functional, high-performance assets for your 2026 woodworking projects.

Key Takeaways
- Assessment is Crucial: Before starting, thoroughly inspect the tool for damage, missing parts, and overall condition to determine the feasibility and scope of restoration.
- Rust Removal is Key: Effective rust removal methods, from chemical solutions to electrolysis, are vital for restoring metal components without causing further damage.
- Sharpening Transforms Performance: Proper sharpening and honing techniques are paramount to making vintage tools perform as well as, or even better than, modern counterparts.
- Handle Restoration Preserves Ergonomics: Repairing and refinishing wooden handles not only improves aesthetics but also ensures comfortable and safe modern use.
- Patience and Attention to Detail: Restoring Vintage Wooden Tools: Bringing Old Handplanes, Chisels, and Saws Back to Life for Modern Use is a meticulous process that rewards careful work and attention to every component.
The Initial Assessment and Disassembly: Unveiling Potential in Vintage Hand Tools
The first step in Restoring Vintage Wooden Tools: Bringing Old Handplanes, Chisels, and Saws Back to Life for Modern Use is a thorough inspection. Many vintage tools might appear beyond salvage at first glance, covered in grime, rust, and sometimes even paint. However, beneath this exterior often lies a quality piece of engineering and craftsmanship waiting to be rediscovered.
What to Look For During Assessment:
- Completeness: Are all major components present? For a handplane, check for the body, frog, iron, cap iron, and lever cap. For a chisel, ensure the handle, ferrule, and blade are intact. Saws need a handle and a reasonably intact plate. Missing parts can often be sourced or fabricated, but it adds to the complexity.
- Metal Condition:
- Rust: Surface rust is common and usually manageable. Pitting (deep corrosion) can be more problematic, especially on plane soles or chisel backs, as it affects flatness and performance.
- Cracks/Bends: Inspect plane irons, chisel blades, and saw plates for any cracks or significant bends that might compromise their integrity or sharpening ability.
- Wooden Component Condition:
- Cracks/Splits: Check handles, plane totes, and knobs for cracks, especially along the grain or near stress points.
- Rot/Wormholes: Look for signs of wood rot or insect damage, which might necessitate replacement.
- Loose Joinery: For plane totes and knobs, ensure they are securely attached.
- Flatness and Squareness: Especially for planes, check the sole for flatness and the sides for squareness. While minor corrections are possible, severely twisted bodies can be challenging.
Disassembly: A Systematic Approach
Once assessed, carefully disassemble the tool. Take photos at each stage to aid reassembly, especially for complex mechanisms like plane frogs. Store all small parts in labeled containers to prevent loss.
Typical Disassembly Steps:
- Handplanes: Remove the lever cap, iron, and cap iron. Then, unfasten the frog from the body. Some planes allow for easy removal of the tote and knob; others might require more effort.
- Chisels: The handle might twist off or be epoxied. If the ferrule is loose, note its position.
- Saws: Unscrew the saw nuts that secure the handle to the plate.
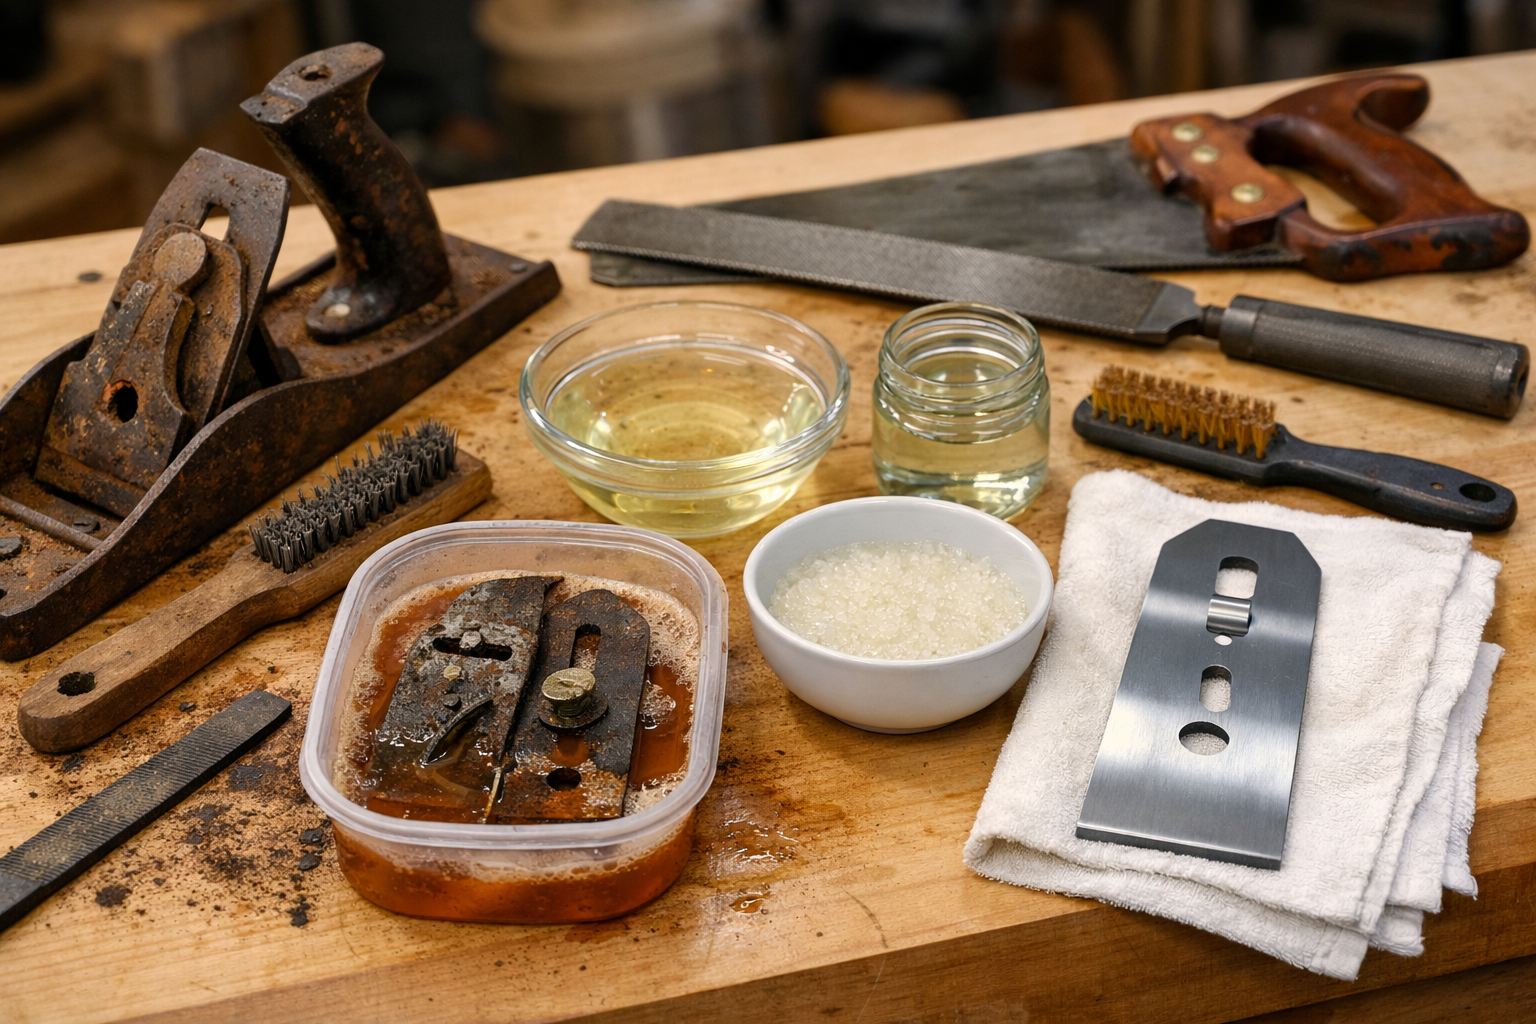
Cleaning and Rust Removal: Revitalizing Metal and Wood
This stage is perhaps the most satisfying part of Restoring Vintage Wooden Tools: Bringing Old Handplanes, Chisels, and Saws Back to Life for Modern Use, as it reveals the true character beneath years of neglect.
Rust Removal Techniques for Metal Parts
For comprehensive rust removal methods, readers can refer to “Restoring Vintage Woodworking Hand Tools: A Guide to Rust Removal,” – Restoring Vintage Woodworking Hand Tools: A Guide to Rust Removal.
- Soaking in Mild Acid (e.g., Oxalic Acid): A popular and effective method for moderate to heavy rust. Mix oxalic acid powder with water (follow safety instructions!). Submerge rusted parts for several hours or overnight.
- ⚠️ Safety First: Always wear gloves, eye protection, and work in a well-ventilated area. Neutralize parts with a baking soda solution after treatment to prevent re-rusting.
- Electrolysis: An excellent method for heavily rusted items. It involves a plastic tub, water, washing soda, a sacrificial anode (rebar), and a battery charger. This process converts rust back into iron, making it easy to wipe away.
- 👍 Benefits: Non-damaging to underlying metal, effective for complex shapes.
- Wire Brushes and Abrasives: For light rust, a brass wire brush (manual or on a drill) can be effective. Sandpaper (starting coarse, moving to fine grits) can remove rust and smooth surfaces, especially for plane soles and chisel backs.
- Important: Be careful not to remove too much material, especially on critical mating surfaces.
- Evapo-Rust/Citric Acid: Commercial rust removers like Evapo-Rust are non-toxic and reusable. Citric acid (from grocery stores) can also be used as a mild, safe acid bath.
Cleaning Wooden Components
- Gentle Cleaning: Use mineral spirits or denatured alcohol on a cloth to remove grime, old finish, and some stains from wooden handles and bodies. Avoid water, which can swell the wood.
- Sanding (Optional): Lightly sand wooden parts with fine-grit sandpaper (220-320 grit) to smooth out minor imperfections, scratches, or raise the grain for a new finish. Avoid heavy sanding, which can alter the tool’s original shape or proportions.
- Repairing Cracks: Small cracks can be repaired with woodworking glue (like Titebond) and clamps. For larger damage or missing chunks, consider using epoxy or shaping a new piece of matching wood to graft in.
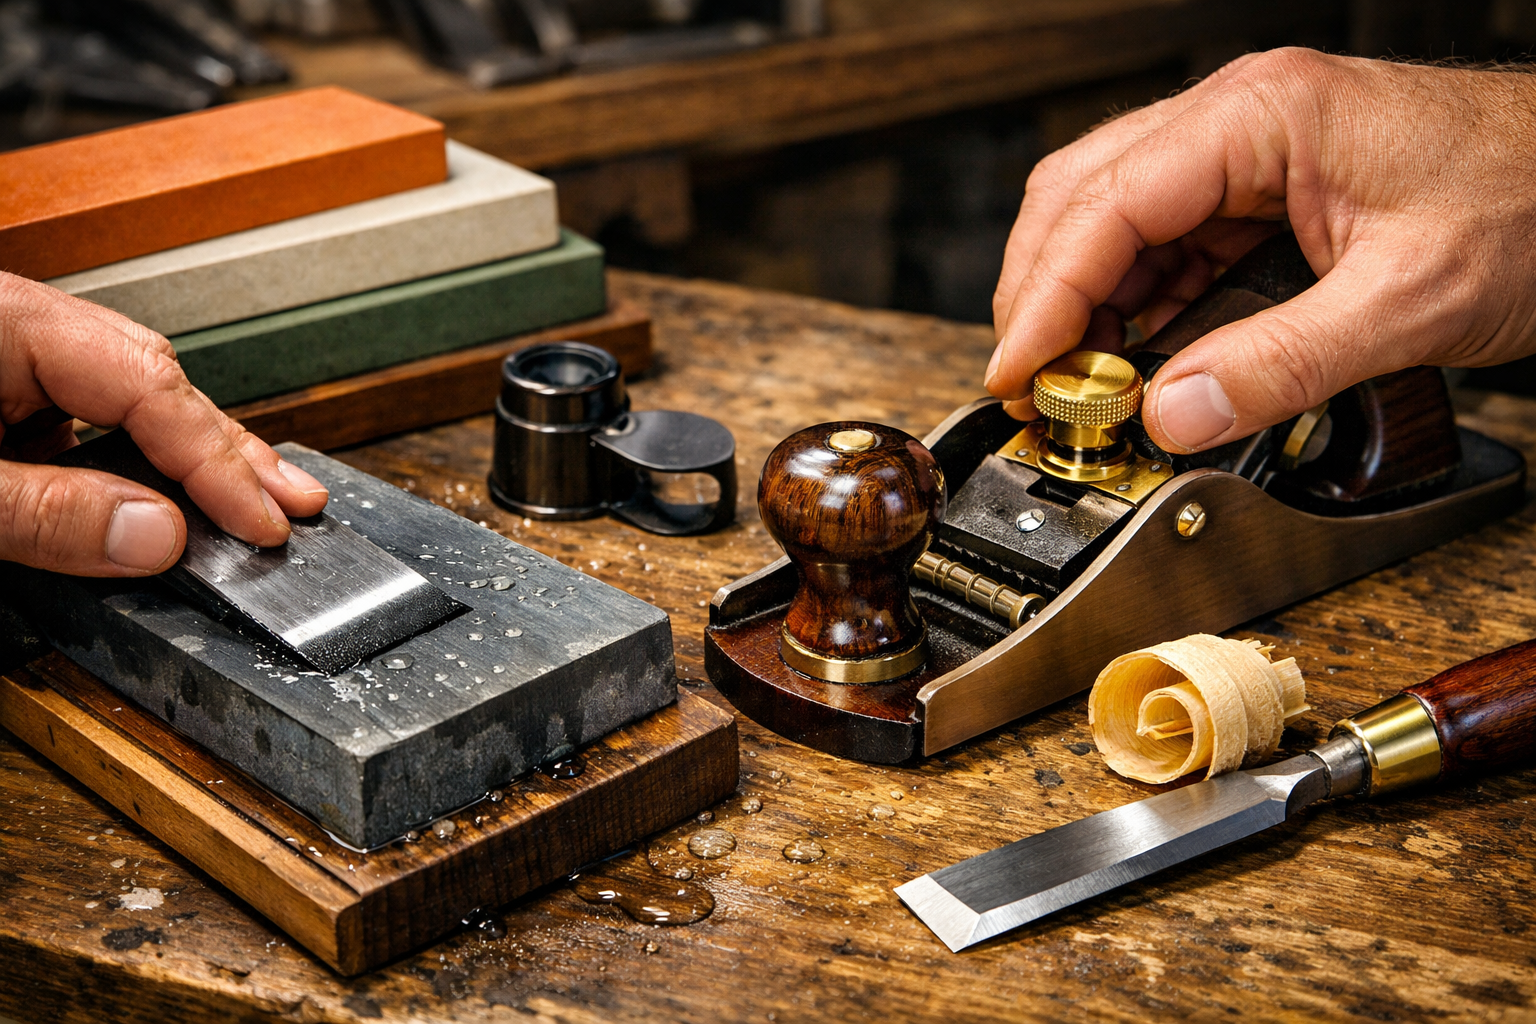
Sharpening, Tuning, and Reassembly: Bringing Performance Back
This is where the tool truly comes back to life, transforming from a neglected antique into a precision instrument capable of modern woodworking tasks.
Sharpening Blades: Chisels, Plane Irons, and Saws
Sharpness is paramount for performance. Dull tools are dangerous and frustrating.
Chisels and Plane Irons:
- Flatten the Back: This is critical. Use a flat reference surface (float glass, granite slab) and abrasive paper (starting from 220 grit, progressing to 1000 grit or higher) or sharpening stones to achieve a perfectly flat, mirror-like back, at least an inch from the cutting edge. Any low spots will hinder performance.
- Grinding the Bevel: Establish the primary bevel (typically 25-30 degrees for chisels and planes) using a grinding wheel or coarser sharpening stone. A honing guide can help maintain a consistent angle.
- Honing the Edge: Use progressively finer sharpening stones (waterstones, oilstones, diamond stones – e.g., 1000, 4000, 8000 grit) to refine the bevel and remove the burr.
- Stropping: Finish with a leather strop loaded with honing compound for a razor-sharp, polished edge.
“A truly sharp edge isn’t just about cutting easily; it’s about control, precision, and the joy of effortless work.”
Saws:
- Cleaning: Ensure the saw plate is free of rust and grime.
- Jointing: Lightly run a file across the top of the teeth to bring them to a uniform height.
- Shaping/Filing: Use a specific saw file (e.g., triangular file for rip or crosscut teeth) to reshape each tooth to its correct geometry and sharpness. This requires practice and understanding of tooth patterns.
- Setting: Use a saw set to bend alternate teeth slightly outwards. This creates clearance (kerf) so the blade doesn’t bind in the cut. Learn more about precision cuts with “Beginner’s Guide to Japanese Hand Saws: Precision Cuts and Essential Techniques for Fine Woodworking” – Beginner’s Guide to Japanese Hand Saws: Precision Cuts and Essential Techniques for Fine Woodworking.
Tuning Handplanes for Optimal Performance
- Sole Flattening: If the plane sole has minor pitting or isn’t perfectly flat, lap it on a flat surface with abrasive paper, working through grits, until it’s perfectly flat and smooth. This is crucial for consistent shavings.
- Frog Adjustment: Ensure the frog’s mating surface with the plane body is flat. Adjust the frog to achieve the desired mouth opening—a tighter mouth for fine shavings, a wider one for heavier cuts.
- Cap Iron Setting: The cap iron should be set very close to the cutting edge (1/32″ to 1/16″) for fine work, or further back for coarser cuts, to effectively break the chip and prevent tear-out.
- Lateral Adjustment: Check that the lateral adjustment lever works smoothly to align the blade perfectly.
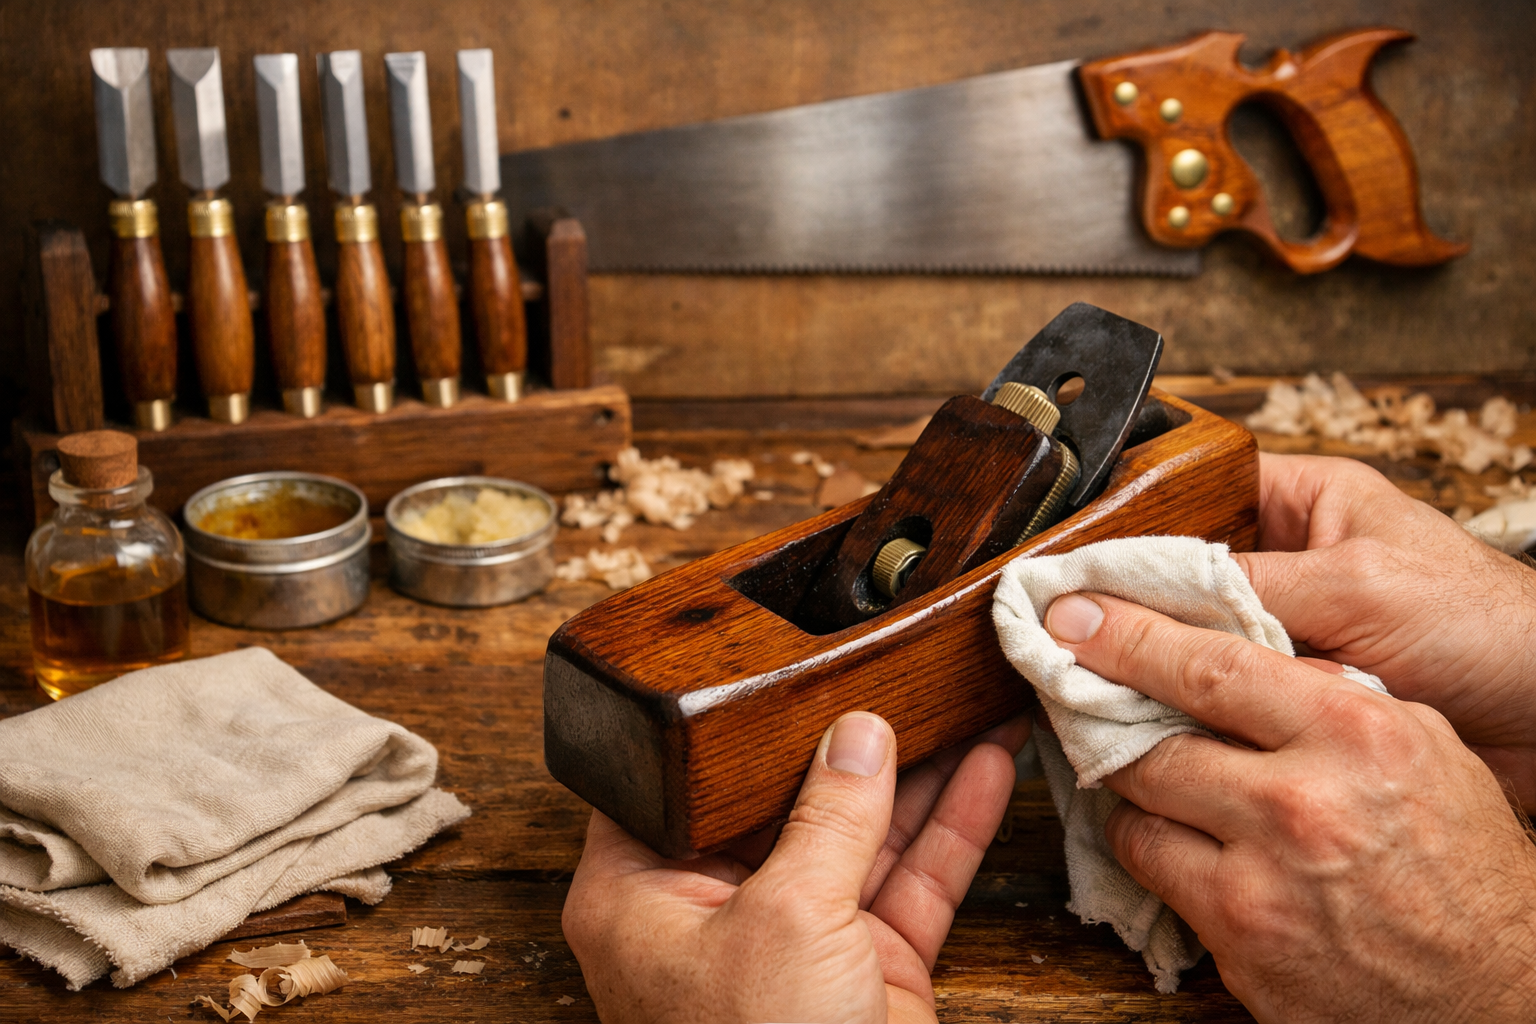
Reassembly and Finishing Wooden Components
With metal parts clean and sharp, and wooden parts repaired, it’s time for reassembly and the final touches.
- Reassembly: Follow your disassembly photos. Ensure all screws are tightened appropriately, but avoid overtightening, especially on wooden components. For plane frogs, ensure a snug fit for stability.
- Handle Finishing:
- Oil Finish: A classic choice for wooden tools. Penetrating oils (linseed oil, tung oil, Danish oil) soak into the wood, providing protection and highlighting the grain without creating a thick film that can chip. Apply multiple thin coats, wiping off excess.
- Shellac: Provides a durable, traditional finish that can be rubbed out to a beautiful sheen.
- Varnish/Polyurethane: Offers high durability but can feel less “natural” than oil.
- Waxing: After finishing, apply a coat of paste wax to all metal surfaces (especially plane soles and saw plates) to prevent rust and allow the tool to glide smoothly over wood. This also protects wooden handles.
- Testing: Test your restored tools on scrap wood. Adjust as needed. A properly restored handplane should produce continuous, feathery shavings, and a chisel should pare end grain cleanly.
Caring for Your Restored Vintage Tools
Restoring Vintage Wooden Tools: Bringing Old Handplanes, Chisels, and Saws Back to Life for Modern Use is an investment of time and effort. Protecting that investment requires ongoing care.
- Regular Cleaning: After each use, wipe down tools to remove sawdust and moisture.
- Rust Prevention: Apply a thin coat of camellia oil, paste wax, or a rust preventative to metal surfaces, especially if storing tools for extended periods.
- Proper Storage: Store tools in a dry environment, ideally in tool chests, cabinets, or on tool walls where they are protected from moisture and impact. Avoid storing directly on concrete floors, which can draw moisture.
- Maintain Sharpness: Touch up edges regularly on a strop or fine sharpening stone. Don’t wait until a tool is completely dull.
For further exploration into optimizing your workspace, consider “Building a Compact and Ergonomic Workbench for Small Workshops: Maximizing Space and Efficiency” – Building a Compact and Ergonomic Workbench for Small Workshops: Maximizing Space and Efficiency. And for those venturing into more complex builds, understanding joinery is key, as highlighted in “Hand Tool Joinery for Visible Wood Joints: Dovetails, Mortis” – Hand Tool Joinery for Visible Wood Joints: Dovetails, Mortise.
Conclusion
The journey of Restoring Vintage Wooden Tools: Bringing Old Handplanes, Chisels, and Saws Back to Life for Modern Use is a rewarding endeavor that connects you to the rich history of woodworking. It’s a testament to the enduring quality of tools made with care and craftsmanship. Beyond the aesthetic appeal, a properly restored vintage tool can outperform many modern equivalents, offering a level of precision and feel that is truly unmatched.
As you restore these pieces of history, you’re not just fixing a tool; you’re preserving a legacy and gaining invaluable skills that deepen your understanding of the craft. So, whether you’re bringing an old Stanley plane back to its former glory or rehabilitating a forgotten chisel, embrace the process. The satisfaction of using a beautifully restored tool for your 2026 projects will be immense, reminding you that sometimes, the best tools are the ones with a story to tell.
Actionable Next Steps:
- Start Small: Begin with a less complex tool, like a single chisel, to practice rust removal and sharpening techniques.
- Gather Supplies: Invest in quality sharpening stones, rust removers, and suitable finishes.
- Research Specifics: Each tool type (plane, chisel, saw) has unique restoration nuances. Consult specialized guides and videos for your particular tool.
- Practice Patience: Restoration takes time. Don’t rush the process, and enjoy each step of bringing these treasures back to life.
References

- Hack, C. (2014). The Woodworker’s Guide to Hand Tools. Popular Woodworking Books.
- Schwarz, C. (2011). The Anarchist’s Tool Chest. Lost Art Press.
- Underhill, J. (2011). The Essential Woodworker. The Taunton Press.
