
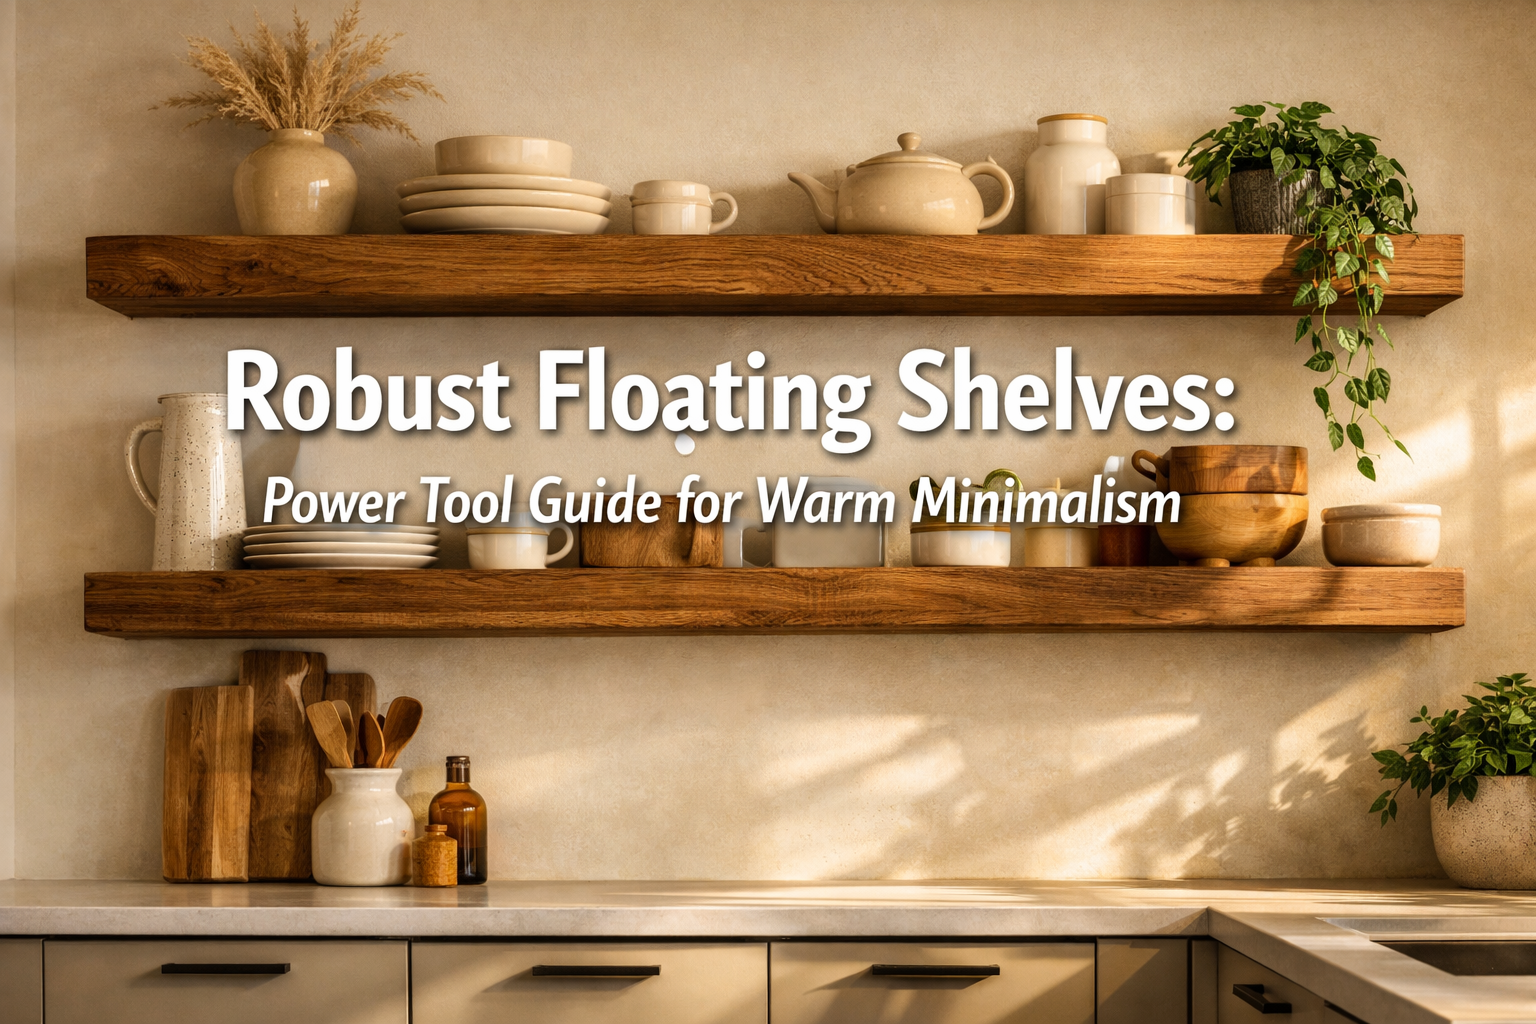

Are you tired of flimsy, unreliable shelves that buckle under the weight of your cherished items? In 2026, the trend of warm minimalism continues to dominate interior design, emphasizing clean lines, natural materials, and functional beauty. Central to this aesthetic are robust floating shelves, offering a seamless, sophisticated storage solution that appears to defy gravity. This comprehensive article serves as your definitive Robust Floating Shelves: Power Tool Guide for Warm Minimalism, designed to empower you with the knowledge and skills to craft sturdy, stylish shelves that perfectly complement your minimalist vision, particularly in high-traffic areas like kitchens. We’ll move beyond the superficial, diving into the essential power tools, precise joinery techniques, and finishing touches that ensure your floating shelves are not just beautiful, but built to last.
Flimsy shelves are a thing of the past. The demand for thick, solid wood floating shelves that can hold significant weight, from stacks of dinner plates to heavy cookbooks, is higher than ever. Achieving this level of robustness requires more than just basic hand tools; it demands the precision and power that modern woodworking tools provide. Whether you’re a seasoned woodworker or an enthusiastic DIYer looking to elevate your home, understanding the right tools and techniques is paramount.

Key Takeaways
- Embrace Solid Wood: For true robustness and warm minimalist aesthetics, prioritize solid hardwoods like oak, maple, or walnut over engineered wood products.
- Essential Power Tools: A miter saw, circular saw, router, and orbital sander are indispensable for precise cuts, strong joinery, and smooth finishes.
- Secure Mounting Systems: Hidden metal brackets with multiple anchor points, coupled with solid wood blocking within wall studs, are crucial for heavy-duty floating shelves.
- Master Joinery Techniques: Techniques like dado joints, mortise and tenon, or even simple but strong glued butt joints reinforced with screws, provide superior strength.
- Warm Minimalism Finishing: Opt for natural oil finishes (like Danish oil) or matte polyurethanes to enhance the wood’s natural beauty without a high-gloss distraction.
Building the Foundation: Essential Power Tools for Robust Floating Shelves
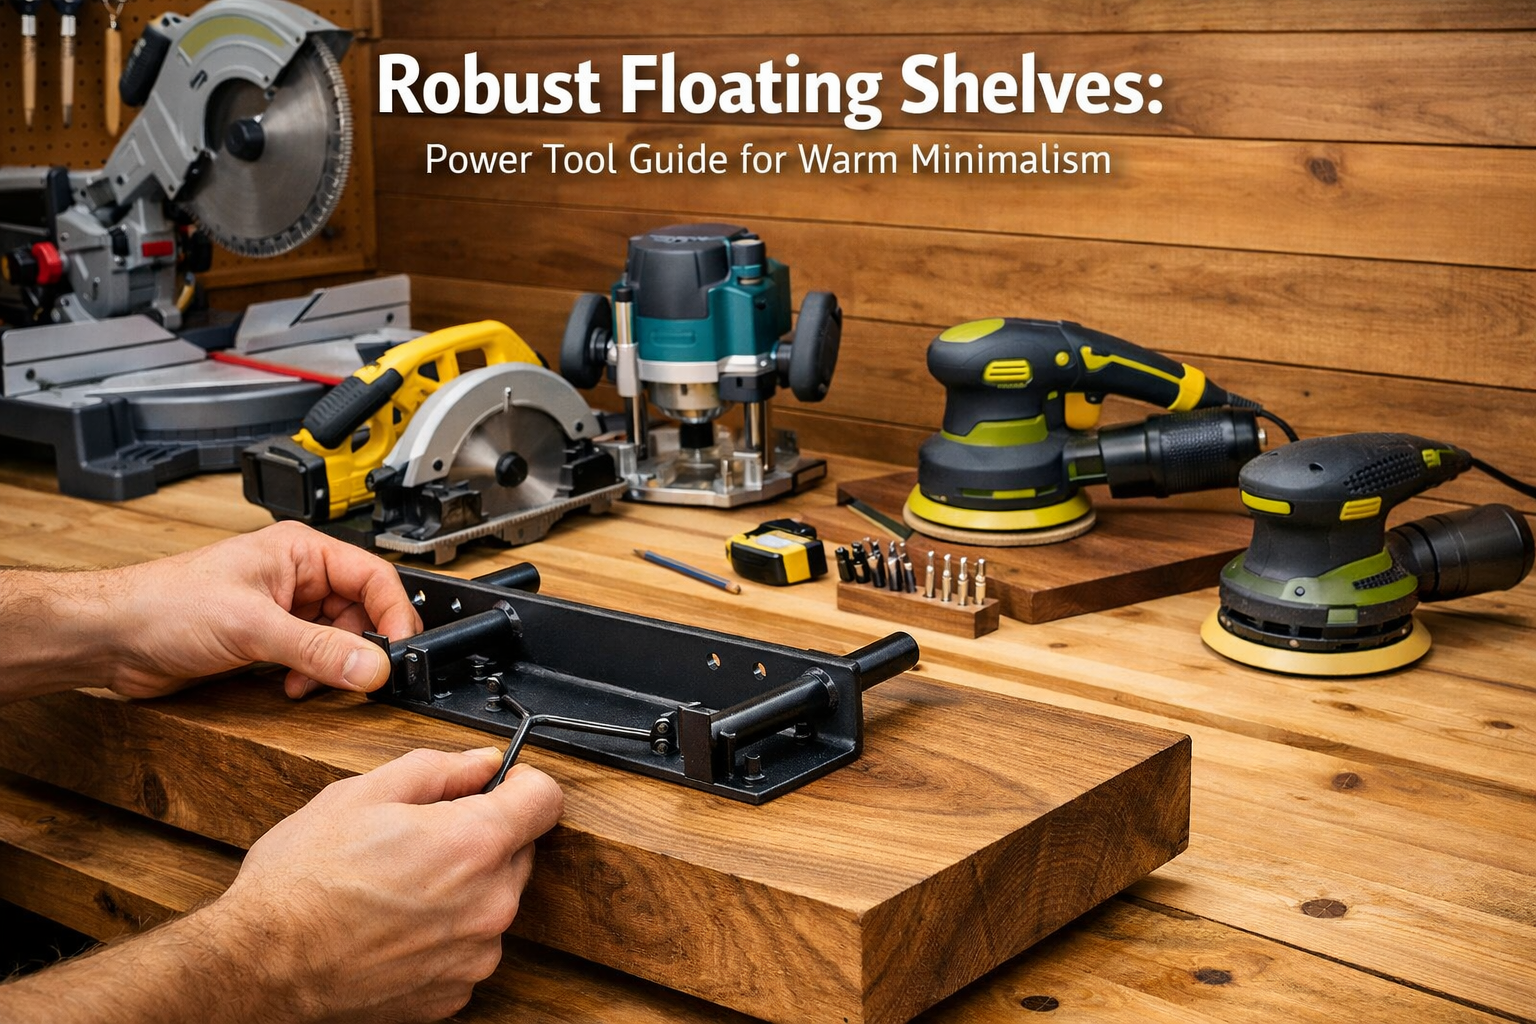
Creating truly robust floating shelves demands precision, power, and the right tools. Skimping on tool quality or technique can lead to saggy, unsafe shelves that undermine the minimalist aesthetic. This section of the Robust Floating Shelves: Power Tool Guide for Warm Minimalism will walk you through the essential power tools, explaining their function and how they contribute to the structural integrity and aesthetic appeal of your project.
The Power Tool Arsenal
| Tool Name | Primary Function | Why it’s Essential for Floating Shelves | Safety Tip |
|---|---|---|---|
| Miter Saw | Precise crosscuts and mitered angles | Ensures perfectly square ends for shelves and mounting cleats, critical for tight joints and flush installation. | Always keep hands clear of the blade path. Use clamps for small pieces. |
| Circular Saw | Straight cuts on larger sheets or rough lumber | Ideal for dimensioning rough lumber into shelf blanks or trimming wider boards accurately. | Use a straight edge guide for long, accurate cuts. Wear eye and ear protection. |
| Table Saw | Ripping lumber to width, dadoes, rabbets | Essential for achieving consistent shelf widths, cutting dadoes for hidden mounting systems, and creating clean edges. | Always use a push stick and maintain a safe distance from the blade. Refer to guides on Pro Tech Table Saw: A Comprehensive Guide for Effective Usage for best practices. |
| Router | Shaping edges, cutting dados, mortises | Perfect for creating decorative edges (chamfers, rounds) and for precise dadoes or mortises for stronger joinery. | Secure workpiece firmly. Move router smoothly against the grain for best results. |
| Orbital Sander | Smooth sanding for finish preparation | Achieves a buttery-smooth surface, crucial for professional-looking finishes that highlight the wood’s natural beauty. | Work through grits progressively. Keep the sander moving to avoid swirl marks. |
| Drill/Driver | Drilling pilot holes, driving screws | Indispensable for pre-drilling holes for mounting brackets and securing structural components without splitting wood. | Use the correct bit size for pilot holes to avoid splitting and ensure screw grip. |
| Stud Finder | Locating wall studs | Absolutely critical for safely mounting heavy floating shelves to structural elements in your wall. | Calibrate your stud finder according to manufacturer instructions for accuracy. |
Miter Saw: A good quality miter saw is invaluable for ensuring that the ends of your shelf boards are cut perfectly square, or at precise angles if you’re creating a corner unit. This accuracy is paramount for strong, gap-free joints and a clean, professional appearance. When working with solid hardwoods, the power of a miter saw makes quick, clean work of cross-cutting.
Circular Saw: While a miter saw excels at crosscuts, a circular saw is your go-to for making long, straight cuts on wider pieces of lumber or plywood. If you’re cutting your own shelf blanks from larger stock, a circular saw paired with a straight edge guide will ensure accurate dimensions.
Table Saw: For consistency in width and for cutting crucial joinery like dadoes (grooves) for hidden shelf supports, a table saw is indispensable. It allows for highly repeatable, parallel cuts, which is vital when creating multiple shelves or when ripping thicker lumber to precise dimensions. Mastering this tool can greatly enhance the robustness and aesthetic of your shelves. For more on safe and effective use, explore our guide on Pro Tech Table Saw: A Comprehensive Guide for Effective Usage.
Router: A router is incredibly versatile. It can be used to soften the edges of your shelves with a round-over or chamfer bit, giving them a more refined, finished look that aligns with warm minimalism. More importantly, it can cut precise dadoes or mortises within the shelf material itself or the wall cleat, allowing for stronger, hidden connections that resist sagging.
Orbital Sander: The final aesthetic of your robust floating shelves hinges on a smooth, flawless surface. An orbital sander, moving through progressively finer grits, ensures that your wood is perfectly prepared for finishing, highlighting its natural grain and warmth. This step is non-negotiable for achieving a high-quality, professional appearance.
Drill/Driver: From drilling pilot holes for screws to driving fasteners, a powerful drill/driver is essential. It ensures that your mounting brackets are securely fastened to wall studs and that any internal shelf joinery is robustly assembled. Remember to use appropriate woodworking screws for maximum holding power.
Stud Finder: Before any drilling into a wall, a reliable stud finder is critical. Floating shelves, especially robust ones designed for heavy loads, must be anchored directly into wall studs. Locating these structural members is the first and most important step for safe and secure installation.
Investing in quality tools and learning to use them safely and effectively is the cornerstone of successful woodworking projects, especially when aiming for the strength and beauty of robust floating shelves.
Engineering Strength: Joinery & Mounting Techniques for Robust Floating Shelves
The true strength and “floating” illusion of your shelves depend entirely on the chosen joinery and mounting techniques. This section of our Robust Floating Shelves: Power Tool Guide for Warm Minimalism delves into the methods that will ensure your shelves are not only visually striking but also capable of holding substantial weight.
Selecting the Right Wood
For a truly robust floating shelf, solid hardwood is the superior choice. Its density, stability, and beautiful grain patterns perfectly complement the warm minimalist aesthetic.
- Oak: Known for its strength, durability, and prominent grain.
- Maple: Offers a fine, even grain and excellent resistance to dents.
- Walnut: Prized for its rich, dark color and luxurious appearance.
- Cherry: Develops a beautiful patina over time, adding warmth.
Avoid softwoods like pine for heavily loaded shelves, as they are more prone to warping and sagging under significant weight. While plywood can be used for the core of a thicker shelf, it should always be faced with solid wood to hide the plies and provide a premium finish.
Joinery for Internal Shelf Strength
While many floating shelves appear to be a single solid piece, some designs, especially thicker ones, are actually hollow boxes or laminated sections. Internal joinery techniques ensure these components are rigidly connected.
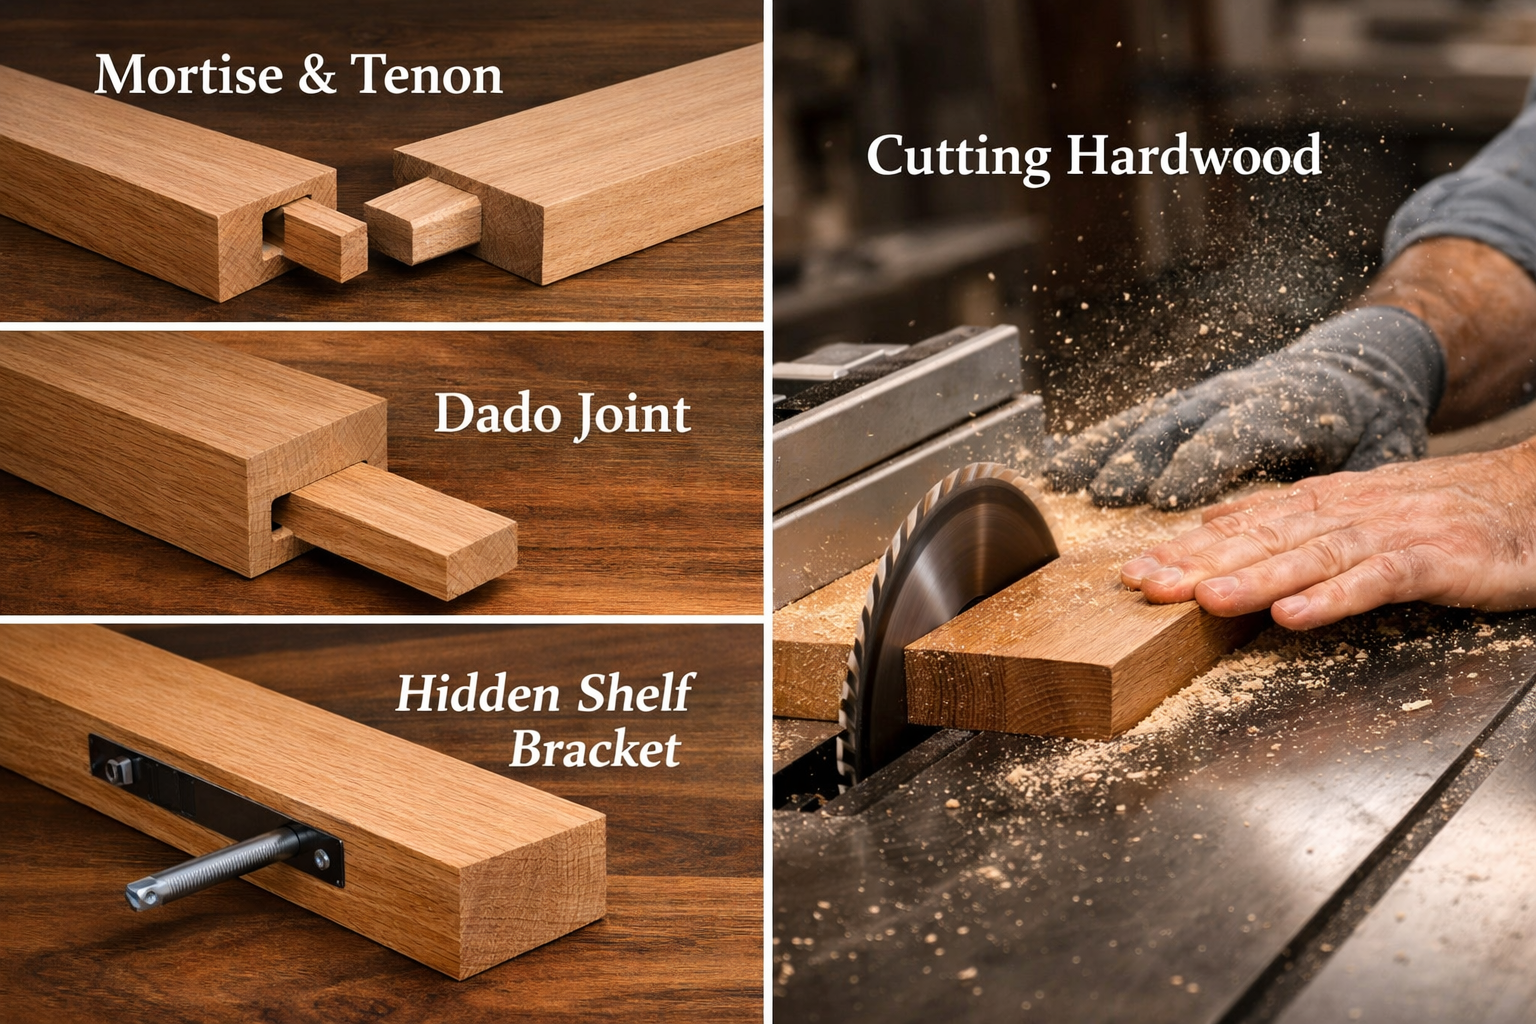
Dado Joints: For box-construction floating shelves, dadoes are excellent for creating strong, interlocking connections. A dado is a groove cut across the grain of a board, into which another board fits snugly. Using a table saw with a dado blade set, or a router, allows for precise dadoes. This forms a strong mechanical lock for the top, bottom, and side pieces of a hollow shelf.
- Pro Tip: For extra strength, add wood glue to all dado joints before assembly.
Mortise and Tenon: While more advanced, this traditional joinery method offers unparalleled strength for attaching components within a shelf, or for creating the shelf itself from multiple pieces. A mortise is a rectangular hole, and a tenon is a projecting piece that fits into it.
- Consideration: This technique is usually reserved for solid-wood, high-end construction rather than typical floating shelf box construction. Our guide on Shank Hole Basics: A Comprehensive Guide to Drilling and Troubleshooting offers related insights into precise hole making.
Laminated Construction: For very thick, solid-looking shelves, multiple thinner boards can be glued together edge-to-edge and face-to-face. This creates a solid block that is incredibly strong and stable. Use a high-quality wood glue and clamp thoroughly.
- Process:
- Plane all boards to the same thickness.
- Apply glue evenly to mating surfaces.
- Clamp firmly until dry.
- Plane or sand flat after glue has cured.
- Process:
Robust Mounting Systems
The mounting system is the most critical factor for supporting heavy loads. Forget flimsy L-brackets; true robust floating shelves rely on hidden, heavy-duty supports.
Hidden Metal Rod/Bracket Systems: These are the gold standard for robust floating shelves.
Through-Rod System: Heavy-duty metal rods (often 1/2″ or 5/8″ diameter) are threaded into specialized wall anchors that are securely fastened to wall studs. Corresponding holes are precisely drilled into the back of the shelf board, allowing it to slide onto the rods.
- Installation Steps:
- Locate wall studs precisely with a stud finder.
- Mark desired shelf height and rod locations on studs.
- Pre-drill pilot holes for the mounting hardware into the studs.
- Install the metal bracket base or threaded inserts into the studs.
- Drill corresponding, slightly oversized holes into the back edge of the shelf for the rods. Use a drill press for perfect perpendicularity if possible, or a doweling jig for accuracy if drilling by hand.
- Slide the shelf onto the rods. A bit of construction adhesive in the holes can add extra security.
- Installation Steps:
Heavy-Duty Floating Shelf Brackets: These consist of a metal plate that mounts to the wall studs, with projecting arms that slide into routed channels or drilled holes in the back of the shelf. Some systems allow for slight adjustment to level the shelf.
- Key Feature: The metal arms should extend deep into the shelf (at least 70-80% of its depth) for optimal support.
Integrated Wood Blocking (for new construction or renovations): The ultimate in robustness involves building solid wood blocking directly into the wall framing before drywall is installed. This creates a continuous, rock-solid anchor point along the entire length of where the shelf will be.
- Benefits: Allows for direct screwing of a wood cleat to the blocking, eliminating reliance on individual studs and distributing weight evenly.
| Mounting System | Advantages | Considerations | Best Use Case |
|---|---|---|---|
| Hidden Metal Rods | Extremely strong, truly invisible support, ideal for heavy loads. | Requires precise drilling into shelf and wall. | Kitchens, libraries, displaying heavy items. |
| Heavy-Duty Floating Shelf Brackets | Strong, relatively easy to install, some adjustability. | Arms may need precise routing (dadoes) into the shelf back. | General living areas, displaying moderate to heavy items. |
| Integrated Wood Blocking | Max. strength & weight distribution, future-proof. | Requires opening up walls (new construction/renovation). | Dedicated built-ins, commercial applications. |
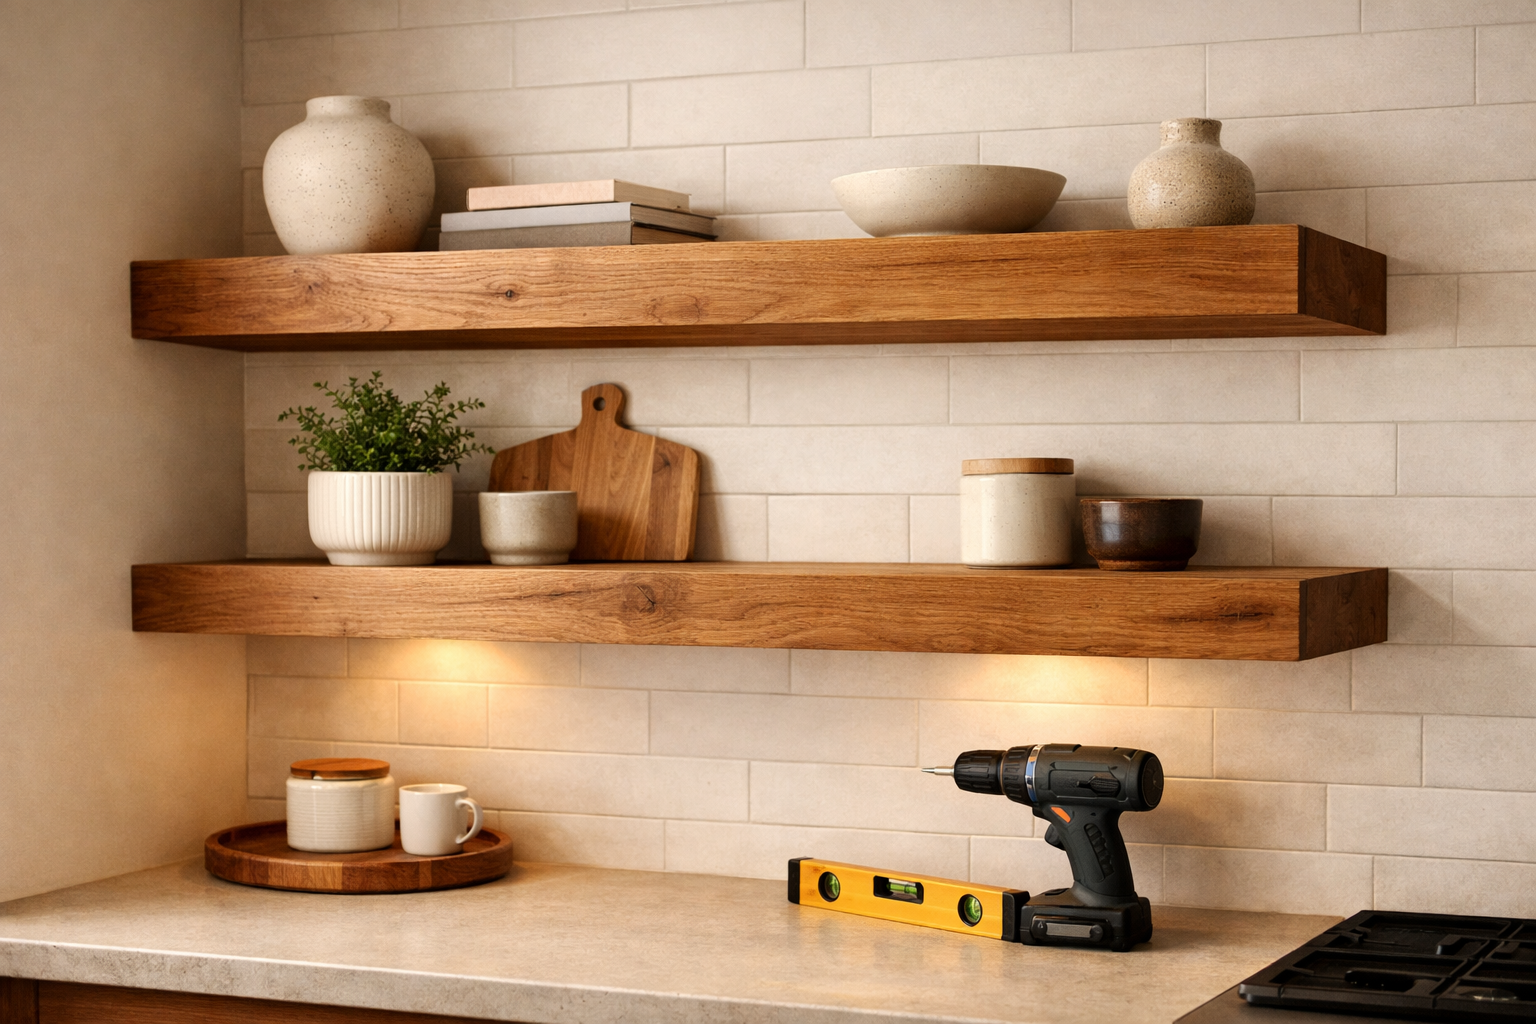
When installing your robust floating shelves, always use a level and double-check your measurements. Pilot holes are crucial to prevent splitting expensive hardwood, and choosing the right screws for the job (e.g., structural lag screws for brackets) cannot be overstated. By focusing on quality wood, intelligent joinery, and a robust mounting system, your shelves will not only achieve the desired warm minimalist aesthetic but also provide unwavering support for years to come.
The Finishing Touches: Achieving Warm Minimalism and Lasting Durability
Once your robust floating shelves are structurally sound and securely mounted, the final step is to apply a finish that enhances the wood’s natural beauty and protects it for years. This section completes our Robust Floating Shelves: Power Tool Guide for Warm Minimalism by focusing on finishes that align with the aesthetic and offer lasting durability.
Embracing Warm Minimalism Through Finish Choices
Warm minimalism celebrates natural textures, muted tones, and understated elegance. The finish you choose should allow the wood’s grain and character to shine through, rather than obscuring it.
Natural Oil Finishes: These are often the preferred choice for warm minimalism. Oils penetrate the wood fibers, enhancing the grain, providing a rich, natural luster, and offering excellent protection.
- Danish Oil: A blend of oil and varnish, Danish oil is easy to apply and provides a subtle, matte to satin finish that feels natural to the touch. It soaks into the wood, hardening within the fibers, offering good protection against moisture and wear. It’s also relatively easy to repair if scratched. For a detailed comparison, see our article on “Danish Oil vs Linseed: The Ultimate Wood Finishing Guide – Wood Craft Wiz”.
- Tung Oil/Linseed Oil: Pure oils offer a very natural, hand-rubbed look. They require multiple coats and longer drying times but build a durable, water-resistant finish. These finishes are very forgiving to touch-ups.
- Application: Apply thin coats with a clean rag, allowing each coat to penetrate before wiping off excess. Repeat until desired depth and protection are achieved.
Matte Polyurethane or Water-Based Finishes: If higher durability against spills and heavy use (especially in a kitchen environment) is a priority, a matte or satin polyurethane or water-based finish can be an excellent choice. These form a protective film on the surface of the wood.
- Key Features: Look for low-VOC (Volatile Organic Compound) options for better indoor air quality.
- Application: Apply thin, even coats with a high-quality brush or a sprayer. Lightly sand with very fine grit sandpaper (e.g., 220-320 grit) between coats to ensure good adhesion and a smooth finish. Always follow the manufacturer’s drying time recommendations. Our general guide on wood finishing techniques provides more context.
Waxes: While not as durable as oils or polyurethanes, a natural wax finish can provide a beautiful, soft sheen and feel. It offers some protection but is generally best for shelves not subject to heavy use or moisture. Waxes can also be applied over an oil finish for added depth and protection.
Finishing Don’ts for Warm Minimalism:
- High-Gloss Finishes: These can detract from the natural, understated aesthetic of warm minimalism.
- Heavy Stains: While stains can alter wood color, aim for transparent or semi-transparent options if staining is desired, allowing the grain to remain visible. Deeply pigmented, opaque stains can look less natural.
- Excessive Distressing: Unless specifically going for a rustic look, avoid overly distressing the wood. Warm minimalism favors clean, refined surfaces.
Maintenance and Care
To ensure your robust floating shelves maintain their beauty and durability for years to come:
- Regular Cleaning: Dust shelves with a soft, dry cloth. For spills, wipe immediately with a slightly damp cloth and dry thoroughly.
- Avoid Harsh Cleaners: Chemical cleaners can damage the finish. Stick to mild soap and water if needed, or specialized wood cleaners designed for your specific finish type.
- Re-oiling: Oil finishes may benefit from periodic re-oiling (every 1-3 years, depending on use) to refresh their protective qualities and luster.
- Protection: Use coasters or felt pads under heavy or abrasive items to prevent scratches and dents.
By carefully considering your finish, you ensure that your investment in crafting robust floating shelves pays off aesthetically and functionally. The right finish is not merely a protective layer; it’s an integral part of achieving that coveted warm minimalist look.

Conclusion
Crafting robust floating shelves that embody the principles of warm minimalism is a deeply rewarding project. It transforms mere storage into a design statement, blending seamless functionality with understated elegance. As we’ve explored in this comprehensive Robust Floating Shelves: Power Tool Guide for Warm Minimalism, achieving this level of quality requires thoughtful planning, the judicious use of power tools for precision and strength, and a keen eye for detail in both joinery and finishing.
From dimensioning your chosen hardwood with a table saw, to executing precise dadoes with a router for internal shelf strength, and finally, mounting with heavy-duty hidden brackets anchored firmly into wall studs – every step contributes to shelves that are not only beautiful but truly built to last. The selection of a natural oil finish or a subtle matte polyurethane further enhances the wood’s inherent beauty, aligning perfectly with the serene and inviting aesthetic of warm minimalism.
The flimsy, sagging shelves of the past have no place in a carefully curated home. By embracing the techniques and tools outlined here, you are empowered to create stunning, durable storage solutions that elevate your space, particularly in high-demand areas like the kitchen.
Actionable Next Steps:
- Plan Your Project: Measure your space, sketch out your desired shelf dimensions, and calculate the amount of lumber needed.
- Gather Your Tools: Ensure you have the essential power tools discussed, along with safety gear. Consider acquiring any missing tools or borrowing them for the project.
- Source Quality Materials: Select solid hardwoods that complement your home’s aesthetic and provide the necessary strength.
- Practice Joinery (Optional but Recommended): If new to certain joinery techniques, practice on scrap wood before committing to your final pieces.
- Build and Install with Precision: Follow the steps for cutting, assembling, and mounting carefully, prioritizing safety and accuracy.
- Apply Your Chosen Finish: Take your time with the finishing process to achieve the desired look and protection, allowing appropriate drying times.
- Enjoy Your Robust Floating Shelves: Style your new shelves with intention, celebrating the blend of craftsmanship and minimalist design you’ve achieved.
By following this guide, you will not only create beautiful, functional storage but also gain valuable woodworking experience, proving that DIY projects can stand proudly alongside professional craftsmanship in the pursuit of a warm, minimalist home in 2026.
