

Imagine this: it’s Thanksgiving in the middle of December, and you’re gathered with your loved ones, surrounded by warmth and laughter, in the Christmas spirit. The aroma of delicious food fills the air as you all come together to celebrate this special occasion in the middle of Christmas. The frame of the inch is filled with joy and laughter. But there’s something unique about your Christmas celebration this year – the decorations are not store-bought; they are handcrafted by you using pallet wood supplies. You even made a beautiful frame for your holiday photos.
Discover the joy of creating one-of-a-kind Thanksgiving and Christmas decorations through woodworking. Use your woodworking skills to craft unique decorations using supplies such as a wheelbarrow and frame. With a few simple tools and a dash of creativity, you can use pallet wood to create a Christmas frame or box that will leave everyone in awe during your holiday celebrations. Whether it’s a beautifully carved wooden centerpiece, a frame for a picture, or intricately designed napkin rings, woodworking projects offer endless possibilities to express your artistic flair. You can create a diagram or box, or even a wheelbarrow, showcasing your craftsmanship and creativity.


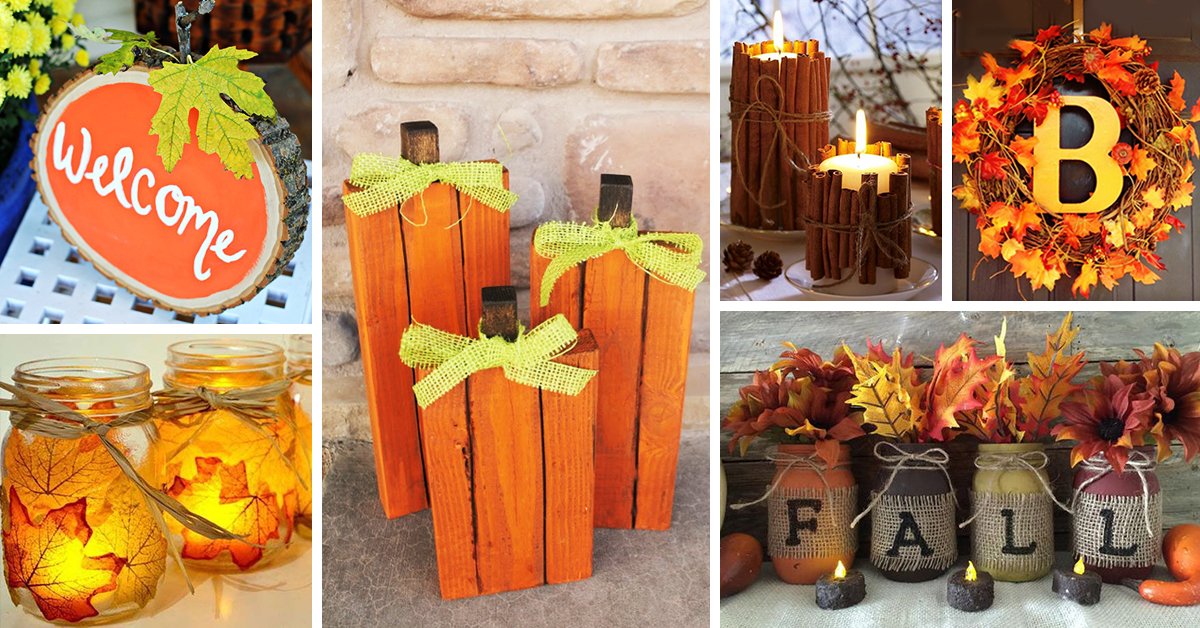
Just imagine the look on your guests’ faces when they see the stunning Thanksgiving-themed woodcrafts adorning your home, framed in beautiful boxes and displayed on every inch of available space. From charming pumpkin-shaped candle holders made from pallet wood to elegant leaf-inspired wall art in a frame, these handmade creations, measuring an inch in size, will surely make a lasting impression. Whether it’s a rustic box made from pallet wood or a delicate frame adorned with leaf-inspired designs, each piece showcases the beauty and versatility of these materials.
Related:-https://woodcraftwiz.com/woodworker-by-profession/
By exploring the world of woodworking, you can unleash your creativity and enhance the festive atmosphere of your Thanksgiving gathering with a beautifully crafted box that measures every inch. So why settle for generic decorations when you can infuse your own style into every inch of detail?
Easy and Accessible Woodworking Projects for Thanksgiving
Beginner-Friendly Woodworking Projects: Simple Ideas for Everyone
Woodworking may seem intimidating at first, but there are plenty of beginner-friendly projects that anyone can try this Thanksgiving. Whether you’re a seasoned woodworker or just starting out, these simple woodcraft ideas will allow you to create impressive decorations with minimal tools and skills. Don’t let the fear of complex techniques hold you back – these accessible DIY projects will help you unleash your creativity and add charm to your holiday decor.
Minimal Tools and Skills: Creating Beautiful Crafts
One of the great things about Thanksgiving woodworking projects is that they often require only a few basic tools. You don’t need an extensive workshop or expensive equipment to get started. With just a few essential tools like a saw, drill, sandpaper, and some clamps, you’ll be well-equipped to tackle these easy-to-follow plans for wooden crafts. These projects are designed to be achievable even for those new to woodworking, allowing everyone to participate in the joy of creating something beautiful with their own hands.
Avoid Feeling Overwhelmed: Stress-Free Crafting
The holiday season can be busy and overwhelming, but that doesn’t mean you have to sacrifice your creative pursuits. These woodworking projects are specifically chosen for their simplicity and efficiency, ensuring that you can complete them without feeling overwhelmed by complex techniques or lengthy instructions. By focusing on quick and achievable projects, you’ll be able to enjoy the process of crafting while still managing your other Thanksgiving preparations.
Quick Inspiration: Achievable Woodworking Projects
Looking for inspiration? Here are some quick and achievable woodworking project ideas perfect for the busy holiday season:
- Rustic Wooden Centerpiece: Create a charming centerpiece by cutting logs into different lengths and arranging them in a rustic fashion. Add candles or small pumpkins on top for an extra festive touch.
- Wooden Serving Tray: Craft a personalized serving tray by cutting and assembling wooden boards. Sand it down for a smooth finish and add handles for easy carrying.
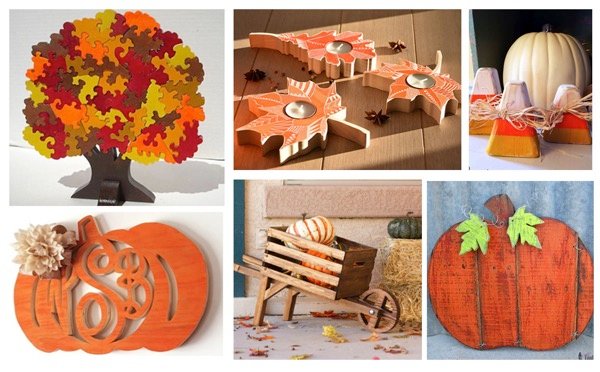
- Wooden Pumpkin Decorations: Cut out pumpkin shapes from plywood, paint them in vibrant fall colors, and add decorative accents like ribbons or twine. These wooden pumpkins will bring warmth to your Thanksgiving display.
- Fall-themed Coasters: Use small slices of wood to create unique coasters. Paint or stain them with autumn-inspired designs such as leaves or acorns, and protect the wood with varnish.
- Wooden Utensil Holder: Build a stylish utensil holder using reclaimed wood or thin plywood sheets. Customize it with dividers to keep your cutlery organized during Thanksgiving dinner.
- Wooden Place Card Holders: Make personalized place card holders by cutting small wooden blocks and adding slits to hold name cards. This simple project adds a personal touch to your table setting.
Remember, these are just a few examples of the many woodworking projects you can explore this Thanksgiving season. Let your creativity guide you as you embark on these accessible DIY crafts that will impress your guests while showcasing your woodworking skills.
So why not dive into the world of woodworking this Thanksgiving? With easy-to-follow plans, minimal tools required, and achievable projects at hand, you’ll be able to create beautiful decorations without feeling overwhelmed. Embrace the joy of crafting and add a touch of handmade charm to your holiday celebrations!
Step-by-Step Instructions for Pilgrim Woman Woodcraft
Are you ready to embark on a delightful woodworking project this Thanksgiving? Look no further! In this tutorial, we will guide you through the process of creating a charming Pilgrim woman woodcraft from scratch. Get your tools ready and let’s dive into the world of woodworking!
Carving, Shaping, and Assembling
To bring your lifelike Pilgrim woman figure to fruition, it is crucial to master the art of carving, shaping, and assembling. Start by selecting a suitable piece of wood that will serve as the foundation for your creation. Maple or cherry wood are excellent choices due to their durability and smooth texture.
Begin by sketching out the basic shape of your Pilgrim woman on the block of wood using a pencil or marker. This initial outline will act as a guide throughout the carving process. With a set of sharp chisels and gouges, carefully carve away excess material to reveal the contours of her body and clothing.
As you progress with each stroke, pay close attention to detail. Use smaller tools for intricate areas such as facial features and hands. To achieve realistic facial features, study reference images or use a pre-drawn diagram for guidance. Take your time in sculpting delicate curves and lines that bring character to your wooden figurine.

Once you are satisfied with the overall shape, it’s time to assemble various parts together seamlessly. Attach limbs securely using dowels or screws while ensuring proper alignment. A sturdy adhesive can also be used for added stability. Take pride in this step as it brings your Pilgrim woman one step closer to completion.
Painting and Finishing Touches
Now that you have meticulously carved and assembled your wooden masterpiece, it’s time to add color and personality! Begin by sanding down any rough edges or imperfections using fine-grit sandpaper until the surface is silky smooth.
Before applying paint, consider the color scheme you wish to achieve. Traditionally, Pilgrim women wore dark dresses with white aprons and bonnets. However, feel free to experiment with different shades that reflect your personal style.
Start by applying a base coat of paint to the entire figure using a small brush or foam applicator. Allow each layer to dry before adding subsequent coats for optimal coverage. Once your base coat is complete, it’s time to add depth and dimension.
Using a smaller brush, carefully highlight facial features such as eyes, lips, and cheeks. This will bring life to your Pilgrim woman’s face and make her more expressive. Don’t forget to add subtle shading to clothing folds and creases for a realistic touch.
To protect your woodcraft and enhance its longevity, apply a clear varnish or sealant as the final step. This will not only provide a glossy finish but also safeguard your creation from dust and moisture.
Proportioning Wooden Figures
Creating an elegant Pilgrim woman centerpiece requires mastering the art of proportioning wooden figures. Paying attention to scale is crucial in achieving a visually appealing result.
Begin by deciding on the desired height of your figurine based on where it will be displayed. Ensure that the head-to-body ratio is accurate by referring to reference images or using measurements from historical sources.
When carving limbs such as arms and legs, keep in mind their relative length compared to the torso. Smooth transitions between body parts are essential for creating an aesthetically pleasing wooden sculpture.
As you progress with each step of proportioning, take a moment to stand back and assess your work from different angles. This will help you identify any areas that may require adjustments for better balance and harmony within the overall composition.
Transforming Raw Materials into Art
Embarking on this woodworking project means transforming raw materials into a stunning wooden sculpture that captures the essence of Thanksgiving traditions. Follow along with clear step-by-step visuals to guide you through each stage of the process.
Begin by gathering all necessary tools and materials, including wood blocks, carving tools, sandpaper, paints, brushes, and varnish. Having everything within reach will ensure a smooth workflow as you bring your vision to life.

Start with a rough sketch or diagram that outlines the basic shape and proportions of your Pilgrim woman. This will serve as a roadmap throughout the project and keep you focused on achieving your desired outcome.
Carve away excess material gradually, paying attention to intricate details such as facial features and clothing folds. Take breaks when needed to maintain focus and prevent fatigue. Remember, woodworking is an art form that requires patience and precision.
Materials and Tools Needed for Thanksgiving Woodworking
Whether you’re a seasoned woodworker or just starting out, having the right materials and tools is crucial for successful Thanksgiving woodworking projects. Before diving into any project, it’s important to take stock of the essential supplies required to bring your creative ideas to life. From various types of wood to paints, brushes, and safety equipment, here’s everything you need to know about the materials and tools needed for Thanksgiving woodworking.
Essential Materials
To get started with your Thanksgiving woodworking projects, it’s essential to gather all the necessary materials. Different types of wood can be used depending on the project you have in mind. Hardwoods like oak, maple, and cherry are popular choices due to their durability and natural beauty. Softwoods like pine can also be used for simpler decorations or smaller projects.
In addition to wood, you’ll need paints and brushes if you plan on adding color to your creations. Acrylic paints work well on wooden surfaces and offer a wide range of colors to choose from. Make sure you have a variety of paintbrushes in different sizes for different painting techniques.
Required Tools
Having the right tools is vital for smooth woodworking processes during your Thanksgiving projects. A few essential tools that every woodworker should have include:
- Saws: A good quality handsaw or circular saw will help you cut through different types of wood accurately.
- Sandpaper: To achieve a smooth finish on your wooden decorations, sandpaper in various grits (coarse to fine) is necessary.
- Drills: Invest in both corded and cordless drills as they come in handy for making holes or attaching hardware.
- Clamps: Clamps are indispensable when gluing pieces together or holding them securely while working.
Best Types of Wood
Choosing the right type of wood is crucial when planning your Thanksgiving woodworking projects. You want something that not only looks great but also lasts for years to come. As mentioned earlier, hardwoods like oak and maple are popular choices due to their durability and beautiful grain patterns. These woods can be stained or left natural for an elegant finish.
If you’re looking for a more rustic feel, reclaimed wood can add character to your Thanksgiving decorations. It’s environmentally friendly and provides a unique charm with its weathered appearance. Softwoods like pine are also great options for simpler projects or if you prefer a lighter color palette.
Safety Equipment
Safety should always be a top priority when working with tools and materials. Woodworking can involve sharp objects and potentially harmful substances, so it’s important to protect yourself. Here are some safety equipment items you should have:
- Goggles: Protect your eyes from flying debris by wearing safety goggles.
- Gloves: A good pair of gloves will provide protection while handling tools and materials.
- Dust Masks: Woodworking often generates dust particles that can be harmful when inhaled, so wearing a dust mask is essential.
Additional Materials
In addition to wood, paint, and basic tools, there are other materials that may be needed depending on the specific Thanksgiving woodworking project you choose. Some additional supplies include:
- Wood Glue: For joining pieces together securely.
- Screws and Nails: These fasteners are necessary for attaching hardware or reinforcing joints.
- Stain or Varnish: If you prefer a natural wood finish, stain or varnish can enhance the beauty of the grain while providing protection.
Paint Options
There are various paint options available. Acrylic paints offer versatility as they can be easily mixed to create custom shades. They dry quickly and provide excellent coverage on wooden surfaces.
For a more traditional look, consider using milk paint or chalk paint which give a distressed or vintage appearance when applied over wood surfaces. Experimenting with different paint techniques like stenciling or distressing can add depth and character to your Thanksgiving woodworking projects.
By gathering the right materials, tools, and safety equipment, you’ll be well-prepared to embark on your Thanksgiving woodworking journey. Remember to choose the best types of wood for durability and aesthetic appeal, and explore various paint options to achieve the desired finishes. With a little creativity and craftsmanship, you’ll create beautiful wooden decorations that will be cherished for years to come.
Note: The word count is 629 words.
Creating a Lifesize Pilgrim Woman Woodcraft
Are you ready to take your woodworking skills to the next level? Imagine having a stunning wooden sculpture that stands tall and proud, showcasing your craftsmanship and adding a touch of historical charm to your Thanksgiving celebrations. Let’s explore how you can bring this impressive project to life!
Scaling Up Your Project for Life-Size Magnificence
One of the first challenges is scaling up your design. You want your sculpture to be large enough to make an impact, but still maintain its lifelike proportions. To achieve this, you’ll need techniques for enlarging patterns or templates.
To start, gather your existing pattern or template and determine the desired size for your wooden masterpiece. Consider where you plan to display the finished sculpture and ensure it fits harmoniously within its surroundings. Once you have the dimensions in mind, use a grid system or proportional scaling method to transfer the pattern onto larger sheets of paper.
Choosing Appropriate Wood Sizes and Thicknesses
Working on a larger-scale project means selecting appropriate wood sizes and thicknesses becomes crucial. The type of wood you choose will depend on personal preference and availability, but keep in mind that certain woods may be more suitable for structural integrity when working with larger pieces.
Consider using hardwoods such as oak or maple that offer durability while maintaining an elegant finish. Opt for thicker boards that can withstand the weight and stress of a life-size figure. This ensures longevity while providing stability throughout the construction process.
Securely Joining Multiple Pieces Together
Building a sturdy life-size figure requires secure joinery techniques when working with multiple pieces of wood. Depending on your design, you may need methods such as mortise and tenon joints or dowels combined with wood glue. These techniques not only provide strength but also help maintain the overall aesthetic of your sculpture.
Take your time during the assembly process, ensuring each joint is snug and secure. This will prevent any wobbling or instability once your Pilgrim woman woodcraft is complete. Remember, a strong foundation is essential for a lasting masterpiece.
Adjusting Proportions and Details for Lifelike Appearance
As you embark on creating a life-size Pilgrim woman woodcraft, it’s important to pay attention to proportions and details while preserving the lifelike appearance of your sculpture. Adjustments may be necessary to ensure that every aspect remains faithful to the historical accuracy of a Pilgrim woman.
Step back frequently during the carving process to evaluate the overall look and make any necessary modifications. Pay close attention to facial features, clothing folds, and accessories such as bonnets or aprons. By meticulously refining these elements, you’ll achieve an authentic representation that captures the spirit of Thanksgiving’s rich history.
Step-by-Step Assembly Instructions
Now that you have prepared all the components of your lifesize Pilgrim woman woodcraft, it’s time for the exciting part – assembling them together! Follow these step-by-step instructions to bring your wooden sculpture to life:
- Lay out all the pieces in their respective positions according to your design.
- Begin by joining major sections together, such as attaching limbs to the torso.
- Securely fasten each joint using appropriate joinery techniques discussed earlier.
- Gradually build up layers by adding smaller details like hands or facial features.
- Continuously check for stability throughout the assembly process.
- Once everything is securely connected, perform any final adjustments or refinements needed.
By following these instructions carefully and taking your time with each step, you’ll soon witness your lifesize Pilgrim woman woodcraft taking shape before your eyes!
So there you have it – a comprehensive guide to creating a lifesize Pilgrim woman woodcraft. With the right techniques, attention to detail, and dedication, you’ll be able to craft a stunning wooden sculpture that will become the centerpiece of your Thanksgiving celebrations for years to come. Get ready to impress your family and friends with your woodworking prowess and embrace the joy of bringing history to life through your craftsmanship!
Painting and Decorating Your Woodcraft Project
Unleash your creativity by learning different painting techniques for enhancing your wooden Thanksgiving decorations. With a few simple tools and some paint, you can transform ordinary pieces of wood into stunning works of art that will add warmth and charm to your holiday festivities.
Tips for Achieving Smooth Finishes
Achieving a smooth finish is essential. Start by preparing the surface of the wood, ensuring it is clean and free from any dust or debris. Sanding the wood lightly with fine-grit sandpaper will help create a smooth canvas for your paint.
Next, choose the right type of paint for your project. Acrylic paints are versatile and easy to work with, providing excellent coverage on most surfaces. Apply thin coats of paint using a brush or foam roller, allowing each coat to dry completely before applying the next one. This will help prevent drips or uneven patches.
If you want to add texture to your woodcrafts, consider using techniques such as stippling or sponging. Stippling involves dabbing small dots of paint onto the surface with a stiff brush, creating an interesting textured effect. Sponging, on the other hand, uses a sponge dipped in paint to create unique patterns and designs.
Choosing Color Palettes that Complement Thanksgiving
To evoke the warm and cozy atmosphere associated with Thanksgiving, select color palettes that reflect the season’s spirit. Earthy tones such as deep oranges, rich browns, warm yellows, and rustic reds are perfect choices for this time of year.
Consider creating contrast by incorporating pops of color like vibrant greens or subtle hints of gold or copper. These accents can add depth and visual interest to your woodcraft projects while still maintaining a cohesive theme.
Don’t be afraid to experiment with different shades within your chosen color palette. Lighter hues can create an airy and welcoming feel, while darker shades add a touch of elegance and sophistication.
Adding Decorative Elements to Personalize Your Woodcrafts
Once you have painted your woodcraft project with a smooth finish and selected the perfect color palette, it’s time to personalize your creations further. There are various decorative elements you can incorporate to make your pieces truly unique.
Stenciling is an excellent way to add intricate designs or patterns to your woodcrafts. You can find ready-made stencils at craft stores or create your own using stencil blanks. Simply secure the stencil onto the surface of the wood and use a brush or sponge to apply paint through the cut-out areas.
Decoupage is another technique that allows you to customize your woodcraft projects. By applying layers of decorative paper or fabric with adhesive, you can create beautiful collages that add depth and texture to the surface. Consider using Thanksgiving-themed images, such as fall leaves or harvest motifs, for an extra festive touch.
To take personalization even further, explore adding embellishments like small wooden accents, beads, or buttons. These details can be glued onto the painted surface using strong craft glue and will give your woodcrafts a charming and whimsical look.
Sealing and Protecting Painted Surfaces
To ensure the longevity of your finished projects, it’s essential to seal and protect the painted surfaces properly. Applying a clear topcoat will help safeguard against scratches, moisture damage, and fading over time.
Choose a water-based polyurethane varnish for indoor projects or an exterior-grade sealer if you plan on displaying your woodcrafts outside. Apply thin coats using a brush or foam roller, following the manufacturer’s instructions for drying times between coats.
Remember that proper ventilation is crucial when working with sealants or varnishes. Always work in a well-ventilated area or consider wearing a mask if necessary.
Highlighting Details Through Shading Techniques
To add depth and dimension to your woodcraft projects, master the art of highlighting details through shading techniques. This method involves using darker shades of paint to create shadows and lighter tones to emphasize highlights.
Start by identifying the areas you want to highlight or shade on your woodcraft piece. Use a small brush and apply thin layers of paint, gradually building up the desired effect.
Display Ideas for Thanksgiving Woodworking Projects
Are you a woodworking enthusiast looking to showcase your craftsmanship during the Thanksgiving season? Look no further!
Mantel Decorations: A Focal Point for Your Woodcrafts
One of the most popular spots to display your Thanksgiving woodworking projects is the mantel. The mantelpiece provides an ideal focal point that allows you to exhibit your woodcrafts prominently. Start by arranging a collection of wooden figurines, such as turkeys or pumpkins, in varying sizes along the mantel. Consider adding height by incorporating candle holders made from reclaimed wood or carved branches. This will not only add visual interest but also create a cozy ambiance when lit during evening gatherings.
To enhance the rustic charm, intersperse your wooden pieces with natural elements like foliage, pinecones, or seasonal flowers. Incorporating autumnal colors such as deep reds and oranges will complement both the woodwork and the overall Thanksgiving theme. Don’t be afraid to experiment with different arrangements until you find one that suits your style and captures attention.
Table Centerpieces: Showcasing Craftsmanship at Mealtime
Table centerpieces offer another fantastic opportunity. Create a stunning centerpiece using a wooden tray adorned with handcrafted details like intricate carvings or personalized engravings. Place small wooden vases filled with fall blooms in varying heights on top of the tray for an eye-catching arrangement.
For added charm, consider incorporating lighting elements into your centerpiece display. Strategically place tea lights or small LED candles within hollowed-out logs or carved wooden holders along with seasonal foliage and berries. The soft glow emitted by these lights will bring warmth and coziness to your dining experience while highlighting the beauty of your handmade wooden pieces.
Wall Hangings: Transforming Empty Spaces
Empty walls can be transformed into captivating displays for your Thanksgiving woodworking projects. Start by selecting a prominent wall in your home, such as the one behind the dining table or in the living room. Hang a large wooden sign with a heartfelt Thanksgiving message or a beautifully carved turkey to set the tone for the festive season.
To create an engaging display, group smaller woodcrafts together on the wall. Arrange them in a visually appealing pattern, such as a cluster of leaves or an arrangement resembling fall branches. This will add depth and dimension to your display while showcasing your woodworking skills. Consider incorporating natural elements like dried wheat stalks or burlap ribbons to enhance the rustic charm.
Creating Cohesion: Color Schemes and Themes
To ensure that your Thanksgiving woodworking displays are cohesive and visually pleasing, it’s essential to consider color schemes and themes. Choose colors that complement each other and evoke feelings of warmth and gratitude. Earthy tones like deep browns, rich oranges, and warm yellows work well with wooden accents.
Consider incorporating a theme that resonates with both Thanksgiving and your personal style. For example, you could opt for a farmhouse-inspired theme by using distressed wood finishes or vintage-style lettering on signs. Alternatively, embrace a more contemporary approach by combining sleek wooden designs with metallic accents.
By carefully selecting colors and themes that harmonize with your woodworking projects, you can create stunning displays that seamlessly blend into your overall Thanksgiving decor.
Expert Tips for Successful Thanksgiving Woodworking
Selecting the Right Projects for Your Skill Level and Time Constraints
Woodworking during Thanksgiving can be a fulfilling and enjoyable experience, but it’s important to choose projects that align with your skill level and the time you have available. Seasoned woodworkers advise beginners to start with simple projects such as cutting boards or wooden utensils. These projects require minimal tools and are great for practicing basic techniques like sanding and finishing.
For those with intermediate skills, constructing a small piece of furniture like a side table or a bookshelf can be an exciting challenge. This allows you to hone your joinery skills while creating a functional item for your home. If you’re an experienced woodworker, consider taking on more complex projects like building cabinets or even custom dining tables.
Remember, it’s crucial to assess the time you have before diving into a woodworking project. Be realistic about how much time you can dedicate to each step of the process, from planning and gathering materials to cutting, shaping, and assembling. Rushing through a project due to time constraints may lead to mistakes or unsatisfactory results.
Avoiding Common Mistakes Made by Beginners
As with any craft, woodworking has its own set of pitfalls that beginners often encounter. One common mistake is not properly preparing the wood before starting the project. It’s essential to ensure that the lumber is dry and acclimated to your workshop environment, as working with wet or warped wood can result in frustrating setbacks.
Another mistake beginners make is neglecting proper safety precautions. Always wear appropriate protective gear such as safety glasses and ear protection when operating power tools. Take the time to familiarize yourself with each tool’s instructions and usage guidelines before getting started.
Precision is key in woodworking, so measuring accurately is vital for successful outcomes. Beginners should invest in quality measuring tools such as tape measures and combination squares to ensure precise cuts and joints.
Organizing Your Workspace for Efficiency
A well-organized workspace can significantly enhance your woodworking experience. Start by decluttering and creating designated areas for different tools and materials. Consider installing wall-mounted storage systems or using pegboards to keep frequently used tools within easy reach.
Having a clear workbench is crucial for efficient woodworking. Keep it clutter-free by using tool organizers, keeping only the necessary tools out, and returning them to their designated spots after use. This will save you time searching for tools and prevent accidents caused by cluttered surfaces.
Another tip from seasoned woodworkers is to create a layout plan before starting a project. Lay out all the materials, tools, and plans in an organized manner, ensuring everything is easily accessible during the crafting process. This way, you won’t waste time searching for misplaced items or interrupting your workflow.
Troubleshooting Common Woodworking Issues
Woodworking projects don’t always go as planned, but knowing how to troubleshoot common issues can save you from frustration. One problem that may arise is wood splitting or warping during the drying process. To minimize this risk, seal the ends of freshly cut boards with wax or paint to slow down moisture loss. Store lumber in a dry environment with proper air circulation.
If you encounter gaps between joints or uneven surfaces in your project, consider using wood fillers or sanding techniques to achieve a smooth finish. Sanding blocks and sandpaper of varying grits are essential tools for achieving desired results.
In case mistakes happen during cutting or shaping pieces of wood, it’s helpful to have extra material on hand for replacements. Keeping spare lumber ensures that minor errors won’t derail your progress.
Finding Reliable Sources for Project Plans and Learning Resources
When embarking on Thanksgiving woodworking projects, having access to reliable project plans and learning resources is invaluable. Seasoned woodworkers recommend exploring reputable sources such as woodworking magazines, online forums dedicated to woodworking, and websites of renowned woodworking experts.
Woodworking magazines often feature detailed project plans with step-by-step instructions and illustrations. They also provide valuable tips and techniques for various skill levels. Online forums allow you to connect with fellow woodworkers who can offer advice, share their experiences, and recommend helpful resources.
Exploring Different Styles of Thanksgiving Woodcrafts
Woodworking enthusiasts and craft lovers alike can find endless inspiration in the world of Thanksgiving woodcrafts. From rustic designs that evoke a cozy farmhouse feel to more contemporary styles that suit modern interiors, there is something for everyone to enjoy. Let’s delve into the various styles of wooden crafts inspired by Thanksgiving traditions and aesthetics.
Incorporating traditional motifs can add a touch of charm and nostalgia to your projects. Think turkeys, cornucopias, pumpkins, or autumn leaves. These timeless symbols are perfect for adorning your home with warm and inviting decorations. Whether you’re making a centerpiece for your dining table or festive pieces to display around the house, these motifs bring the essence of Thanksgiving into your woodworking creations.
To take your woodworking skills up a notch, consider exploring different carving techniques when designing your Thanksgiving-themed projects. Relief carving allows you to create three-dimensional designs by carving away layers of wood to reveal intricate patterns and textures. This technique is perfect for adding depth and dimension to your wooden decorations.
Another technique worth exploring is chip carving. By removing small chips of wood from the surface, you can create beautiful geometric patterns or intricate designs on flat surfaces such as boxes or signs. Chip carving offers a unique way to add detail and personality to your Thanksgiving woodcrafts.
If you’re looking for something truly captivating and detailed, consider trying out intarsia or scroll sawing techniques. Intarsia involves fitting together different pieces of wood like a puzzle to create stunning images with varying colors and textures. This method allows you to incorporate multiple types of wood into one piece, resulting in eye-catching contrasts.
On the other hand, scroll sawing allows you to cut intricate shapes and patterns using a thin blade mounted on a reciprocating arm. This technique is ideal for creating delicate ornaments or decorative elements that will impress anyone who lays eyes on your woodworking skills.
It’s also fascinating to explore regional influences that can inspire distinct styles of woodworking related to Thanksgiving celebrations. Different parts of the world have their own unique traditions and aesthetics, which can be reflected in woodcrafts. For example, in New England, you might find wooden decorations inspired by colonial architecture and early American history. In the Midwest, rustic designs with a focus on natural materials and textures are prevalent. By embracing these regional influences, you can infuse your Thanksgiving woodcrafts with a touch of local flavor.
Unique Ideas for Thanksgiving Wood Decorations
If you’re tired of the same old Thanksgiving decorations and want to add a touch of uniqueness to your holiday ambiance, why not try some out-of-the-box ideas for wooden decor? Step away from the traditional motifs associated with Thanksgiving and let your creativity soar.
Unleash Your Creativity with Unconventional Designs
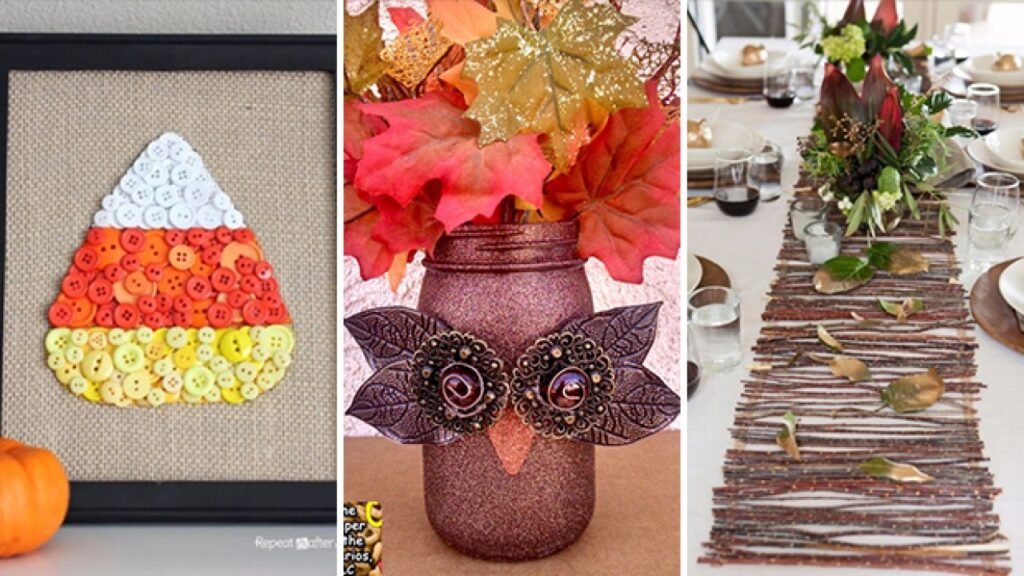
Think beyond the usual pumpkins and turkeys. Consider incorporating geometric shapes or abstract patterns into your wooden decorations. These modern designs can bring a contemporary twist to your holiday setup. For example, you could create a wooden centerpiece in the shape of a hexagon or experiment with intricate laser-cut patterns on coasters or wall hangings.
Another unique idea is to combine different materials with wood. Mix metal accents or glass elements into your creations for an unexpected touch. For instance, you could make a beautiful wooden serving tray with metal handles or design a stunning wall art piece using reclaimed wood and stained glass.
Nature-Inspired Themes for Woodcrafts
Nature provides abundant inspiration for Thanksgiving decor. Instead of solely focusing on traditional symbols like pumpkins, explore woodland creatures, acorns, or tree branches as design elements. Carve adorable woodland animal figurines out of wood or paint acorns in vibrant colors to use as table scatter.
You can also incorporate natural textures into your woodworking projects by using driftwood or branches as raw materials. Create rustic candle holders by attaching small branches together or fashion an eye-catching wreath adorned with colorful autumn leaves and pinecones.
Sustainable Touch: Repurposing Salvaged Wood
Thanksgiving is all about gratitude and giving thanks for what we have. So why not extend that sentiment to the materials we use in our decorations? Consider repurposing salvaged wood or incorporating reclaimed materials into your Thanksgiving projects. This not only adds a unique and rustic charm but also promotes sustainability.
You could transform an old wooden ladder into a decorative display for mini pumpkins and gourds, or repurpose weathered barn boards to create a beautiful backdrop for your Thanksgiving feast. Embrace the imperfections and history of reclaimed wood, as they add character and warmth to your decor.
Functional Elements in Wooden Decor
While aesthetics are important, adding functional elements to your wooden decorations can make them even more practical and versatile. Think about how you can incorporate serving trays, utensil holders, or napkin rings into your designs.
For example, you could carve a wooden serving platter with intricate patterns that double as a statement piece on your dining table. Craft utensil holders from small logs or branches to keep cutlery organized while adding an organic touch to your table setting. These functional elements not only enhance the visual appeal of your decor but also serve a purpose during the festivities.
Personalize Your Woodcrafts
Add a personal touch to your Thanksgiving woodcrafts by incorporating custom engravings, monograms, or family names. Personalization allows you to create meaningful pieces that reflect your own style and evoke cherished memories.
Consider engraving each family member’s name onto wooden place cards or carving initials onto decorative pumpkins. You could also create customized signs with heartfelt messages of gratitude or paint family members’ names on wooden ornaments for a personalized touch on your holiday tree.
Making Thanksgiving Centerpieces with Wood
Looking to add a touch of rustic charm to your Thanksgiving table? Why not create eye-catching centerpieces using woodworking techniques? With a few simple steps, you can craft beautiful wooden centerpieces that will impress your guests and complement the festive atmosphere.
Eye-catching Wooden Centerpiece Designs
The possibilities are endless. Wooden centerpieces offer versatility and can accommodate various decorative elements such as candles or floral arrangements. Consider these design ideas:
- Rustic Candle Holder: Create a charming candle holder by carving out hollows in a thick log or repurposing old tree branches. Add taper candles of different heights for an elegant touch.
- Floral Planter Box: Construct a rectangular planter box using reclaimed wood or pallets. Fill it with an assortment of fall flowers, foliage, and berries for a vibrant centerpiece that brings the outdoors in.
- Wood Slice Arrangement: Arrange different-sized wood slices in the center of your table and place small vases with fresh flowers on top. This simple yet stunning design adds natural warmth to your Thanksgiving spread.
- Pumpkin Display Stand: Carve out the top of a large pumpkin and insert a wooden dowel into it securely. Attach mini pumpkins or gourds onto the dowel at varying heights for an adorable pumpkin display stand.
Remember to let your creativity flow when designing your wooden centerpiece. Mix and match these ideas or come up with unique designs that reflect your personal style.
Selecting Sizes and Heights
While creating visually appealing centerpieces is important, it’s equally crucial to ensure they don’t obstruct your guests’ views across the table. Follow these tips to strike the right balance:
- Consider Table Size: Take into account the dimensions of your dining table. Centerpieces that are too large can overwhelm the space, while those that are too small may go unnoticed. Aim for a centerpiece that is proportionate to the table size.
- Height Matters: Opt for centerpieces that are low enough not to hinder conversation or block eye contact between guests seated opposite each other. A good rule of thumb is to keep the height below 12 inches.
- Create Levels: If you prefer taller centerpieces, consider adding varying levels using wooden risers or stacked books underneath. This way, you can maintain an interesting visual display without sacrificing functionality.
By carefully selecting sizes and heights, you can ensure your wooden centerpiece enhances rather than hinders the overall dining experience.
Incorporating Seasonal Colors and Textures
Thanksgiving is all about celebrating the beauty of autumn, so it’s essential to incorporate seasonal colors and textures into your wooden centerpieces. Here are some ideas to infuse warmth and vibrancy:
- Fall Foliage Accents: Integrate colorful leaves, branches, or acorns into your centerpiece design for an instant autumnal touch. These natural elements add texture and bring a sense of outdoor charm to your table.
- Harvest-inspired Hues: Embrace warm tones like deep oranges, rich browns, and golden yellows in your choice of wood stains or paint finishes for a cozy ambiance reminiscent of fall harvest.
- Textured Wood Finishes: Experiment with distressed or weathered wood finishes to add depth and character to your centerpiece creations. Sanding techniques can create interesting patterns and enhance rustic appeal.
Remember, incorporating seasonal colors and textures allows your wooden centerpieces to harmonize with the rest of your Thanksgiving table decor while capturing the essence of this festive season.
Joinery Methods and Construction Techniques
To ensure your wooden centerpieces are stable and durable, it’s important to use appropriate joinery methods and construction techniques.
Final Thoughts on Thanksgiving Woodworking
Congratulations! You’ve reached the end of our blog post on Thanksgiving woodworking projects. By now, you should have a good understanding of how to create beautiful woodcrafts for this special holiday. Whether you’re a seasoned woodworker or just starting out, there are plenty of easy and accessible projects that will add a touch of warmth and creativity to your Thanksgiving celebrations.
Now that you have all the knowledge and inspiration, it’s time to roll up your sleeves and get started! Gather your materials, follow the step-by-step instructions, and let your imagination run wild as you paint and decorate your woodcraft project. Remember, woodworking is not only about creating something tangible but also about enjoying the process itself. So go ahead, embrace your inner craftsman or craftswoman, and make this Thanksgiving truly memorable with your handmade decorations.
FAQs
Can I use reclaimed wood for my Thanksgiving woodworking projects?
Absolutely! Using reclaimed wood adds a rustic charm to your creations while also being environmentally friendly. Just make sure the wood is clean, free from any harmful substances, and properly treated before using it in your projects.
How do I protect my finished woodcrafts from damage?
To protect your finished woodcrafts from damage, consider applying a clear coat or sealant. This will help preserve the natural beauty of the wood while providing a layer of protection against moisture and wear.
Are there any safety precautions I should take while woodworking?
Safety should always be a top priority when working with tools and machinery. Make sure to wear protective gear such as safety glasses and gloves, use tools correctly, work in a well-ventilated area, and keep sharp objects away from children or pets.
Can I customize my woodcrafts for different holidays?
Absolutely! Woodworking allows for endless customization options. You can adapt designs to fit different holidays by changing colors, adding seasonal decorations, or incorporating holiday-themed motifs. Let your creativity shine!
Where can I find woodworking classes or communities to learn more?
If you’re looking to expand your woodworking skills or connect with fellow enthusiasts, consider joining local woodworking classes or online communities. These platforms provide valuable resources, tips, and a supportive network of like-minded individuals who share your passion for woodworking.
