
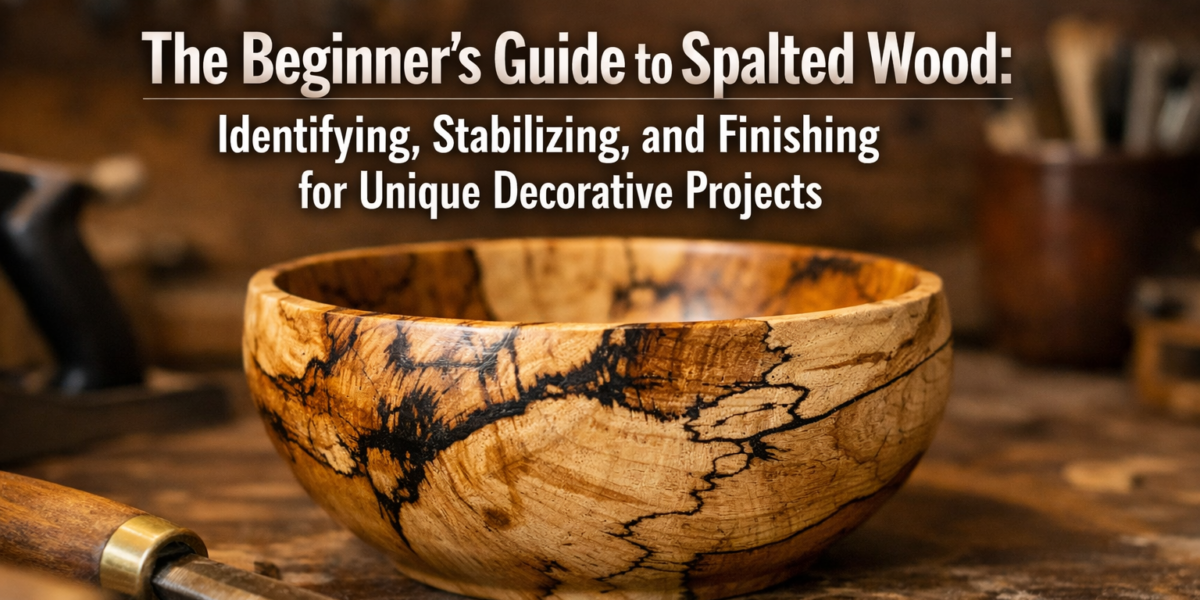

Spalted wood, often considered a defect by the uninitiated, is a treasure trove of unique, intricate patterns, revered by woodworkers and artisans worldwide. A staggering 60-70% of woodworkers, when introduced to spalted timber, express immediate fascination with its aesthetic potential for decorative projects. This striking material, characterized by its distinctive lines, streaks, and colors, is the result of fungal colonization within the wood itself. For those looking to incorporate this natural artistry into their creations, a solid understanding is paramount. This comprehensive resource, “The Beginner’s Guide to Spalted Wood: Identifying, Stabilizing, and Finishing for Unique Decorative Projects,” provides the foundational knowledge necessary to safely and successfully work with this captivating medium in 2026.
Key Takeaways
- Spalting is caused by fungi creating unique patterns in wood, manifesting as zone lines, coloration, and white rot.
- Proper identification involves recognizing these patterns and assessing the wood’s structural integrity, as some spalting stages can weaken timber.
- Stabilization, often using epoxies or resins, is crucial for strengthening punky or soft spalted wood, making it workable and durable.
- Careful drying is essential; spalted wood should be air-dried slowly to prevent cracking and further decay while preserving its unique patterns.
- Finishing techniques enhance spalted wood’s beauty and provide protection, ranging from oils to lacquers, depending on the desired look and project use.
Identifying Spalted Wood: Unveiling Nature’s Artistry
The allure of spalted wood lies in its unpredictable and often breathtaking patterns, which are entirely natural phenomena. These patterns are the visual signatures of various fungi that have begun the decomposition process in timber. Understanding these manifestations is the first step in working with spalted wood.

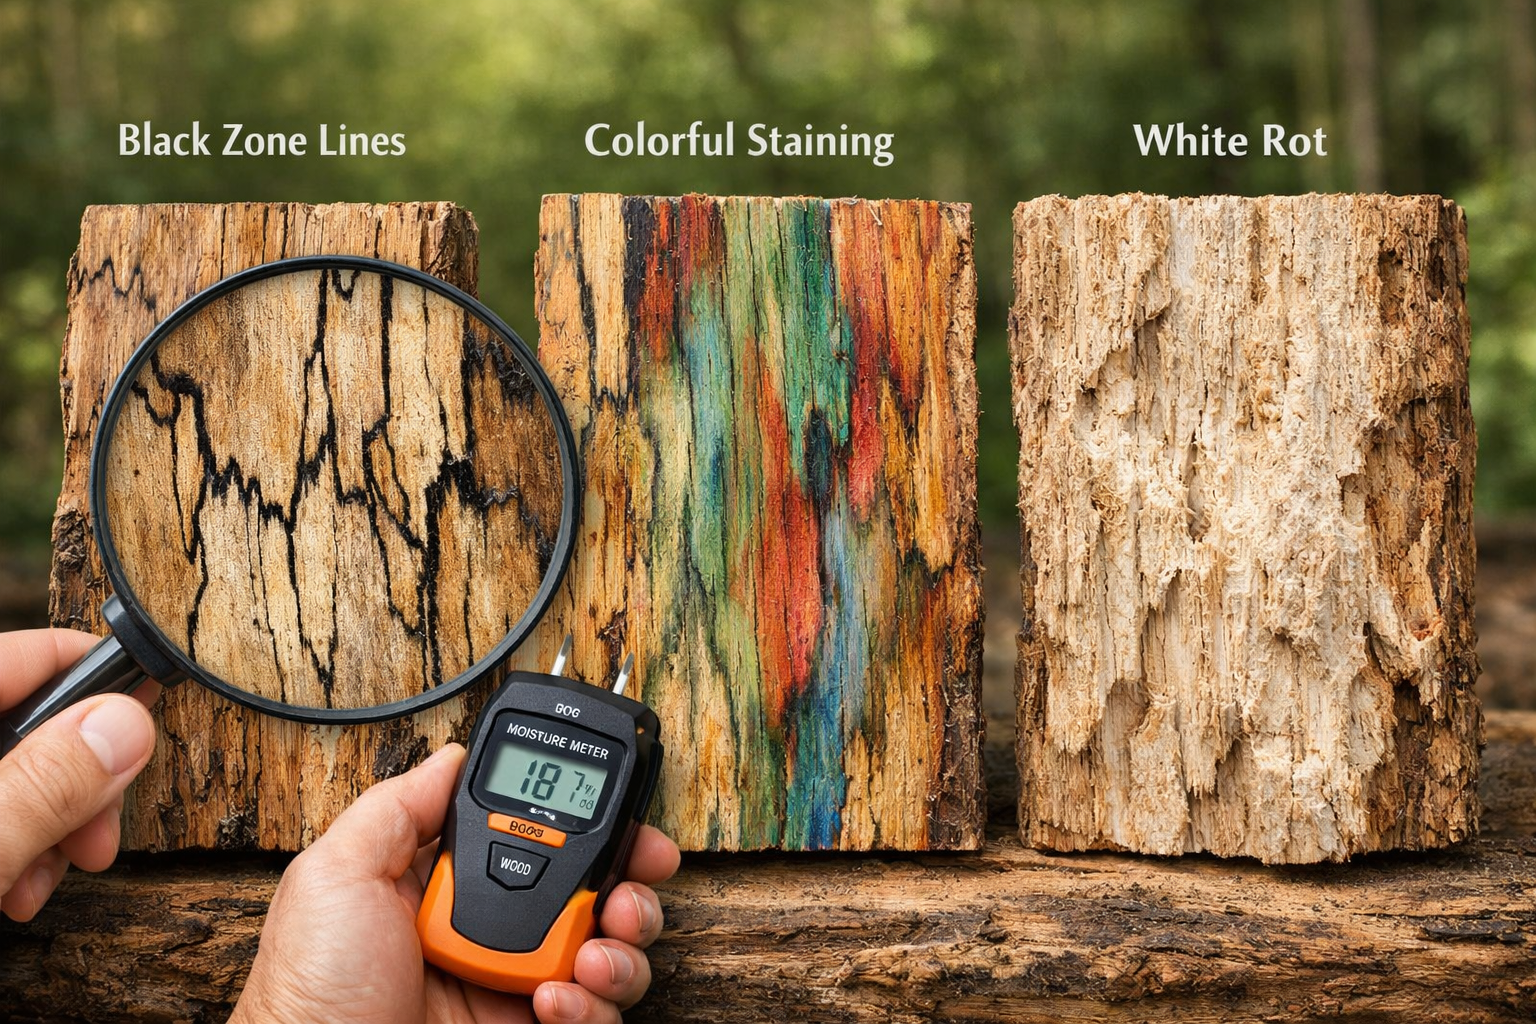
The Three Faces of Spalting
Spalting typically presents in three primary forms, each contributing to the wood’s unique character:
- Zone Lines: These are the most iconic feature of spalted wood. They appear as thin, dark lines, often black, but can also be brown or purple. They are essentially demarcation lines where different fungal colonies have met and established territorial boundaries, or where the fungus reacts to changes in its environment. Think of them as natural wood graffiti, each line telling a story of fungal interaction.
- Coloration: Beyond lines, fungi can also impart stunning colors to the wood. Blues, greens, reds, and yellows can permeate the wood grain, creating a vibrant palette. This coloration is often due to pigments produced by the fungi themselves, or the wood’s reaction to the fungal presence. Maple, birch, and pecan are common species that exhibit beautiful color spalting.
- White Rot: This form of spalting occurs when fungi primarily consume lignin, the component that gives wood its rigidity and dark color. The result is a lighter, often bleached appearance, and a softer, more porous texture. While white rot can create interesting visual effects, it’s crucial to assess the wood’s structural integrity, as advanced white rot can leave the wood very punky and fragile.
Where to Find Spalted Wood
Spalting occurs in timber that has been exposed to moisture and warmth for an extended period, creating ideal conditions for fungal growth. Common sources include:
- Fallen trees: Logs left on the forest floor, especially hardwoods, are prime candidates.
- Discarded lumber: Piles of wood left outdoors, particularly in damp conditions.
- Yard waste: Branches or logs from storm damage.
While many types of wood can spalt, hardwoods like maple, birch, pecan, and beech are particularly known for producing striking patterns. Softwoods can spalt, but the effects are often less dramatic and the wood becomes significantly weaker. When sourcing, always prioritize safety and sustainable practices, perhaps by contacting local arborists or sawmills for their discarded wood. For those interested in sourcing wood responsibly, consider our guide on Sustainable Wood Sourcing for the Modern Woodworker: Beyond Reclaimed.
Assessing the Stage of Spalting
Not all spalted wood is ready for a project. The key is to find wood that has been spalted enough for beautiful patterns but not so much that it’s structurally unsound.
- Early Stage: Minimal patterns, wood is still hard and dense.
- Mid-Stage: Distinct patterns, some areas might feel slightly softer. This is often the ideal stage.
- Advanced Stage: Extensive patterns, but large areas of white rot, making the wood noticeably soft and punky. This wood will require significant stabilization.
When examining spalted wood, look for a balance between visual appeal and structural integrity. Use a sharp probe to test softer areas. If the probe sinks in easily, the wood is likely too soft for direct use and will require stabilization.
Stabilizing Spalted Wood: From Fragile to Functional
Once you’ve identified a piece of spalted wood with promising patterns, the next critical step is often stabilization. Due to the fungal activity, spalted wood can be softer and more brittle than unspalted wood, making it challenging to work with, especially for projects requiring structural integrity or fine detail like Ultimate Guide to Wood Lathe Turning: Pens, Bowls, and Advan. Stabilization strengthens these weaker areas, allowing you to turn, carve, or shape the wood without it crumbling.
The Importance of Drying
Before any stabilization can occur, the wood must be properly dried. Excessive moisture will prevent stabilizing agents from penetrating effectively and can lead to future issues like cracking or further decay. Air drying is the preferred method for spalted wood, as it’s a slower, gentler process.
- Preparation: Cut the spalted wood into workable blanks, removing any bark or heavily decayed sections.
- Sealing End Grain: Apply a wax emulsion or latex paint to the end grain to slow down moisture loss from these areas, preventing rapid drying and subsequent cracking.
- Stacking: Stack the blanks with stickers (small strips of wood) between them to allow for good airflow on all sides.
- Environment: Store the wood in a cool, dry, well-ventilated area, away from direct sunlight or heat sources.
- Monitoring: Regularly check the wood’s moisture content with a moisture meter. Aim for 6-8% for most indoor projects. This process can take months, even a year or more, depending on the wood’s thickness and species.
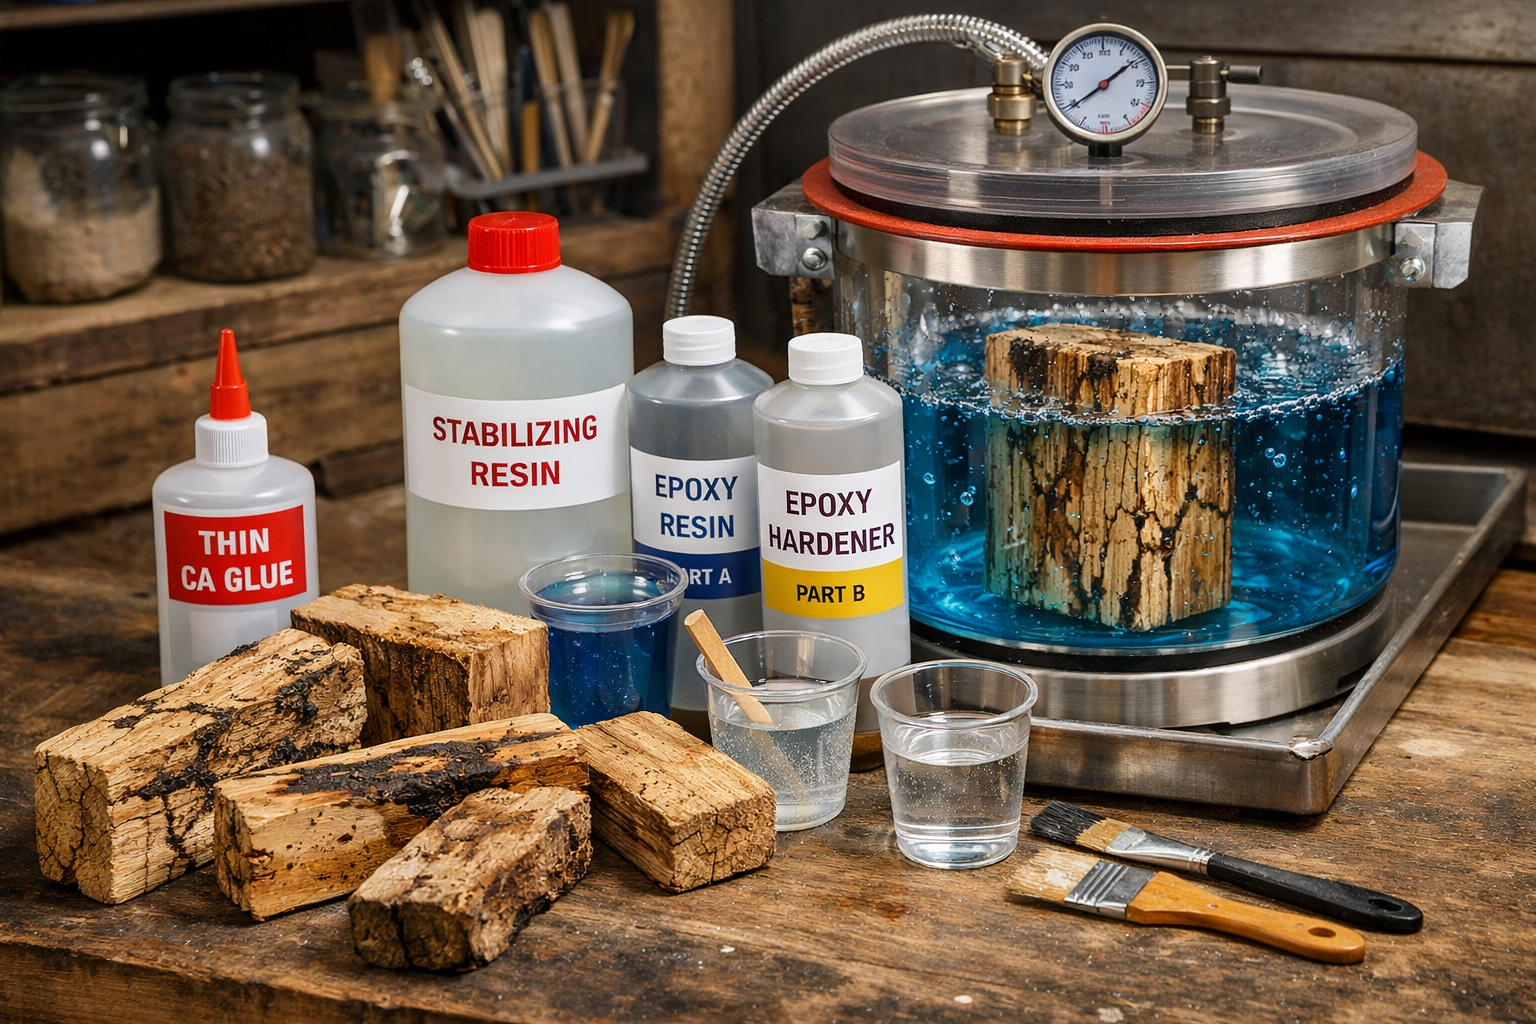
Stabilization Techniques
Once thoroughly dry, spalted wood can be stabilized using various methods, each with its advantages:
1. Thin CA Glue (Cyanoacrylate Adhesive)
- Best for: Small, localized soft spots or for strengthening pen blanks.
- Method: Apply multiple thin coats of CA glue directly to the punky areas. Allow each coat to fully cure before applying the next. The glue soaks into the wood, hardening as it cures. Use an accelerator for faster curing if needed.
- Pros: Quick drying, excellent hardening properties, minimal equipment required.
- Cons: Can be expensive for large areas, fumes require good ventilation. For more on adhesives, see our guide on The Ultimate Guide to Wood Glue: Choosing the Right Adhesive for.
2. Penetrating Epoxy Resins
- Best for: Larger sections of punky wood, filling voids, or strengthening entire blanks for turning.
- Method: Low-viscosity epoxy resins are designed to penetrate deeply into the wood fibers. The wood can be soaked in the epoxy, or the epoxy can be applied in multiple coats. For deeper penetration, a vacuum chamber is highly effective.
- Vacuum Stabilization: Place the dry wood in a vacuum chamber, submerge it in a stabilizing resin (like Cactus Juice or specially formulated wood stabilization epoxy), and pull a vacuum. The vacuum draws air out of the wood, allowing the resin to permeate the cellular structure when the vacuum is released. The wood is then cured (often with heat).
- Pros: Superior strength, fills voids, excellent for large pieces.
- Cons: Requires specialized equipment (vacuum chamber), longer cure times, potentially more costly.
3. Wood Hardener Solutions
- Best for: General strengthening of moderately punky areas.
- Method: These are typically polymer-based solutions that penetrate and harden the wood fibers. They are applied with a brush or by soaking.
- Pros: Easier to use than epoxy, less equipment.
- Cons: May not achieve the same level of hardness as vacuum-applied resins, can affect wood color slightly.
When selecting a stabilization method, consider the degree of spalting, the size of the wood, and the intended use of the finished project. Always work in a well-ventilated area and use appropriate personal protective equipment.
Finishing Spalted Wood: Revealing Its True Beauty
Once your spalted wood is identified, dried, and stabilized, the final step is to finish it. Proper finishing enhances the visual impact of the unique patterns, protects the wood from moisture and wear, and brings out its natural luster. The choice of finish depends on the desired look, the project’s use, and your personal preference.
Sanding Preparation
A flawless finish begins with meticulous sanding. Spalted wood can be tricky to sand due to variations in hardness.
- Start with a Lower Grit: Begin with 80-120 grit sandpaper to remove tool marks and level the surface.
- Gradual Progression: Systematically work through finer grits (150, 180, 220, 320, 400), ensuring all scratches from the previous grit are removed before moving to the next.
- Dust Removal: After each grit, thoroughly clean the surface with compressed air or a tack cloth to remove sanding dust, which can interfere with the finish.
For projects involving turning, such as bowls or pens, sanding is typically done on the lathe, allowing for a smooth, uniform surface. Our Ultimate Guide to Wood Lathe Turning: Pens, Bowls, and Advan provides detailed sanding techniques for turned items.
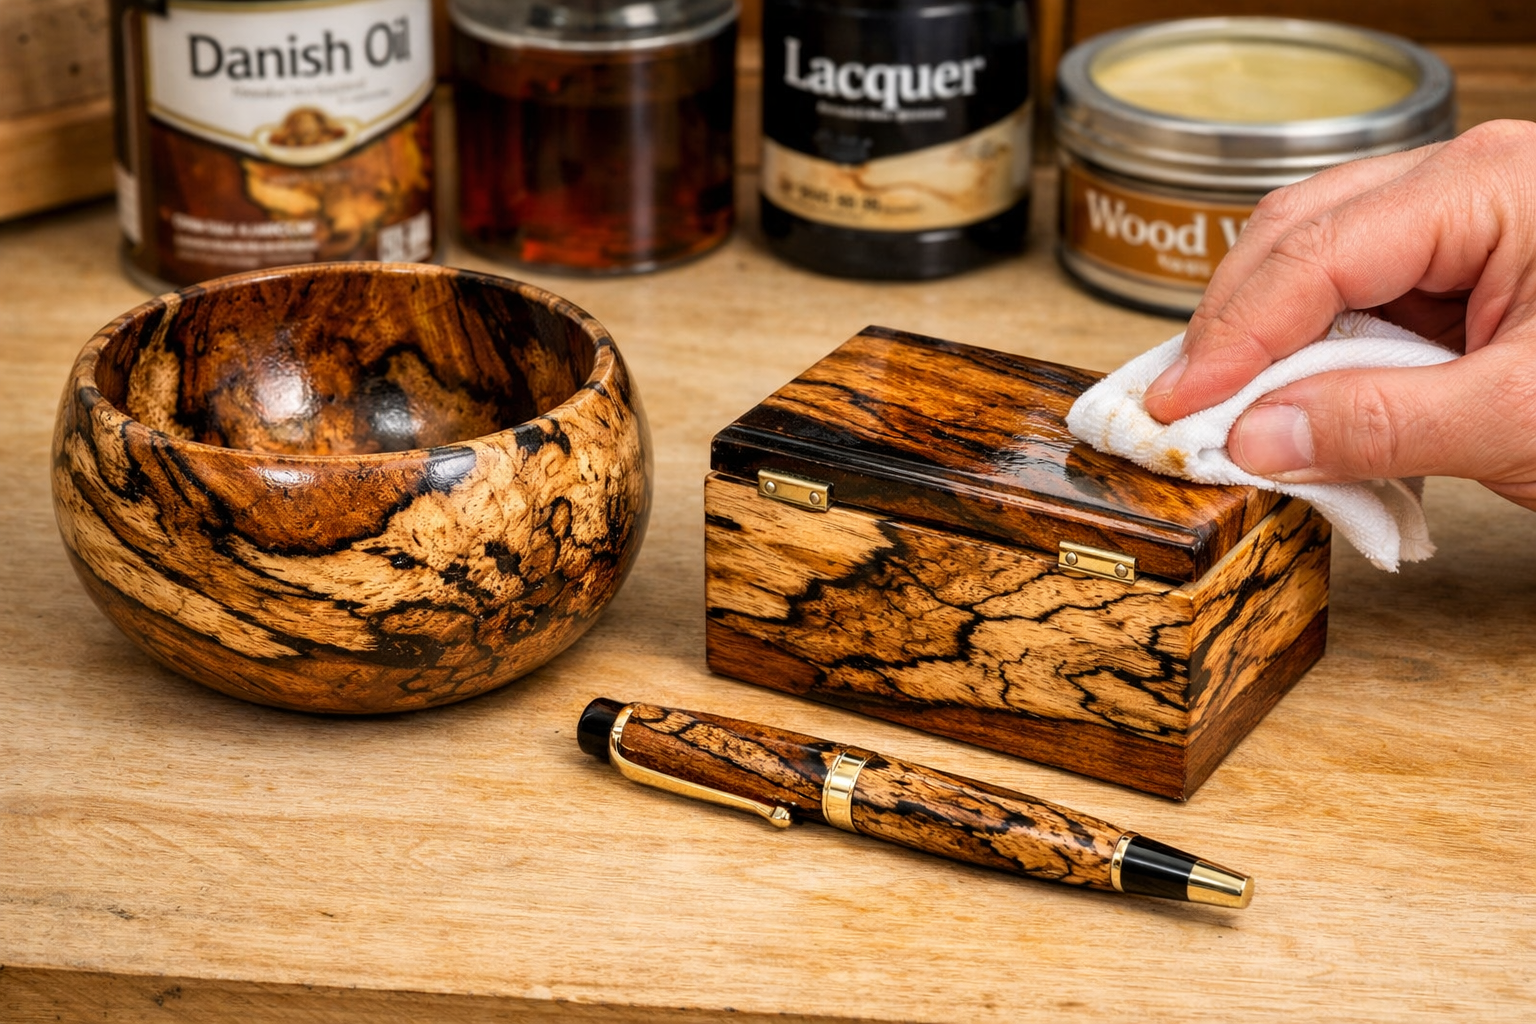
Popular Finishing Options
There are numerous finishes suitable for spalted wood, each offering distinct characteristics:

1. Oils (Tung Oil, Linseed Oil, Danish Oil)
- Characteristics: Penetrating finishes that soak into the wood, enhancing its natural color and grain. They provide a warm, natural look with a soft sheen.
- Application: Apply in thin coats, allowing each to penetrate and wipe off excess before it gets tacky. Multiple coats build depth and protection.
- Pros: Easy to repair, natural feel, highlights chatoyancy (the shimmering effect in certain wood grains).
- Cons: Less durable than film finishes, requires periodic reapplication, longer drying times.
- Ideal for: Bowls, decorative items, pieces where a natural feel is desired. For specific oil finishes like those for oak, check out Oak Wood Finishing Techniques.
2. Lacquer and Shellac
- Characteristics: Film-building finishes that create a durable surface layer. They offer excellent clarity and can achieve high gloss or satin sheens.
- Application: Typically sprayed for best results, but can be brushed. Apply several thin coats.
- Pros: Dries quickly, durable, provides good protection against moisture and scratches.
- Cons: Can be challenging to repair, requires good ventilation, potentially strong fumes.
- Ideal for: Furniture accents, boxes, items needing a hard, protective coat.
3. Varnishes (Polyurethane, Spar Varnish)
- Characteristics: Durable, film-building finishes that offer excellent protection against abrasion, chemicals, and moisture. Polyurethane is popular for its hardness.
- Application: Can be brushed or sprayed. Apply multiple thin coats, sanding lightly between coats for better adhesion.
- Pros: Very durable, long-lasting protection, good clarity.
- Cons: Slower drying than lacquer, can be thick if not applied carefully, challenging to repair seamlessly.
- Ideal for: Tabletops, high-use items, outdoor projects (spar varnish).
4. Waxes (Carnuba Wax, Beeswax)
- Characteristics: Offer a soft, natural luster and a silky feel. Provide minimal protection against moisture and wear but enhance the wood’s beauty. Often used as a top coat over other finishes.
- Application: Apply a thin layer, let it haze, then buff to a shine.
- Pros: Easy to apply, beautiful natural sheen, enhances tactile feel.
- Cons: Low durability, offers little protection.
- Ideal for: Decorative carvings, small gift items.
Best Practices for Finishing Spalted Wood
- Test on Scraps: Always test your chosen finish on a scrap piece of the same spalted wood. This allows you to see how the finish interacts with the unique patterns and colors before applying it to your main project.
- Cleanliness is Key: Ensure the wood surface is absolutely free of dust and debris before applying any finish.
- Thin Coats: Multiple thin coats are always better than one thick coat. Thin coats dry more evenly, build up protection gradually, and reduce the risk of drips or runs.
- Proper Curing: Allow adequate drying and curing time between coats and before putting the finished piece into use. Rushing this step can compromise the finish’s durability.
By carefully selecting and applying the right finish, you can transform a simple piece of spalted wood into a stunning work of art, highlighting its inherent beauty for unique decorative projects in 2026.
Conclusion
Spalted wood, with its captivating patterns and unique character, offers a rewarding challenge for woodworkers seeking to create truly distinctive pieces. This beginner’s guide has illuminated the path from identifying nature’s artistic handiwork to stabilizing its delicate structure and finally, bringing out its full potential with the right finish. The journey from a fungi-colonized log to a stunning decorative project demands patience, attention to detail, and an appreciation for the organic processes that shape this remarkable material.
Embracing spalted wood means embracing imperfection and transforming it into unparalleled beauty. Whether you’re crafting a turned bowl, a unique jewelry box, or intricate carved details, the steps outlined here provide a robust foundation. In 2026, as the demand for unique, handcrafted items continues to grow, mastering spalted wood techniques can set your projects apart. Start experimenting with smaller, less complex pieces to gain confidence. Source your spalted wood responsibly, practice careful drying and stabilization, and explore different finishes to discover what truly highlights the individuality of each piece. The world of spalted wood is rich with artistic possibilities—dare to explore them.
References
- Crawford, D. (2014). Spalting: The Fascinating Science Behind Nature’s Art. Schiffer Publishing.
- Findley, M. & Moore, S. (2007). Working with Spalted Wood: A Guide to the Art and Science of Spalting. Fox Chapel Publishing.
- Schwarze, F. W. M. R. (2007). Wood decay: Its chemistry, biology and applications. Academic Press.
Meta Title: Beginner’s Guide to Spalted Wood: Identify, Stabilize, Finish Meta Description: Unlock the beauty of spalted wood in 2026! Learn to identify, stabilize, and finish unique spalted wood for stunning decorative projects.
