


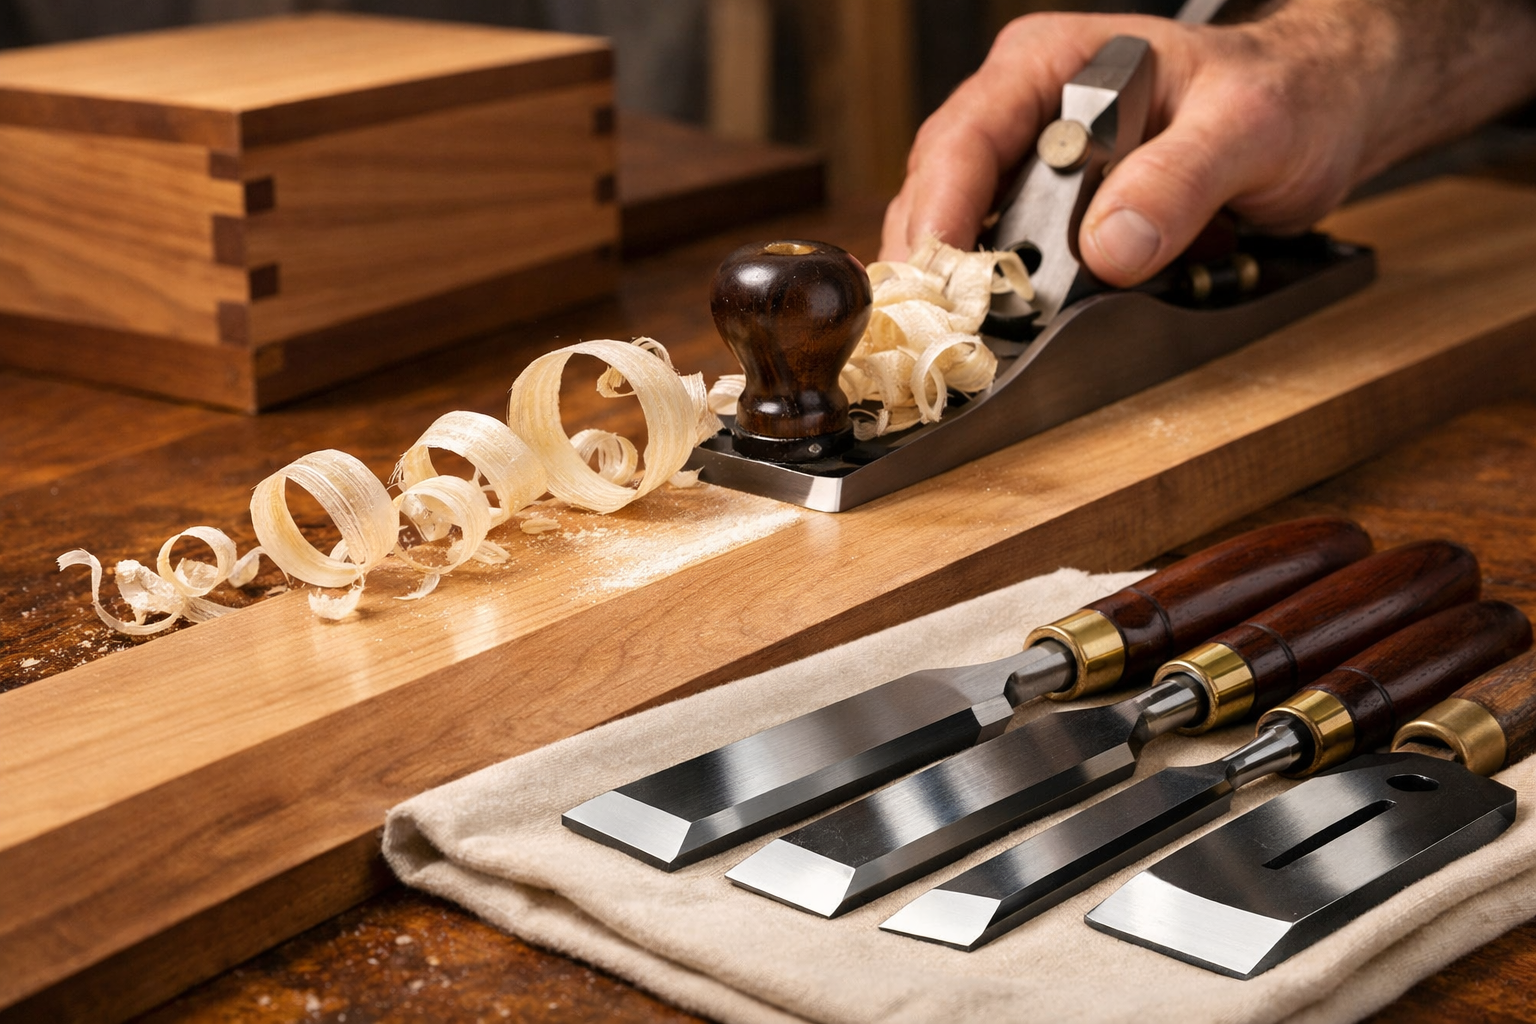
There’s a fundamental truth in woodworking: a dull tool is a dangerous tool, and a sharp tool is a joy to use. Achieving razor-sharp edges on your woodworking chisels and planes isn’t just about making cuts; it’s about precision, safety, and ultimately, the quality of your finished projects. This comprehensive guide, “The Ultimate Guide to Sharpening Woodworking Chisels and Planes: Achieving Razor-Sharp Edges,” will walk you through the essential principles and practical methods, ensuring your hand tools perform at their absolute best in 2026 and beyond.
Imagine slicing through grain with minimal effort, leaving behind a surface so smooth it needs little to no sanding. This isn’t just a dream; it’s the reality you can achieve with properly sharpened tools. Dull edges tear wood fibers, create frustrating chatter, and require excessive force, leading to fatigue and potential accidents. By mastering the art of sharpening, you’ll unlock a new level of control and enjoyment in your craft.

Key Takeaways
- Understanding the Fundamentals: Learn the anatomy of a sharp edge and the importance of consistent bevel angles.
- Essential Sharpening Tools: Discover the must-have abrasives, jigs, and accessories for effective sharpening.
- Mastering the Sharpening Process: Follow step-by-step instructions for flattening backs, grinding bevels, and honing micro-bevels.
- Maintaining Sharpness: Understand how to keep your tools sharp and when to re-sharpen for optimal performance.
- Safety First: Always prioritize safety by using proper techniques and protective gear during sharpening.
Understanding the Fundamentals of Achieving Razor-Sharp Edges
Before diving into the “how-to,” it’s crucial to grasp the core concepts behind a truly sharp edge. An edge isn’t just a point; it’s the intersection of two perfectly flat, highly polished surfaces.
The Anatomy of a Sharp Edge
A woodworking chisel or plane iron has two primary surfaces that meet to form the cutting edge:
- The Bevel: This is the angled face of the blade. For most chisels and plane irons, the primary bevel is typically between 25° and 30°. A consistent angle is paramount for effective cutting.
- The Back: This is the flat, un-beveled side of the blade. For an edge to be truly sharp, the back must be absolutely flat and highly polished, especially near the cutting edge. Any deviation here will prevent the bevel from forming a perfect intersection.
A truly sharp edge will feel like it’s “biting” into your thumbnail without slipping, and it should be able to cleanly slice thin paper. The goal is not just to make the tool sharp, but to make it durable so it stays sharp through use. This involves moving through progressively finer abrasives to refine the edge.
Sharpening Angles for Chisels and Planes
The angle at which you sharpen your tools significantly impacts their performance and durability.
| Tool Type | Primary Bevel Angle | Micro-Bevel/Honing Angle | Notes |
|---|---|---|---|
| Bench Chisels | 25° | 30° | Good balance of sharpness and durability |
| Paring Chisels | 20° | 25° | Finer edge for delicate work, less durable |
| Plane Irons (General) | 25° | 30° | Standard for most general-purpose planing |
| Plane Irons (Smoothing) | 30° | 35° | More durable edge for tear-out resistance |
| Joinery Chisels | 25°-30° | 30°-35° | Depends on wood type and joinery strength |
A “micro-bevel” is a slightly steeper, secondary bevel honed right at the very edge. It offers several advantages:
- Faster Honing: Less metal needs to be removed to refresh a dull edge.
- Increased Durability: A slightly steeper angle at the apex makes the edge stronger.
- Easier Sharpening: It’s simpler to maintain a consistent angle for a small micro-bevel.
For more on selecting the right materials for your projects, see our guide on Premium Wood Selection for 2026 Projects: Walnut, Cherry, an.
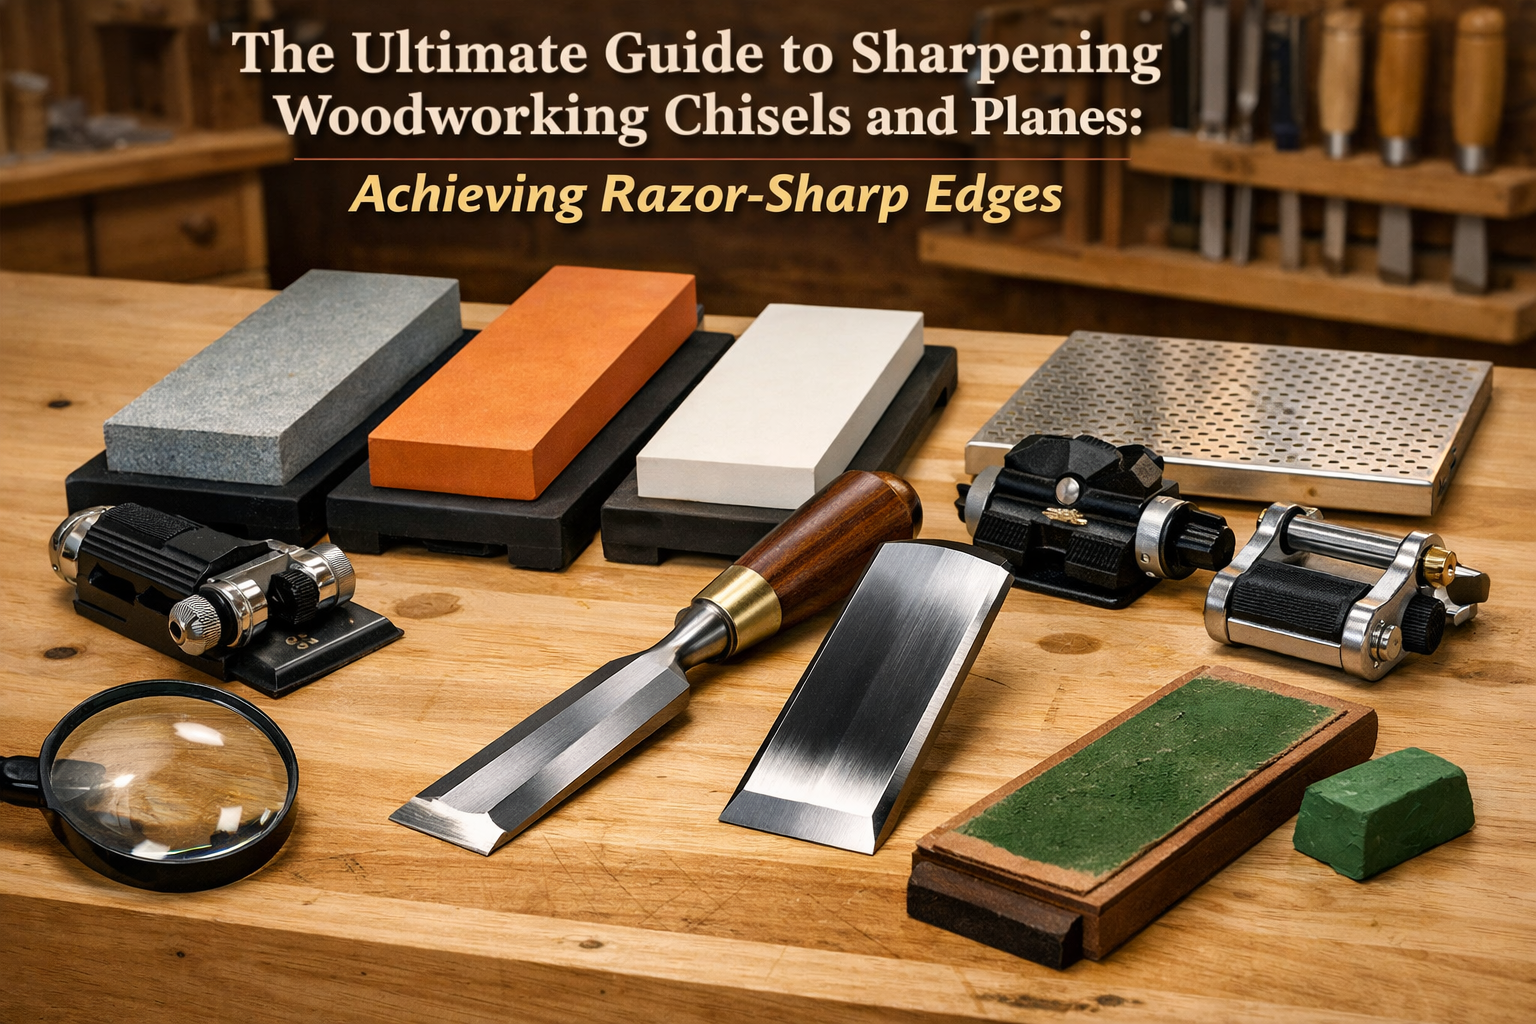
Essential Sharpening Tools and Techniques for Razor-Sharp Edges
A well-equipped sharpening station is key to consistently achieving sharp edges. While there are many options, a basic setup is surprisingly affordable and effective.
Abrasive Choices: Stones, Plates, and Papers
The core of sharpening involves using abrasives to grind and polish the metal.
- Waterstones: These synthetic stones use water as a lubricant and produce a slurry that aids in sharpening. They cut quickly and leave a very fine edge. Common grits range from 1,000 (coarse/medium) to 8,000 (extra-fine).
- Pros: Fast cutting, excellent finish.
- Cons: Require flattening, can wear down.
- Oilstones: Traditional stones that use oil as a lubricant. They are durable but cut slower than waterstones.
- Pros: Very durable, don’t require flattening as often.
- Cons: Slower cutting, oil can be messy.
- Diamond Plates: Steel plates coated with industrial diamonds. They are extremely durable, never lose their flatness, and can sharpen any material.
- Pros: Never need flattening, can flatten waterstones, long-lasting.
- Cons: Can be expensive, can feel “gritty” on finer grits compared to waterstones.
- Sandpaper on a Flat Surface (Scary Sharp Method): A budget-friendly method where various grits of sandpaper are adhered to a perfectly flat surface (like a float glass or granite tile).
- Pros: Inexpensive, easily accessible, produces excellent results.
- Cons: Sandpaper wears out quickly, can be tedious to change grits.
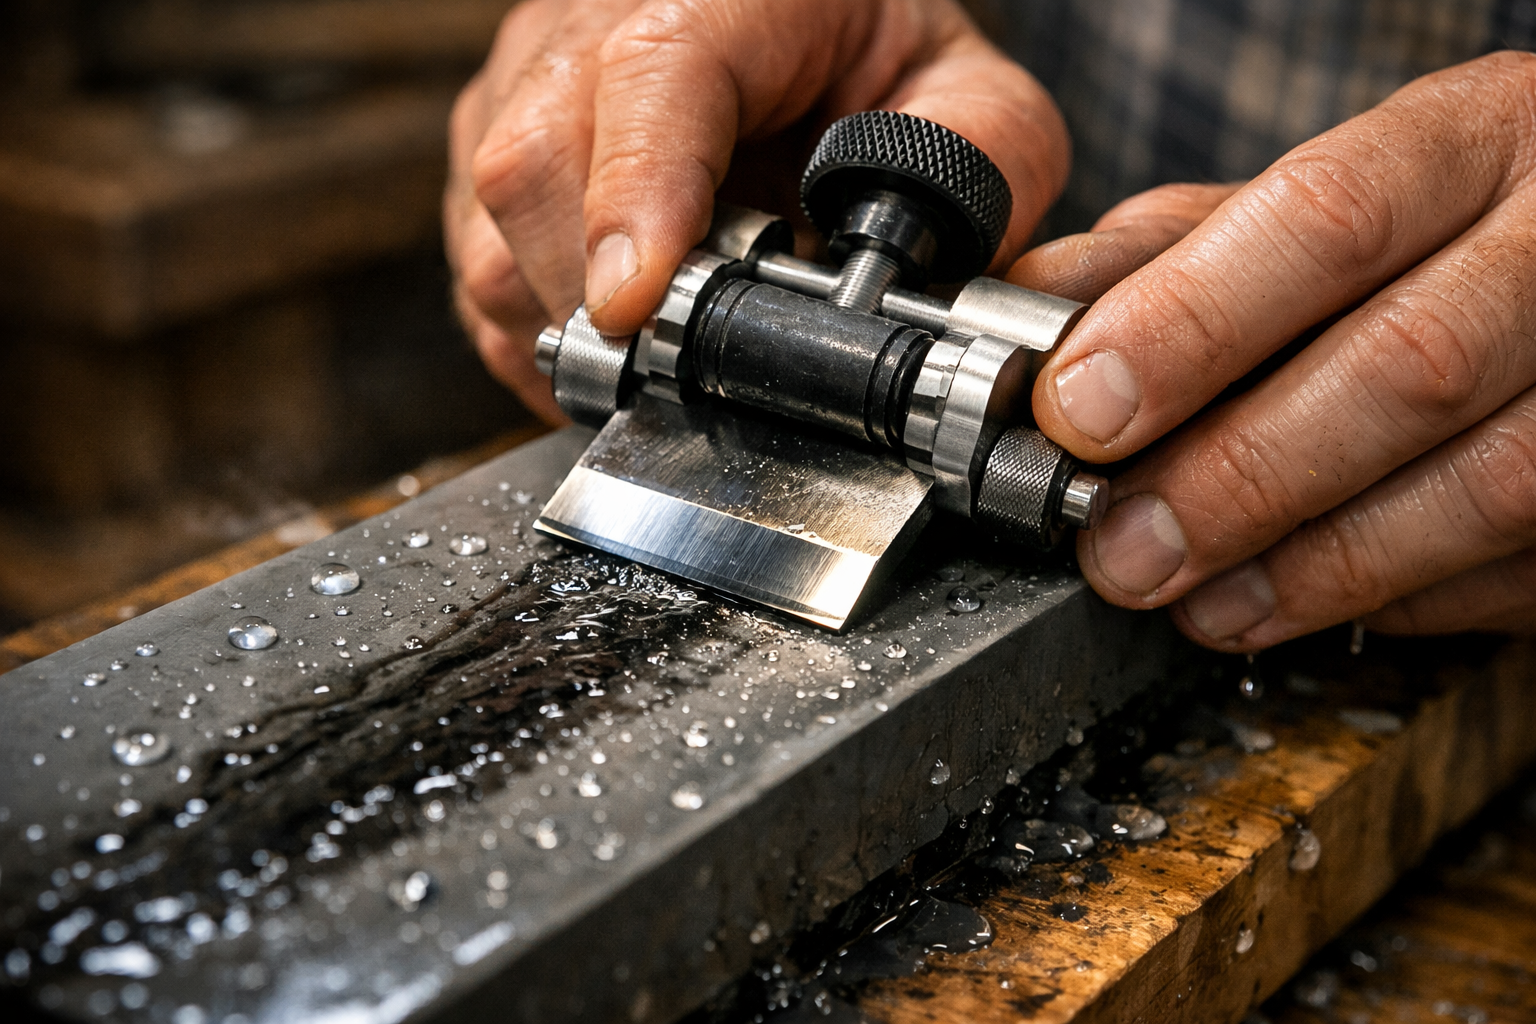
Sharpening Jigs and Guides
While freehand sharpening is possible with practice, jigs provide consistent angles, making the process much easier and more repeatable, especially for beginners.
- Honing Guides (Roller Style): These jigs hold your chisel or plane iron at a set angle and roll across the sharpening surface. They are excellent for maintaining consistent bevels.
- Side-Clamping Guides: These guides clamp the tool from the sides, allowing for precise angle setting.
When working on your sharpening station, consider optimizing your workspace. Our article on The Ultimate Guide to Wooden Work Tables: Choosing, Building, and Maintaining Your Perfect Workspace offers valuable insights for setting up an efficient bench.
Essential Accessories
Beyond the main abrasives, a few accessories are crucial:
- Stone Flattener: For waterstones, a diamond plate or dedicated flattening stone is essential to maintain a truly flat surface.
- Strop and Honing Compound: A leather strop with polishing compound (like chromium oxide) provides the final, ultimate polish, removing any remaining burr and creating a mirror-like edge.
- Marker Pen: Used to color the bevel during sharpening to easily see where the abrasive is contacting the tool.
- Magnifier: A jeweler’s loupe or magnifying glass helps inspect the edge for burrs and sharpness.
- Water Bottle/Spray: For lubricating waterstones.
- Rags/Paper Towels: For cleaning up slurry and tools.
The Sharpening Process: A Step-by-Step Guide to Razor-Sharp Edges
Mastering “The Ultimate Guide to Sharpening Woodworking Chisels and Planes: Achieving Razor-Sharp Edges” involves a systematic approach, typically broken down into three main stages: flattening the back, grinding the primary bevel, and honing the micro-bevel.
Step 1: Flattening the Back
This is arguably the most critical step for achieving a truly sharp edge, especially for new tools. Any concavity or irregularity on the back will prevent a keen edge from forming.

- Start with Coarse Abrasive: Begin with your coarse diamond plate or 1,000-grit waterstone.
- Lay Flat: Lay the back of the chisel or plane iron completely flat on the abrasive.
- Rub Vigorously: Apply firm, even pressure and rub the tool back and forth, ensuring the entire back is contacting the stone. Use plenty of water if using waterstones.
- Inspect with Marker: Periodically clean the tool, color the back with a marker near the edge, and continue rubbing. You’ll know the back is flat when the marker ink is completely removed right up to the edge.
- Progress to Finer Grits: Once the back is flat on the coarse stone, move to the 4,000-grit stone, and then the 8,000-grit stone, repeating the process. The goal is a mirror-polish on the last 1/2 inch of the back, right up to the edge.
“A truly flat back is the foundation of a truly sharp edge. Don’t skip this step, especially with new tools.”
Step 2: Grinding the Primary Bevel
This step establishes or re-establishes the main angle of the blade.
- Coarse Abrasive (1,000-grit): Set your sharpening guide to the desired primary bevel angle (e.g., 25°).
- Apply Pressure: With the tool in the guide, place it on the 1,000-grit stone. Apply firm, even pressure and push/pull the tool across the stone.
- Check for Burr: Continue sharpening until you feel a “burr” along the entire length of the back edge. This burr is a tiny lip of metal pushed over by the abrasive, indicating you’ve reached the very edge. You can feel it with your fingertip (carefully!).
- Remove the Burr (Initial): Lay the back flat on the 1,000-grit stone and make a few light passes to remove the burr.
- Progress to Finer Grits: Move to the 4,000-grit stone, repeating steps 2-4. The burr will become finer. Do the same on the 8,000-grit stone. The goal is a mirror-polish on the bevel and a tiny, almost invisible burr.
Step 3: Honing the Micro-Bevel
This final step creates a slightly steeper angle right at the cutting edge for maximum sharpness and durability.
- Set Micro-Bevel Angle: Increase your sharpening guide angle by 5° (e.g., from 25° to 30°).
- Fine Abrasive (8,000-grit): Use your finest stone (8,000-grit or higher).
- Light Passes: Make just 5-10 light passes with the tool in the guide on the fine stone. You’re aiming for a tiny, barely visible secondary bevel.
- Check for Burr: A very fine burr should form.
- Remove with Strop: Lay the back flat on your leather strop loaded with honing compound. Make 5-10 light passes, then flip the tool and strop the micro-bevel side 5-10 times. Alternate between back and bevel, progressively reducing pressure until the burr is completely gone.
- Test for Sharpness: Your tool should now be razor-sharp. Test it by slicing paper, shaving arm hair, or paring end grain effortlessly.
Maintaining Your Sharpening Stones
- Waterstone Flattening: Regularly flatten your waterstones with a diamond plate or flattening stone. A dished stone will create rounded bevels.
- Cleaning: Rinse waterstones thoroughly after use to remove slurry. Clean oilstones with mineral spirits.
- Storage: Store stones in a cool, dry place. Waterstones can be soaked before use or kept in water if they are designed for it.
For similar precise techniques in other woodworking areas, check out Mastering Dovetail Joinery for Drawers: Hand and Router Meth.
Advanced Tips and Troubleshooting for Achieving Razor-Sharp Edges
Even with “The Ultimate Guide to Sharpening Woodworking Chisels and Planes: Achieving Razor-Sharp Edges,” you might encounter challenges. Here are some advanced tips and common troubleshooting scenarios.
Honing Plane Irons
Sharpening plane irons follows the same principles as chisels, with a few nuances:
- Chipped Edges: If a plane iron has significant chips, you may need to grind a new primary bevel on a coarser stone or even a grinding wheel (with care to avoid overheating) before moving to the finer stones.
- Camber: For smoothing planes, a very slight camber (curve) on the edge helps prevent “tracking” lines in the wood. This is achieved by applying slightly more pressure to the corners of the blade during the final honing stages.
Troubleshooting Common Sharpening Issues
| Problem | Possible Cause(s) | Solution(s) |
|---|---|---|
| Tool feels dull quickly | Insufficient honing, burr not fully removed, too shallow bevel, soft steel | Ensure full burr removal on strop, try a slightly steeper micro-bevel, consider higher quality steel tools. |
| Edge is not straight/square | Uneven pressure on stone, stone not flat, improper jig setup | Flatten stones regularly, ensure even pressure across the blade, double-check jig angle and clamp security. |
| Tool chatters/tears wood | Dull edge, back not flat, wrong bevel angle for wood | Re-sharpen, flatten back thoroughly, check bevel angle. For tear-out, try a higher angle or use a back-bevel on plane. |
| Takes too long to sharpen | Starting with too fine a grit, not enough pressure | Begin with coarser grit if edge is very dull, apply firm and consistent pressure. |
| Scratches on tool body | Sharpening jig rubbing on stone, grit on tool body | Keep sharpening station clean, ensure jig rollers are clean and not damaged. |
Safety Considerations
Sharpening involves handling extremely sharp objects. Always prioritize safety:
- Keep Fingers Away: Never run your fingers along the cutting edge.
- Use a Push Stick: When using grinding wheels, always use a push stick or jig.
- Stable Workspace: Ensure your sharpening stones are securely held and won’t slip.
- Eye Protection: Wear safety glasses when grinding or using power tools.
- Clean Up: Immediately clean up any metal shavings or slurry.
A well-maintained tool is also easier to work with, leading to fewer errors and safer operations, whether you’re building a craft your dream farmhouse dining table or crafting intricate wooden candle holders.
Conclusion
Mastering the techniques in “The Ultimate Guide to Sharpening Woodworking Chisels and Planes: Achieving Razor-Sharp Edges” is a transformative skill for any woodworker. It’s an investment not just in your tools, but in your craft, leading to cleaner cuts, greater precision, and a more enjoyable woodworking experience. The difference between a dull tool and a razor-sharp one is truly night and day.
By consistently applying the principles of flattening backs, grinding consistent bevels, and meticulously honing micro-bevels, you will achieve edges that glide through wood, leaving behind surfaces that inspire awe. Remember, sharpening is a skill that improves with practice and patience. Don’t be discouraged by initial challenges; embrace the learning process, and soon you’ll be experiencing the profound satisfaction of working with truly razor-sharp tools.
Commit to making sharpening a regular part of your woodworking routine in 2026. Your projects, and your hands, will thank you for it.
Actionable Next Steps:
- Assess Your Tools: Inspect your current chisels and plane irons. Do they have flat backs? Are the bevels consistent?
- Gather Your Gear: Acquire the necessary sharpening stones, a reliable honing guide, and a leather strop.
- Practice: Start with an old chisel or a less critical tool to practice the steps outlined in this guide.
- Regular Maintenance: Implement a routine for touching up your edges regularly, rather than waiting for them to become completely dull.
References
- Schwarz, C. (2011). The Anarchist’s Tool Chest. Lost Art Press.
- Moxon, J. (1678). Mechanick Exercises, Or The Doctrine of Handy-Works.
- Fine Woodworking Magazine. (Various issues). Sharpening Techniques. Taunton Press.
