
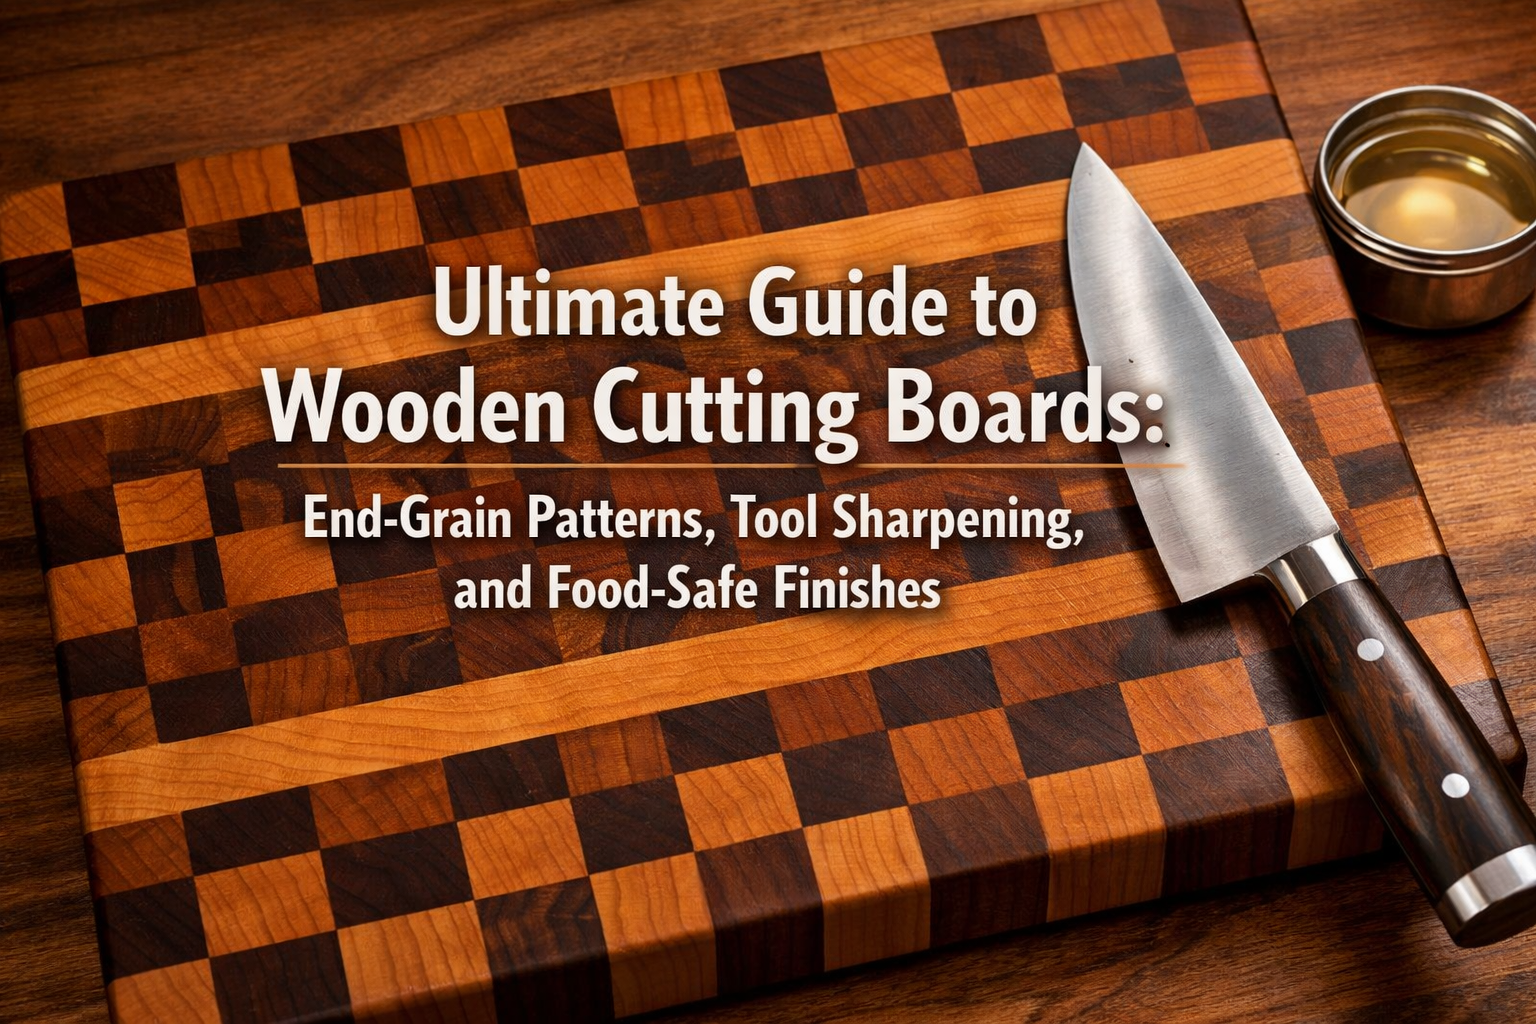

A high-quality wooden cutting board is more than just a kitchen tool; it’s an investment, a statement of culinary passion, and often a beautiful piece of craftsmanship. Whether you’re a seasoned chef or a home cooking enthusiast, understanding the nuances of wooden cutting boards, from their construction to their care, can elevate your kitchen experience. This Ultimate Guide to Wooden Cutting Boards: End-Grain Patterns, Tool Sharpening, and Food-Safe Finishes delves deep into everything you need to know to choose, maintain, and even craft your own exceptional cutting board in 2026. From the fascinating world of end-grain patterns to the critical skill of tool sharpening and the importance of food-safe finishes, this guide will equip you with the knowledge for professional results, ensuring your cutting board lasts a lifetime and performs flawlessly.
The journey of a wooden cutting board begins long before it reaches your kitchen counter. It starts with selecting the right wood, understanding grain orientation, and employing precise woodworking techniques. For those looking to craft their own, mastering power tool setups for cutting precise strips for edge and end-grain boards, along with honing hand tool maintenance tips, is paramount. We’ll explore premium woods like cherry and walnut, renowned for their beauty and durability, and discuss how to achieve professional results that can even sell at local markets.

Key Takeaways
- End-Grain vs. Edge-Grain: End-grain cutting boards are superior in durability and knife-friendliness due to their self-healing properties and are more resistant to warping.
- Wood Selection is Crucial: Hardwoods like maple, cherry, and walnut are ideal for cutting boards, offering a balance of hardness, density, and aesthetic appeal.
- Tool Sharpening is Essential: Properly sharpened tools (saws, planes, chisels) are vital for precise cuts during construction and for maintaining your knives during use.
- Food-Safe Finishes Protect and Preserve: Regular application of mineral oil, beeswax, or other food-safe finishes is necessary to protect the wood, prevent drying and cracking, and ensure hygiene.
- Proper Maintenance Extends Lifespan: Hand washing, immediate drying, and consistent oiling are key to the longevity and beauty of your wooden cutting board.
Unpacking Wooden Cutting Board Design: End-Grain Patterns, Edge-Grain, and Wood Selection
Choosing or crafting the perfect wooden cutting board begins with understanding its fundamental design principles, particularly the orientation of the wood grain. This choice impacts durability, knife longevity, and overall aesthetics.
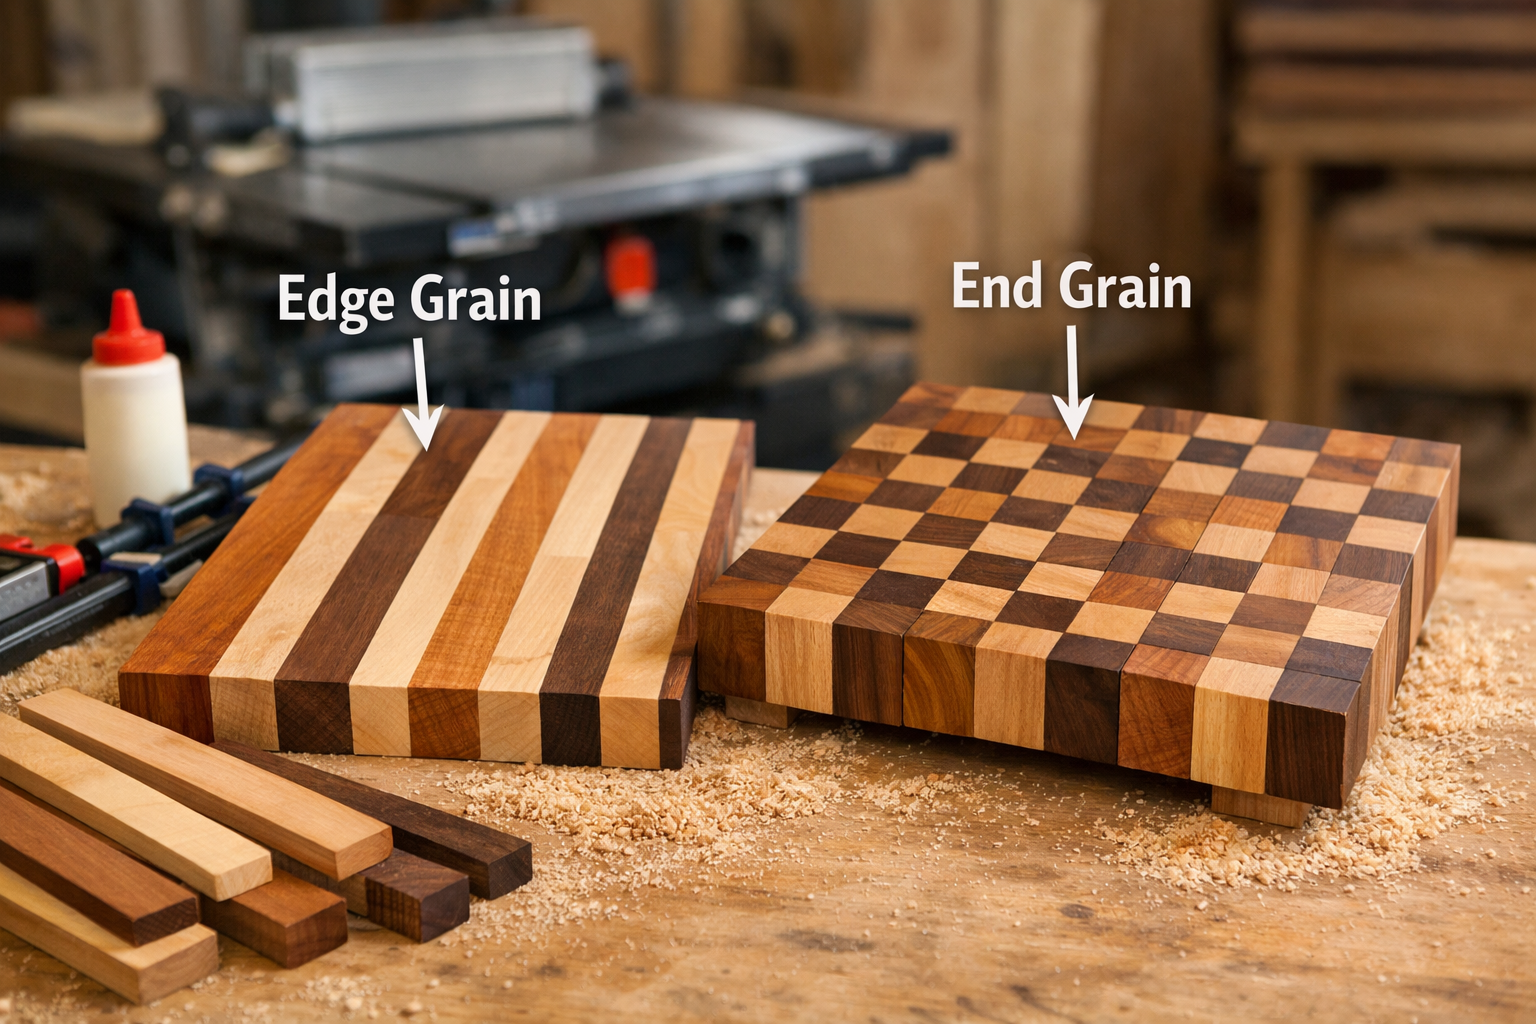
Edge-Grain vs. End-Grain: The Core Distinction
The primary difference in wooden cutting board construction lies in how the wood fibers are oriented.
Edge-Grain Cutting Boards
Edge-grain boards are constructed by gluing strips of wood together with the long grain running parallel to the cutting surface. This is a common and often more economical method of construction.
- Appearance: Typically shows long, continuous grain lines across the board.
- Durability: While durable, knife blades cut across the wood fibers, which can dull knives faster and lead to more visible cut marks.
- Moisture Resistance: Can be more prone to warping and cracking if not properly cared for, as moisture can penetrate and cause swelling or shrinking across the grain.
- Construction: Simpler to construct, requiring fewer cuts and glue-ups.
End-Grain Cutting Boards
End-grain boards are made by cutting wood into small blocks, then arranging and gluing these blocks so that the end grain (the tree’s growth rings) faces upward, forming the cutting surface. This is the preferred method for high-quality, long-lasting cutting boards.
- Appearance: Features a distinct checkerboard or mosaic pattern, often highlighting the beautiful growth rings of the wood.
- Durability & Knife-Friendliness: The most significant advantage. Knife blades glide between the wood fibers, rather than cutting across them. The fibers “self-heal” by closing back up after the knife passes, making the board incredibly durable and much gentler on your knives. This results in fewer visible knife marks and a longer-lasting edge on your blades.
- Moisture Resistance: Generally more resistant to warping and cracking than edge-grain boards because the end grain absorbs and releases moisture more evenly across its surface.
- Construction: More complex and labor-intensive to construct, involving multiple precise cuts and glue-ups, often requiring specialized power tool setups.
Pull Quote: “An end-grain cutting board isn’t just a surface; it’s a testament to superior craftsmanship and an investment in your knives’ longevity.”
Selecting the Best Wood for Your Cutting Board
The type of wood chosen significantly influences the board’s performance, appearance, and lifespan. The best woods for cutting boards are hardwoods that are dense enough to resist deep cuts but not so hard that they damage knives. They should also be closed-pore, meaning they have smaller pores, which makes them more resistant to absorbing moisture and harboring bacteria.
Here are some top choices for premium wooden cutting boards:
- Hard Maple (Sugar Maple):
- Characteristics: Light cream color, very dense, fine grain. It’s often considered the gold standard for cutting boards due to its hardness and tight grain structure.
- Benefits: Excellent durability, resists knife marks well, neutral color that fits most kitchens.
- Cherry (Black Cherry):
- Characteristics: Starts as a light pinkish-brown and deepens to a rich reddish-brown over time with exposure to light. Fine, straight grain.
- Benefits: Beautiful aesthetic, softer than maple but still very durable, gentle on knives, ages gracefully.
- Walnut (Black Walnut):
- Characteristics: Ranges from light brown to deep chocolate brown, often with purplish hues. Distinctive grain patterns.
- Benefits: Striking appearance, good hardness, excellent for contrast in end-grain patterns. Its natural oils offer some resistance to moisture.
- Sapele: (Learn more about Sapele for Cutting Board: Characteristics, Benefits, and Maintenance Tips)
- Characteristics: A tropical hardwood with a reddish-brown color that darkens with age, often exhibiting a beautiful ribbon-like figure.
- Benefits: Good density, naturally resistant to decay, and offers an exotic aesthetic.
- Red Oak: (Explore our Red Oak for Cutting Board: A Comprehensive Guide)
- Characteristics: Distinctive open grain pattern, typically light to medium brown.
- Benefits: Readily available and durable, though its open grain requires more diligent sealing to prevent moisture absorption.
Woods to Avoid:
- Softwoods: Pine, cedar, fir are too soft, easily scarred, and can splinter into food.
- Open-Pored Hardwoods (some): While some hardwoods are great, overly open-pored woods like some types of ash can be more difficult to keep sanitary.
- Treated or Reclaimed Wood: Unless you are absolutely certain of its origin and chemical treatment history, avoid these for food contact.
Mastering Tool Sharpening for Cutting Board Creation and Maintenance
The journey of creating a high-quality wooden cutting board, especially an intricate end-grain one, demands precision. This precision is only achievable with sharp tools. Furthermore, maintaining the sharpness of your kitchen knives is directly related to the surface you cut on. This section provides beginner tutorials on power tool setups for cutting precise strips for both edge and end-grain boards, along with essential hand tool maintenance tips.
Power Tool Setups for Precision Cuts
Crafting end-grain cutting boards involves many glue-ups, which require perfectly straight and square cuts. This is where power tools shine.
Table Saw Setup for Strips
The table saw is your primary tool for cutting strips of wood.
- Blade Selection: Use a thin kerf, high tooth count (e.g., 60-80 tooth ATB) crosscut or combination blade for smooth, clean cuts that minimize tear-out.
- Rip Fence Alignment: Crucial for straight cuts. Use a reliable method (like a dial indicator or simply measuring from the blade to the fence at the front and back) to ensure your rip fence is perfectly parallel to the blade. A slight misalignment can lead to binding or non-square cuts.
- Featherboards: Use featherboards to keep the wood firmly against the fence and the tabletop, ensuring consistent width and preventing kickback.
- Crosscut Sled or Miter Gauge: For cross-cutting strips to length (especially for end-grain blocks), a perfectly square crosscut sled is indispensable. Build or purchase one and verify its 90-degree angle with a reliable machinist square. This is where you’ll make the final cuts for those perfect end-grain blocks.
Planer Setup for Flatness
After gluing up sections, your planer will ensure perfectly flat surfaces before the next glue-up.
- Sharp Blades: Always start with sharp planer blades. Dull blades can lead to tear-out, especially on figured grains.
- Snipe Prevention: Adjust your infeed and outfeed tables if possible, or use sacrificial boards at the beginning and end of each pass to minimize snipe (a slight dip at the ends of the board).
- Light Passes: Take shallow passes (1/32″ to 1/16″ at a time) to avoid stressing the machine, burning the wood, and getting cleaner results. For information on a specific model, consider checking out guides like Ryobi Planer AP1300: Overview, Advantages, and User Experience.
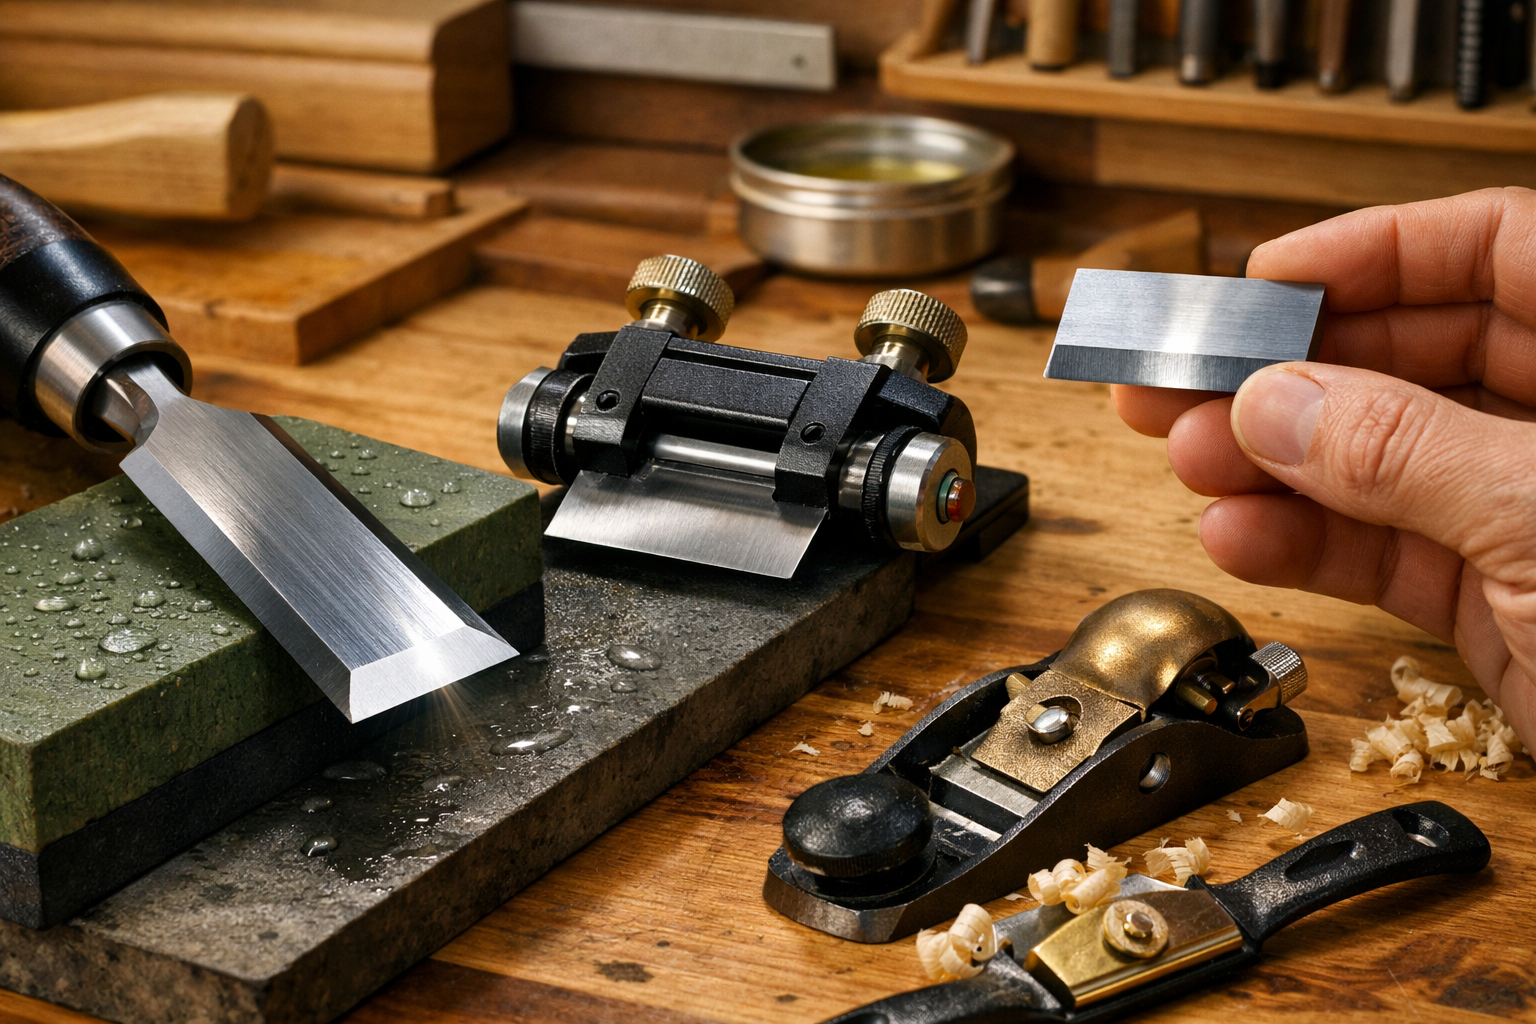
Hand Tool Maintenance: Sharpening Chisels and Planes
Even with power tools, hand tools like chisels and hand planes are invaluable for fine-tuning and surfacing. Keeping them razor-sharp is non-negotiable.
The Sharpening Process (Whetstones or Honing Guides)
- Grinding (if necessary): If a tool’s edge is severely damaged or chipped, you may need to re-establish the primary bevel using a low-speed grinder or a coarse sharpening stone (100-400 grit). Maintain the original bevel angle.
- Coarse Sharpening (400-1000 grit): Use a coarse whetstone (waterstone or oilstone) to refine the bevel and remove any remaining nicks. A honing guide can be incredibly helpful here for maintaining a consistent angle.
- Medium Sharpening (2000-4000 grit): Move to a medium grit stone to further refine the edge. You should start to see a tiny burr forming on the back of the blade.
- Fine Sharpening (6000-8000+ grit): Finish with a fine grit stone to polish the edge. The burr should become very delicate.
- Stropping: The final step involves stropping the blade on a leather strop loaded with honing compound. This removes the burr entirely and polishes the edge to a mirror finish, making it truly razor-sharp.
Key Considerations for Sharpening:

- Consistency: The most important aspect is maintaining a consistent angle throughout the sharpening process. Honing guides are excellent for this.
- Flatness: Ensure your sharpening stones are flat. Use a flattening stone to periodically resurface your whetstones.
- Safety: Always sharpen away from your body and use caution with razor-sharp edges.
- Checking Sharpness: A sharp tool will effortlessly pare end-grain wood, or shave hair from your arm.
Why Sharp Tools Matter for Cutting Boards
- Better Cuts: Sharp saws make clean, tear-out-free cuts crucial for strong glue joints.
- Easier Planing: Sharp planer blades and hand planes produce smooth, glass-like surfaces with less effort and less risk of tear-out.
- Enhanced Safety: Counterintuitively, sharp tools are safer. They cut efficiently, requiring less force, thus reducing the chance of slips and accidents.
- Professional Finish: A truly sharp hand plane can produce a surface so smooth it almost doesn’t need sanding, leaving an impeccable finish for your food-safe oil.
For more generalized woodworking tool care, explore articles such as Best Steel for Screwdriver Bits: A Comprehensive Guide for insights into tool material quality.
The Art of Food-Safe Finishes and Ongoing Maintenance
Once your wooden cutting board is expertly crafted, the final, crucial step is applying a food-safe finish. This not only enhances the wood’s natural beauty but also protects it from moisture, prevents drying and cracking, and ensures a hygienic surface for food preparation. Proper ongoing maintenance is equally important to prolong its life and appearance.
Understanding Food-Safe Finishes
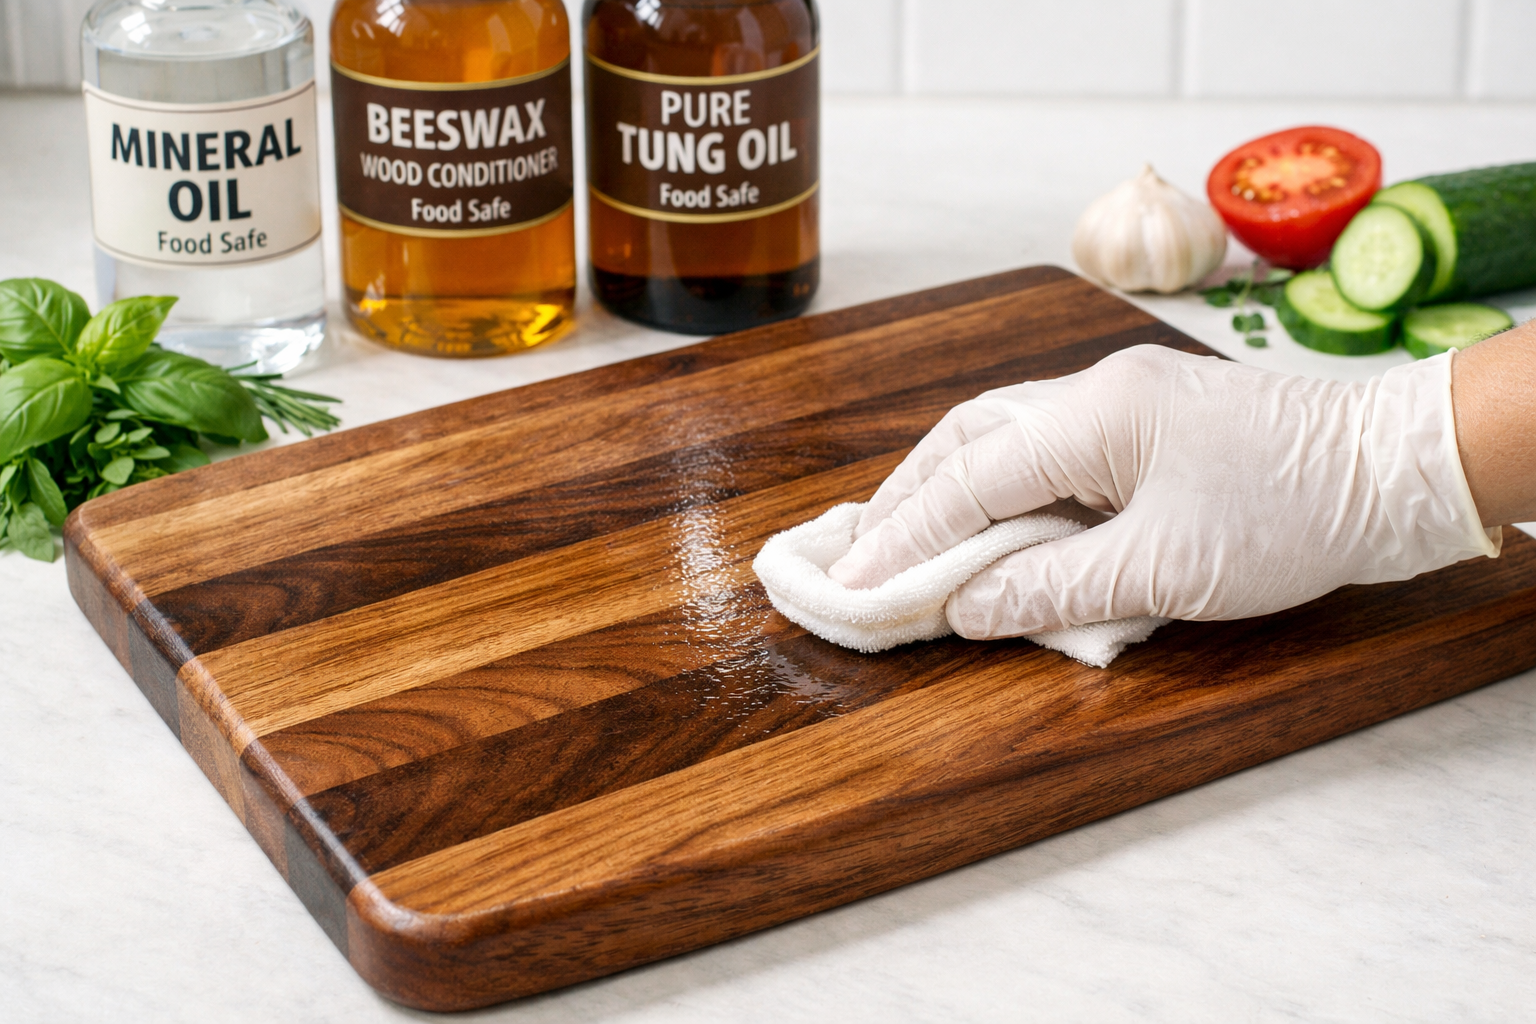
A food-safe finish is any product that, once cured or applied, is non-toxic and will not leach harmful chemicals into food. For cutting boards, the most common and recommended finishes are oils and waxes.
Types of Food-Safe Finishes
Mineral Oil (Food-Grade):
- Description: A non-drying, petroleum-based oil that penetrates the wood fibers, preventing water absorption and keeping the wood hydrated. It’s inexpensive and readily available.
- Application: Apply generously, let it soak in for several hours (or overnight), then wipe off any excess. Repeat monthly or as needed.
- Benefits: Easy to apply, deeply conditions the wood, and is completely food-safe.
- Drawbacks: Needs frequent reapplication as it doesn’t polymerize (harden).
Beeswax/Mineral Oil Blends (Board Butter/Cream):
- Description: A mixture of food-grade mineral oil and beeswax (sometimes with carnauba wax). The wax adds a protective barrier and a slightly more durable finish than oil alone.
- Application: Apply a small amount with a cloth, rub it into the wood until absorbed, and then buff off any excess.
- Benefits: Provides a more robust protective layer, adds a subtle sheen, and enhances water resistance.
- Drawbacks: A bit more involved to apply than pure mineral oil, and still requires regular reapplication.
Pure Tung Oil (100% Food-Grade):
- Description: A natural, drying oil derived from the nut of the tung tree. It polymerizes (hardens) within the wood fibers, creating a durable, water-resistant finish. Ensure it’s 100% pure tung oil, not “tung oil finish,” which often contains varnishes or solvents.
- Application: Apply thin coats, allowing each to cure completely before applying the next (can take days). Lightly sand between coats. Many coats are needed for full protection.
- Benefits: Extremely durable, highly water-resistant, and completely food-safe once cured.
- Drawbacks: Long curing time, more complex application, and higher cost.
Walnut Oil:
- Description: A natural drying oil that, like tung oil, polymerizes and hardens. It imparts a subtle nutty aroma initially.
- Application: Similar to tung oil, requires thin coats and ample drying time.
- Benefits: Food-safe, good durability, natural origin.
- Drawbacks: Can be an allergen for those with nut allergies.
Finishes to Avoid:
- Vegetable Oils (Olive, Canola, etc.): These oils can go rancid over time, leading to unpleasant odors and flavors, and can attract bacteria.
- Linseed Oil (Flaxseed Oil) not Food-Grade: While food-grade linseed oil (flaxseed oil) is safe, industrial linseed oil contains heavy metal driers that are toxic. It’s safer to avoid linseed oil unless specifically labeled as food-grade for consumption.
- Varnishes, Lacquers, Polyurethane: These finishes form a hard film on the surface. While some are technically food-safe once fully cured (e.g., Sprayable Water Based Polyurethane: A Step-by-Step Guide), they can chip, crack, and peel, potentially contaminating food. They also don’t allow the wood to “breathe” and self-heal like oil finishes do on end-grain boards.
Application Techniques for a Professional Finish
Achieving a professional-looking finish that sells at markets involves careful application.
- Sanding: Start with thorough sanding. Gradually move through grits from 80 or 120 up to 220 or even 320 grit. For end-grain, stop at 220 grit to allow better oil penetration. Between grits, wipe the board clean to remove dust. A light dampening with water (and letting it dry) before the final sanding can raise the grain, ensuring a smoother final product.
- Generous Initial Oiling: For the first application, warm your mineral oil slightly (microwave for 30 seconds) to help it penetrate deeper. Apply a very generous amount, soaking the entire board. Let it sit for several hours, or even overnight, allowing the wood to absorb as much as possible.
- Wipe Off Excess: After the soak, use a clean, lint-free cloth to thoroughly wipe off any excess oil. The board should feel hydrated, not greasy.
- Repeat: For new boards, repeat the oiling process daily for a week, then weekly for a month, then monthly thereafter. This “seasoning” process builds up the oil’s protective qualities.
- Board Butter/Cream Application: For subsequent applications, or as a final protective layer after oiling, apply a board butter or cream. Rub it in a circular motion, ensuring full coverage, then buff to a gentle sheen.
Ongoing Maintenance: Keeping Your Board Pristine
Consistent care will ensure your cutting board remains beautiful and functional for years.
- Hand Wash Only: Never put a wooden cutting board in the dishwasher. The extreme heat and prolonged exposure to water will cause it to warp, crack, and potentially harbor bacteria.
- Clean Immediately: After each use, wash the board promptly with warm water and mild dish soap.
- Rinse and Dry Thoroughly: Rinse off all soap and immediately dry the board with a towel. Do not let it air dry in a rack, as uneven drying can lead to warping.
- Sanitize (When Needed): For deeper cleaning, especially after handling raw meat, you can use a solution of white vinegar (1 part) and water (4 parts), or a dilute hydrogen peroxide solution. Apply, let sit for a few minutes, then rinse and dry. Salt and lemon can also be used to remove odors and stains.
- Regular Oiling: As mentioned, oil your board regularly. When the wood starts to look dry, faded, or dull, it’s time for more oil. The “water bead” test is a good indicator: if water no longer beads up on the surface, it needs oiling.
- Storage: Store your board on its edge, in a well-ventilated area, rather than flat. This promotes even airflow and prevents moisture accumulation on one side, which can lead to warping.
By understanding and implementing these finishing and maintenance practices, your wooden cutting board, especially a meticulously crafted end-grain board from premium woods like cherry and walnut, will not only perform exceptionally but also stand as a beautiful testament to your woodworking skill. For inspiration on other woodworking projects, you might consider guides like Crafting Your Dream Retreat: The Ultimate Guide to a Woodworking Bedroom in 2026.
Conclusion
The journey through the Ultimate Guide to Wooden Cutting Boards: End-Grain Patterns, Tool Sharpening, and Food-Safe Finishes reveals that a cutting board is far more than a simple kitchen accessory. It’s a blend of artistry, engineering, and diligent care. From the strategic choice of premium hardwoods like maple, cherry, and walnut, to the intricate construction of a self-healing end-grain pattern, every step contributes to its longevity and performance.
Mastering the precise power tool setups for cutting flawless strips, and honing your hand tool maintenance skills—especially sharpening—are essential for achieving professional-grade results, whether for your own kitchen or for selling at markets. Equally important is the commitment to food-safe finishes and consistent maintenance, which safeguards the wood’s integrity and ensures a hygienic surface for countless meals to come.
In 2026, as home cooking and artisanal craftsmanship continue to thrive, investing in or creating a truly exceptional wooden cutting board remains a worthwhile endeavor. It’s a piece that brings warmth, character, and unparalleled functionality to your culinary space.
Actionable Next Steps:
- Assess Your Current Board: Examine your existing cutting board. Is it edge-grain or end-grain? Does it show signs of excessive knife marks, drying, or warping?
- Consider an Upgrade or DIY Project: If you’re inspired, consider purchasing a high-quality end-grain board or embarking on a DIY project to craft your own using premium hardwoods.
- Gather Your Tools: Ensure your woodworking tools (if crafting) are sharp and properly set up for precision cuts. Review sharpening techniques for both woodworking and kitchen knives.
- Stock Up on Finishes: Purchase food-grade mineral oil, beeswax cream, or pure tung oil to properly finish and maintain your board.
- Establish a Maintenance Routine: Commit to regularly oiling and properly cleaning your wooden cutting boards to maximize their lifespan and beauty.
By embracing these insights, you’re not just caring for a piece of wood; you’re nurturing a tool that will enrich your cooking experience for years to come.
References
- Hoadley, R. B. (2000). Identifying Wood: Accurate Results with Simple Tools. The Taunton Press.
- Schwarz, C. (2011). The Anarchist’s Tool Chest. Lost Art Press.
- USDA Food Safety and Inspection Service. (n.d.). Kitchen Safety – Cutting Boards. Retrieved from https://www.fsis.usda.gov/food-safety/safe-food-handling-and-preparation/food-safety-basics/kitchen-safety#cutting-boards
- Flexner, B. (2005). Understanding Wood Finishing: How to Choose and Apply the Right Finish. Fox Chapel Publishing.
