


The modern home theater experience demands more than just a large screen and high-fidelity sound; it requires seamless integration, organized aesthetics, and functional design. For woodworking enthusiasts and DIY homeowners alike, the opportunity to craft a custom solution presents a rewarding challenge. This article provides a comprehensive, step-by-step guide to Building Custom Wooden TV Stands: Modern Media Consoles with Cable Management and Hidden Joinery, specifically tailored for small workshops utilizing efficient tools like track saws and pocket hole jigs. The focus will be on creating robust, stable, and visually appealing modular designs that perfectly complement 2026 home theater setups, ensuring your heavy TV and media components are housed securely and stylishly, free from the clutter of tangled cables.
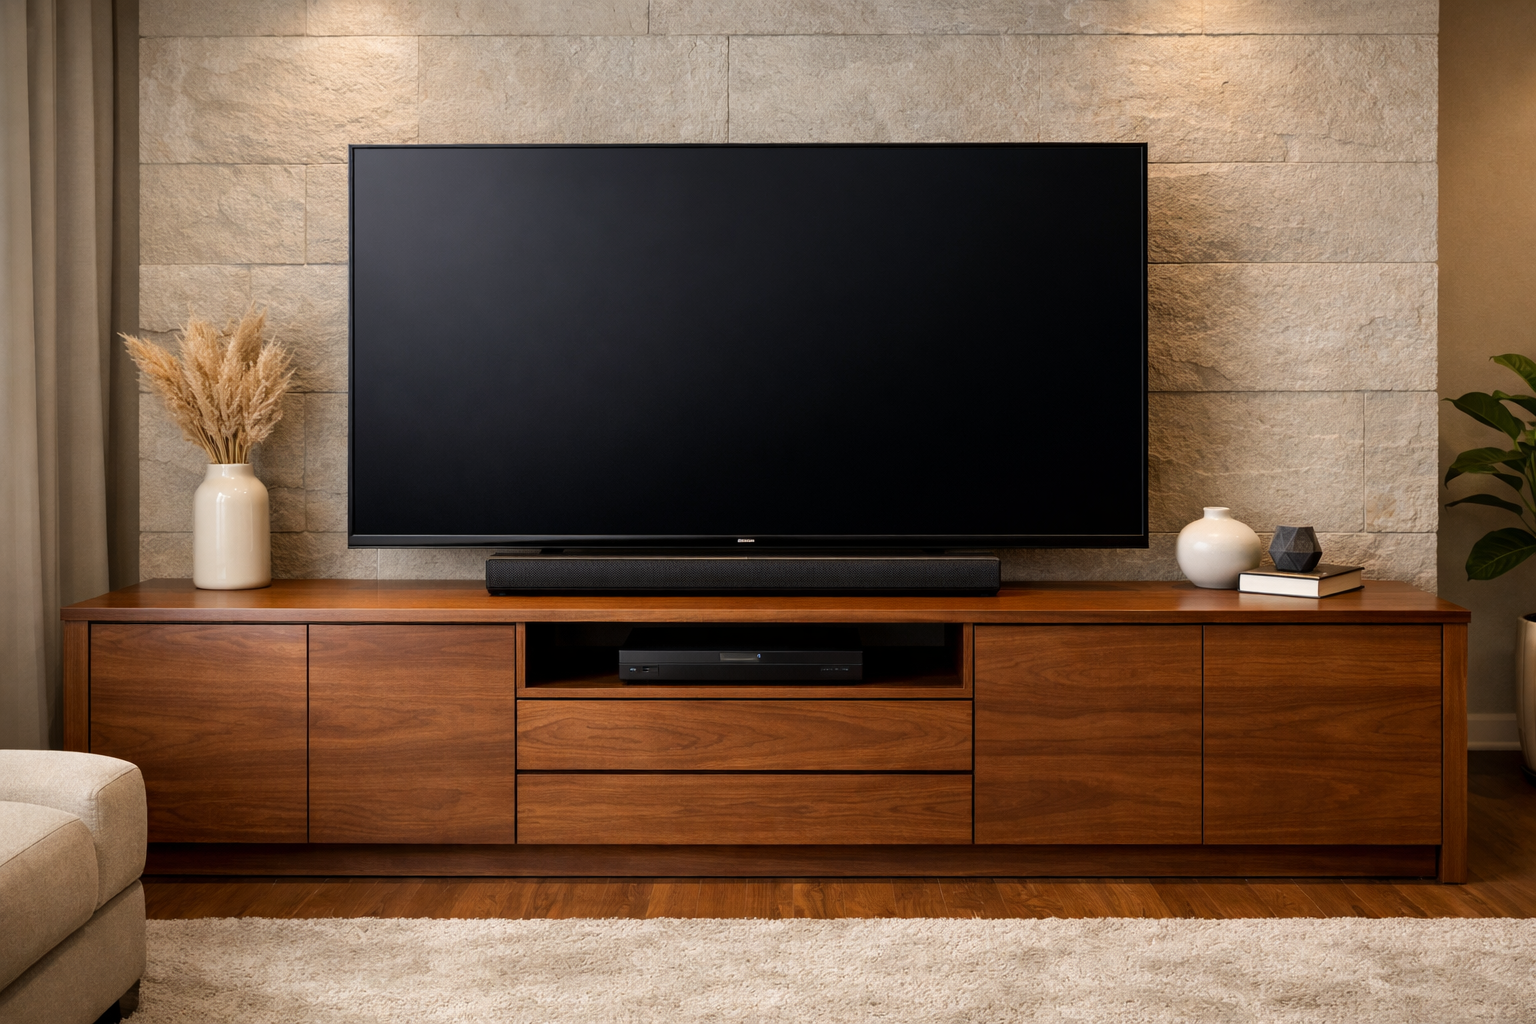
In an era where technology is central to our living spaces, a thoughtfully designed TV stand is more than just a piece of furniture; it’s a statement. It’s about achieving a minimalist aesthetic, optimizing functionality, and showcasing your craftsmanship. By focusing on hidden joinery techniques and integrated cable management, your custom media console will not only support your entertainment system but also elevate the entire room’s decor.

Key Takeaways
- Modular Design for Flexibility: Plan your TV stand with modular components to adapt to various media equipment and future upgrades, making it ideal for the evolving 2026 home theater.
- Precision Cutting with Track Saws: A track saw is essential for accurate, straight cuts in sheet goods and large panels, crucial for professional results in small workshops.
- Strong, Hidden Joinery: Utilize techniques like pocket holes, dadoes, or mortise and tenon joints to create robust connections that are invisible from the outside, ensuring a clean aesthetic.
- Integrated Cable Management: Design and incorporate specific channels, grommets, and access points from the outset to effectively hide all wires and power strips.
- Finishing for Durability and Aesthetics: Choose a durable wood finish that protects the wood and enhances its natural beauty, ensuring your custom wooden TV stand lasts for years.
Designing Your Custom Modern Media Console (H2)
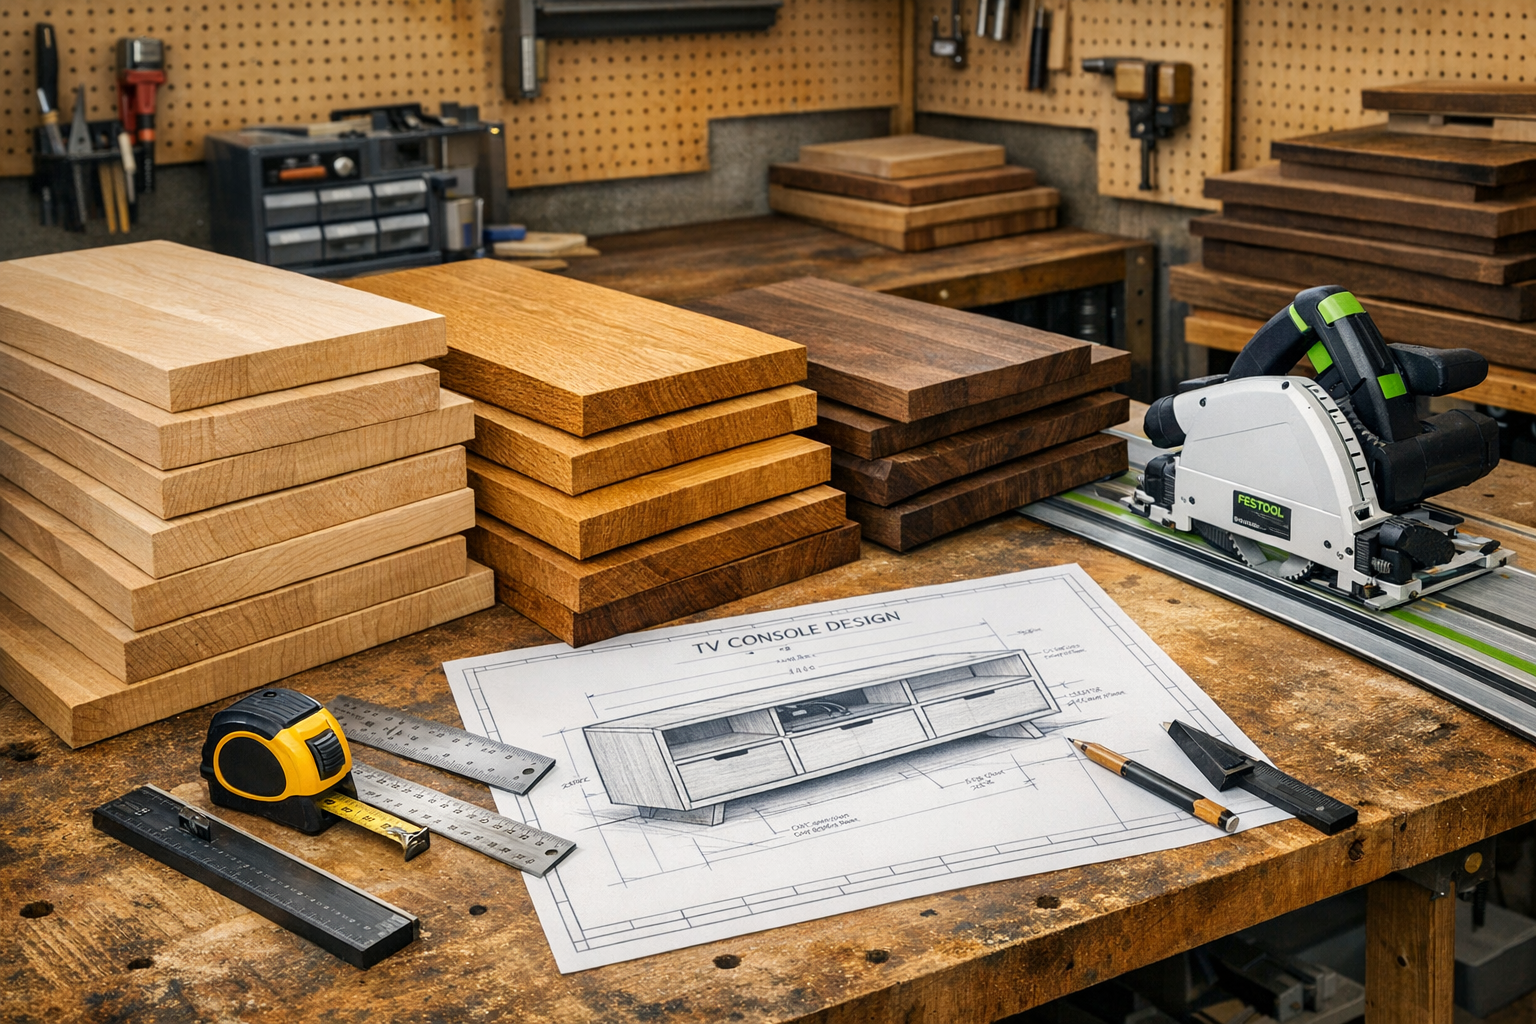
The journey of Building Custom Wooden TV Stands: Modern Media Consoles with Cable Management and Hidden Joinery begins long before the first cut is made. Thoughtful design and meticulous planning are paramount, especially when working in a smaller space and aiming for a clean, modern aesthetic. This section will guide you through the initial design considerations, material selection, and essential tools.
Initial Design Considerations for Modern TV Stands (H3)
Before sketching your design, consider the following key aspects:
- TV Size and Weight: Measure your television’s width, height, and depth, and note its weight. This dictates the overall dimensions and structural integrity required for your stand. Ensure the stand is wider than the TV for visual balance and to accommodate soundbars or speakers.
- Media Component Storage: List all devices you intend to house (e.g., receiver, gaming consoles, streaming boxes, soundbar). Measure their dimensions (width, depth, height) to ensure adequate shelf space and ventilation.
- Aesthetic and Style: Modern media consoles typically feature clean lines, minimalist profiles, and often a floating appearance. Consider how the stand will integrate with your existing room decor. Are you aiming for a sleek, Scandinavian look or something more industrial?
- Modular Approach: For maximum flexibility, consider a modular design. This could involve separate cabinets, open shelves, or adjustable components that can be reconfigured or expanded later. A modular design is particularly beneficial for small workshops as it breaks down the project into manageable parts.
“A well-designed TV stand isn’t just a place to put your TV; it’s an integral part of your living space that combines form and function seamlessly.”
Material Selection: Choosing the Right Wood 🌳 (H3)
The choice of wood significantly impacts the aesthetic, durability, and cost of your custom TV stand.
- Plywood (Cabinet Grade): A popular choice for its stability, strength, and relatively lower cost. High-quality Baltic birch or veneer-core plywood offers excellent screw-holding power and a beautiful edge grain that can be left exposed or edge-banded. Plywood is especially friendly for track saw users.
- Solid Hardwoods: Options like oak, maple, walnut, or cherry provide superior durability and natural beauty. They are more expensive and require careful consideration of wood movement, but offer a premium look and feel. For advice on finishing specific hardwoods, check out our guides on maple wood finishing techniques or oak wood finishing techniques.
- MDF (Medium-Density Fiberboard): An economical option for painted finishes due to its smooth surface. However, it lacks strength compared to plywood or solid wood and is heavy. It’s often used for internal shelves or panels that won’t bear significant weight.
When selecting wood, consider the total thickness needed for shelves and panels to prevent sagging under the weight of your equipment. Typically, 3/4-inch (19mm) thick material is suitable for most structural components.
Essential Tools for a Small Workshop (H3)
Building Custom Wooden TV Stands: Modern Media Consoles with Cable Management and Hidden Joinery in a small workshop requires smart tool choices that maximize precision and minimize space.
- Track Saw: This is your best friend for accurate, splinter-free cuts on large sheet goods like plywood. It allows you to break down full sheets with professional precision, even in confined spaces, eliminating the need for a large table saw (though a Delta Table Saw 36-600 is always a powerhouse if you have the room).
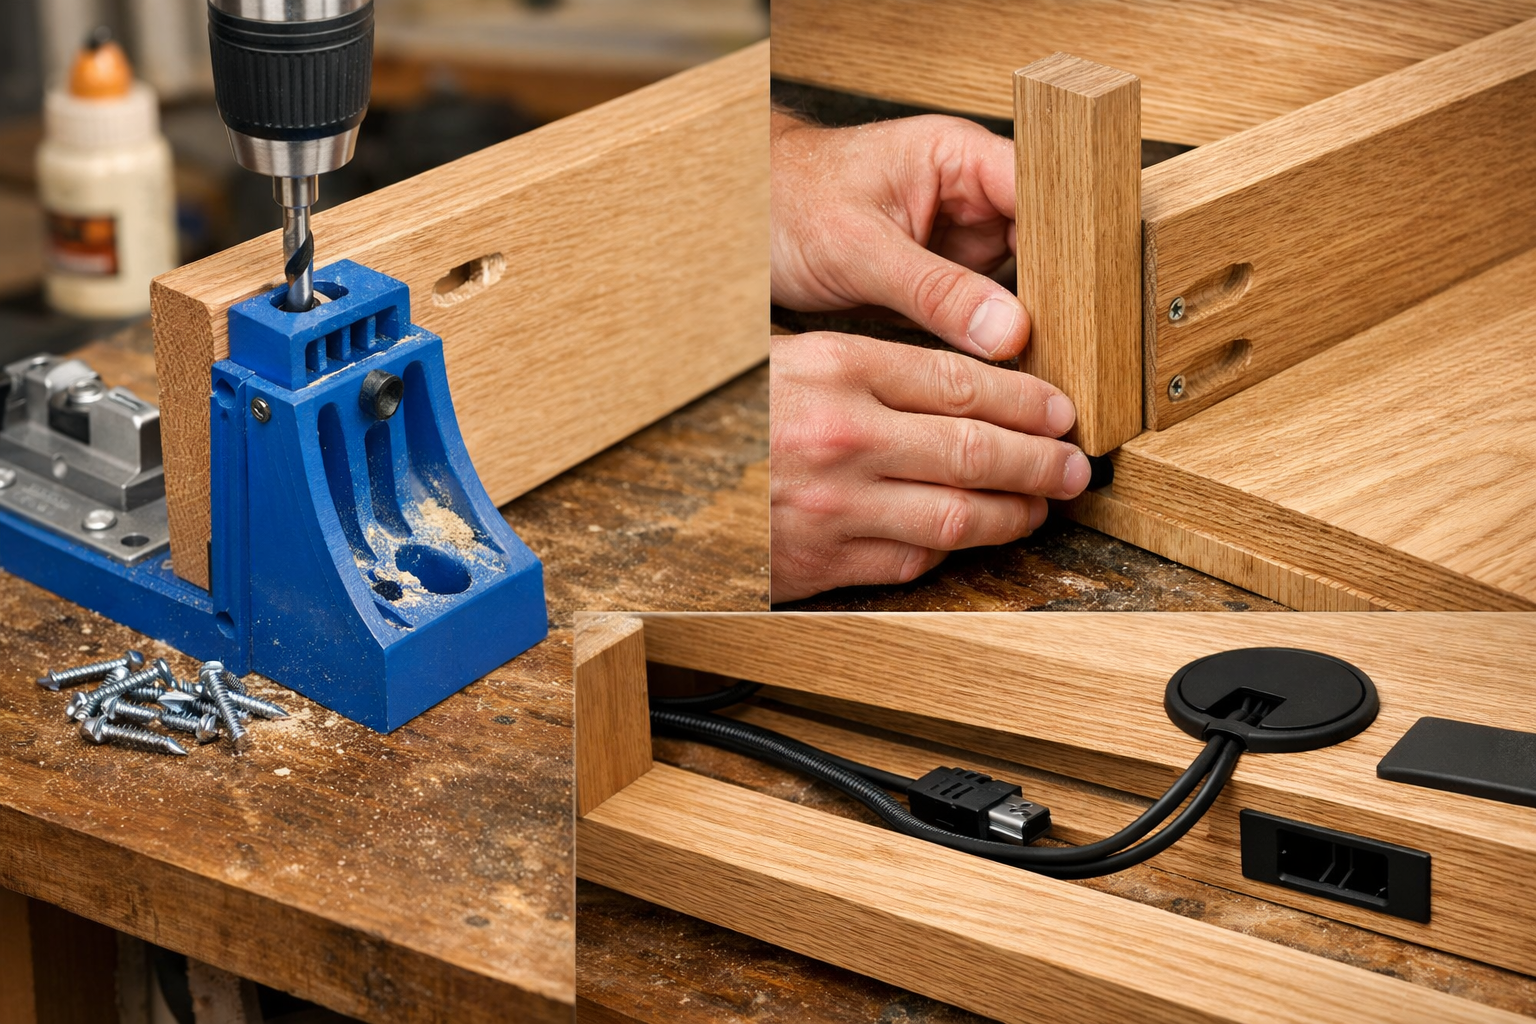
- Pocket Hole Jig: Kreg jigs are renowned for creating strong, hidden joints quickly and easily. They are perfect for carcass construction and attaching shelves without visible fasteners.
- Drill/Driver: For pilot holes, driving screws, and using the pocket hole jig.
- Router (and bits): Essential for creating dadoes, rabbets, and especially for routing channels for cable management. A trim router can be sufficient for many tasks.
- Measuring Tools: Tape measure, combination square, and a reliable marking knife are crucial for accuracy.
- Clamps: A variety of clamps (bar clamps, F-style clamps, parallel clamps) are indispensable for holding pieces during assembly and glue-up.
- Sander (orbital or block): For preparing surfaces for finishing.
- Safety Gear: Always wear safety glasses, hearing protection, and a dust mask.
Planning for Cable Management and Ventilation (H3)
This is a critical, often overlooked, aspect of a modern media console.
- Cable Pass-Throughs: Plan for large holes (2-3 inches in diameter) in the back panel and internal shelves. Use rubber or plastic grommets for a finished look and to protect cables.
- Cable Channels: Consider routing shallow channels along the back edge of shelves or the interior of cabinet sides to guide cables discreetly.
- Power Strip Compartment: Design a dedicated, hidden compartment for a power strip and excess cable slack. This keeps the power source out of sight and centralizes connections.
- Ventilation: Electronic components generate heat. Ensure adequate airflow by incorporating open backs where possible, or by drilling ventilation holes (e.g., using a decorative pattern) in enclosed compartments. Raised feet can also aid under-cabinet ventilation.
Precision Cutting and Assembly with Hidden Joinery (H2)
With your design finalized and materials chosen, the next phase involves precise cutting and assembling your custom TV stand, focusing on robust yet invisible joinery. This section emphasizes techniques that create strong structures while maintaining a clean, modern aesthetic.
Accurate Cuts for Professional Results 📏 (H3)
Precision is key in woodworking, especially for a piece like a media console where tight tolerances lead to a superior finish.
- Track Saw Mastery: For sheet goods, lay out your cuts carefully on the plywood sheets. Use your track saw with a fine-tooth blade for smooth, splinter-free edges. Ensure the track is firmly clamped to prevent movement. This tool is invaluable for getting perfectly straight and square cuts, even in a small shop.
- Crosscutting and Rip Cutting: For solid wood components, if you have a table saw, use it for rips and a miter saw for accurate crosscuts. Always double-check your measurements before cutting.
- Dadoes and Rabbets: If your design includes dadoes (grooves) for shelves or rabbets (shoulders) for back panels, use a router with a straight bit or a dado stack on a table saw. These joints are exceptionally strong and offer a clean, finished appearance. They are also excellent for aligning components during assembly.
“Precise cuts are the foundation of fine woodworking. They make assembly easier and the final product stronger and more beautiful.”
Mastering Hidden Joinery Techniques (H3)
The hallmark of modern furniture is often its clean aesthetic, free from visible fasteners. Hidden joinery is crucial for achieving this in Building Custom Wooden TV Stands: Modern Media Consoles with Cable Management and Hidden Joinery.
Pocket Hole Joinery
Pocket holes are an excellent choice for speed, strength, and concealed fasteners, making them ideal for carcass construction and shelf attachment.
- Drilling: Use a pocket hole jig to drill angled holes into the edge of one piece of wood. Adjust the jig and drill bit collar according to the thickness of your material.
- Assembly: Apply wood glue to the mating surfaces, clamp the pieces together securely, and drive self-tapping pocket hole screws into the pre-drilled holes. The glue provides long-term strength, while the screws hold the joint tight during drying. For optimal results, ensure your clamps hold the joint flush. If you’re using super glue for any minor adjustments or quick fixes during assembly, remember to check our guide: Does Super Glue Work on Wood? The Ultimate Guide for Woodworkers 🧰.
Dado and Rabbet Joints
These are classic joinery techniques that offer significant strength and a clean appearance when properly executed.
- Dadoes: Ideal for fixed shelves. A dado cut precisely to the thickness of the shelf creates a strong, interlocking joint. When routed accurately, the joint is flush and visually seamless.
- Rabbets: Often used for back panels, where the panel fits into a recessed shoulder cut along the edges of the cabinet sides, top, and bottom. This provides a strong attachment point and conceals the panel edge.
Dominos or Dowels (Advanced Options)
For an even more refined hidden joint, consider a Domino joiner or traditional dowel joinery. These methods create perfectly aligned, strong joints without external fasteners, making them fantastic for face frames, cabinet doors, or panels.

Constructing the Carcass and Shelving (H3)
This is where your design starts to take shape.
- Side Panels First: Begin by assembling the side panels with any fixed internal partitions or shelf supports. If using pocket holes, ensure they are on the inside surfaces where they will not be seen.
- Attaching Shelves: Secure fixed shelves using dadoes, pocket holes, or dowels. For adjustable shelving, drill shelf pin holes before assembly. A shelf pin jig makes this process accurate and repeatable. For more on shelves, see our guide: Mastering Shelf Woodworking: Your Definitive Guide for 2026.
- Back Panel Integration: If your design includes a back panel, attach it using rabbet joints, screws, or small brad nails and glue. Remember to cut out cable management holes before attachment.
- Doors and Drawers: If your design includes doors or drawers, these are typically fitted after the main carcass is assembled. Use Euro-style concealed hinges for a modern, clean look on doors.
Always use good quality wood glue on all mating surfaces, and ensure pieces are square and clamped securely until the glue dries. Wipe away any excess glue promptly with a damp cloth to prevent finish adhesion issues.
Integrated Cable Management and Finishing Touches (H2)
The true elegance of Building Custom Wooden TV Stands: Modern Media Consoles with Cable Management and Hidden Joinery lies not only in its robust structure but also in its ability to seamlessly integrate technology without visual clutter. This final stage focuses on bringing together all the functional elements and applying a professional finish.
Implementing Comprehensive Cable Management Solutions (H3)
An often-overlooked aspect, effective cable management transforms a potentially messy entertainment center into a sleek, organized media console. Plan and execute these steps carefully:
- Cable Ports and Grommets:
- Pre-Drill: Ensure all necessary cable pass-through holes are drilled into the back panel and internal shelves during the cutting phase. Use a hole saw for clean, round holes.
- Grommets: Install rubber or plastic grommets into these holes. They protect cables from sharp wood edges and provide a neat, finished appearance. Consider larger grommets (2-3 inches) for bundles of HDMI, power, and audio cables.
- Routed Channels and Conduits:
- Internal Channels: Utilize a router with a straight bit to create shallow channels along the back of shelves or inside cabinet uprights. These hidden pathways guide cables from one compartment to another, preventing them from dangling visibly.
- Vertical Chase: Design a vertical cable chase within one of the cabinet’s side walls or a central divider. This allows all cables to drop down to a single power outlet or surge protector point.
- Hidden Power Strip Compartment:
- Enclosed Box: Dedicate a small, accessible compartment (often at the bottom or back of the stand) to house a multi-outlet power strip and excess cable slack. This keeps all power connections and bulky adapters out of sight. Ensure adequate ventilation for this compartment.
- Access: Design this compartment with easy access, perhaps a hinged door or a removable panel, for plugging and unplugging devices.
- Cable Ties and Wraps:
- Once cables are routed, use Velcro cable ties or zip ties to bundle them neatly within the channels and compartments. This prevents tangles and makes future modifications easier.
Base and Leg Construction (H3)
The base of your TV stand contributes significantly to its stability and aesthetic.
- Recessed Toe Kick: For a built-in, furniture-like look, create a recessed toe kick. This lifts the main cabinet off the floor and provides a solid base.
- Modern Legs: For a lighter, more contemporary feel, attach metal or wooden legs. Consider tapered legs, hairpin legs, or a minimalist block design. Ensure they are securely fastened and can support the combined weight of the stand, TV, and all components. Unlock the Secrets of Brackets Woodworking: A Comprehensive Guide can offer guidance on secure fastening methods.
Sanding for a Flawless Surface (H3)
Proper sanding is crucial for a professional finish.
- Gradual Progression: Start with a coarser grit sandpaper (e.g., 100-120 grit) to remove machining marks and imperfections.
- Smooth Transition: Progress through finer grits (e.g., 150, 180, 220 grit). Avoid skipping grits, as this can leave scratches from the previous grit.
- Dust Removal: After each sanding stage, thoroughly remove all dust using a vacuum, compressed air, or a tack cloth. Dust left on the surface will be trapped by the finish, leading to a rough result.
Applying the Perfect Finish (H3)
The finishing process protects the wood, enhances its beauty, and defines the overall look of your custom media console. For a modern aesthetic, typically a clear finish or a subtle stain is preferred. For more detailed insights into various techniques, you might want to explore our general guide on wood finishing techniques.
Stains (Optional)
If you desire to change or deepen the wood’s color:
- Pre-Stain Conditioner: For woods like pine or maple, apply a pre-stain conditioner to help achieve a more even stain absorption and prevent blotchiness.
- Application: Apply stain evenly with a brush or rag, working in the direction of the grain. Allow it to penetrate for the recommended time, then wipe off excess. Test the stain on a scrap piece of the same wood first.
Topcoats
Choose a topcoat that provides durability and the desired sheen.
- Polyurethane (Oil-Based or Water-Based): A highly durable finish that offers excellent protection against scratches and moisture. Oil-based polyurethane tends to add a warm, amber tone, while water-based remains clearer. Apply thin coats, sanding lightly with fine-grit sandpaper (e.g., 320 grit) between coats.
- Lacquer: Dries very quickly, allowing for multiple coats in a short period, and offers a beautiful, smooth finish. It’s often sprayed for best results.
- Varnish: Similar to polyurethane in durability but often used in marine applications, providing excellent water resistance.
- Hardwax Oil: A modern, natural-looking finish that penetrates the wood and provides a durable, low-sheen surface. It’s easy to apply and repair.
Application Tips:
- Clean Environment: Apply finishes in a dust-free environment as much as possible.
- Thin Coats: Multiple thin coats are always better than one thick coat. This prevents drips, ensures even drying, and results in a more durable finish.
- Curing Time: Allow adequate curing time between coats and before putting the TV stand into service. This can vary from hours to weeks, depending on the finish type.
Final Assembly and Placement (H3)
With the finish cured, carefully move your custom wooden TV stand into its final position.
- Install Hardware: Attach any remaining hardware like door pulls, drawer slides, or adjustable shelf pins.
- Leveling: Use furniture glides or small shims to ensure the stand is perfectly level on your floor, preventing wobbles.
- Cable Integration: Route all your media component cables through the designed management system. Connect your TV and other devices, enjoying the clean, clutter-free aesthetic of your newly built, modern media console.
Conclusion
Building Custom Wooden TV Stands: Modern Media Consoles with Cable Management and Hidden Joinery is a deeply satisfying project that combines practical skills with aesthetic vision. By following a structured approach from thoughtful design and material selection to precise cutting, robust hidden joinery, and meticulous finishing, you can create a piece of furniture that is not only functional but also a testament to your craftsmanship. In a 2026 home, a custom media console with integrated cable management and a minimalist design stands out as a focal point, bringing order and sophistication to your entertainment space.

The use of efficient tools like the track saw and pocket hole jig empowers even those with small workshops to achieve professional-grade results. Embrace the challenge of planning for every cable, perfecting every joint, and applying a flawless finish. The result will be a durable, beautiful, and highly personalized addition to your home that perfectly accommodates your modern media setup.
Actionable Next Steps:
- Measure and Design: Take precise measurements of your TV and all media components. Sketch a detailed design, paying close attention to internal dimensions and cable routing.
- Source Materials: Select your preferred wood and purchase high-quality hardware like hinges, drawer slides, and cable grommets.
- Gather Tools: Ensure you have the necessary tools, including a track saw, pocket hole jig, router, and clamps.
- Practice Joints: If new to hidden joinery, practice on scrap wood before making cuts on your project pieces.
- Build and Finish: Follow the steps outlined, taking your time with assembly and especially with the finishing process, to achieve a durable and beautiful custom wooden TV stand.
