
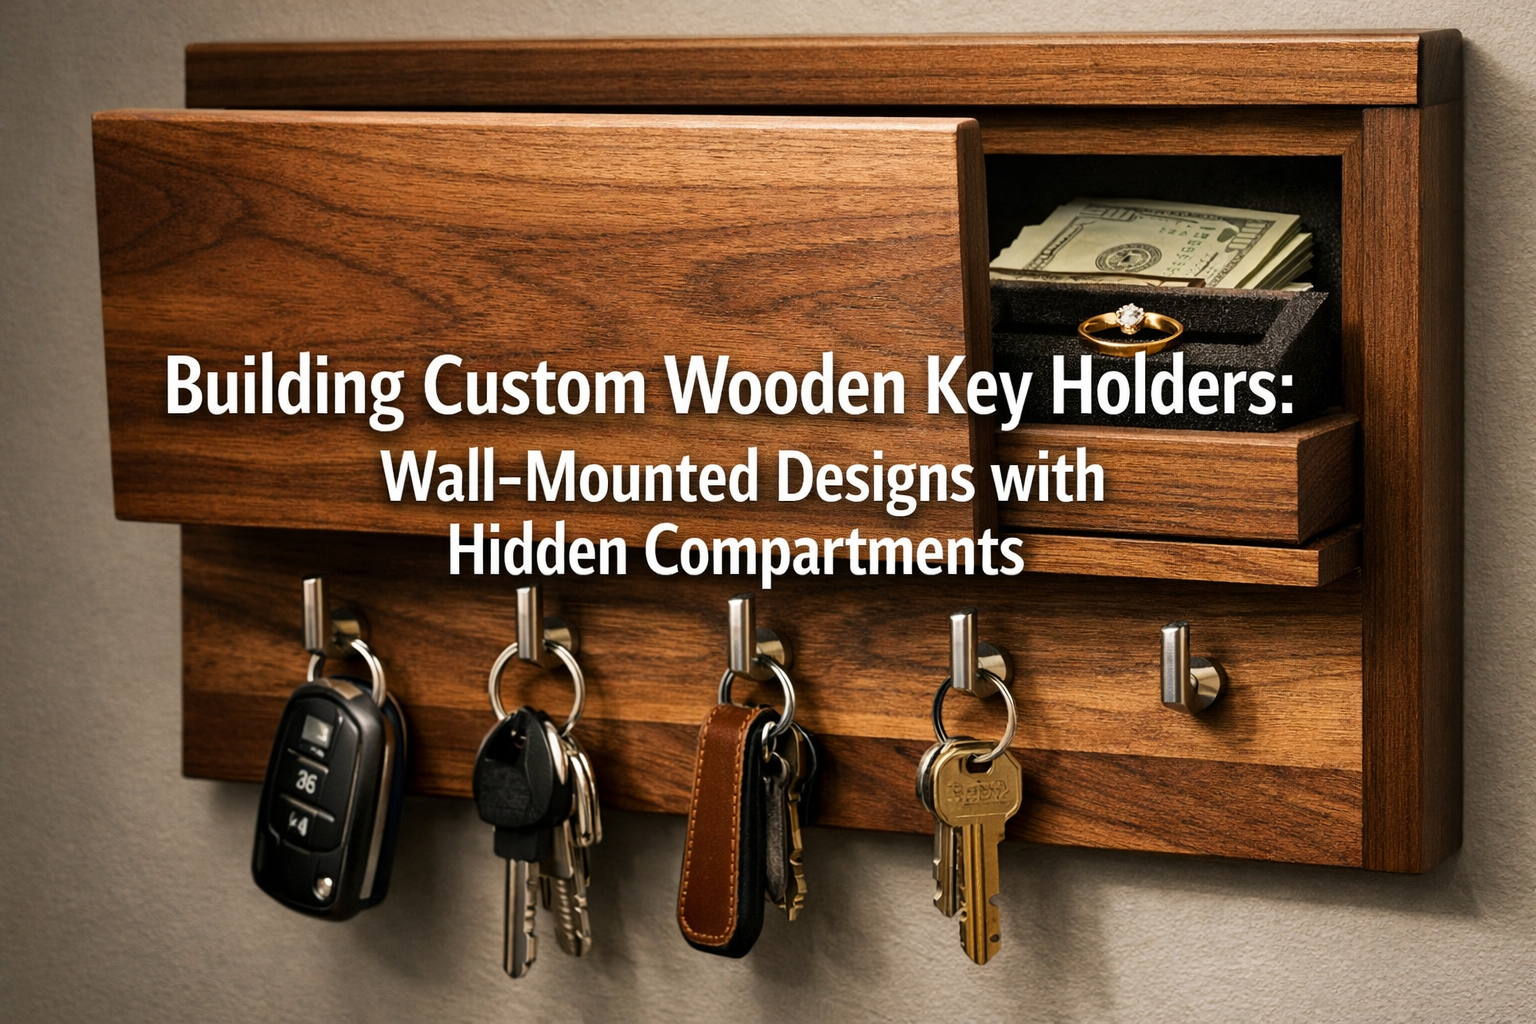

The entryway of any home in 2026 is more than just a transition space; it’s a critical command center for organization and security. As lifestyles become increasingly streamlined, the demand for elegant, functional, and secure home solutions rises. This article delves into the art and craft of Building Custom Wooden Key Holders: Wall-Mounted Designs with Hidden Compartments, offering a sophisticated blend of traditional woodworking artistry and modern security. We’ll explore how combining robust pocket-hole joinery with refined hand-cut techniques can create multifunctional entryway organizers that not only declutter your space but also provide a discreet sanctuary for valuables. This project taps directly into 2026’s organized home trends, offering a rewarding build for woodworkers of all skill levels while empowering them to master essential tool techniques.
A custom wooden key holder with a hidden compartment is more than just a place to hang your keys. It’s a statement piece, a secret storage solution, and a testament to personalized craftsmanship. Imagine a beautiful piece of woodworking that seamlessly blends with your home decor, offering convenient key storage while subtly safeguarding small, important items from plain sight. This guide will walk you through the entire process, from design conceptualization to the final finish, ensuring you create a piece that is both practical and a point of pride.

Key Takeaways
- Integrated Functionality & Security: Learn to design and build a wall-mounted key holder that serves as both an organized key drop and a discreet, secure storage space for valuables.
- Hybrid Joinery Mastery: This project offers a unique opportunity to combine the speed and strength of pocket-hole joinery with the precision and aesthetic appeal of hand-cut joinery, suitable for woodworkers from beginners to advanced.
- Customization & Personalization: Discover how to tailor your key holder’s size, wood species, finish, and compartment mechanism to perfectly match your home’s aesthetic and your specific security needs.
- Essential Woodworking Skills: Gain practical experience in precise cutting, assembly, finishing, and wall-mounting techniques, enhancing your overall woodworking repertoire.
- Elevate Home Organization: Create a functional and beautiful piece that contributes significantly to decluttering and organizing your entryway, aligning with contemporary home design trends in 2026.
Designing Your Wall-Mounted Key Holder with Hidden Compartments
The foundation of any successful woodworking project lies in meticulous design. When Building Custom Wooden Key Holders: Wall-Mounted Designs with Hidden Compartments, careful planning is paramount to ensure both aesthetic appeal and functional security. This initial phase involves considering the overall size, style, wood selection, and, most importantly, the mechanism and integration of the hidden compartment.
Conceptualizing Size and Style
Before making the first cut, visualize where your key holder will reside.
- Location: Will it be in a narrow hallway, a spacious mudroom, or near the front door? The available wall space will dictate the maximum dimensions.
- Scale: A key holder that is too large can overwhelm a small space, while one that is too small might look lost on a grand wall. Aim for balance.
- Aesthetic Integration: Consider your home’s existing decor. Is it modern, rustic, minimalist, or traditional? The key holder should complement this style.
| Style | Characteristics | Recommended Wood | Design Elements |
|---|---|---|---|
| Modern/Minimalist | Clean lines, geometric shapes, absence of clutter, smooth surfaces. | Maple, Ash, Walnut (dark stains), Bamboo. | Flush-mounted panels, sleek metal hooks, push-to-open compartment mechanisms. |
| Rustic/Farmhouse | Distressed finishes, natural imperfections, robust construction, warm tones. | Reclaimed Barnwood (see Barnwood Accent Walls), Oak, Pine. | Cast iron hooks, visible wood grain, sliding panel compartments. |
| Traditional/Classic | Ornate details, intricate carvings, darker finishes, timeless elegance. | Cherry, Mahogany, Dark Walnut. | Decorative molding, brass hooks, hinged compartments with magnetic catches. |
| Eclectic/Bohemian | Mix of textures, colors, and global influences, unique and artistic. | Mixed woods, painted wood, live edge wood (check out Live Edge Wood Projects). | Carved elements, colorful accents, disguised compartment as a decorative box. |
“A well-designed key holder isn’t just about utility; it’s about creating a welcoming first impression and a sense of calm in your daily routine.”
Wood Selection: More Than Just Looks
Choosing the right wood species is crucial, as it impacts not only the appearance but also the durability and workability of your key holder.
- Hardwoods (Oak, Maple, Walnut, Cherry): These are dense, durable, and offer beautiful grain patterns. They hold fasteners well and are resistant to dings and scratches. They can be more challenging to work with and are generally more expensive.
- Softwoods (Pine, Fir): More affordable and easier to work with, softwoods are great for beginners. However, they are softer and more prone to dents. They accept stains differently than hardwoods.
- Reclaimed Wood: For a piece with character and a story, sourcing and restoring urban-harvested and reclaimed wood is an excellent option. It adds unique texture and history, perfect for rustic or industrial styles.
Consider the grain pattern, color, and how the wood will accept your chosen finish. For intricate joinery, a stable wood with a tight grain is often preferred.
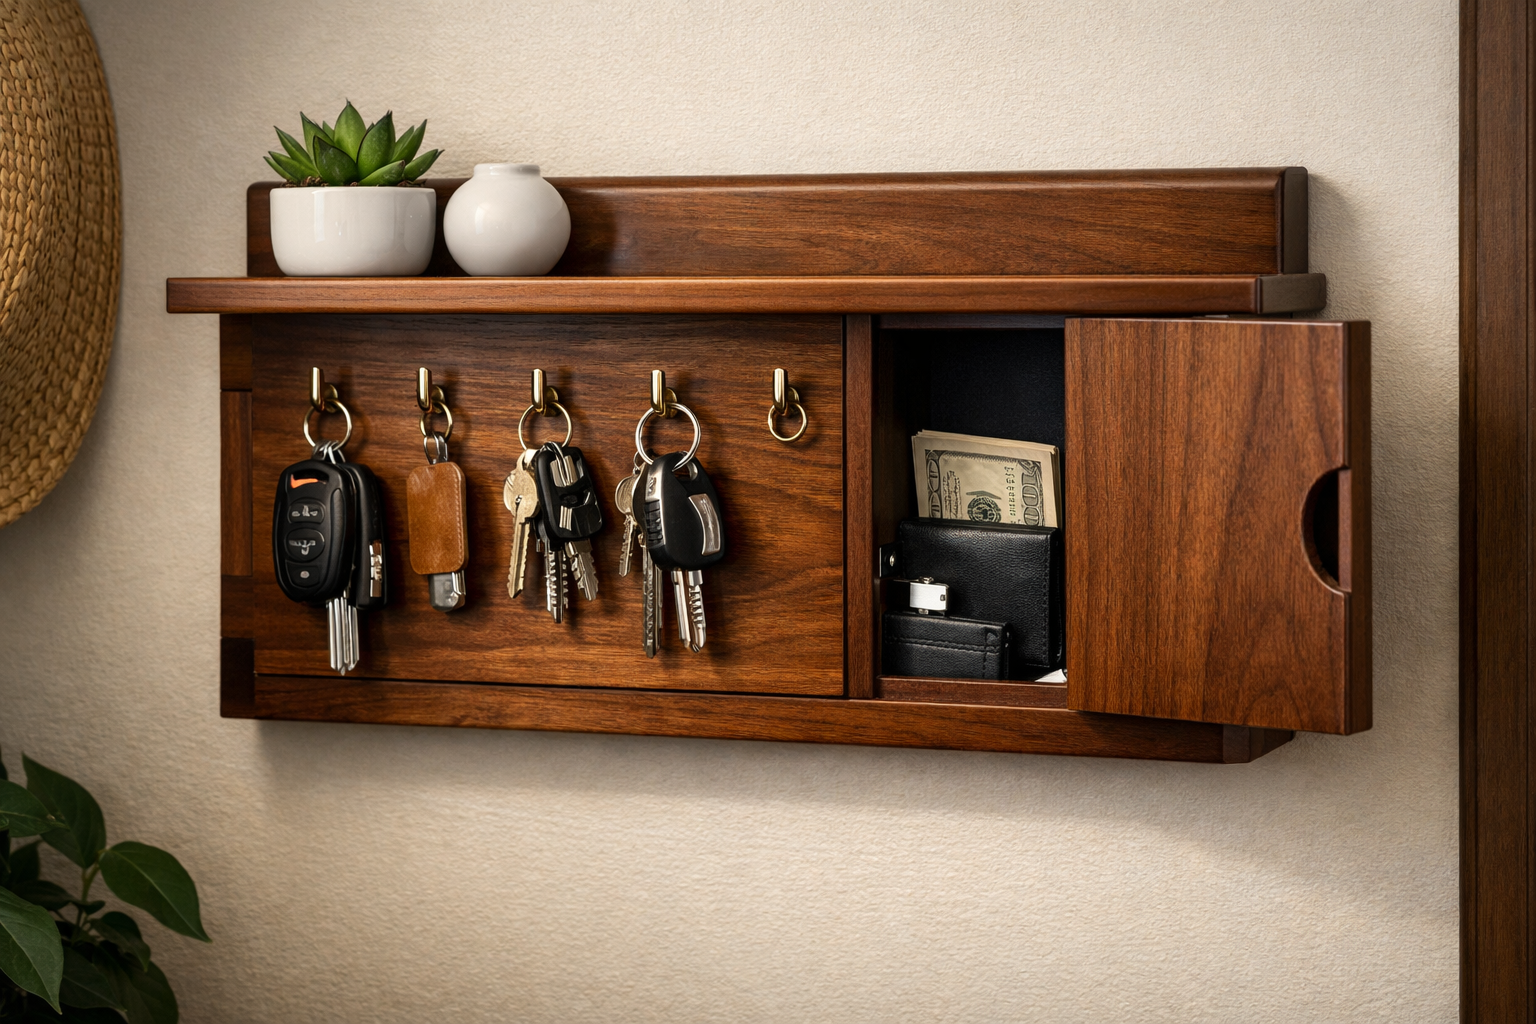
Integrating the Hidden Compartment: Security Meets Secrecy
The hidden compartment is the defining feature of this project. Its design requires careful thought to ensure it remains discreet and secure.
Type of Compartment:
- Sliding Panel: A section of the key holder that slides open horizontally or vertically. This can be integrated into the back panel or a side panel.
- Hinged Door: A small panel that swings open on hidden hinges. This can be disguised as part of the frame, a decorative element, or even behind a set of hooks.
- Drawer: A small, shallow drawer that pulls out. This requires more complex joinery but offers easy access.
- Magnetic Release: For advanced users, a magnetic lock that requires a specific magnet to open, offering a higher level of security.
Location:
- Behind the Main Panel: The entire key holder could swing open to reveal a compartment behind it, flush with the wall.
- Integrated into the Body: A section of the key holder itself, perhaps a thicker side or bottom piece, could house the compartment.
- Disguised Shelf: A small, seemingly decorative shelf that slides or pivots to reveal the storage.
Mechanism:
- Friction Fit: Simplest, but least secure.
- Magnetic Catches: Common for small doors or panels.
- Push-to-Open Latches: Creates a seamless, handle-free look.
- Finger Pulls/Hidden Notches: Allows access without visible hardware.
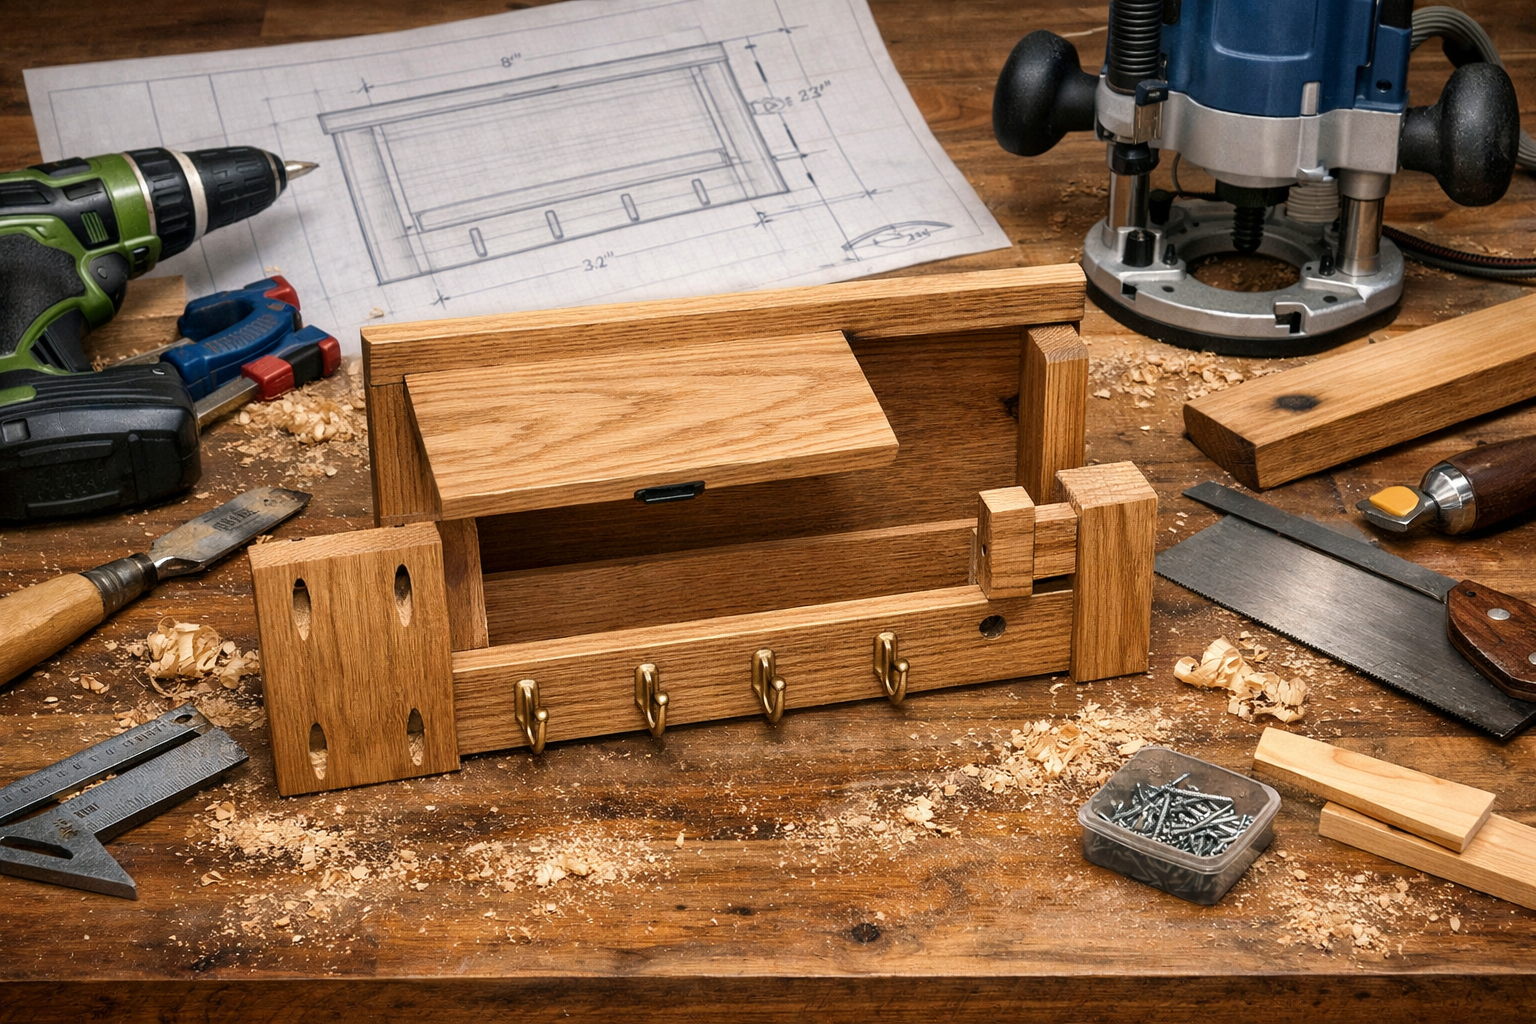
Sketching and Prototyping
Once you have a general idea, create detailed sketches.
- Front, Side, and Top Views: Draw your design from multiple angles, including dimensions.
- Compartment Detail: Sketch the hidden compartment’s mechanism, showing how it opens and closes, and how it will be secured.
- Joinery Plan: Indicate where you will use pocket holes and where hand-cut joinery (like mortise and tenon or dovetails) will be employed. This project aims to combine both for strength and aesthetics. For example, pocket holes might be used for the main frame assembly, while a finely crafted sliding compartment panel might use a dado and rabbet joint.
Consider building a small-scale prototype from scrap wood or even cardboard. This allows you to test the compartment mechanism, assess proportions, and identify potential challenges before working with your chosen lumber.
Precision Joinery and Assembly Techniques
The integrity and beauty of your custom wooden key holder depend heavily on the quality of its joinery and assembly. This project provides an excellent opportunity to blend modern efficiency with traditional craftsmanship, utilizing both pocket-hole and hand-cut joinery techniques. Mastering these methods is key to Building Custom Wooden Key Holders: Wall-Mounted Designs with Hidden Compartments that are both robust and aesthetically pleasing.
Cutting Your Components
Accuracy in cutting is non-negotiable.
- Measure Twice, Cut Once: Always verify your measurements before making any cut.
- Crosscutting: Use a miter saw or a table saw with a crosscut sled for precise square cuts.
- Ripping: A table saw is ideal for ripping boards to width.
- Router Usage: A router is invaluable for creating dados, rabbets, and decorative edges. Consider using templates for repeatable precision, as discussed in our article on templates for woodworking.
Remember to account for the kerf (the thickness of the saw blade) when making multiple cuts from a single board.
Hybrid Joinery: The Best of Both Worlds
This project leverages a hybrid approach to joinery, combining the speed and strength of pocket holes with the refined aesthetics of hand-cut joinery.
1. Pocket-Hole Joinery
Pocket holes are excellent for strong, fast, and relatively simple construction, particularly for the main frame or box structure where the joint might be less visible or where speed is a priority.

- Tools: A Kreg Jig or similar pocket-hole jig, clamps, and specific pocket-hole screws.
- Process:
- Mark the locations for your pocket holes.
- Set your pocket-hole jig for the correct material thickness.
- Drill the angled pocket holes into the end grain or edge of one of the mating pieces.
- Apply wood glue to the joint surfaces.
- Clamp the pieces together firmly, ensuring they are flush.
- Drive the self-tapping pocket-hole screws into the holes.
- Advantages: Strong, relatively quick, doesn’t require complex clamps, and can be concealed with wood plugs.
- Application: Ideal for attaching the sides to the top/bottom panels of the main key holder frame, or for securing the back panel. For more insights into fasteners, check out Mastering Woodworking Screws: Your Ultimate Guide for 2026.
2. Hand-Cut Joinery for the Hidden Compartment
For the hidden compartment, hand-cut joinery offers superior precision, strength, and a more refined aesthetic, crucial for mechanisms that need to operate smoothly and discreetly. This is where you can truly showcase your craftsmanship.
- Dado Joints: Perfect for creating grooves that a sliding panel or a drawer bottom can ride in. Cut these with a router or a dado stack on a table saw.
- Rabbet Joints: Used to create a recess along the edge of a board, often to accept a back panel or to form part of a lid.
- Mortise and Tenon (for a hinged compartment door): If your hidden compartment involves a small hinged door, a small, blind mortise and tenon joint can provide exceptional strength and a clean appearance. This involves cutting a rectangular hole (mortise) into one piece and a corresponding projection (tenon) on the end of another.
- Box Joints/Finger Joints (for a pull-out drawer): For a more complex pull-out drawer, box joints provide robust, attractive corner connections. This is a great skill to develop, and our guide on Mastering the Woodworking Box Lid: A Comprehensive Guide for 2026 offers relevant insights into box construction.
Technique for Hand-Cut Joinery:
- Marking: Use a marking knife and square for absolute precision.
- Cutting: Employ chisels, hand saws, or a router (with jigs) for controlled material removal.
- Test Fits: Always test-fit your joints before applying glue. They should fit snugly but not require excessive force.
Assembly of the Main Body
- Dry Fit: Assemble all components without glue first to ensure everything fits correctly.
- Glue Up: Apply a high-quality wood glue (like Titebond III for strength and open time) to all mating surfaces.
- Ensure even coverage without excessive squeeze-out.
- For strength, consider adding a few drops of super glue on wood for immediate tack, then rely on the wood glue for long-term hold.
- Clamping: Use appropriate clamps (bar clamps, pipe clamps, parallel clamps) to apply even pressure until the glue dries. Ensure the assembly remains square. Use cauls (scrap wood pads) to protect your workpiece from clamp marks.
- Squaring: Double-check that your assembly is square using a reliable framing square or speed square.
Integrating the Hidden Compartment
This is the most critical step in Building Custom Wooden Key Holders: Wall-Mounted Designs with Hidden Compartments.
- Sliding Mechanism: If using a sliding panel, ensure the dados are perfectly straight and parallel. Test the slide repeatedly. Small shims or a thin layer of wax can help achieve a smooth, silent operation.
- Hinged Mechanism: Use concealed barrel hinges or European-style cabinet hinges for a seamless look. Ensure the hinges are mortised accurately so the door sits flush. Magnetic catches or push-to-open latches should be installed precisely to hold the door securely.
- Drawer Mechanism: If building a small drawer, precise box joints (or dovetails for a truly high-end piece) are essential. Small, flush-mounted drawer slides or wooden runners can be used.
Pro Tip: For maximum concealment, use wood for the compartment components that matches the grain and color of the surrounding structure as closely as possible.
Finishing and Installation: Bringing Your Key Holder to Life
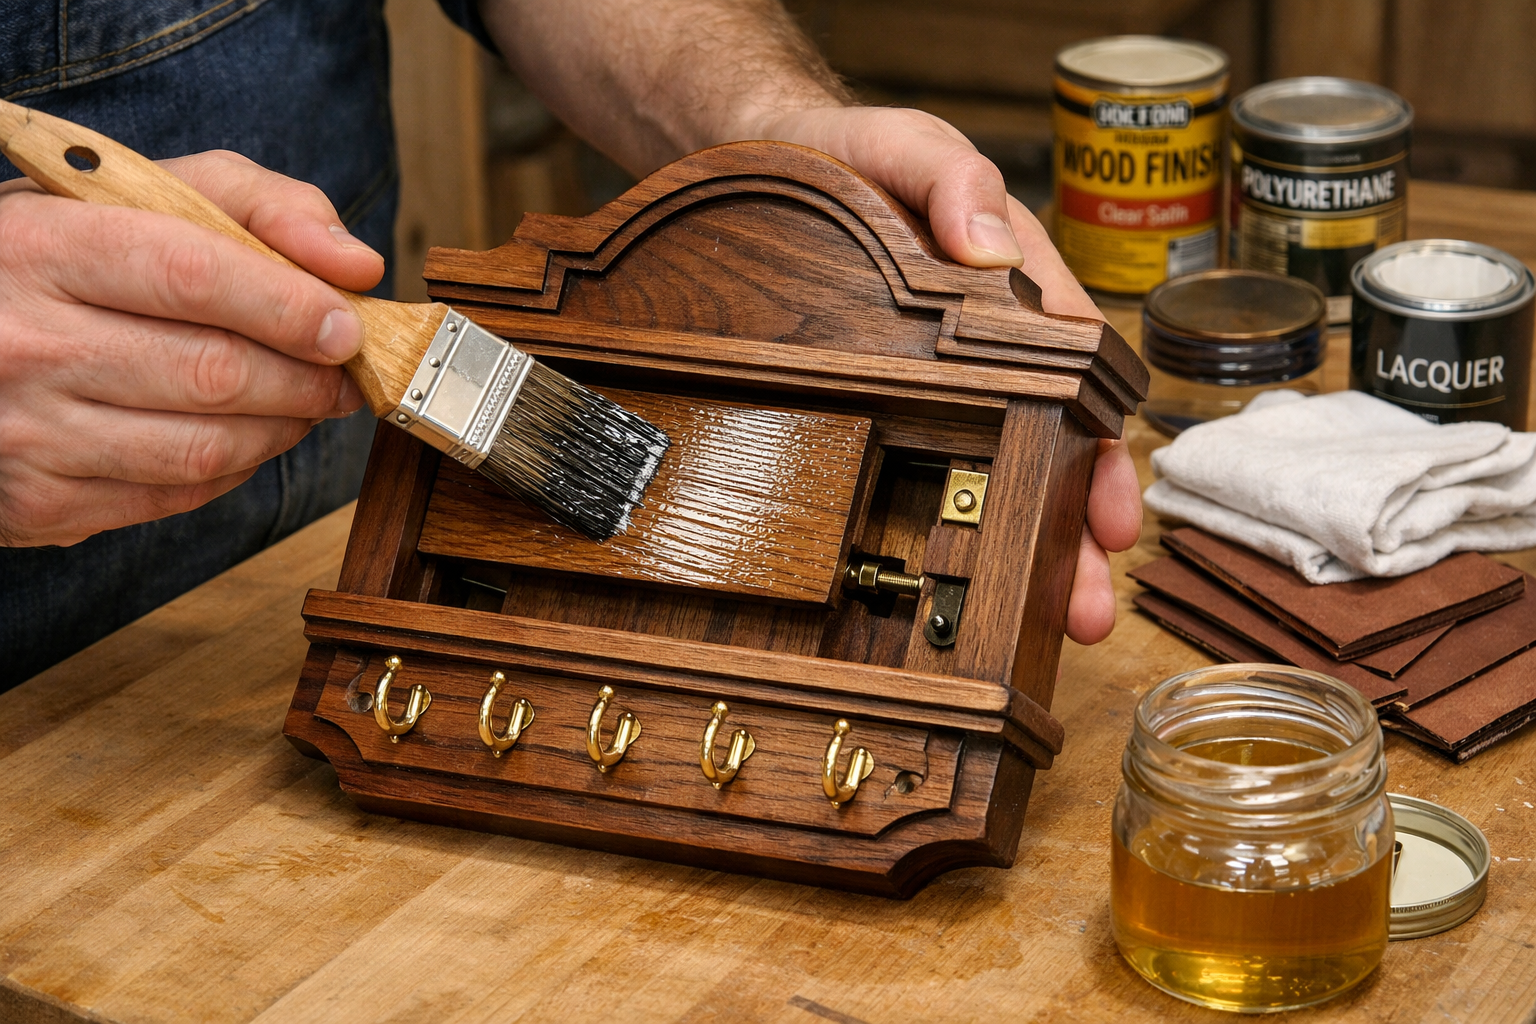
After the careful work of design and joinery, the finishing touches and proper installation are what truly elevate your custom wooden key holder. This final stage is crucial for durability, aesthetic appeal, and securely mounting your new, secure entryway organizer.
Sanding: The Foundation of a Great Finish
A beautiful finish starts with meticulous sanding.
- Grit Progression: Begin with a coarser grit sandpaper (e.g., 80 or 100-grit) to remove any major imperfections, glue squeeze-out, or tool marks.
- Progressive Finesse: Gradually move through finer grits (120, 150, 180, 220-grit). For very smooth surfaces, you might even go up to 320 or 400-grit.
- Even Pressure: Use a random orbital sander for larger flat surfaces and sanding blocks for edges and curves. Always sand with the grain to avoid visible scratches.
- Dust Removal: Between each grit, thoroughly clean the piece to remove all dust. A shop vacuum, compressed air, and a tack cloth are essential. Any remaining dust can compromise the finish.
Applying the Finish: Protection and Beauty
Choosing the right finish protects the wood and enhances its natural beauty.
- Stains: If you want to alter the wood’s color, apply a wood stain before the topcoat. Test the stain on a scrap piece of the same wood to ensure you achieve the desired color. Wipe on, then wipe off excess for an even application.
- Topcoats: These provide protection against moisture, scratches, and wear. Popular choices include:
- Polyurethane: Highly durable and available in oil-based or water-based formulas. Spraying water-based poly can achieve a very smooth, even finish, but brushing is also effective. For best results, follow our guide to polyurethane not drying if you encounter issues.
- Lacquers: Fast-drying and create a hard, clear finish. Best applied with a sprayer.
- Oils (Tung Oil, Linseed Oil): Penetrate the wood, providing a natural, warm look and good protection. Require more frequent reapplication. For pine, oil on pine provides a beautiful, natural look.
- Wax: Can be applied over an oil or polyurethane finish for an added layer of protection and a silky smooth feel. Learn more about wax on top of polyurethane.
Application Tips:
- Clean Environment: Apply finishes in a dust-free area to prevent imperfections.
- Thin Coats: Multiple thin coats are always better than one thick coat. This prevents drips, bubbles, and ensures proper curing.
- Light Sanding Between Coats: Lightly sand (220-400 grit) between coats of topcoat to ensure adhesion and remove any dust nibs. Clean thoroughly after sanding.
- Cure Time: Allow ample time for the finish to fully cure before putting the key holder into heavy use. This can take several days to weeks, depending on the product.
Hardware Installation
Once the finish is fully cured, it’s time to install the hardware.
Key Hooks: Mark the locations for your key hooks precisely. Predrill pilot holes to prevent splitting the wood, especially with hardwoods. Choose hooks that complement your design style (e.g., brass, chrome, matte black, wrought iron).
Hidden Compartment Hardware: Install any magnetic catches, push-to-open latches, or small pulls for your hidden compartment. Ensure they operate smoothly and discreetly.
Wall Mounting Hardware:
- D-Ring Hangers: Simple and effective for smaller, lighter key holders. Attach them securely to the back of the key holder.
- Keyhole Hangers: Recess these into the back of the piece for a flush mount.
- French Cleat: For heavier key holders or those requiring maximum stability, a French cleat is an excellent choice. This involves two interlocking pieces of wood, one attached to the key holder and one to the wall. This provides robust support and allows for easy removal if needed.
Wall Installation: Secure and Level
Proper wall installation ensures your key holder is safe, secure, and visually appealing.
- Locate Studs: Use a reliable stud finder to locate wall studs. Mounting into studs provides the strongest possible hold.
- Marking: Hold your key holder against the wall at the desired height and mark the screw locations. Use a level to ensure it is perfectly horizontal.
- Predrill: Predrill pilot holes into the wall studs.
- Anchors (if no stud): If mounting where no stud is available, use heavy-duty wall anchors (toggle bolts or self-drilling anchors) rated for the weight of your key holder plus its potential contents.
- Mounting: Carefully screw the key holder to the wall. Double-check for levelness one last time.
Safety First: When drilling into walls, be aware of potential electrical wires or plumbing lines.
By meticulously following these finishing and installation steps, you’ll ensure that your custom wooden key holder with a hidden compartment is not only a functional and secure item but also a beautiful, long-lasting addition to your home’s organized entryway in 2026.

Conclusion
Building Custom Wooden Key Holders: Wall-Mounted Designs with Hidden Compartments is a deeply rewarding woodworking project that merges practicality with clever design. This endeavor allows woodworkers of all skill levels to create a truly unique and functional piece for their home. By embracing a hybrid approach to joinery, combining the efficiency of pocket holes with the refined craftsmanship of hand-cut techniques, you can construct a robust and beautiful entryway organizer that not only declutters but also discreetly safeguards small valuables.
This project reinforces crucial woodworking skills, from precise measurement and cutting to thoughtful assembly and meticulous finishing. It underscores the importance of choosing the right wood for both aesthetic and structural integrity, and it challenges you to think creatively about integrating secure, hidden compartments that enhance both form and function. In an era where organized homes are a priority, your custom creation stands as a testament to personalized design and practical security, perfectly aligning with the sophisticated trends of 2026.
Actionable Next Steps:
- Refine Your Design: Revisit your sketches and finalize your chosen wood species, dimensions, and hidden compartment mechanism. Consider the specific items you intend to store.
- Gather Materials: Compile a list of all necessary lumber, hardware (hooks, hinges, catches), and finishing supplies. Source high-quality wood that matches your aesthetic vision.
- Assemble Your Tools: Ensure you have the necessary hand tools (saws, chisels, marking knives) and power tools (miter saw, table saw, router, pocket-hole jig, sander) in good working order. Refer to our guide on Precision Woodworking Tools: Top 5 Picks for Your Shop to ensure you have the best gear.
- Start Cutting: Begin with the largest components and work your way to the smaller, more intricate pieces, always prioritizing accuracy.
- Practice Joinery: If you’re new to hand-cut joinery, practice on scrap pieces before committing to your final lumber. A precise joint makes all the difference.
- Build and Finish: Take your time with the assembly, ensuring squareness and strong glue-ups. Dedicate ample time to sanding and applying thin, even coats of your chosen finish for a professional result.
- Install with Confidence: Securely mount your masterpiece, knowing you’ve created a custom solution that combines style, organization, and a touch of hidden security for your home.
Your custom wooden key holder will not only serve a vital purpose but will also be a conversation starter and a source of personal pride for years to come.
