
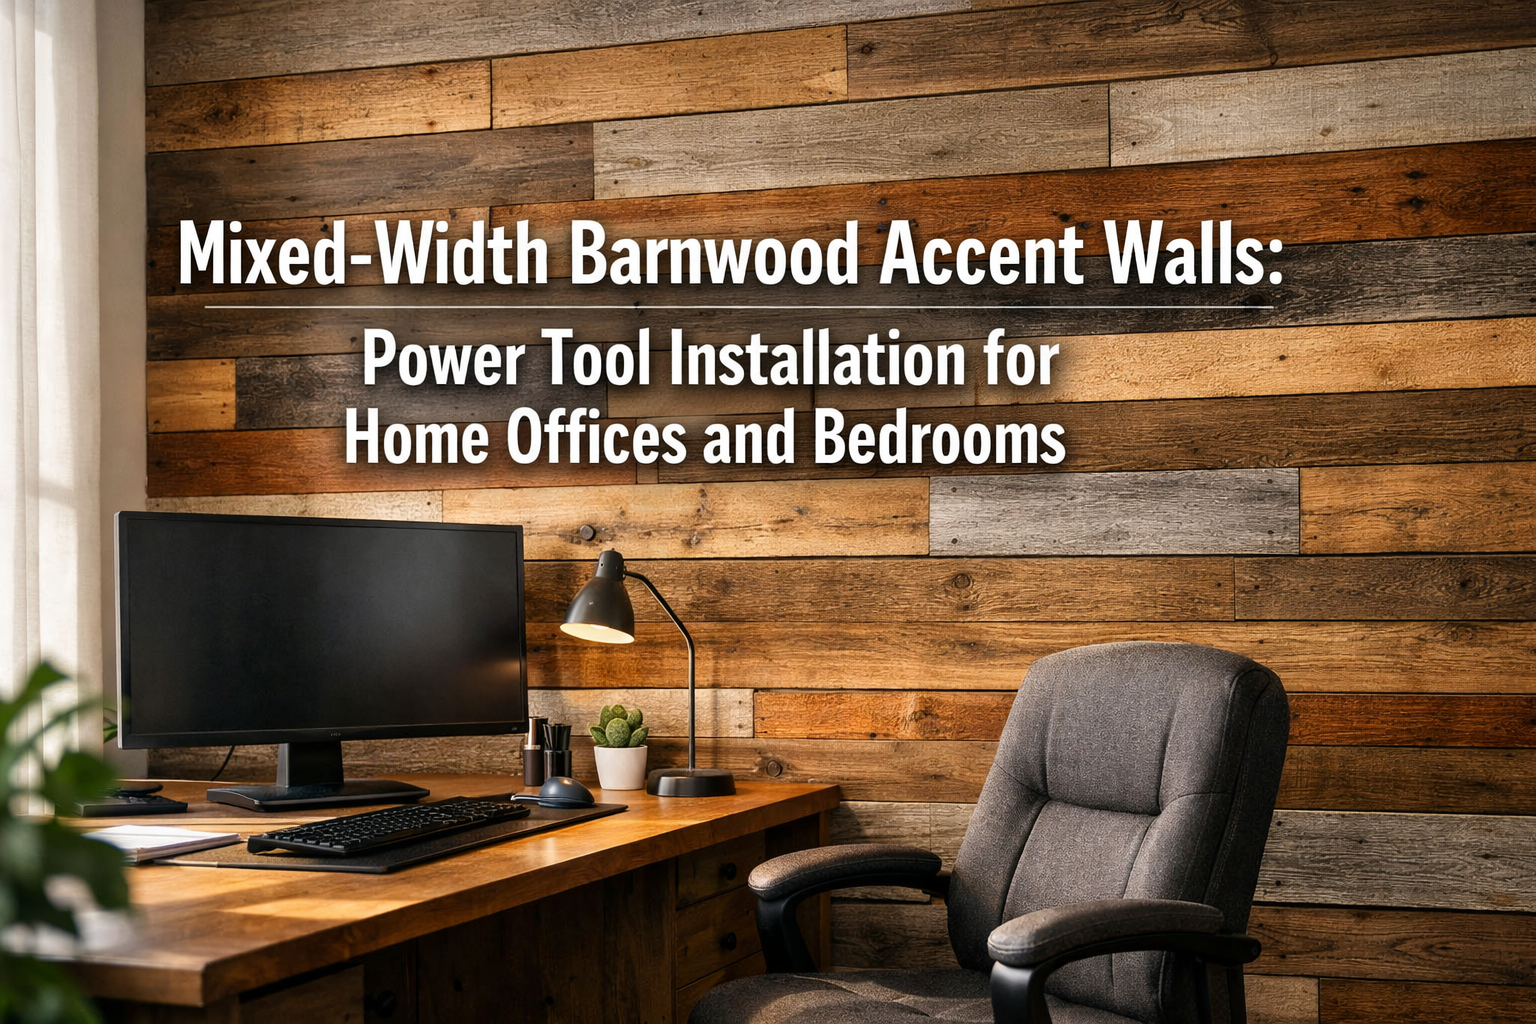

In 2026, home design continues to embrace authenticity and texture, with a strong demand for elements that bring warmth and character into modern living spaces. Beyond the ubiquitous shiplap, the rustic-modern aesthetic finds its pinnacle in Mixed-Width Barnwood Accent Walls: Power Tool Installation for Home Offices and Bedrooms. These walls offer a dynamic visual interest, transforming mundane surfaces into rugged, textured statements that are not only visually appealing but also remarkably effective as a sophisticated backdrop for video calls in a home office or a tranquil, inviting feature in a bedroom. This comprehensive guide delves into professional techniques, emphasizing precision, efficiency, and durability, ensuring your barnwood accent wall is a lasting testament to skilled craftsmanship.
Reclaimed barnwood brings with it a rich history, unique imperfections, and an unparalleled aesthetic that cannot be replicated with new materials. The variation in width of the boards further enhances this appeal, creating a visually engaging pattern that speaks to bespoke design rather than mass production. This article will equip you with the knowledge and techniques to confidently execute a power tool installation, transforming your space with a custom, high-impact design feature.

Key Takeaways
- Design for Impact: Plan your mixed-width barnwood layout carefully, considering board variety, room dimensions, and the desired visual flow.
- Source Quality Reclaimed Wood: Opt for genuine barnwood for authentic character, ensuring it’s properly de-nailed, cleaned, and free of active pests.
- Master Power Tool Techniques: Utilize miter saws, nail guns, and stud finders for efficient, precise, and secure installation.
- Ensure Structural Integrity: Always attach boards securely to wall studs to prevent warping and ensure long-term stability.
- Protect and Preserve: Apply a suitable low-VOC finish to enhance durability, facilitate cleaning, and bring out the wood’s natural beauty.
Planning Your Rustic-Modern Design 🏡✨

The success of a Mixed-Width Barnwood Accent Wall: Power Tool Installation for Home Offices and Bedrooms begins long before the first board is cut. Meticulous planning is crucial for achieving a professional, aesthetically pleasing, and durable result. This initial phase involves conceptualizing the design, selecting the right materials, and preparing the installation site.
Conceptualizing Your Barnwood Wall
Before acquiring any materials, visualize the finished wall. Consider:
- Room Function: For a home office, think about how the wall will appear on video calls. A horizontally oriented mixed-width pattern can create a sense of spaciousness, while vertical applications can add height. The varied textures and natural tones of barnwood offer a warm, professional backdrop.
- Aesthetic Goal: Are you aiming for a cohesive, subtle texture, or a bolder, more dramatic statement? Mixed widths inherently add visual interest, but the degree of variation you choose (e.g., boards ranging from 3 inches to 8 inches) will dictate the final look.
- Layout Pattern: While a random staggering of lengths is common for a rustic look, consider repeating patterns or even geometric designs with your mixed widths for a more contemporary twist. Sketching out several options can help you decide.
💡 Pull Quote: “A thoughtfully designed mixed-width barnwood wall transforms a room from ordinary to extraordinary, acting as both a visual anchor and a conversation starter.”
Sourcing and Preparing Reclaimed Barnwood
The soul of your accent wall lies in the wood itself. Reclaimed barnwood typically comes with a story, evident in its unique patinas, saw marks, and nail holes.
Selection Criteria:
- Authenticity: Seek out genuine reclaimed barnwood from reputable suppliers. Look for boards with natural weathering, varying depths of color, and unique imperfections.
- Dimension Variety: Specify your desired range of widths (e.g., 3″, 5″, 7″ wide boards) and lengths. Having a good mix ensures the “mixed-width” aesthetic truly stands out.
- Condition: Ensure the wood is thoroughly cleaned, de-nailed, and kiln-dried to prevent warping and pest issues. If purchasing directly from a barn, proper cleaning and treatment are paramount. For more on working with aged wood, consider exploring Reclaimed Wood Restoration: Adding Narrative & Soul for Modern Spaces.
Pre-Installation Preparation:
- Acclimatization: Allow the barnwood to acclimate to your home’s humidity and temperature for at least 7-10 days. This minimizes shrinkage or expansion after installation.
- Light Sanding (Optional): Lightly sand any rough edges or splinters that could pose a hazard, but avoid over-sanding the face, which can diminish the rustic character.
- Inspection: Inspect each board for severe warping or hidden nails. Discard or trim problematic pieces.
Wall Preparation and Measurement
Proper wall preparation is non-negotiable for a professional installation.
- Clear the Area: Remove all furniture, decor, and wall hangings.
- Remove Obstacles: Take off electrical outlet covers, light switch plates, and any baseboards you intend to replace or incorporate into the design.
- Clean the Wall: Ensure the wall is clean, dry, and free of dust or grease.
- Repair Imperfections: Patch any large holes or significant damage. While barnwood hides minor imperfections, a flat surface is essential for proper adhesion and a smooth finish.
- Locate Studs: Use a reliable stud finder to mark the location of every stud on the wall. Drawing vertical lines indicating stud centers will be invaluable during installation. This ensures you’re attaching your boards to the structural framing, not just drywall, providing maximum security for your Mixed-Width Barnwood Accent Walls: Power Tool Installation for Home Offices and Bedrooms.
- Measure Accurately: Measure the height and width of your accent wall area. Calculate the total square footage to estimate the amount of wood needed, adding 10-15% for cuts and waste. Consider creating a detailed cut list based on your chosen pattern.
Power Tool Installation Techniques 🛠️
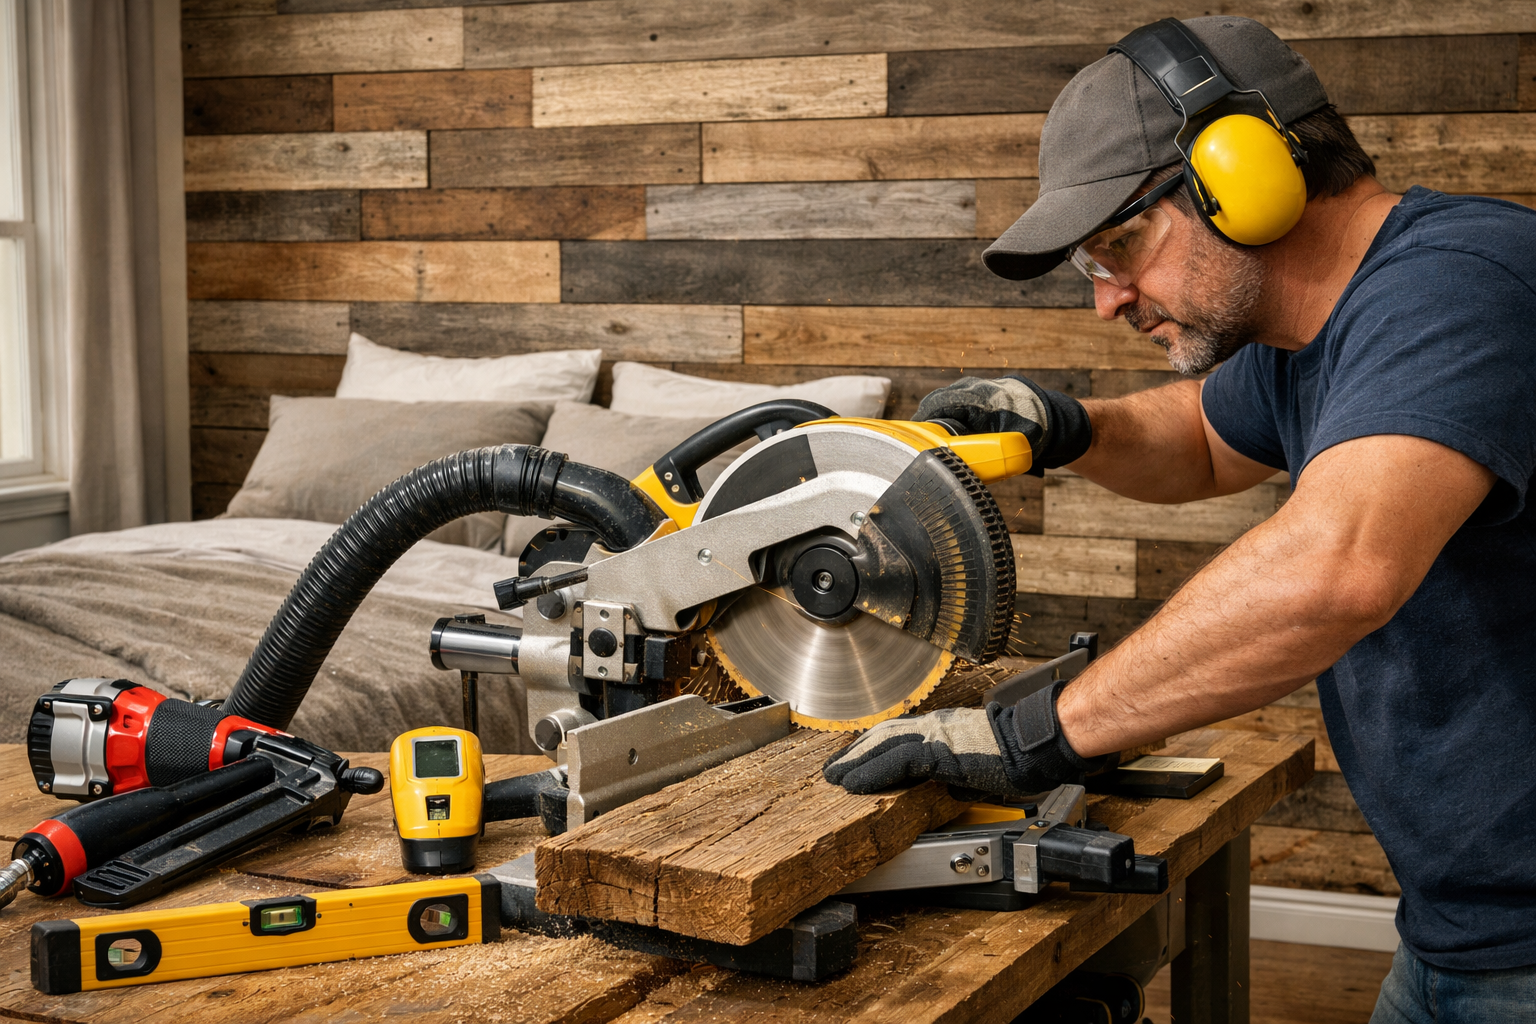
Executing the installation of Mixed-Width Barnwood Accent Walls: Power Tool Installation for Home Offices and Bedrooms with power tools offers precision, speed, and a professional finish. This section details the step-by-step process, emphasizing safety and efficiency.
Essential Power Tools and Safety Gear
Before beginning, gather your tools and prioritize safety:
- Miter Saw: Indispensable for clean, accurate crosscuts. A compound miter saw allows for angled cuts if your design requires them.
- Nail Gun: A pneumatic or cordless nail gun (e.g., 18-gauge brad nailer or 16-gauge finish nailer) will significantly speed up installation and provide secure fastening.
- Stud Finder: Crucial for locating wall studs.
- Level (4-foot and Torpedo): For ensuring boards are perfectly straight.
- Tape Measure and Pencil: For marking cuts and measurements.
- Jigsaw or Oscillating Multi-Tool: For cutting around outlets, windows, or intricate shapes.
- Safety Glasses: Always wear eye protection when operating power tools.
- Hearing Protection: Essential when using miter saws and nail guns.
- Work Gloves: To protect hands from splinters.
- Dust Mask: Especially when cutting barnwood, which can produce fine dust.
Step-by-Step Installation Process
This guide focuses on horizontal installation, a popular choice for mixed-width designs.
Establish a Level Starting Line:
- Using your 4-foot level, draw a perfectly level horizontal line across the bottom of your accent wall. This will be your guide for the first row of boards. Even if your floor is slightly uneven, starting with a level line ensures your entire wall remains straight.
- For rooms with existing baseboards you wish to keep, measure up from the baseboard to mark your starting line.
Begin First Row:
- Select your first board. Remember, you’re working with mixed widths, so select boards randomly to create an organic pattern.
- Measure the length needed for the first section of your wall.
- Using your miter saw, make a precise cut. Ensure the cut edge is clean and square. For tips on maximizing tool performance, see Power Tool Mastery for Building Console Tables: Modern Entryway Furniture for Small Spaces.
- Apply a small amount of construction adhesive to the back of the board (optional but recommended for added security, especially with heavier barnwood).
- Place the board along your level line, pressing firmly.
- Using your nail gun, secure the board to the wall studs. Aim for two nails per stud, one near the top edge and one near the bottom edge of the board. Counter-sink the nails if possible for a cleaner finish.
Continue with Mixed Widths and Staggered Joints:
- Once the first board is installed, select a different width board for the next piece in the row.
- For the next row, start with a board that is a different length from the one directly below it. This creates a pleasing, staggered joint pattern that enhances the “mixed-width” aesthetic and distributes stress more evenly. Aim for at least 12-18 inches of offset between vertical joints in adjacent rows.
- Continuously check for level as you proceed. Use your torpedo level frequently to ensure individual boards are straight, and your 4-foot level to ensure rows maintain their level.
Tool Primary Use Tip for Barnwood Installation Miter Saw Precise crosscuts and angled cuts Ensure blade is sharp to prevent splintering aged wood. Nail Gun Fast, secure fastening of boards Use appropriate nail length (e.g., 1.5-2 inches) for stud penetration. Stud Finder Locating wall studs for secure attachment Mark studs clearly to avoid guesswork and ensure strong hold. Level Ensuring straight, even installation Use frequently, especially for the first few rows. Jigsaw/Multi-Tool Cutting around outlets and irregular shapes Mark cuts precisely before cutting, especially on visible areas. Cutting Around Obstacles:
- When you encounter electrical outlets or windows, measure carefully.
- Trace the outline of the obstacle onto the barnwood board.
- Use a jigsaw or oscillating multi-tool to make the necessary cuts. Err on the side of making the opening slightly smaller; you can always trim more. Remember to replace outlet covers after the wall is complete.
Top Row and Finishing the Edges:
- The final row may require ripping boards lengthwise on a table saw to fit the remaining space. Ensure this cut is clean and straight.
- If you’re wrapping the accent wall around a corner or ending it mid-wall, consider using a trim piece to give it a clean, finished edge. This trim can be a thinner piece of barnwood or a complementary wood species.
Finishing Touches and Long-Term Care ✨🧼
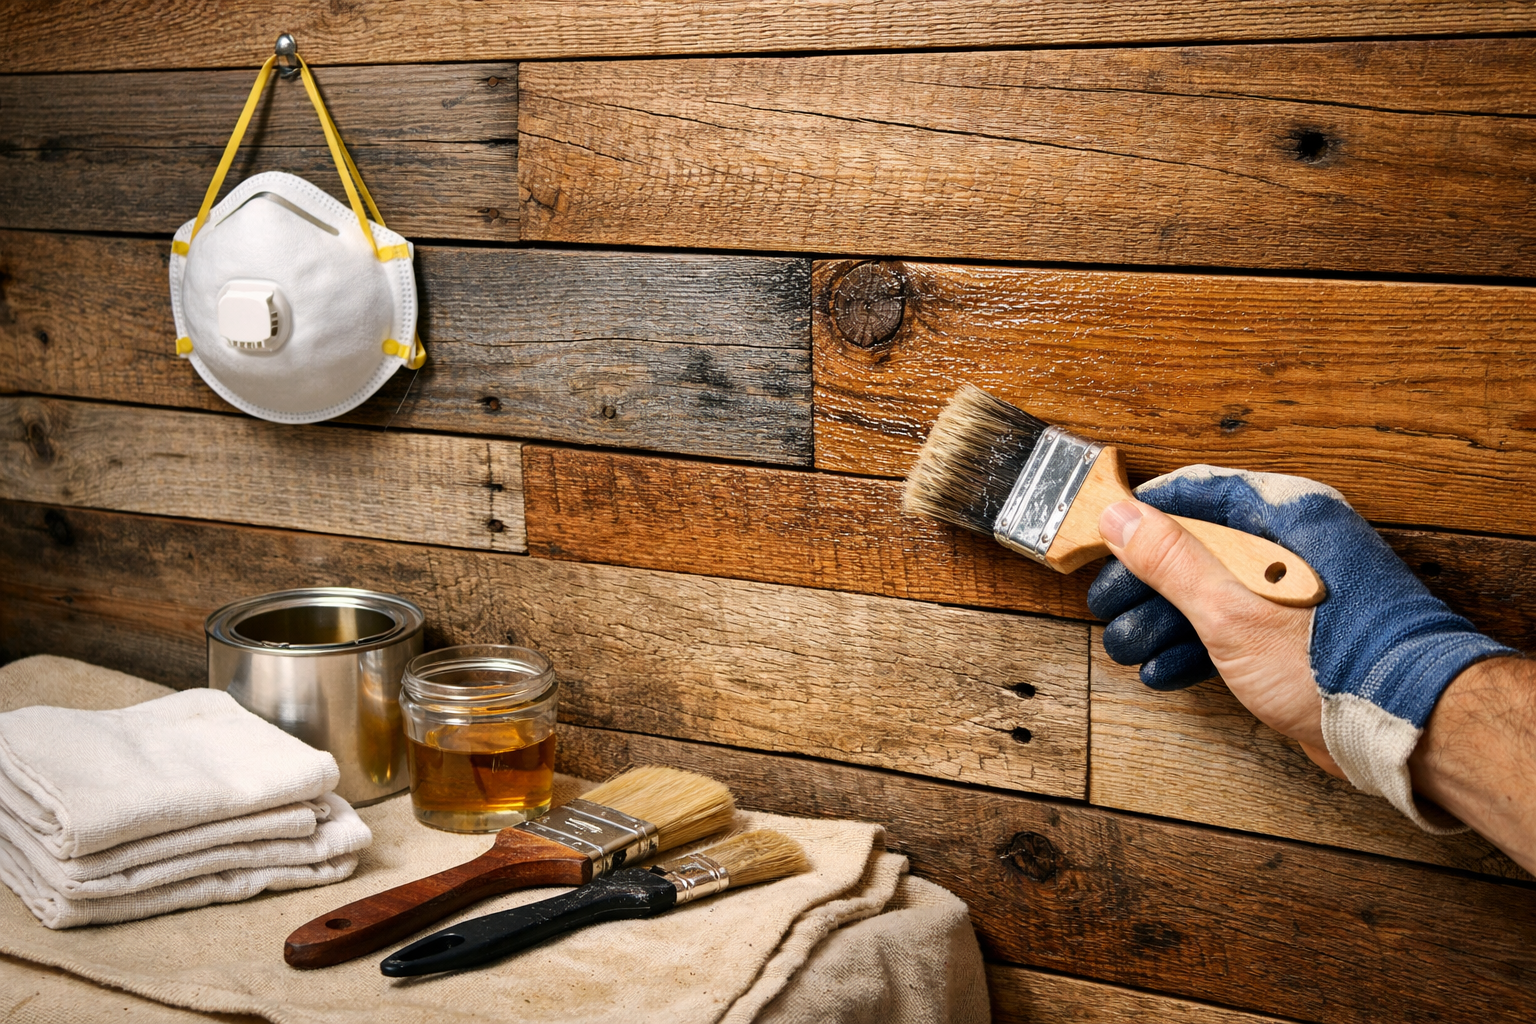
Once your Mixed-Width Barnwood Accent Walls: Power Tool Installation for Home Offices and Bedrooms are physically installed, the final steps involve adding protective finishes and understanding how to maintain their rustic beauty for years to come.
Applying Protective Finishes
While barnwood’s weathered look is part of its charm, applying a suitable finish is essential, especially in areas like a home office or bedroom where dust accumulation and occasional cleaning are inevitable.
Why Finish?
- Protection: Seals the wood, preventing moisture absorption, splintering, and excessive dust collection.
- Durability: Extends the life of the wood, making it more resistant to wear and tear.
- Aesthetics: Can enhance the wood’s natural colors and grain, providing a subtle sheen without compromising the rustic appeal.
- Cleanability: Makes the surface easier to wipe down and maintain.
Choosing the Right Finish:
- Low-VOC Water-Based Polyurethane: A popular choice for its durability, quick drying time, and minimal odor. It provides good protection without significant color change. For options, explore Sustainable Finishes for Reclaimed Wood: Low-VOC Recipes and Application Tutorials.
- Clear Matte or Satin Varnish: Offers excellent protection and a low-sheen finish that maintains the natural look of the barnwood.
- Wax Finishes: Can provide a soft, natural luster and some protection, but may require more frequent reapplication.
- Avoid High-Gloss: High-gloss finishes can detract from the rustic charm of barnwood. Opt for matte, satin, or semi-gloss at most.
Application Tips:
- Clean Thoroughly: Before applying any finish, thoroughly vacuum and wipe down the entire wall to remove all dust and debris.
- Test in an Inconspicuous Area: Always test your chosen finish on a scrap piece of barnwood or an area of the wall that will be hidden (e.g., behind a large piece of furniture).
- Apply Thin Coats: Apply 2-3 thin, even coats, following the manufacturer’s instructions for drying times between coats.
- Light Sanding (Optional): Lightly sand with very fine-grit sandpaper (e.g., 220-grit) between coats to ensure a smooth, even surface, especially if using polyurethane. Wipe off dust before the next coat.
Integrating the Accent Wall with Your Space
The barnwood wall is a feature, but it needs to harmonize with the rest of the room.
- Trim and Edging: If your accent wall doesn’t go wall-to-wall or floor-to-ceiling, consider adding simple trim pieces to create a clean border. These can be stained to match or left natural for contrast.
- Color Palette: Complement the earthy tones of the barnwood with a coherent color palette in the rest of the room. Neutrals, deep greens, blues, or warm grays often work well.
- Lighting: Accent lighting can highlight the texture of the barnwood, creating dramatic shadows and enhancing its visual appeal. Consider LED strip lighting or upward/downward wall sconces.
- Furniture and Decor: Choose furniture that complements the rustic-modern aesthetic. In a home office, a sleek, minimalist desk can contrast beautifully with the rugged wall. In a bedroom, soft linens and understated decor will let the wall shine. For complementary pieces, look into Crafting Your Perfect Woodworking Nightstand: A Comprehensive Guide for 2026.
Long-Term Maintenance and Care
With proper care, your mixed-width barnwood accent wall will maintain its beauty for decades.
- Regular Dusting: Dust the wall regularly with a soft, dry cloth or a vacuum cleaner with a brush attachment.
- Spot Cleaning: For minor smudges or marks, use a slightly damp cloth with mild soap, then immediately wipe dry. Avoid harsh chemical cleaners, which can damage the finish and wood.
- Humidity Control: Maintain a stable indoor humidity level (ideally 35-55%). Extreme fluctuations can cause wood to expand, contract, or even crack.
- Reapplication of Finish: Depending on the type of finish used and environmental factors, a reapplication of finish might be necessary every 5-10 years to refresh its protective qualities.
Conclusion
Creating Mixed-Width Barnwood Accent Walls: Power Tool Installation for Home Offices and Bedrooms is a rewarding project that significantly elevates the aesthetic and character of any space. From the careful selection of authentically weathered wood to the precise application of power tool techniques and the final protective finishes, each step contributes to a stunning, durable result. The unique texture and varied widths of barnwood offer a powerful visual statement, perfect for transforming a home office into a sophisticated video-call backdrop or infusing a bedroom with rustic serenity.
By meticulously planning your design, prioritizing safety during installation, and committing to proper finishing and maintenance, you can ensure your barnwood accent wall remains a captivating feature for many years to come. Embrace the imperfections, celebrate the history, and enjoy the enduring beauty of your handcrafted, professional-grade accent wall.

Next Steps:
- Refine Your Design: Sketch out various mixed-width patterns and consider how they’ll integrate into your room’s existing decor.
- Source Materials Locally: Visit local lumberyards or reclamation specialists for the best selection of genuine barnwood.
- Practice Power Tool Safety: If new to certain tools, familiarize yourself with their operation and safety guidelines before starting the project.
