
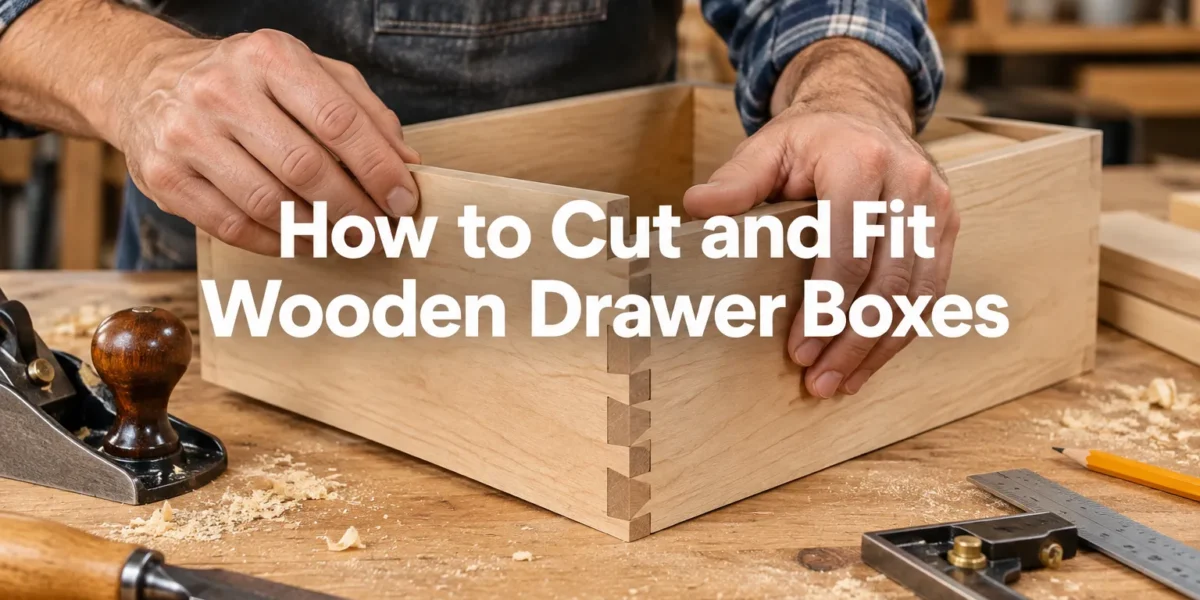
The pursuit of durable, aesthetically pleasing cabinetry often leads woodworkers to master the art of traditional joinery. Building robust drawer boxes with impeccable fit and finish is a hallmark of quality craftsmanship. This comprehensive guide will explain how to Cut and Fit Wooden Drawer Boxes with Half-Blind Dovetails, Dados, and Captive Bottoms, providing a meticulous workflow from initial dimensioning to final assembly and fine-tuning. Successfully implementing these techniques ensures drawers that glide smoothly, operate reliably for decades, and add significant value to any furniture piece built in 2026.
Key Takeaways
- Half-blind dovetails offer superior strength and conceal joinery from the front, enhancing aesthetics.
- Accurate dimensioning and test cuts are crucial for achieving tight-fitting joints and overall drawer integrity.
- Dados create a robust, integrated slot for a captive drawer bottom, preventing sag and enhancing stability.
- Careful assembly, including dry runs and precise glue-up, prevents errors and ensures a perfect fit.
- Minor adjustments and corrective techniques can resolve common fit issues, leading to professional results.
Understanding Drawer Box Components and Joinery
Before beginning construction, it is essential to understand the individual components of a drawer box and the specific joinery employed. A standard drawer box consists of a front, two sides, a back, and a bottom. The choice of joinery significantly impacts both the strength and visual appeal of the finished drawer.
Half-Blind Dovetails for the Front Joint
Half-blind dovetails are a classic choice for drawer fronts because they offer exceptional mechanical strength while concealing the joint from the outside when the drawer is closed. The tails are cut into the drawer sides, and the pins are cut into the drawer front. When assembled, the pins extend only partially through the thickness of the front, leaving the exterior face clean and continuous. This joint resists the pulling forces exerted on a drawer during use, making it incredibly durable.
Dados for Captive Bottoms
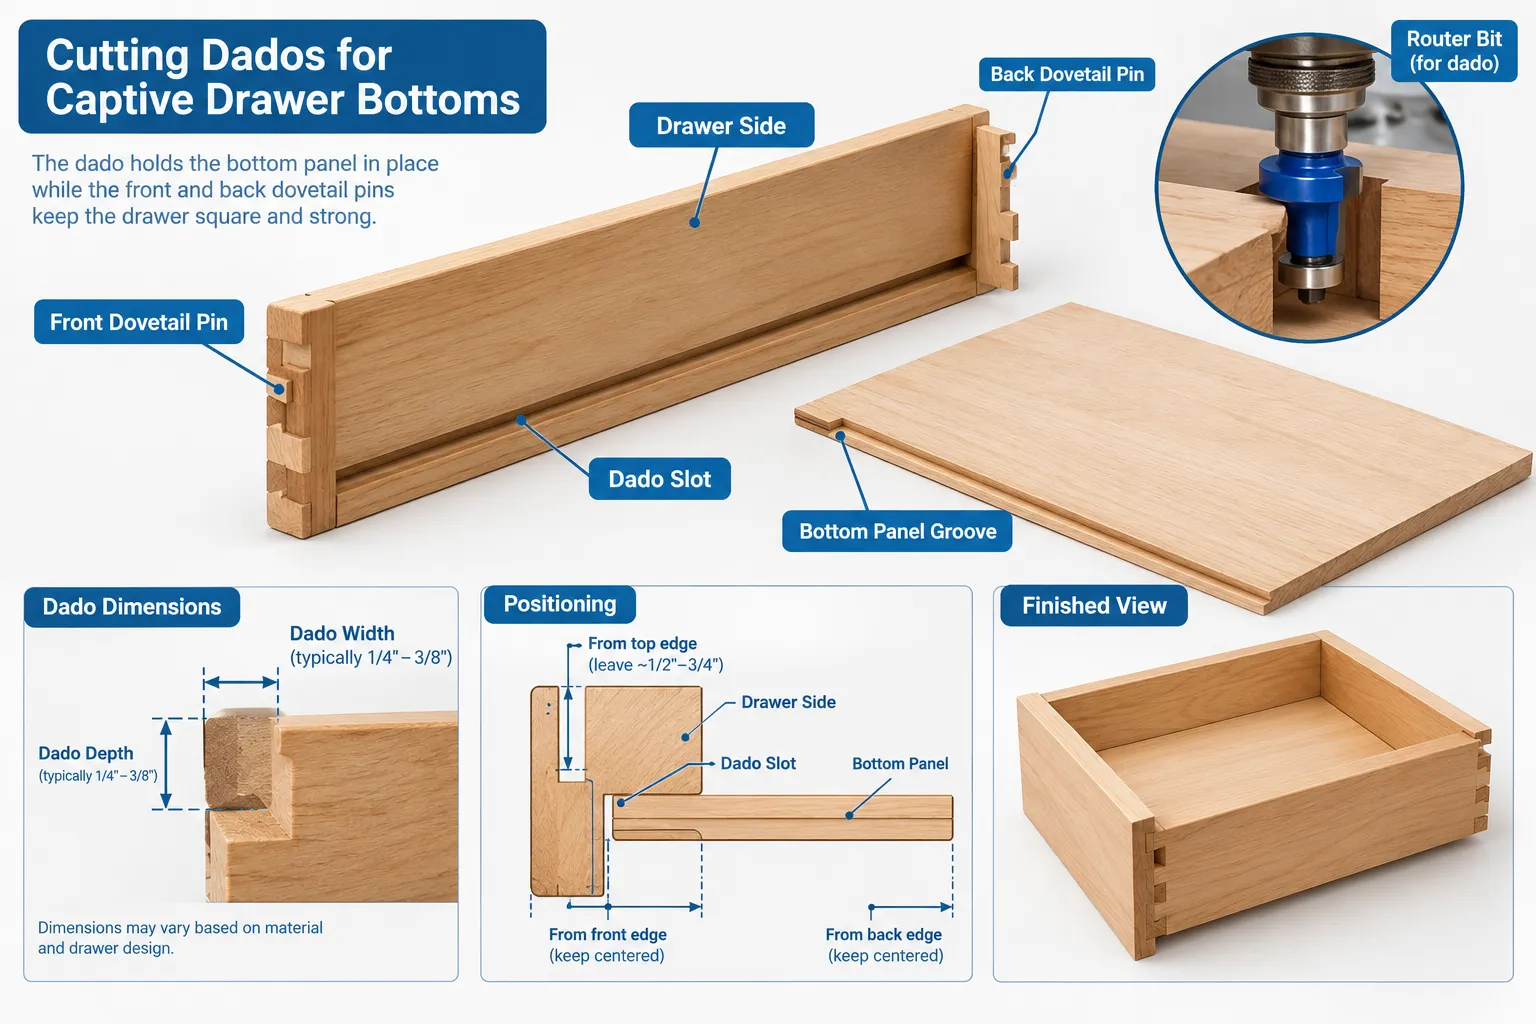
A captive bottom is a drawer bottom panel that sits within a groove (dado) routed or cut into the drawer’s front and sides. This method securely holds the bottom panel, preventing it from bowing, rattling, or falling out. The dado in the front is typically a through dado, while the dados in the sides run the full length. The back of the drawer often has a groove that allows the bottom to slide in from the rear before the back is attached. This design permits wood movement in the bottom panel while keeping it firmly in place.
The Role of Precision in Cutting and Fitting Wooden Drawer Boxes with Half-Blind Dovetails, Dados, and Captive Bottoms
Precision is paramount in woodworking, especially when dealing with fine joinery like dovetails and dados. Even slight inaccuracies can lead to gaps, a loose fit, or a drawer that doesn’t operate smoothly within its cabinet opening. Taking the time for careful measurements, accurate layout, and sharp tools will save significant time and frustration during assembly. Wood selection also plays a vital role; choose stable, straight-grained lumber for drawer components to minimize warping and twisting. Learn more about selecting materials for various projects by exploring Reclaimed Wood Woodworking Sourcing Preparing And Building Furniture From Salvaged Materials.
Step-by-Step Guide to Layout and Cutting
The process of cutting and fitting wooden drawer boxes with half-blind dovetails, dados, and captive bottoms requires a systematic approach. Follow these steps for accurate and efficient construction.
1. Dimensioning and Material Preparation
Begin by accurately milling your lumber to the final dimensions. For drawer sides, front, and back, ensure they are perfectly square and to thickness. The drawer bottom should be cut to its specific dimensions, allowing for the dado depth and width.
| Component | Description |
|---|---|
| Drawer Front | Width = Opening width – 1/32″ to 1/16″; Height = Opening height – 1/32″ to 1/16″ |
| Drawer Sides | Length = Drawer depth; Height = Front height; Thickness = 1/2″ to 3/4″ |
| Drawer Back | Width = Opening width – (2 * side thickness) – 1/16″; Height = Front height – 1/2″ to 3/4″ (shorter) |
| Drawer Bottom | Plywood or solid wood. Width = Front width – (2 * dado depth); Length = Side length – (dado depth) |
Note: These dimensions are general guidelines. Always measure your specific cabinet opening and hardware for precise figures.
2. Cutting the Dados for the Drawer Bottom
The dados for the captive bottom are typically cut first. This ensures that the dovetail layout can account for the dado’s presence.
- Mark the Dado Location: On the inside face of the drawer front and sides, mark a line for the bottom edge of the dado, usually 1/2″ to 3/4″ up from the bottom edge of the drawer components.
- Set Up Router or Table Saw: Use a dado stack on a table saw or a router with an appropriate bit to cut the grooves. The dado’s width should precisely match the thickness of your drawer bottom material.
- Cut Dados: Cut the dados into the inside faces of the drawer front and sides. The dado on the front will be a through dado (visible from edge to edge), while the dados on the sides will stop short of the front edge if the front pins will cover them. The back also gets a through dado, usually aligning with the sides.
- Test Fit: Always perform a test cut on scrap material to ensure the dado width perfectly accommodates the drawer bottom. It should be a snug, not tight, fit.
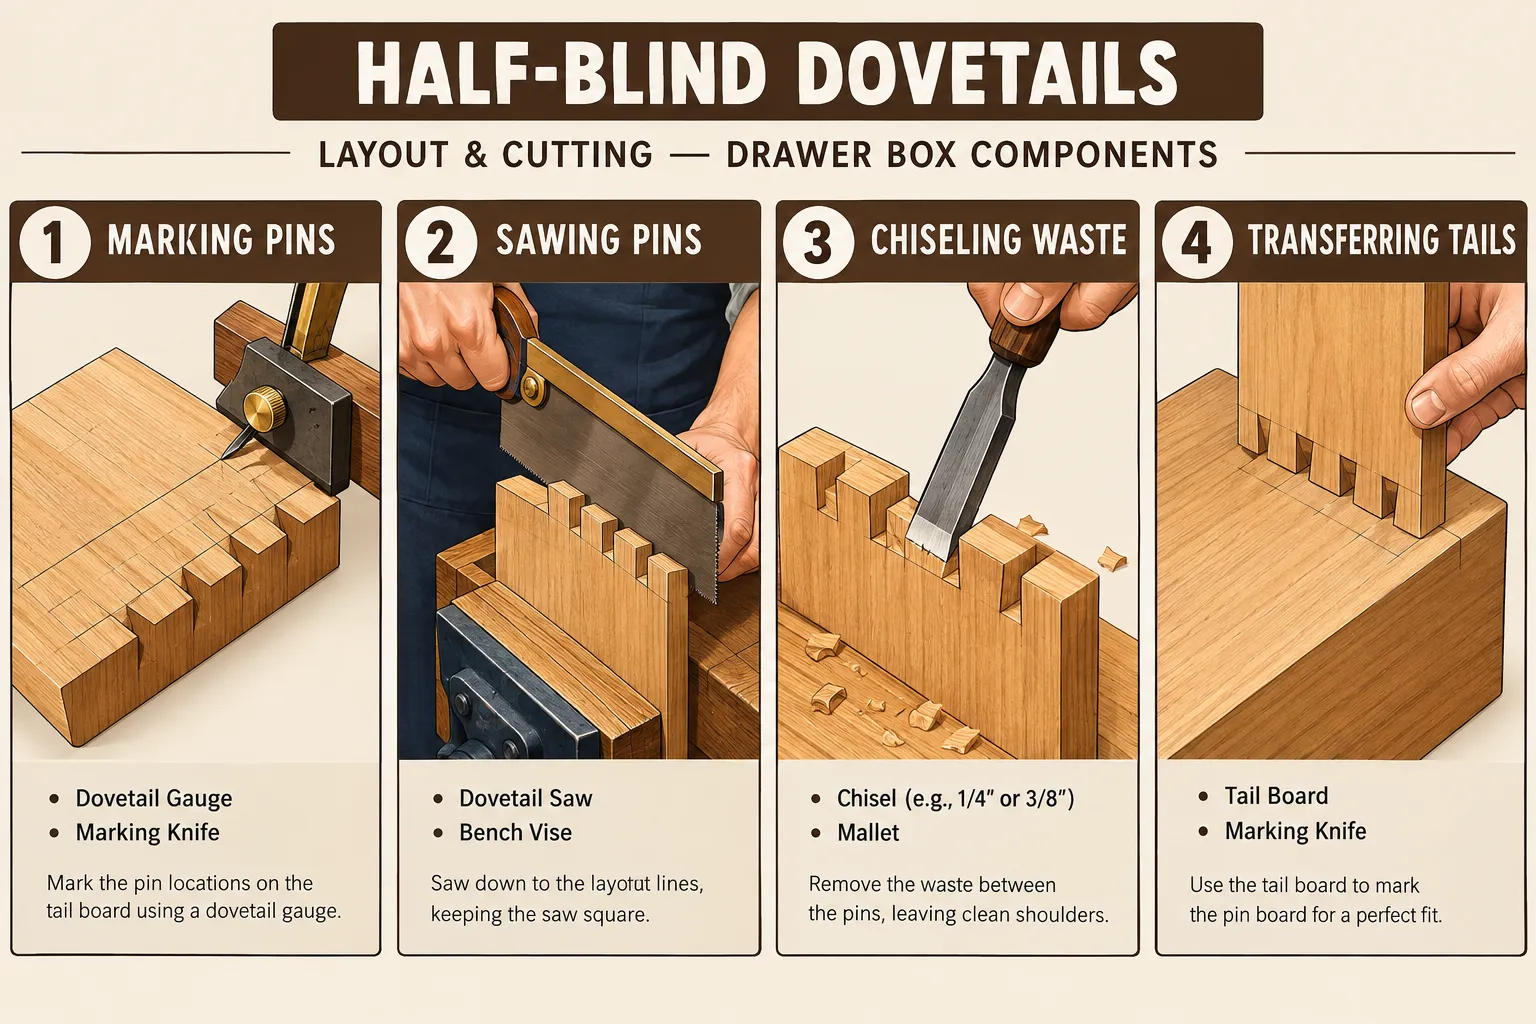
3. Laying Out and Cutting Half-Blind Dovetails
This is the most critical step for the drawer’s strength and appearance.
- Mark Reference Faces: Clearly mark the inside face and top edge of all drawer components.
- Prepare the Front Piece (Pins):
- Lay out the baseline for the pins on the inside face of the drawer front, typically equal to the thickness of the drawer sides plus the dado depth.
- Use a dovetail marker or gauge to lay out the pins. Decide on the number of pins and their spacing for aesthetic balance.
- Mark the waste areas.
- Cut the Pins:
- Using a dovetail saw, carefully cut along your marked lines, stopping precisely at the baseline.
- Remove the waste between the pins using a coping saw or by carefully chiseling. Work from both sides to prevent tear-out.
- Transfer Pins to Side Pieces (Tails):
- Position a drawer side piece (inside face up, end flush with the front’s baseline) directly on top of the cut drawer front.
- Align the top edges and clamp them securely.
- Carefully transfer the pin layout onto the end grain of the drawer side using a marking knife or a sharp pencil.
- Cut the Tails:
- Mark the baseline on the drawer side, indicating the depth of the tails (equal to the thickness of the drawer front).
- Using the transferred lines, cut the tails with a dovetail saw.
- Remove the waste between the tails using a coping saw and refine with chisels.
- Repeat for all Joints: Repeat this process for all four front corners, ensuring consistent quality. For more on advanced joinery, explore Hybrid Joinery Tutorials Blending Classic Joints With Cnc And Metal Connectors.
4. Cutting the Back Joint (Dovetails or Rabbets)
While half-blind dovetails are often used for the front, the back joint can be simpler, such as through dovetails, rabbets, or even dado and rabbet joints, as it is less visible. For simplicity, many woodworkers opt for through dovetails or a simple dado and rabbet joint at the back for speed. For the purpose of this guide, let’s assume simple through dovetails or rabbets are used for the back.
Assembly and Fitting Wooden Drawer Boxes with Half-Blind Dovetails, Dados, and Captive Bottoms
Once all components are cut, the assembly process begins. This stage requires careful attention to ensure a strong, square, and well-fitting drawer.
1. Dry Fit All Components
Before applying any glue, perform a complete dry fit of all drawer components. This step is crucial for identifying any fit issues before they become permanent.
- Carefully tap the dovetails together. They should fit snugly, requiring light mallet taps, but not excessive force.
- Check if the drawer box is square using a reliable square.
- Ensure the drawer bottom slides freely into its dados.
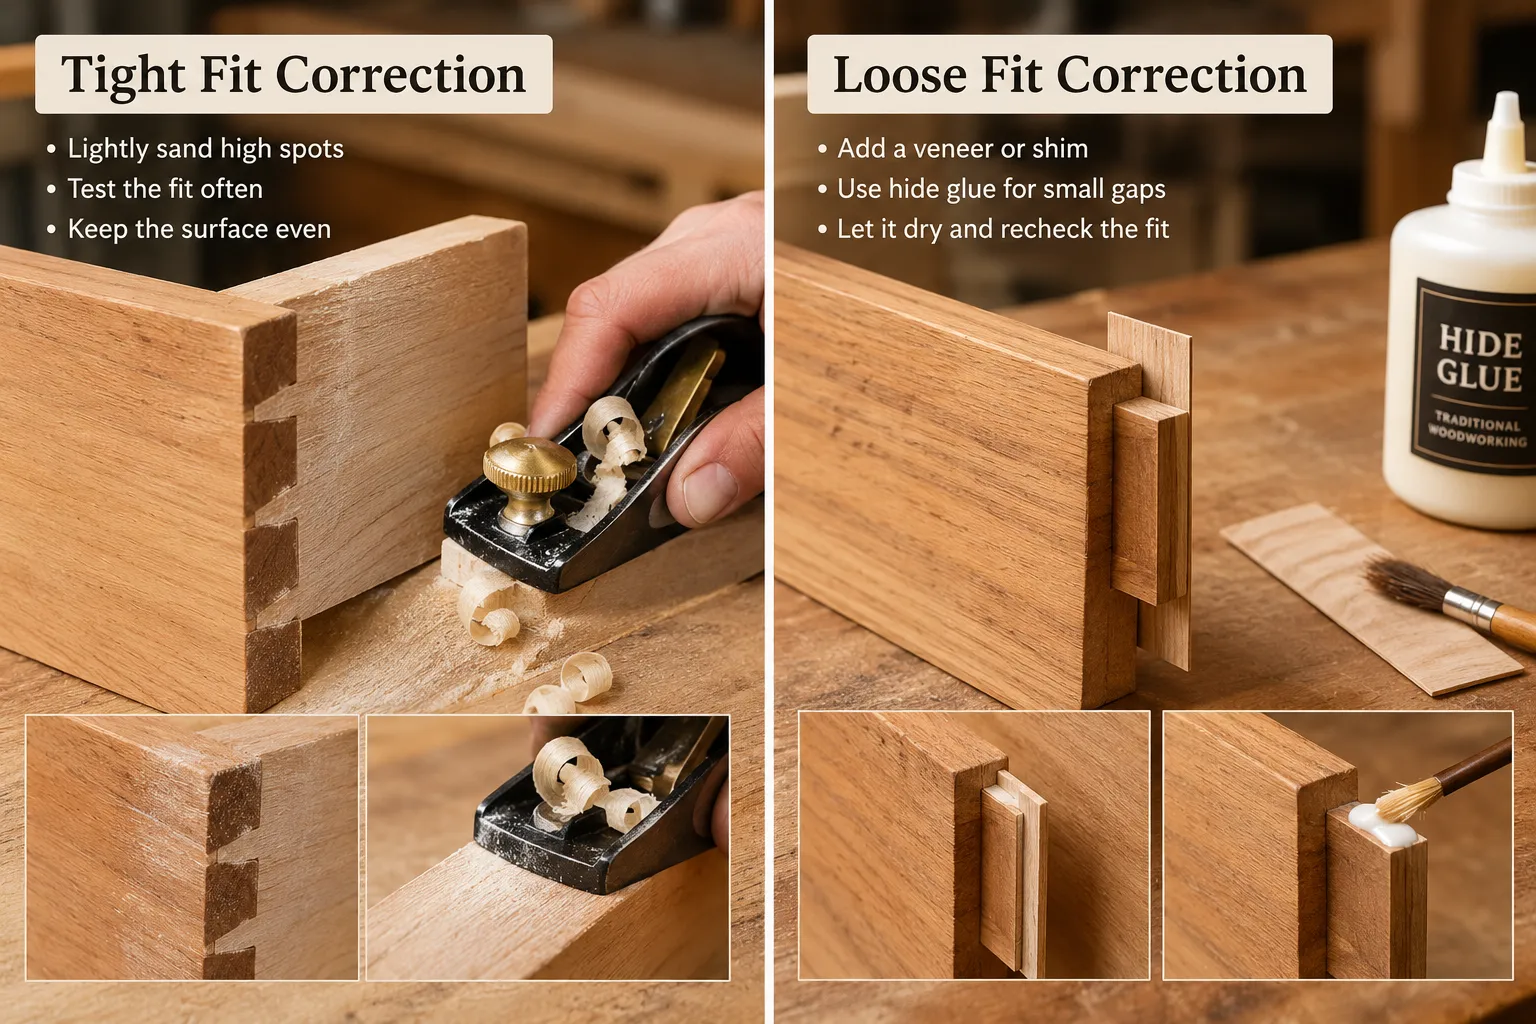
- If the fit is too tight, identify the areas of interference and carefully pare them down with a sharp chisel or fine sandpaper.
- If the fit is too loose, assess if shims or a slightly thicker veneer might be needed, or if the joint needs recutting (for major errors).
2. Glue Up and Clamping
With a successful dry fit, proceed with the glue-up.
- Apply Glue: Apply a thin, even coat of wood glue to the mating surfaces of the dovetail joints. Avoid excessive glue, which can create squeeze-out that’s difficult to clean.
- Assemble Front and Sides: Carefully assemble the front and side pieces, tapping the dovetails together.
- Insert Drawer Bottom: Before the glue sets, slide the drawer bottom into the dados from the back. Ensure it sits flat and square.
- Attach Back: Attach the back piece, gluing its joints to the sides.
- Clamp: Clamp the drawer box firmly, ensuring all joints are pulled tight. Use cauls (protective blocks of wood) to prevent clamp marks.
- Check for Squareness: Immediately check the drawer box for squareness. If it’s out of square, apply clamps diagonally across the longest diagonal until it is square.
- Clean Squeeze-out: Wipe away any excess glue with a damp cloth before it dries. Dried glue can prevent stain absorption and create blemishes.
3. Fine-Tuning the Fit
After the glue has fully cured, remove the clamps. The drawer box is now a solid unit, ready for final fitting into its cabinet opening.
- Test in Opening: Carefully slide the assembled drawer box into its designated opening.
- Identify Tight Spots: If the drawer binds or is too tight, identify the areas of friction. This is often on the sides or top/bottom edges.
- Sanding or Planing: Use a hand plane or sanding block with fine-grit sandpaper (150-220 grit) to carefully remove small amounts of material from the exterior surfaces of the drawer box. Work slowly and incrementally, continuously checking the fit. Focus on areas where the drawer binds.
- Check for Parallelism: Ensure the drawer slides in and out smoothly and parallel to the cabinet opening. Avoid creating tapered sides that could cause jamming.
- Install Drawer Slides: If using mechanical drawer slides, install them according to the manufacturer’s instructions. Ensure they are perfectly parallel and plumb for smooth operation. Building a custom tool cabinet often involves precise drawer slide installation, which you can learn more about in Building A Diy Tool Cabinet With Drawer Organization Custom Storage Solutions For Hand And Power Tools.
- Attach Drawer Face (if applicable): If you are using a separate drawer face, attach it now, ensuring it is square and flush with the cabinet opening. Consider using slotted holes for the screws to allow for minor adjustments.
Advanced Considerations and Troubleshooting
Achieving perfection when you cut and fit wooden drawer boxes with half-blind dovetails, dados, and captive bottoms takes practice. Here are some advanced considerations and common troubleshooting tips.
Dealing with Wood Movement
Wood is a hygroscopic material, meaning it absorbs and releases moisture, causing it to expand and contract. This is particularly relevant for drawer bottoms. The captive bottom design addresses this by allowing the panel to float within its dados. Do not glue the drawer bottom into the dado grooves, as this can cause the panel to crack when it expands. Instead, secure it at one end (usually the front) with a small dab of glue or small brad nails, allowing the rest of the panel to move freely.
Tool Selection and Maintenance
The quality of your tools directly impacts the quality of your joints.
- Sharp Chisels: Essential for paring dovetail waste. Keep them razor-sharp.
- Dovetail Saw: A dedicated dovetail saw with fine teeth is invaluable for precise cuts.
- Marking Knife: Provides crisp lines that your saw can follow accurately.
- Router or Table Saw with Dado Stack: For efficient and accurate dado cutting.
- Dovetail Jig (Optional): While hand-cutting dovetails is a rewarding skill, a quality dovetail jig can significantly speed up the process and ensure repeatable results, especially for multiple drawers.
Regular maintenance, especially sharpening, will make the process much easier and yield superior results.
Common Fitting Problems and Solutions
- Drawer too tight:
- Solution: Identify binding points. Lightly plane or sand the exterior sides until the drawer slides smoothly. Work incrementally.
- Drawer too loose/rattles:
- Solution: This indicates slightly undersized dimensions or excessive material removal. For minor issues, apply a thin strip of veneer or a few coats of shellac/finish to the binding surfaces. For significant looseness, consider recutting the drawer box or shimming the drawer slides.
- Dovetail gaps:
- Solution: Small gaps can sometimes be filled with a matching wood filler or a mixture of sawdust and glue. For larger gaps, the joint may need to be recut. Precision in layout and cutting is the best prevention. For more on achieving flawless finishes, refer to Wood Finishing for Artisan Manufacturers: Achieving Production-Ready.
- Drawer not square:
- Solution: If caught during dry fit or immediately after glue-up (before glue fully cures), use diagonal clamping to pull the drawer back into square. Once dry, it’s very difficult to correct without disassembling.
Finishing Your Drawer Box
Once fitted, the drawer box is ready for finishing. A durable finish will protect the wood and enhance its appearance. Common choices include lacquer, shellac, oil, or polyurethane. Consider the interior and exterior equally. A smooth interior finish protects contents and simplifies cleaning. For guidance on different finishing techniques, see Finishing Techniques Showdown: Oil vs. Stain vs. Polyurethane for.
Conclusion
Mastering how to cut and fit wooden drawer boxes with half-blind dovetails, dados, and captive bottoms is a significant achievement for any woodworker. This process, while demanding in its precision, yields incredibly strong, functional, and beautiful drawers that will stand the test of time. By carefully following the steps for dimensioning, cutting, and assembly outlined in this guide, and by embracing the meticulous nature of traditional joinery, you can create pieces in 2026 that exhibit true craftsmanship. Remember that practice and patience are key. Start with smaller projects to hone your skills, and soon you’ll be producing exquisite drawers that elevate your furniture building to a professional level.
Next Steps:
- Practice cutting half-blind dovetails on scrap wood until you achieve consistent, tight-fitting joints.
- Invest in quality measuring and marking tools, and keep your cutting tools sharp.
- Consider building a small storage box or a Personalized Heirloom Woodcraft Projects: Building Keepsake Boxes to apply these techniques on a smaller scale.
- Always perform a dry fit before glue-up to catch and correct errors early.
References
- Duginske, M. (1989). The Dovetail Handbook: A Guide to the Art of Dovetailing. Taunton Press.
- Fine Woodworking Magazine. (Multiple issues). Techniques and Tools for Better Dovetails. Taunton Press.