


A persistent ringing, an indistinguishable vocal echo, or a general sense of sonic clutter in your workshop can be more than just annoying; it directly impedes focus, communication, and even the accurate perception of machine noises. In 2026, many woodworkers are discovering that acoustic challenges, once accepted as an inevitable byproduct of a hard-surfaced environment, can be elegantly overcome. The solution lies in the strategic implementation of DIY Acoustic Diffusion Panels: Enhancing Workshop Sound and Aesthetics with Wood Designs. These panels not only transform the auditory landscape by scattering sound waves, reducing echoes, and clarifying the soundstage, but they also offer a unique opportunity to integrate bespoke woodworking craftsmanship directly into your workspace’s visual appeal.
Key Takeaways
- Improved Acoustics: DIY diffusion panels scatter sound waves, significantly reducing flutter echoes and standing waves in your workshop, leading to a clearer, more pleasant sound environment.
- Aesthetic Integration: These panels can be designed using various wood types, finishes, and geometric patterns, turning a functional acoustic treatment into a beautiful piece of workshop art.
- Cost-Effectiveness: Building diffusion panels yourself is significantly more affordable than purchasing commercial units, allowing for customization and material choice.
- Enhanced Focus & Safety: A clearer acoustic environment reduces noise fatigue, improves communication, and helps in better distinguishing machine sounds, indirectly contributing to workshop safety and productivity.
- Skill Development: The construction process offers an excellent opportunity to practice precise woodworking techniques, including joinery, measuring, and finishing.
Understanding the Science and Art of DIY Acoustic Diffusion Panels: Enhancing Workshop Sound and Aesthetics with Wood Designs
Acoustic treatment often brings to mind foam panels that absorb sound, which are vital for taming reverberation. However, absorption isn’t the whole story. Diffusion is equally critical, especially in spaces where sound clarity, rather than just overall quietness, is desired. Imagine a workshop where sharp tool impacts or conversations bounce off every hard surface, creating a chaotic din. This is where the magic of diffusion comes in. A diffusion panel works by breaking up sound waves into smaller, randomly dispersed reflections, preventing strong, localized echoes and creating a more even, spacious sound field.

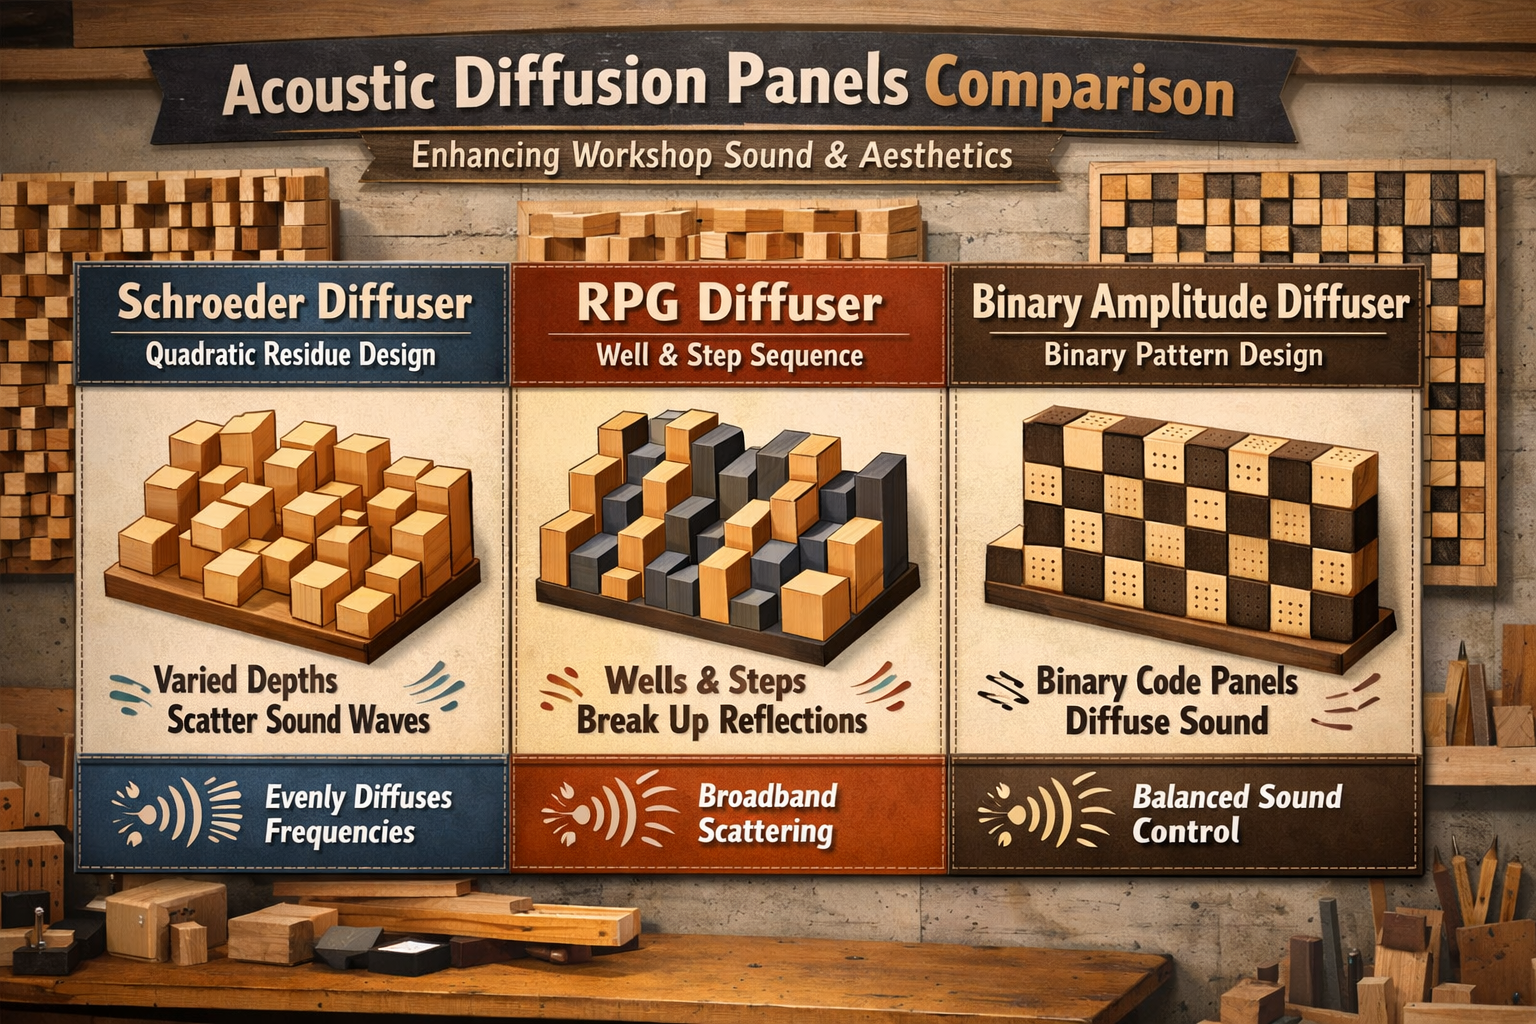
The most common type of diffuser is the Quadratic Residue Diffuser (QRD), originally developed by Manfred Schroeder. These panels consist of a series of wells or blocks of varying depths, typically arranged in a mathematical sequence. When a sound wave strikes the panel, it is reflected at different times and in different directions, based on the depth of the well it encounters. This scattering of sound energy reduces echoes and standing waves, which are specific frequencies that get trapped between parallel surfaces, making a room sound boomy or harsh.
Beyond the scientific efficacy, the “art” component of DIY Acoustic Diffusion Panels: Enhancing Workshop Sound and Aesthetics with Wood Designs lies in the creative freedom. Unlike plain foam, wood diffusers can be crafted from various species, offering diverse grain patterns, colors, and textures. This allows woodworkers to create functional acoustic treatments that are also visually appealing, seamlessly blending with or even enhancing the workshop’s décor. They can be stained, painted, or left natural, becoming a focal point rather than an eyesore.
A well-designed diffuser not only improves the workshop’s acoustics but also contributes to a more professional and inspiring workspace. It’s an investment in both function and form. Consider the choice of wood; for instance, using reclaimed wood can add character and a story to your panels, aligning with sustainable woodworking practices. Understanding wood movement is also crucial when designing and building these panels to ensure longevity and prevent warping, especially with varying block depths that can be susceptible to changes in humidity. For insights into managing this, explore our guide on Understanding Wood Movement: How to Design and Build Furniture That Lasts Through Seasonal Changes.
Popular Diffusion Panel Designs for Workshops
- Quadratic Residue Diffusers (QRDs): As mentioned, these are highly effective due to their mathematically derived well depths. They are relatively straightforward to build for a woodworker with precise cutting tools.
- Primitive Root Diffusers (PRDs): Similar to QRDs but based on different mathematical sequences, often offering broader diffusion bandwidth.
- Binary Amplitude Diffusers: Simpler in construction, these panels use a pattern of “on” and “off” (or varying heights) blocks to scatter sound. While less mathematically precise than QRDs, they can still be very effective and aesthetically pleasing.
- Skyline Diffusers: These are 2D diffusers that diffuse sound in both horizontal and vertical planes, offering excellent broadband diffusion. They appear as a cityscape of varying height blocks.
Each design offers different acoustic properties and aesthetic potentials. For a workshop, a QRD or Skyline diffuser made from carefully selected wood can be a statement piece that also performs excellently.
Planning and Materials for Your DIY Acoustic Diffusion Panels: Enhancing Workshop Sound and Aesthetics with Wood Designs
The journey to creating effective DIY Acoustic Diffusion Panels: Enhancing Workshop Sound and Aesthetics with Wood Designs begins with meticulous planning and the right material selection. Before cutting a single piece of wood, assess your workshop’s acoustic needs and available space. Identify areas where echoes are most pronounced, typically parallel walls or large, untreated surfaces.
Assessing Your Workshop’s Acoustic Needs
- Clap Test: Walk around your workshop and clap loudly. Listen for how quickly the sound decays and if you hear distinct echoes or a “flutter echo” between parallel surfaces.
- Talk Test: Have a conversation. Does it sound muffled or overly resonant?
- Tool Noise: Do power tool sounds linger unpleasantly, making it hard to concentrate or hear nuances?
These simple tests can help pinpoint problem areas where diffusers would be most beneficial. While a full acoustic analysis is ideal, practical observation is often sufficient for a workshop environment.
Material Selection: The Heart of Your Wood Design
The choice of wood for your diffusion panels is paramount, influencing both acoustic performance and visual appeal.
- Wood Species:
- Pine/Fir: Economical, easy to work with, but might have less dramatic grain.
- Poplar: Affordable, takes paint well, and offers a smooth finish if natural wood look isn’t primary.
- Maple/Oak: Durable, beautiful grain, and good stability. Excellent for a high-end look.
- Walnut/Cherry: Premium woods with rich colors and intricate grain patterns, ideal for statement pieces.
- Reclaimed Wood: Sustainable, adds character and unique visual interest.
- Sheet Goods for Backing:
- Plywood: Stable, strong, and readily available. Birch plywood (½” or ¾”) is often recommended for its flatness and smooth surface. For more on selecting suitable materials, consider our guide on ½” Plywood for Cabinets: Strength, Durability, and Design Considerations.
- MDF: Very stable and takes paint well, but heavier and less resistant to moisture than plywood.
- Adhesives:
- Wood Glue (PVA): Essential for strong, durable bonds between wood pieces.
- Construction Adhesive: Can be used for extra rigidity or bonding to the backing panel.
- Finishes:
- Clear Coat (Polyurethane, Lacquer): Protects the wood and highlights its natural beauty. For advice on applying finishes, see our article on Sprayable Water-Based Polyurethane: A Step-by-Step Guide.
- Stain: Changes the wood’s color while allowing grain to show through.
- Paint: Offers a uniform color, useful for matching specific workshop aesthetics.
- Oil Finishes (Danish Oil, Linseed Oil): Penetrates the wood, providing a natural look and feel while offering protection. Compare options in Danish Oil vs. Linseed: The Ultimate Wood Finishing Guide.
Tool List
Building diffusion panels requires precision and standard woodworking tools:
- Table Saw: Absolutely critical for cutting many identical pieces of varying lengths with accuracy.
- Miter Saw: Excellent for cross-cutting pieces to precise lengths.
- Planer (Optional but Recommended): Ensures all blocks are uniform in thickness.
- Router (Optional): For decorative edges or grooves.
- Clamps: Essential for holding pieces while glue dries.
- Measuring Tapes, Squares, Marking Tools: For accurate layout.
- Sander/Sandpaper: For preparing surfaces for finishing.
- Dust Collection System: Crucial for a clean and safe workspace, especially when making many cuts. Consider building a DIY Smart Workshop Dust Collection System: Integrating IoT Sensors for Automated Air Quality and Tool Activation for efficiency.
Careful planning of your panel layout, calculating the required number of blocks for each depth, and optimizing your cuts will minimize waste and streamline the building process.
Step-by-Step Construction: Bringing Your Diffusion Panel Design to Life
The construction process for DIY Acoustic Diffusion Panels: Enhancing Workshop Sound and Aesthetics with Wood Designs is a rewarding project that hones your woodworking skills. While specific steps may vary depending on the chosen diffuser design (e.g., QRD, Skyline), the general workflow remains consistent.
1. Design and Calculations
First, choose your diffuser type. For a QRD, you’ll need to calculate the well depths. Online QRD calculators can generate the sequence for you based on your desired diffusion frequency range. For example, a common prime number like 7 or 11 is used to determine the number of wells in a sequence.
- Panel Dimensions: Decide on the overall size of your panels. Common sizes are 2’x2′ or 2’x4′.
- Block Width: Typically 1.5″ to 2″ for QRDs.
- Max Depth: This will be determined by your chosen prime number and target frequency.
2. Preparing the Backing Board
Cut your chosen plywood or MDF to the desired overall panel dimensions. This will serve as the structural base for your diffuser. Ensure it’s perfectly square and flat. Sand the edges smooth.
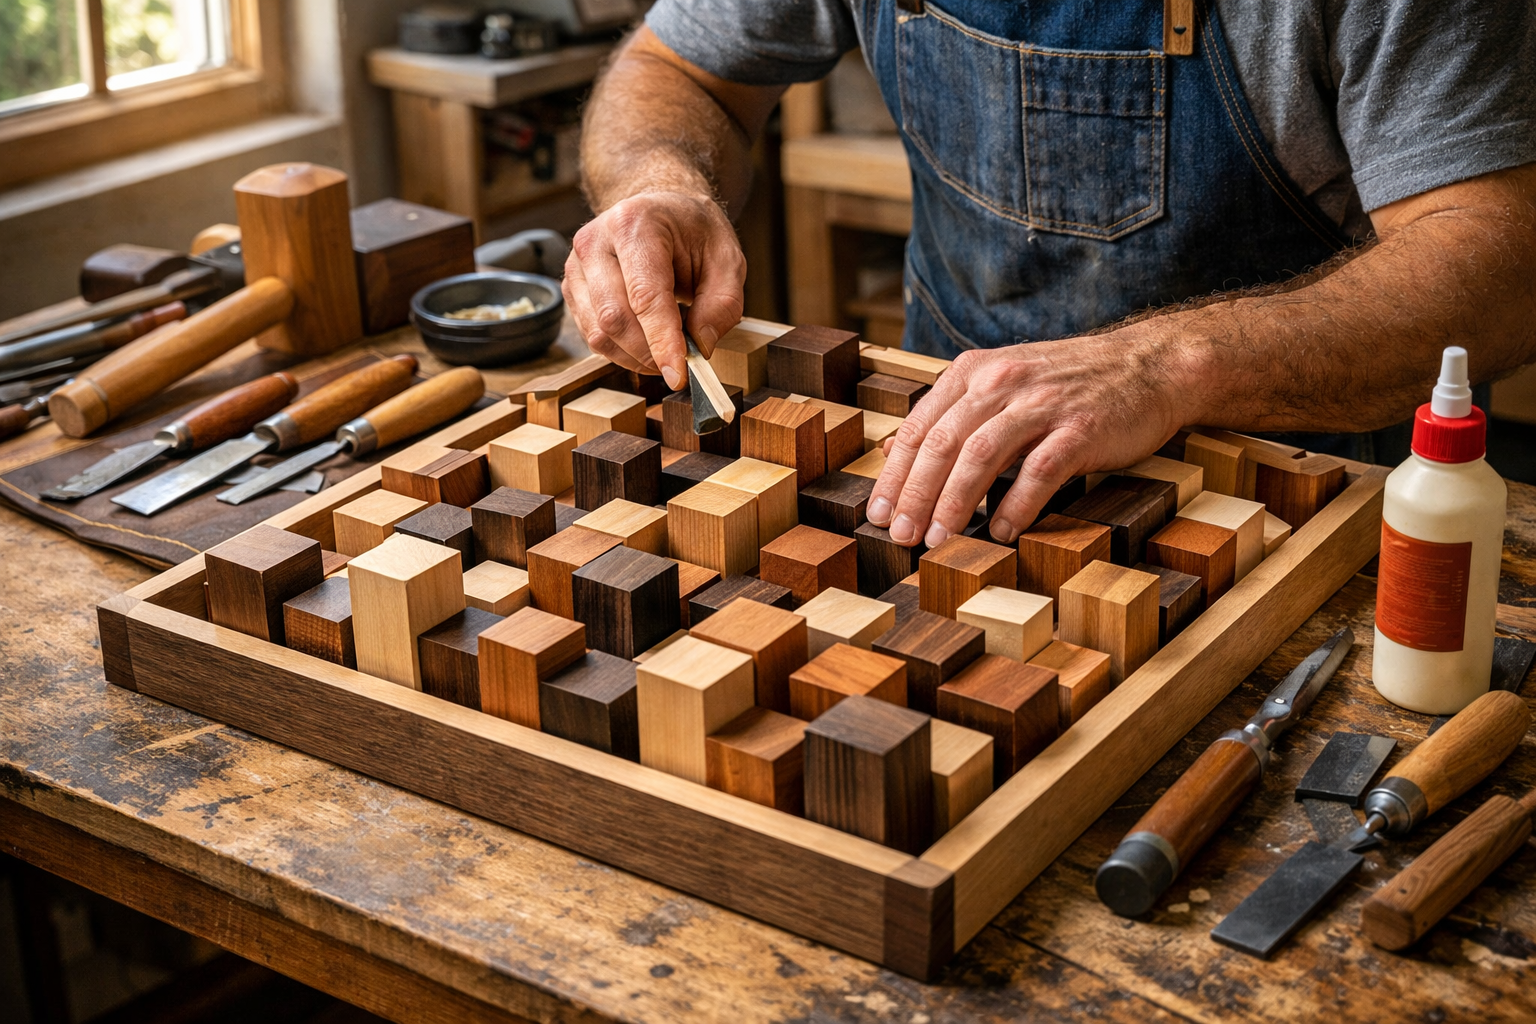
3. Cutting the Wood Blocks
This is the most labor-intensive part.

- Rip Stock to Width: Using your table saw, rip your chosen wood species into strips of uniform width (e.g., 1.5″).
- Plane to Thickness (Optional): If your stock isn’t perfectly uniform, a planer will ensure consistent block thickness, which is crucial for aesthetic and acoustic uniformity.
- Crosscut to Lengths: Using a miter saw or a sled on your table saw, cut the strips into the various calculated lengths (depths) required for your diffuser sequence. Precision is key here. A stop block on your saw will help achieve identical lengths for multiple pieces. Create many of each length required.
- Sanding: Lightly sand all sides of the individual blocks. This will help with glue adhesion and provide a smooth finish.
4. Assembly: Gluing the Blocks
Arrange your cut blocks on the backing board according to your calculated sequence. This is where the pattern emerges.
- Dry Fit: Always perform a dry fit first to ensure all pieces fit correctly and the pattern is accurate.
- Apply Glue: Apply a thin, even layer of wood glue to the bottom of each block and to its long sides where it will meet adjacent blocks. Avoid excessive glue squeeze-out.
- Placement: Carefully place each block onto the backing board, ensuring it’s square and snug against its neighbors. Work in rows or columns, depending on your design.
- Clamping: Use clamps to apply gentle pressure to the assembled sections while the glue dries. Ensure the blocks remain flush and do not shift. Wax paper underneath can prevent the panel from sticking to your workbench. A sturdy workbench is essential for this kind of precise assembly; consider building a Custom Wood Workbench: Design Considerations and Step-by-Step Plans for a Sturdy, Functional Foundation for optimal support.
5. Finishing Touches
Once the glue has fully cured (typically 24 hours), remove the clamps.
- Final Sanding: Lightly sand the entire surface of the diffuser panel, particularly the tops of the blocks, to ensure smoothness and remove any dried glue residue.
- Apply Finish: Apply your chosen finish (stain, clear coat, oil). Multiple thin coats are usually better than one thick coat. Allow adequate drying time between coats. Sand lightly with fine-grit sandpaper between clear coats for a glass-smooth finish.
- Mounting Hardware: Attach appropriate mounting hardware (e.g., French cleats, D-rings, Z-clips) to the back of the panel. Ensure they are robust enough to support the weight of the panel.
6. Installation
Mount your finished DIY Acoustic Diffusion Panels: Enhancing Workshop Sound and Aesthetics with Wood Designs in your workshop.
- Strategic Placement: Place them on walls where echoes are most problematic. Avoid placing them directly behind your listening position; absorption is often better there. Diffusers are most effective on the sidewalls, front wall, or ceiling, breaking up reflections before they reach your ears.
- Height: Mount them at ear level or slightly above your primary working height for optimal effect.
By following these steps, you can create functional and beautiful acoustic diffusion panels that dramatically improve your workshop environment, making it a more pleasant and productive space.
Advanced Techniques and Aesthetic Integration for Wooden Diffusion Panels
Once you’ve mastered the basic construction of DIY Acoustic Diffusion Panels: Enhancing Workshop Sound and Aesthetics with Wood Designs, you can explore advanced techniques to elevate both their acoustic performance and visual impact. The beauty of woodworking allows for endless customization, transforming these functional pieces into true works of art that complement your workshop’s style.
Enhancing Aesthetic Appeal
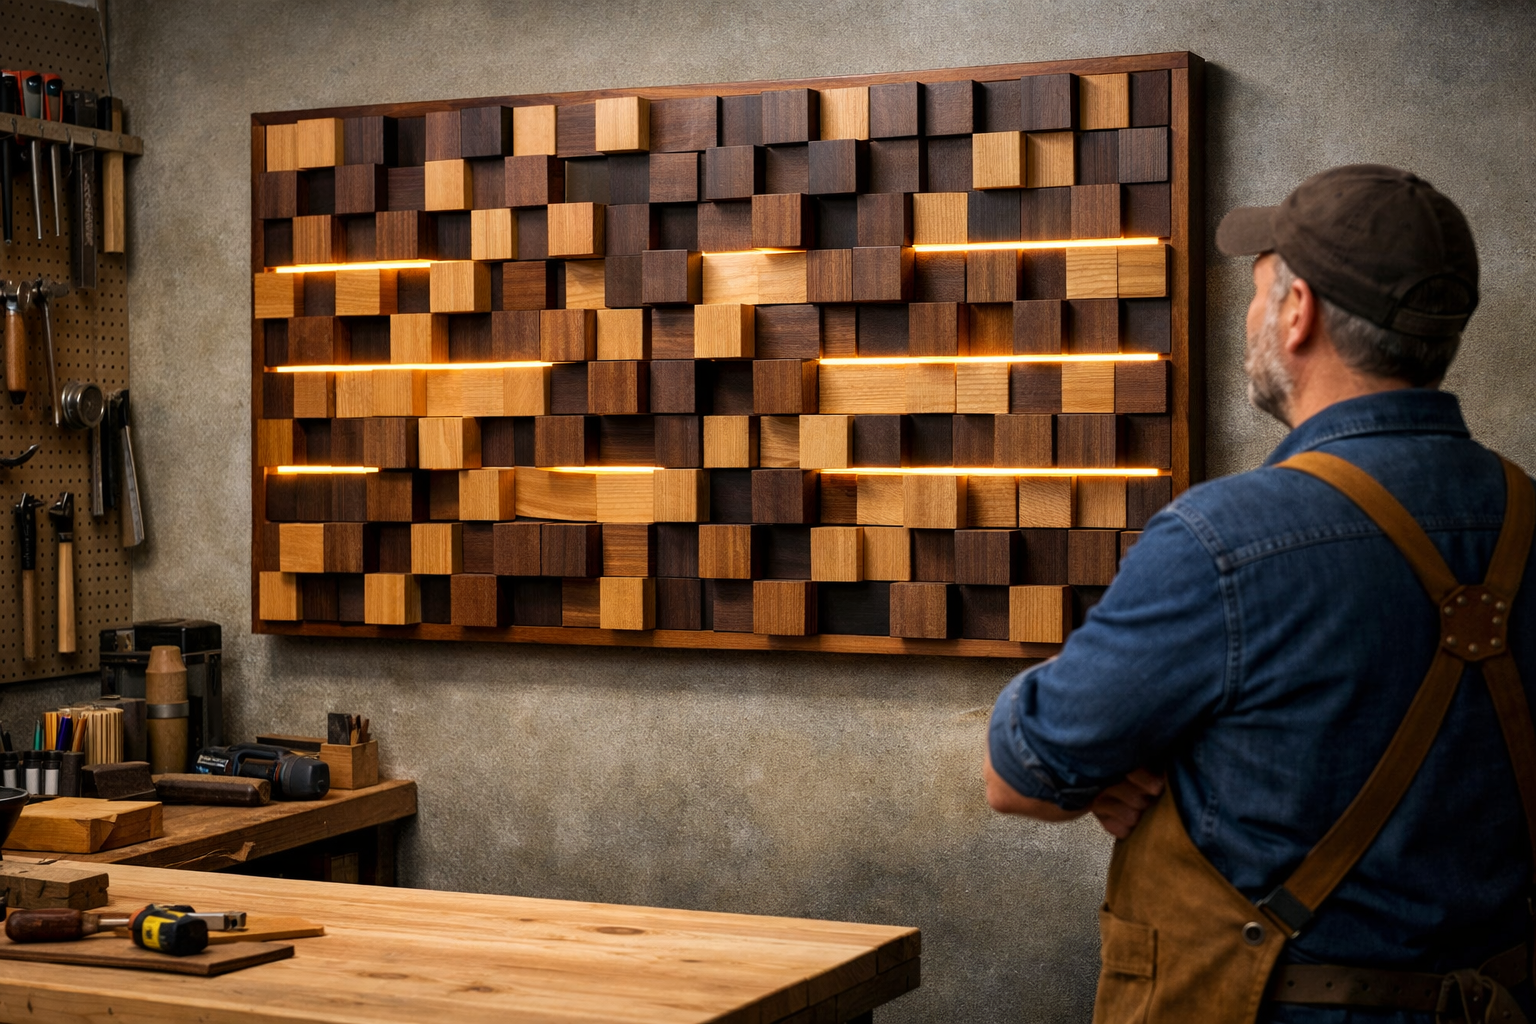
- Mixed Wood Species: Incorporate different wood types (e.g., dark walnut and light maple) within a single panel. This creates stunning visual contrast and highlights the geometric patterns of the diffuser. You could even use a different species for the backing board or frame to add another layer of design.
- Varying Finishes: Apply different stains or dyes to individual blocks or sections of the panel before assembly. This can produce striking multi-tone effects, turning the diffuser into a dynamic visual element. For example, ebonized wood can create dramatic contrast. Learn more about Is Ebonized Wood Food Safe: Expert Recommendations, which provides insights into wood treatment, though not directly for diffusion panels.
- Integrated Lighting: Consider recessing LED strip lights into the frame or along the edges of the diffuser. This ambient lighting can highlight the panel’s three-dimensional structure and add a modern, sophisticated touch to your workshop, especially during evening work sessions.
- Framing: Add a decorative frame around your diffuser panel. This can be a simple mitered frame or a more elaborate design, further enhancing its appearance and providing a clean, finished look.
- Creative Layouts: Instead of a single large panel, consider an array of smaller panels arranged in a staggered or artistic pattern on your wall. This can break up large, monotonous wall spaces and create a dynamic visual display.
Advanced Woodworking Techniques
- Precision Joinery: While simple butt joints are common, exploring advanced joinery techniques can enhance the durability and craftsmanship of your panels. For the frame, mitered corners with splines or even dovetail joints (though perhaps overkill for diffusers) showcase high-level skill. Mastering Dovetail Joinery for Drawers: Hand and Router Methods for Cabinet Builders can improve your overall precision in such projects.
- Router Table Work: A router table can be invaluable for consistent chamfering or rounding over the edges of individual blocks or the panel frame, adding a refined touch. Explore Choosing and Using Router Tables: Maximizing Precision and Safety for Edge Profiling and Joinery for more details.
- CNC Routing (for complex designs): If you have access to a CNC router, you can create incredibly intricate and precise diffusion patterns that would be challenging to achieve by hand. This opens up possibilities for custom, art-inspired designs. For beginners in this area, our Beginner’s Guide to CNC Routers for Small Woodshops: From Setup to First Project can be a great starting point.
- Hidden Fasteners: For a cleaner look, use methods that conceal screws or nails for mounting the panel. French cleats are an excellent option, providing strong support while remaining invisible from the front.
Integrating Diffusers into Your Workshop’s Ecosystem
Consider how your diffusion panels fit into the broader context of your workshop.
- Complementary Furniture: Design your panels to match other custom woodwork in your shop, such as a Modular Home Office Desk System: Customizable Designs for Ergonomics, Cable Management, and Integrated Storage or a portable workbench.
- Smart Integration: If you’re keen on DIY Smart Workshop Upgrades: Integrating AI and IoT for Enhanced Precision and Safety, consider how lighting integrated into your diffusers could be part of an automated smart lighting system.
- Dust Management: Remember that wood dust can settle on textured surfaces. Design with easy cleaning in mind or incorporate a robust dust collection system.
By thinking beyond mere function and embracing the full potential of wood as both an acoustic material and an aesthetic medium, you can create diffusion panels that are not only effective but also deeply personal and inspiring additions to your workshop.
The Impact of Acoustic Diffusion on Workshop Productivity and Well-being
The transformation brought about by effective DIY Acoustic Diffusion Panels: Enhancing Workshop Sound and Aesthetics with Wood Designs extends far beyond simply reducing echoes. It profoundly impacts the comfort, productivity, and even the safety of your woodworking environment. In a space where precision and focus are paramount, creating an optimal auditory landscape is a strategic advantage.
Enhanced Concentration and Reduced Fatigue
A chaotic acoustic environment, characterized by excessive reverberation and harsh reflections, forces the brain to work harder to filter out unwanted noise and focus on critical sounds. This constant cognitive load leads to:
- Increased Mental Fatigue: Prolonged exposure to poor acoustics can be exhausting, leading to burnout and reduced overall stamina for complex tasks.
- Decreased Concentration: Distracting echoes make it harder to concentrate on intricate cuts, detailed joinery, or precise measurements. A diffused sound field allows for a clearer perception of direct sound, improving focus.
- Stress Reduction: The unpleasantness of a noisy, reverberant space contributes to stress. A more balanced and natural sound environment promotes a sense of calm and well-being, making the workshop a more enjoyable place to be.
Think of it as the difference between trying to read a book in a bustling, echoing cafeteria versus a quiet, well-designed library. The latter supports concentration and reduces strain.
Improved Communication and Safety
In many workshops, collaboration, instruction, or even casual conversation is common. Poor acoustics can turn these interactions into frustrating experiences.
- Clearer Communication: Diffusion panels clarify speech intelligibility by scattering reflections, making it easier to understand conversations without shouting or repeating oneself. This is invaluable when discussing project plans or seeking advice.
- Better Sound Awareness: Being able to clearly distinguish the sounds of your tools – the hum of a table saw, the whine of a router, or the rhythmic beat of a planer – is crucial for safety. Uncharacteristic noises can signal a problem. In a diffused environment, these sounds are less muddled, allowing for quicker recognition of potential issues. This aligns with the importance of maintaining your tools, as detailed in Restoring Vintage Woodworking Hand Tools: A Guide to Rust Removal, Sharpening, and Handle Repair for Enhanced Performance.
- Reduced Hearing Strain: Less harshness and reverberation mean less overall strain on your ears, even when wearing hearing protection. This contributes to long-term hearing health.
Elevating the Professional Image of Your Workshop
The aesthetic contribution of wooden diffusion panels should not be underestimated. A workshop that looks professional and well-cared for can inspire greater creativity and pride in your work.

- Visual Appeal: Custom-designed wooden panels act as decorative elements, transforming plain walls into dynamic, textured surfaces. This visual upgrade can make your workshop feel more organized, sophisticated, and inviting.
- Inspiring Environment: Working in a space that is both acoustically comfortable and visually pleasing can foster greater creativity and motivation. It shows a dedication to craftsmanship not just in your projects, but in your workspace itself.
- Showcasing Craftsmanship: Building these panels is a woodworking project in itself. They serve as a testament to your skills, showcasing precision joinery, material selection, and finishing expertise. This is particularly true if you incorporate unique designs like those you might find in DIY Wooden Wall Clocks: Precision Joinery and Modern Designs or other decorative pieces.
Ultimately, investing the time and effort into DIY Acoustic Diffusion Panels: Enhancing Workshop Sound and Aesthetics with Wood Designs is an investment in your well-being and the quality of your work. It transforms your workshop from a mere workspace into a tailored environment optimized for both productivity and enjoyment in 2026.
Maintaining and Optimizing Your DIY Acoustic Diffusion Panels
Once your DIY Acoustic Diffusion Panels: Enhancing Workshop Sound and Aesthetics with Wood Designs are installed, a little ongoing care and attention will ensure they continue to perform optimally and retain their aesthetic appeal for years to come. Furthermore, understanding how to fine-tune their placement can yield even greater acoustic benefits.
Routine Maintenance
Wooden diffusion panels, like any other piece of wooden furniture or fixture, benefit from regular upkeep.
- Dusting: The intricate surfaces and varying depths of diffusers can collect dust. Use a soft brush, a feather duster, or a vacuum cleaner with a brush attachment to gently remove dust from the nooks and crannies. Regular dusting prevents buildup and maintains the panel’s clean appearance.
- Cleaning: For general cleaning, a lightly dampened cloth (not wet) can be used to wipe down the surface. Avoid harsh chemical cleaners, especially if your panels have a delicate finish. If stained or finished, follow the care instructions for that specific finish.
- Inspecting for Damage: Periodically check the panels for any signs of wear, loose blocks, or damage. Wood can swell or shrink with humidity changes, potentially loosening glue joints over time if not properly constructed. Learn more about understanding wood movement to anticipate and mitigate such issues.
- Re-finishing (if necessary): Over many years, the finish might dull or wear. Depending on the type of finish, you may need to re-apply a topcoat or oil to restore its luster and protective qualities.
Optimizing Placement and Adding More Panels
Acoustic treatment is often an iterative process. After installing your initial panels, you might find that further adjustments or additions lead to an even better sound.
- Listen and Adjust: Take time to listen to your workshop’s acoustics after installation. Move around the room. Are there still areas with unwanted reflections? This might indicate a need for more panels or a slight repositioning.
- Strategic Placement for Key Reflections: Consider the “first reflection points.” These are the spots on your walls and ceiling where sound from a source (e.g., your workbench) first bounces before reaching your ears. Placing diffusers or absorbers at these points can be highly effective.
- Combining Diffusion with Absorption: While diffusers scatter sound, absorbers soak up sound energy. A balanced approach often yields the best results. You might place absorption panels on some walls and diffusion panels on others, or even integrate small absorption elements within a diffuser’s frame for a hybrid solution.
- Ceiling Diffusers: Don’t forget the ceiling! A large, flat ceiling is a major source of reflections. Mounting diffusers or absorbers overhead can dramatically improve the overall acoustic experience.
- Experiment with Density: If you built multiple panels, try arranging them in different configurations. Sometimes a higher density of diffusers in a particular area, or spreading them out more evenly, can make a difference.
Remember, the goal is to create a natural, clear, and comfortable sound environment, not a “dead” one. Your DIY Acoustic Diffusion Panels: Enhancing Workshop Sound and Aesthetics with Wood Designs are a key component in achieving this balance. By regularly maintaining them and being open to optimizing their placement, you ensure your workshop remains an ideal space for craftsmanship and creative pursuits in 2026.
Conclusion
The journey of creating DIY Acoustic Diffusion Panels: Enhancing Workshop Sound and Aesthetics with Wood Designs is a truly rewarding endeavor for any woodworker. It’s a project that combines the precision of woodworking with a tangible improvement in your daily working environment. From understanding the scientific principles of sound diffusion to meticulously cutting and assembling individual wooden blocks, each step offers an opportunity to refine your skills while contributing to a more comfortable, productive, and aesthetically pleasing workshop.
In 2026, the value of a well-tuned workspace cannot be overstated. By mitigating harsh echoes, clarifying communication, and reducing auditory fatigue, these panels directly enhance your focus, safety, and overall well-being. Furthermore, the inherent beauty of wood allows these functional acoustic treatments to become bespoke pieces of art, reflecting your personal style and craftsmanship.
Actionable Next Steps:
- Assess Your Space: Conduct a thorough “clap test” and “talk test” in your workshop to identify primary areas of echo and reverberation.
- Research Designs: Explore different diffuser types (QRD, Skyline, etc.) and choose a design that suits your skill level and aesthetic preferences. Online calculators are excellent resources for QRD designs.
- Plan and Procure Materials: Create a detailed cutting list and gather your chosen wood species, backing material, adhesives, and finishes. Don’t forget appropriate safety gear!
- Practice Precision: Dedicate time to making accurate cuts. Remember, consistency in block length and thickness is crucial for both acoustic performance and visual appeal.
- Build and Finish with Care: Take your time during assembly and finishing. A high-quality finish will protect your panels and showcase the beauty of the wood.
- Install Strategically: Mount your panels at key reflection points in your workshop, typically on walls parallel to your primary work area or even on the ceiling.
- Evaluate and Optimize: After installation, listen critically to the changes in your workshop’s acoustics. Don’t hesitate to adjust placement or consider adding more panels for further improvement.
By embarking on this project, you’re not just building panels; you’re crafting an improved experience for every moment spent in your workshop. Embrace the challenge, enjoy the process, and revel in the enhanced sound and aesthetics of your woodworking haven.
