

A bustling kitchen, with its culinary demands, often hides a secret frustration: the incessant search for that elusive jar of cumin or oregano amidst a disorganized spice cabinet. In 2026, the era of fumbling through haphazard spice collections is over. The solution lies not in generic store-bought organizers, but in the deliberate craftsmanship of Building Custom Wooden Spice Racks: Kitchen Organization with Slide-Out Drawers and Wood Finishing. By combining the inherent utility of plywood with the refined beauty of hardwood accents and integrating modern soft-close mechanisms, woodworkers can create not just storage, but a functional art piece. This guide explores how to design and construct bespoke spice racks, offering both wall-mounted and freestanding options, even for those with tiny workshops, transforming kitchen clutter into culinary serenity.
Key Takeaways
- Custom wooden spice racks offer superior organization and aesthetic integration compared to off-the-shelf solutions.
- Plywood forms a robust base, while hardwood accents elevate the rack’s visual appeal and durability.
- Slide-out drawers with soft-close mechanisms enhance accessibility and user experience, a crucial aspect of modern kitchen design.
- Careful wood finishing protects the investment and complements existing kitchen décor.
- Even with limited space, a well-planned approach allows for crafting sophisticated spice storage.
Designing Your Custom Spice Rack: Combining Plywood and Hardwood Accents
The journey of Building Custom Wooden Spice Racks: Kitchen Organization with Slide-Out Drawers and Wood Finishing begins with thoughtful design. The goal is to maximize storage efficiently while ensuring the piece complements your kitchen’s aesthetic. A smart approach leverages the strengths of different wood types: plywood for structural integrity and hardwood for visible elements and durability.

Material Selection: Plywood Foundation with Hardwood Flourishes
For the primary structure—the box and internal dividers—high-quality plywood (such as Baltic birch or cabinet-grade maple plywood) is an excellent choice. Plywood offers stability, resistance to warping, and a smooth surface for finishing. When selecting plywood, consider the veneer quality, as this will impact how well it accepts stains or paint.
- Baltic Birch Plywood: Known for its void-free core and attractive edge grain, often left exposed for a modern look.
- Cabinet-Grade Hardwood Plywood: Features a thin veneer of a specific hardwood (e.g., oak, cherry, maple) on both faces, ideal for staining or clear coating.
Hardwood accents are where the aesthetic truly shines. These can be used for drawer fronts, trim pieces, corner posts, or decorative inlays. Species like walnut, cherry, maple, or even exotic woods can add significant visual appeal and tactile quality. Consider how the grain and color of the hardwood will contrast or complement your chosen plywood and existing kitchen cabinetry.
| Wood Type | Advantages | Common Uses |
|---|---|---|
| Plywood | Stable, strong, resists warping, cost-effective | Main carcass, drawer boxes, shelves, internal dividers |
| Hardwood | Durable, beautiful grain, takes finish well, impact-resistant | Drawer fronts, trim, pulls, decorative accents |
Sizing and Configuration for Optimal Kitchen Organization
Before cutting, meticulous planning is essential.
- Measure Your Space: Determine where the spice rack will reside.
- Wall-mounted: Measure the available wall space, considering height above countertops and proximity to the stove. Wall-mounted racks save counter space and keep spices within easy reach. For similar wall-mounted solutions, explore “DIY Compact Entryway Organizers: Building Wall-Mounted Solutions for Keys, Mail, and Small Accessories”.
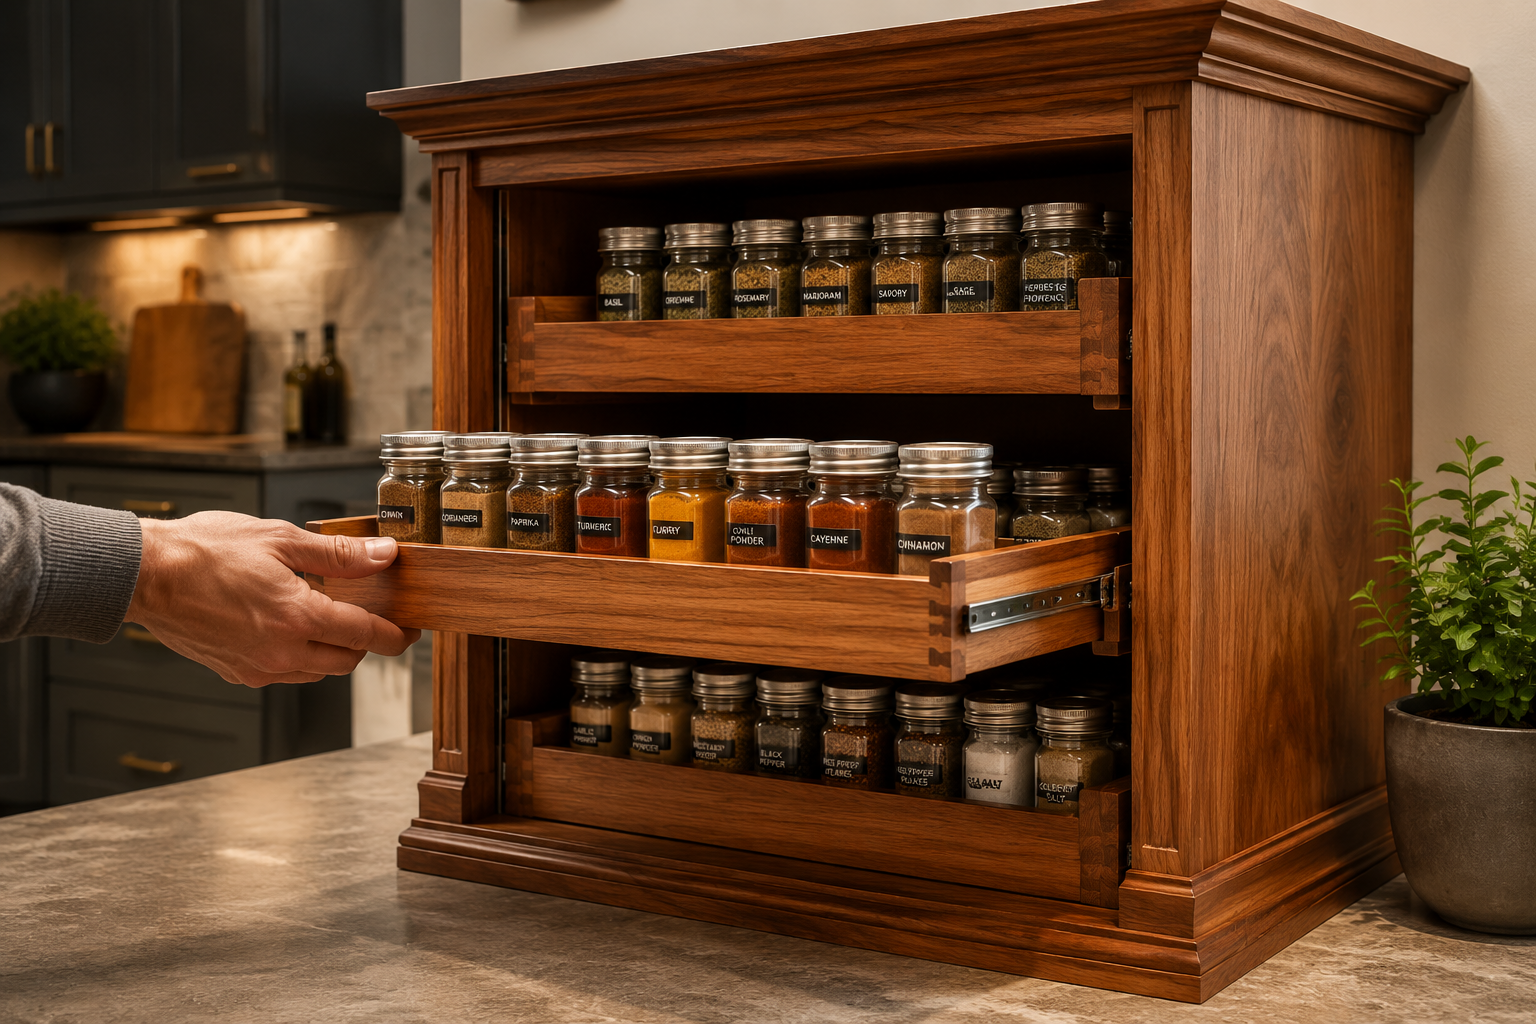
- Freestanding: Decide if it will sit on a countertop, a pantry shelf, or integrate into an existing cabinet. Freestanding units offer flexibility and can be moved.
- Spice Jar Dimensions: Measure your typical spice jars (height, diameter). This dictates the internal dimensions of your drawers and compartments. A common approach is to design drawers that hold two rows of standard spice jars.
- Drawer Quantity and Depth: How many spices do you have? How many do you anticipate? Design for enough drawers to accommodate your collection comfortably, with room to grow. Consider varying drawer depths to accommodate different container sizes.
- Drawer Dividers: Internal dividers are crucial for maintaining order within slide-out drawers. These can be fixed or adjustable, often made from thinner plywood or hardwood strips.
- Soft-Close Mechanism Integration: Factor in the space required for drawer slides. Soft-close slides typically require about 1/2 inch to 5/8 inch clearance on each side of the drawer box. This is critical for smooth operation and silent closing.
Joinery and Construction Techniques for Durability
While precise cuts are paramount, the choice of joinery significantly impacts the rack’s strength and appearance.
- Dadoes and Rabbets: Ideal for connecting plywood panels for the main carcass. These cuts provide strong, interlocking joints that are easy to create with a router or table saw.
- Dovetail Joints: For the ultimate in strength and craftsmanship on hardwood drawer boxes, consider mastering dovetail joints. These interlocking joints are beautiful and incredibly durable. Our guide on “Mastering Dovetail Joints with Hand Tools: A Step-by-Step Guide for Flawless Wood Joinery” offers valuable insights. For those using power tools, “Mastering Dovetail Joinery for Drawers: Hand and Router Methods” provides guidance on router methods.
- Pocket Hole Joinery: A fast and strong method for attaching plywood parts, especially for internal structures or less visible areas.
When assembling, use quality wood glue and clamps to ensure tight, strong bonds. For optimal strength and a lasting finish, always clean excess glue promptly.
Building Slide-Out Drawers with Soft-Close Mechanisms
The hallmark of a truly custom and functional spice rack is the inclusion of smooth, reliable slide-out drawers, enhanced by soft-close mechanisms. This section focuses on the practical steps and considerations for fabricating these essential components in your journey of Building Custom Wooden Spice Racks: Kitchen Organization with Slide-Out Drawers and Wood Finishing.
Precision Power Tools for Accurate Drawer Boxes
Even in a tiny workshop, the right power tools make a significant difference in achieving precision.
- Table Saw: Essential for making accurate, repeatable rip and crosscuts on plywood and hardwoods. A good fence and crosscut sled are invaluable.
- Router: Crucial for cutting dadoes, rabbets, and decorative edges. A router table can greatly improve accuracy and safety, especially for smaller pieces. Learn more about “Choosing and Using Router Tables: Maximizing Precision and Safety for Edge Profiling and Joinery”.
- Miter Saw: Excellent for precise crosscuts on smaller pieces, especially hardwood trim and drawer fronts.
- Drill Press: Ensures perfectly perpendicular holes for drawer pull installation and mounting hardware.
When constructing the drawer boxes, precision is key. Any deviation in measurements will lead to ill-fitting drawers.
- Cut Drawer Sides, Fronts, and Backs: Based on your design, cut these components from plywood. Remember to account for the thickness of your drawer bottom and any dadoes for its insertion.
- Cut Drawer Bottoms: Use thinner plywood or hardboard for the drawer bottoms, typically 1/4 inch thick. These usually sit within a dado cut into the drawer sides, front, and back for a strong, flush fit.
- Assemble Drawer Boxes: Use glue and appropriate joinery (dadoes, rabbets, or dovetails) to assemble the drawer boxes. Ensure they are perfectly square.
- Attach Hardwood Drawer Fronts: Once the plywood drawer boxes are complete, attach your chosen hardwood drawer fronts. These can be attached with screws from the inside of the drawer box, allowing for slight adjustment before final tightening. Consider using spacers to maintain consistent gaps between drawers.
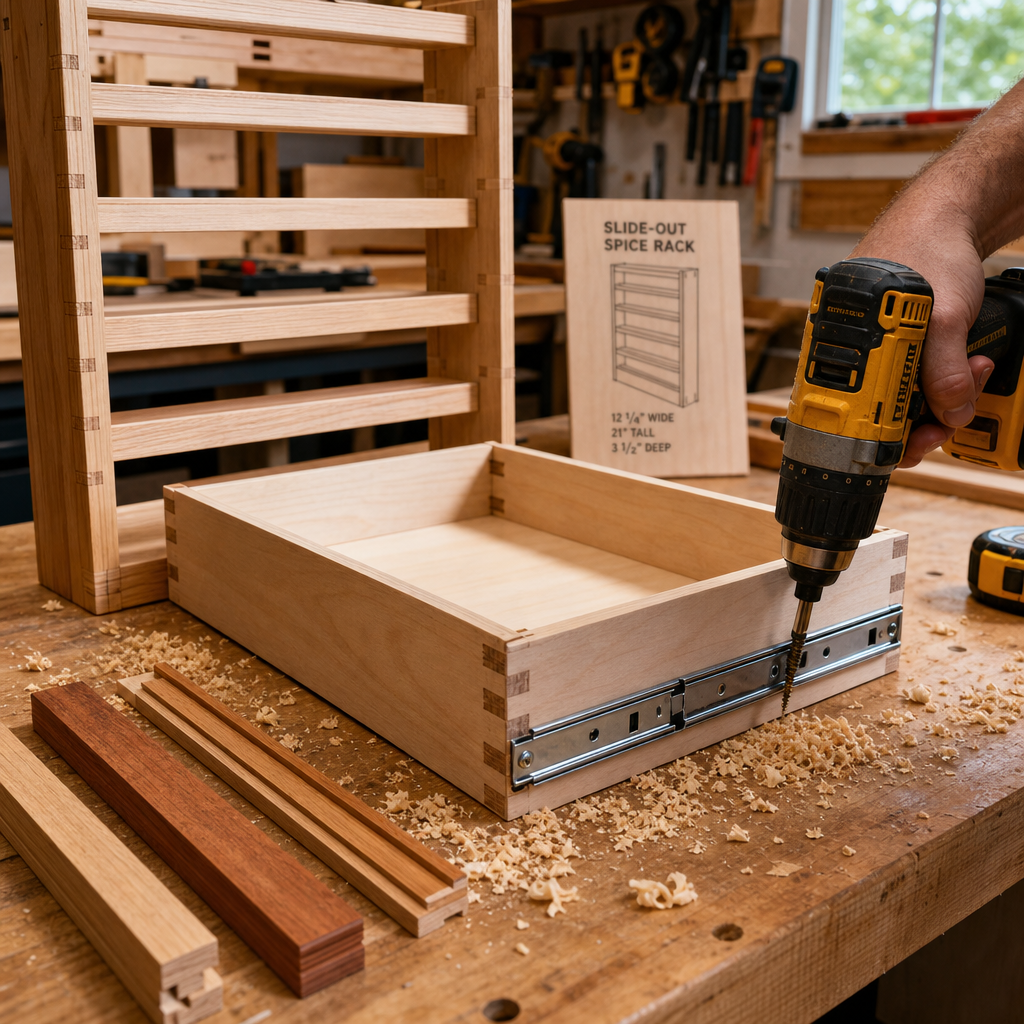
Integrating Soft-Close Drawer Slides
Soft-close drawer slides are a significant upgrade, preventing slamming and providing a luxurious feel.
- Types of Slides:
- Ball-Bearing Slides: Durable and smooth, available in various lengths and weight capacities. Look for full-extension slides to ensure complete access to your spices.
- Undermount Slides: Hidden beneath the drawer box, offering a cleaner aesthetic. These also provide soft-close functionality and full extension.
- Installation:
- Mounting the Cabinet Member: Attach the cabinet-side portion of the slides to the inside walls of your spice rack carcass. Use a spacer or measuring jig to ensure they are perfectly parallel and level. Precision here is paramount for smooth drawer operation.
- Mounting the Drawer Member: Attach the drawer-side portion of the slides to the exterior of your assembled drawer boxes.
- Testing: Carefully insert the drawers and test their movement. Adjust as needed to ensure smooth opening, closing, and consistent soft-close action.
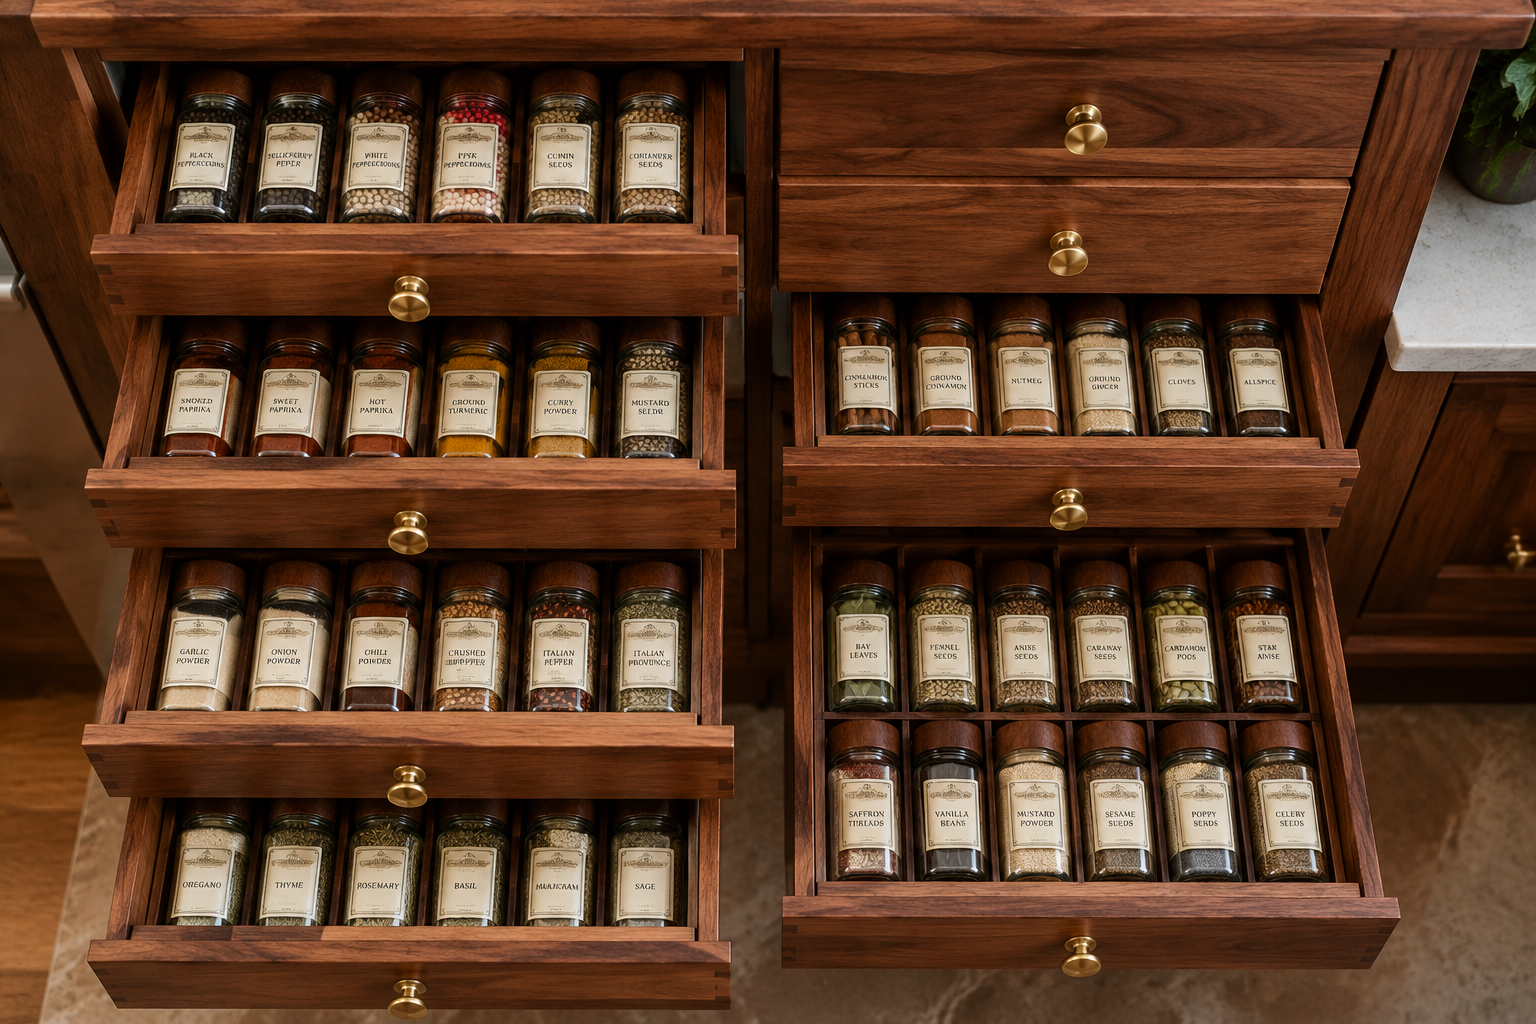
Organizing Drawer Interiors
To maximize the benefits of slide-out drawers, implement smart interior organization:
- Custom Dividers: Create fixed or adjustable dividers from thin wood strips (e.g., 1/4 inch hardwood or plywood). These prevent jars from tumbling and keep them upright.
- Angled Inserts: For narrower drawers, consider angled inserts that display spice labels for easier viewing.
- Non-Slip Liners: Add non-slip drawer liners to prevent jars from sliding around as the drawer opens and closes.
These detailed considerations transform a simple box into a highly functional and elegant spice storage solution.

Wood Finishing for Aesthetics and Protection
The final stage of Building Custom Wooden Spice Racks: Kitchen Organization with Slide-Out Drawers and Wood Finishing is often the most rewarding, as it brings out the wood’s natural beauty and protects your craftsmanship. A well-executed finish elevates the custom spice rack from merely functional to a true showpiece.
Essential Steps for a Flawless Finish
Preparation is crucial for any successful wood finish.
- Sanding: Begin with coarser sandpaper (e.g., 120-grit) to remove any tool marks or imperfections, then progressively move to finer grits (180-grit, 220-grit). For hardwood accents, you might even go up to 320 or 400-grit for an extra smooth feel. Always sand with the grain.
- Dust Removal: After sanding, thoroughly remove all dust. A shop vacuum, compressed air, and a tack cloth are indispensable. Any residual dust will compromise the finish’s smoothness.
- Conditioning (Optional): For woods prone to blotching (like pine or cherry when stained), a pre-stain wood conditioner can help achieve a more even color.
Choosing the Right Wood Finish
The choice of finish depends on the desired look, durability, and ease of application. Since this is for a kitchen, food-safe and durable options are often preferred.
- Oil Finishes (e.g., Danish Oil, Tung Oil):
- Pros: Penetrates the wood, enhancing its natural color and grain. Easy to apply and repair. Provides a natural, warm look.
- Cons: Less durable than film-forming finishes, may require more frequent reapplication, especially in a kitchen environment.
- Consider: “Danish Oil vs. Linseed: The Ultimate Wood Finishing Guide” for a deeper dive into oil finishes.
- Polyurethane:
- Pros: Highly durable, resistant to moisture and abrasion, available in various sheens (matte, satin, semi-gloss, gloss).
- Cons: Can be challenging to apply without brush marks or bubbles, requires multiple coats with sanding in between.
- Tip: For kitchen items, ensure the polyurethane is completely cured before prolonged food contact, although for a spice rack, direct food contact is minimal. For specific considerations, refer to “Is Ebonized Wood Food Safe? Expert Recommendations”, which discusses food safety for wood finishes in general.
- Varnish:
- Pros: Similar to polyurethane in durability, often with better UV resistance. Good for pieces near windows.
- Cons: Can be slower drying, similar application challenges to polyurethane.
- Shellac:
- Pros: Fast-drying, natural, good sealer, easy to repair.
- Cons: Not as durable as polyurethane or varnish, susceptible to alcohol and heat. Generally not ideal for high-traffic kitchen surfaces.
- Stain (Optional): If you want to change the wood’s color before applying a protective topcoat, a wood stain can be used. Test on scrap pieces first to ensure the desired color is achieved. Always follow the stain with a protective clear coat.
Application Techniques for a Professional Look
- Read Manufacturer Instructions: Always follow the specific application guidelines for your chosen finish.
- Ventilation: Work in a well-ventilated area, and wear appropriate personal protective equipment (respirator, gloves).
- Even Coats: Apply thin, even coats. Multiple thin coats are always better than one thick coat, which can lead to drips, runs, and slow drying.
- Between Coats: Lightly sand between coats with a very fine-grit sandpaper (e.g., 320-400 grit) or fine abrasive pad to smooth out any imperfections or dust nibs. Clean thoroughly before the next coat.
- Curing Time: Allow ample time for the finish to cure fully before placing your spices in the rack. This can take several days to weeks, depending on the finish type and environmental conditions.
By dedicating attention to the finishing process, your custom wooden spice rack will not only be a testament to your woodworking skill but also a durable and beautiful addition to your kitchen for years to come. This final touch truly completes the vision of Building Custom Wooden Spice Racks: Kitchen Organization with Slide-Out Drawers and Wood Finishing.
Conclusion
The pursuit of an organized, functional, and aesthetically pleasing kitchen often leads to custom solutions, and Building Custom Wooden Spice Racks: Kitchen Organization with Slide-Out Drawers and Wood Finishing stands as a prime example of woodworking meeting practical domestic needs. Throughout this guide, we’ve explored the deliberate process of marrying the structural reliability of plywood with the refined beauty of hardwood accents, creating a robust yet elegant foundation. The integration of modern soft-close slide-out drawers not only elevates accessibility but also introduces a touch of luxury, transforming a once chaotic spice collection into an orderly, easily navigable culinary resource. Finally, the meticulous application of a quality wood finish protects the craftsmanship and enhances the natural allure of the wood, ensuring durability and seamless integration into your kitchen’s décor.
This project, adaptable for both wall-mounted and freestanding configurations, and achievable even within the constraints of a tiny workshop, proves that custom solutions are within reach for any dedicated woodworker. The satisfaction derived from crafting a bespoke piece that perfectly fits your space and streamlines your daily routine is immense.
Actionable Next Steps
- Assess Your Needs: Catalog your spice collection and measure your available kitchen space to determine the optimal size and configuration for your custom rack.
- Gather Materials: Select your plywood and hardwood accents, keeping in mind the aesthetic you aim for and your budget.
- Plan Your Build: Draw detailed plans, including exact dimensions for all components and the specific drawer slides you intend to use. Double-check all measurements before cutting.
- Invest in Precision: If you don’t already have them, consider acquiring or honing skills with essential power tools like a table saw and router, which are invaluable for accurate cuts and joinery.
- Practice Finishing: Experiment with different stains and finishes on scrap pieces of your chosen wood to ensure you achieve the desired look and feel before applying it to your final project.
Embrace the rewarding process of bringing order and beauty to your kitchen through the art of woodworking.
SEO Meta Title: Build Custom Wooden Spice Racks: Slide-Out Drawers & Finishing SEO Meta Description: Master building custom wooden spice racks with slide-out drawers, hardwood accents, and soft-close mechanisms for peak kitchen organization in 2026.
