

Imagine observing a Carolina Wren meticulously constructing its nest within the perfect shelter you crafted – a sturdy, charming birdhouse specifically designed for its needs. This immediate connection to nature, combined with the satisfaction of building something with your own hands, is an incredibly rewarding experience. For beginners in outdoor woodworking, undertaking a birdhouse project offers a manageable entry point into essential skills, culminating in a functional piece that enhances your yard. This article provides detailed birdhouse blueprints: beginner projects for outdoor woodworking with custom features, guiding you through simple to advanced designs that incorporate ventilation, predator guards, and decorative roofs, teaching basic cuts and assembly along the way.
Key Takeaways

- Birdhouses are excellent beginner woodworking projects, teaching fundamental skills with a tangible, rewarding outcome.
- Proper design incorporates essential features like ventilation, drainage, and predator guards for bird safety and health.
- Selecting the right materials, such as cedar or pine, is crucial for durability and weather resistance in outdoor environments.
- Custom features like decorative roofs and clean-out panels elevate both the aesthetic and functionality of your birdhouse.
- Following detailed blueprints ensures a successful build, fostering confidence for more complex outdoor woodworking projects.
Understanding Birdhouse Blueprints: Essential Elements for Beginners
Embarking on your first outdoor woodworking project can feel daunting, but creating a birdhouse from scratch is an ideal starting point. It requires fundamental cuts, basic assembly techniques, and introduces you to selecting weather-resistant materials. The beauty of birdhouse blueprints: beginner projects for outdoor woodworking with custom features lies in their simplicity combined with the potential for personalization.
Why Start with a Birdhouse?
Birdhouses are forgiving projects. Minor imperfections often add character rather than detract from functionality. They teach you:
- Measuring and Cutting: Precision is important, but not to the extent of fine furniture.
- Assembly Techniques: Mostly butt joints with screws or nails, ideal for learning secure fastening.
- Material Selection: Understanding wood properties for outdoor use.
- Tool Familiarity: Getting comfortable with saws, drills, and measuring tools.
Moreover, the end product serves a valuable purpose, providing shelter for local wildlife and bringing natural beauty to your garden. Many woodworkers discover a passion for creating items that benefit their environment, much like crafting profitable wooden birdhouses and feeders becomes a sustainable hobby.
Critical Design Features for a Successful Birdhouse
A birdhouse isn’t just a box; it’s a habitat. Thoughtful design elements are crucial for the birds’ safety and well-being.
- Entry Hole Size: This is paramount. Too large, and predators can enter; too small, and the target bird can’t.
- Common Bird Entry Hole Sizes:
- Chickadee: 1 1/8 inches
- Wren: 1 1/8 inches
- Bluebird: 1 1/2 inches
- Downy Woodpecker: 1 1/4 inches
- House Finch: 2 inches
- Common Bird Entry Hole Sizes:
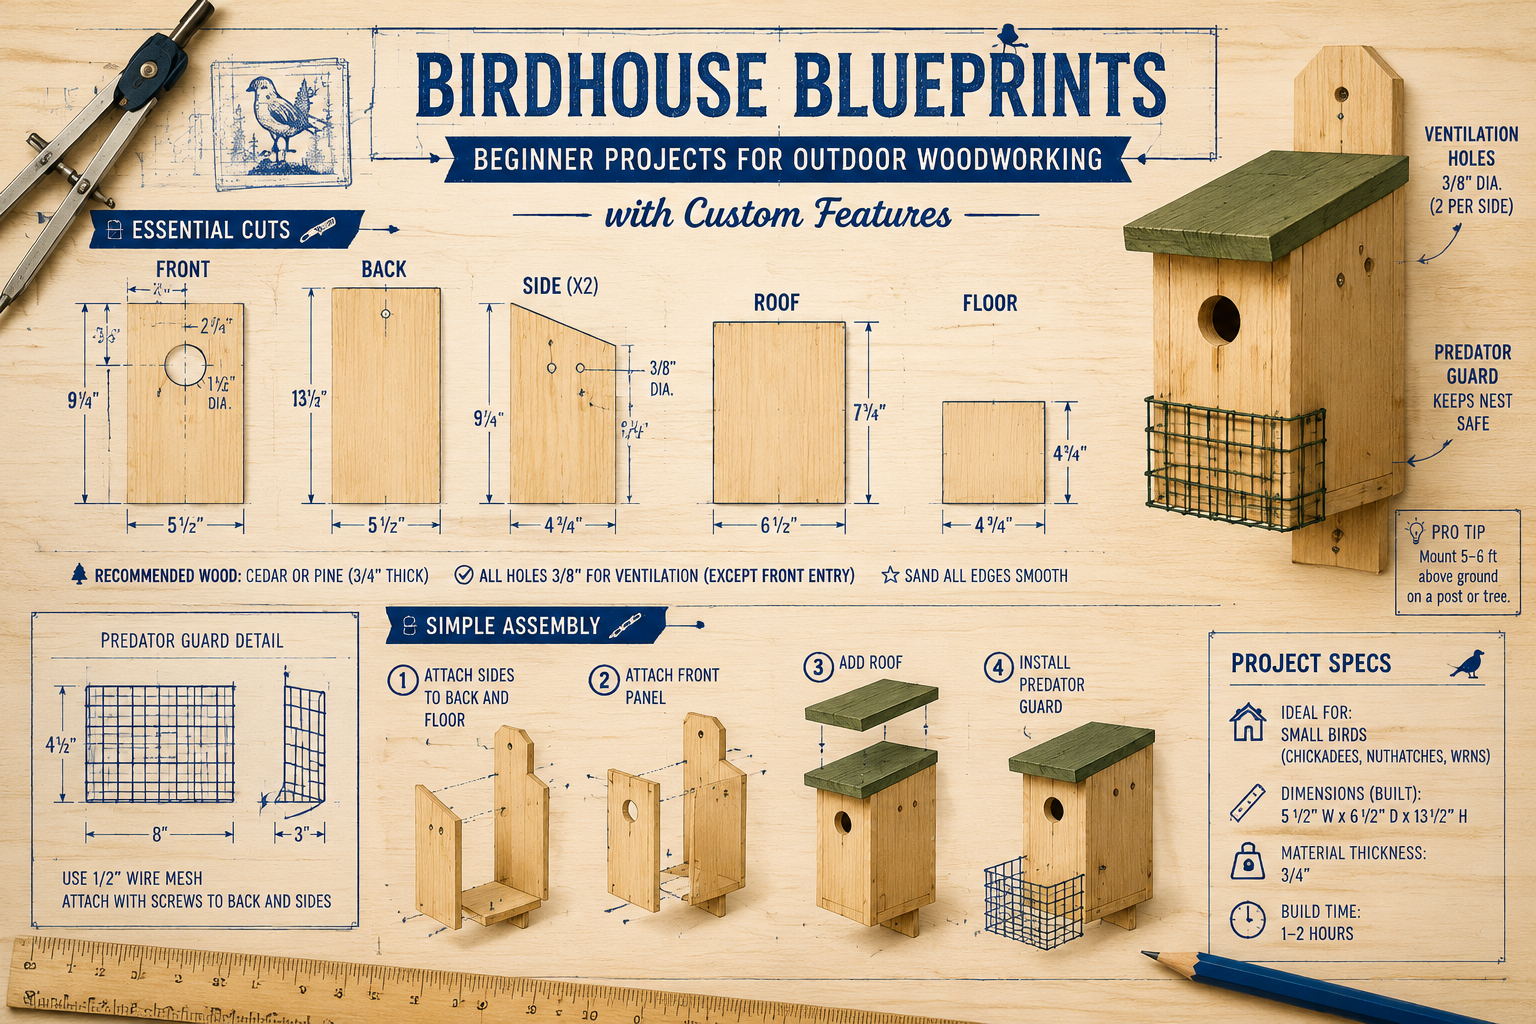
- Ventilation: Without proper airflow, birdhouses can overheat, especially during summer months. Small gaps under the roof eaves or drilled holes near the top edges are effective.
- Drainage: Holes in the floor prevent water from pooling, which can lead to mold and disease. Two to four 1/4-inch holes are usually sufficient.
- Predator Guards: A simple block of wood with a slightly larger hole attached to the entrance can deter larger predators like raccoons and squirrels from reaching inside. This is a critical custom feature for birdhouse blueprints: beginner projects for outdoor woodworking with custom features.
- Clean-out Access: A removable side, bottom, or roof panel is essential for annual cleaning after nesting season. This prevents parasites and allows for safe re-use.
Selecting the Right Wood for Outdoor Durability
The type of wood you choose directly impacts your birdhouse’s longevity and safety.
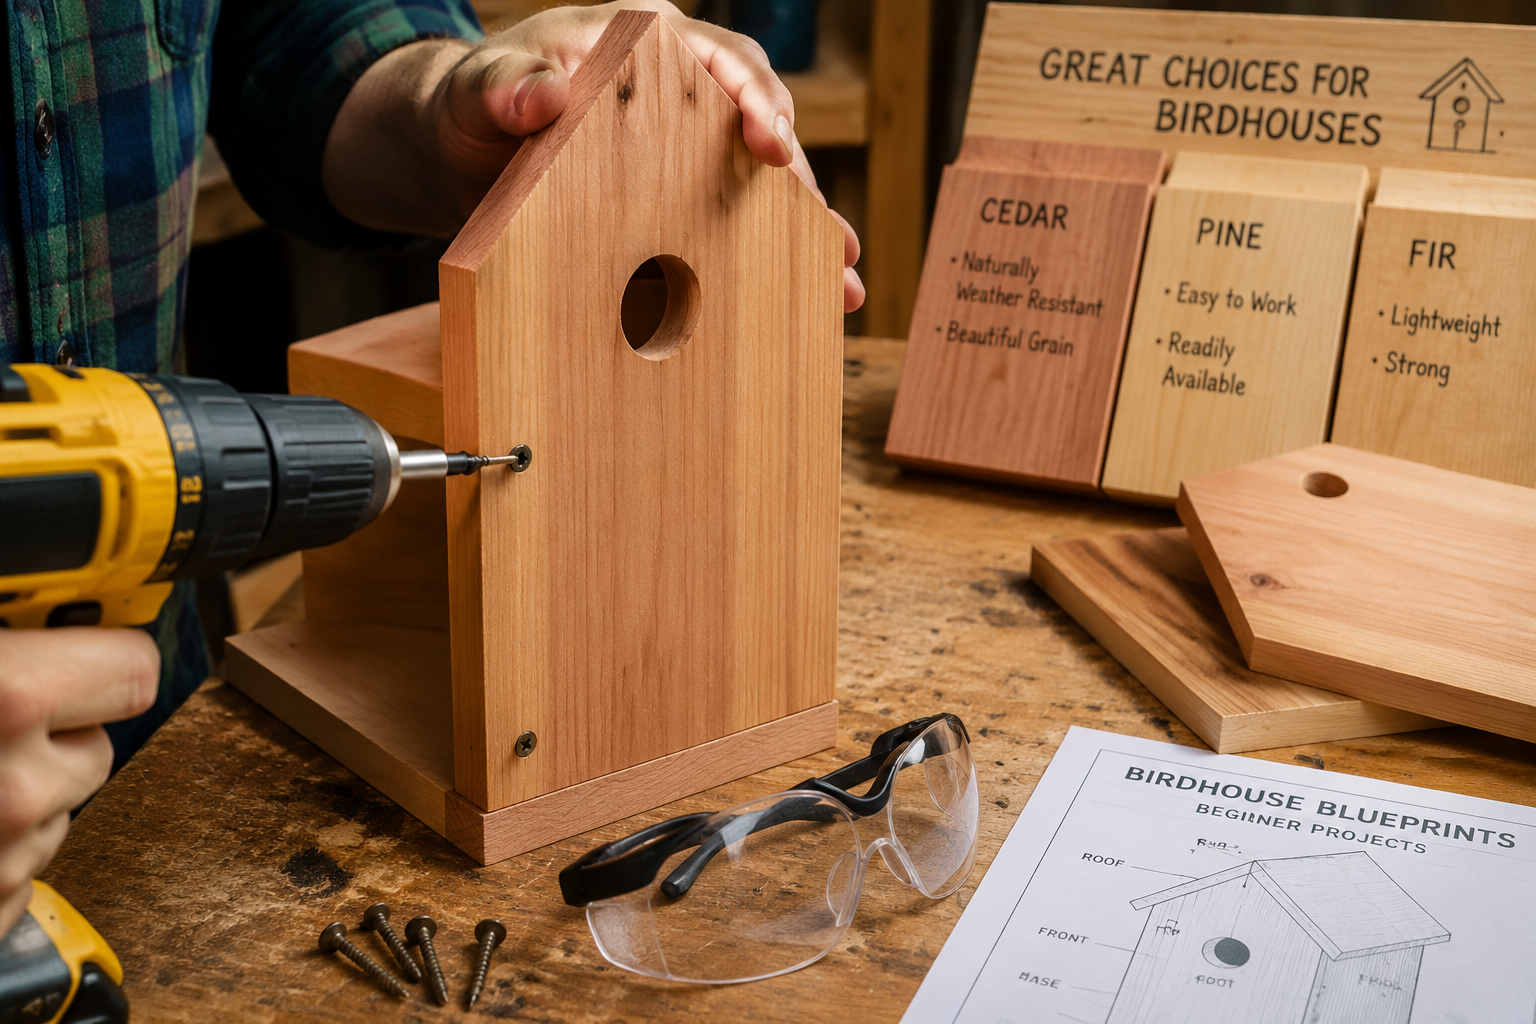
- Cedar: Naturally rot-resistant and doesn’t require chemical treatments. A popular choice due to its durability and pleasant aroma.
- Pine: Readily available and inexpensive. It needs to be treated with a non-toxic, water-based sealant to withstand the elements, or choose pressure-treated pine (ensure it’s certified safe for animal contact).
- Redwood: Similar to cedar in its natural resistance to decay and insects. More expensive but excellent quality.
- Plywood: While cost-effective, exterior-grade plywood is necessary, and all edges must be sealed thoroughly to prevent delamination. Avoid treated plywood unless specified non-toxic.
Avoid: Chemically treated lumber not specifically rated for animal contact, and painted wood with lead-based paints or VOCs. If painting, use non-toxic, water-based exterior paints. When considering materials, remember that sourcing and selecting reclaimed urban lumber can also offer unique, character-rich options, but careful assessment for contaminants is vital.
Beginner-Friendly Projects: Simple Cuts and Assembly
The core of any successful woodworking project, especially for beginners, lies in understanding and executing basic cuts and proper assembly. For birdhouse blueprints: beginner projects for outdoor woodworking with custom features, these skills are paramount.
Tools for Your First Birdhouse
You don’t need a workshop full of expensive tools. Many beginner birdhouse projects can be completed with a modest collection:
- Measuring Tape and Pencil: For accurate marking.
- Saw: A hand saw (like a Japanese hand saw for precision) or a circular saw for straight cuts. A jigsaw is helpful for entrance holes.
- Drill: For pilot holes and driving screws.
- Clamps: Essential for holding pieces securely during assembly.
- Safety Gear: Eye protection, gloves.
| Tool Category | Essential Item | Purpose in Birdhouse Project |
|---|---|---|
| Measuring | Tape Measure | Accurate dimensions |
| Marking | Pencil | Drawing cut lines |
| Cutting | Hand Saw/Jigsaw | Shaping wood |
| Drilling | Cordless Drill | Pilot holes, fasteners |
| Fastening | Screws/Nails | Joining pieces |
| Safety | Safety Glasses | Eye protection |
Project 1: The Classic A-Frame Birdhouse
This design is straightforward, involving mostly straight cuts and simple angles. It’s an excellent model for birdhouse blueprints: beginner projects for outdoor woodworking with custom features.
Materials (Example: Cedar)
- Two side panels (e.g., 6″ x 8″ rectangles, with one top edge cut at a 45-degree angle for the roof pitch)
- Front and back panels (e.g., 6″ x 8″ rectangles, with the top shaped into a triangle for the roof pitch)
- Floor panel (e.g., 4″ x 4″ square)
- Two roof panels (e.g., 5″ x 8″ rectangles)
- 1 1/2″ exterior wood screws
Basic Steps:
- Cut Pieces: Measure and cut all panels according to your blueprint. Use a drill with a hole saw or spade bit to create the entrance hole in the front panel. Drill drainage holes in the floor.
- Assemble Walls: Attach the front and back panels to the side panels, ensuring edges are flush. Use wood glue and screws.
- Attach Floor: Secure the floor panel to the bottom edges of the assembled walls.
- Add Roof: Fasten the two roof panels to the angled tops of the side, front, and back panels, ensuring they overlap at the peak to create an A-frame. Consider making one roof panel hinged for easy cleaning.
- Finish: Sand all rough edges. Apply a non-toxic sealant if using non-naturally resistant wood.

Project 2: Wren House with a Clean-out Panel
Wrens prefer smaller, cozier homes. This design introduces the concept of a removable panel for maintenance.
Materials (Example: Pine)
- Front, back, side panels
- Floor panel
- Roof panel
- Small hinges for the clean-out panel
- Latch or hook-and-eye closure
Basic Steps:
- Cut and Prep: Cut panels to size. The front panel needs a 1 1/8″ hole. Designate one side panel or the bottom as the clean-out access.
- Assemble Fixed Sides: Secure three walls and the back panel to the floor.
- Create Clean-out: If using a side panel for cleaning, attach it with two small hinges at the bottom edge and a latch at the top. If using the bottom, secure it with screws that can be easily removed, or a pivot mechanism.
- Attach Roof: Secure the roof panel, ensuring it overhangs sufficiently to protect the entrance and provide shade.
- Add Perch (Optional): While some birds, like wrens, prefer no perch to deter predators, a small dowel can be added below the entrance for other species.
For more inspiration on practical and profitable woodworking, consider exploring woodworking projects that sell. Birdhouses are often popular sellers!
Custom Features and Advanced Touches for Your Birdhouse Blueprints
Once you’re comfortable with basic construction, you can start exploring custom features that enhance both functionality and aesthetic appeal. These custom features truly make your birdhouse blueprints: beginner projects for outdoor woodworking with custom features stand out.
Integrated Predator Guards and Entrances
Moving beyond a simple block, integrate predator guards more seamlessly into the design:
- Recessed Entrance: Create a slightly thicker front panel and drill the entrance hole through it, effectively recessing the opening to make it harder for predators to reach in.
- Tunnel Entrance: For specific birds, a small tunnel extending inwards from the entrance hole provides an extra layer of protection. This can be achieved by attaching a short piece of PVC pipe or a carved wooden block behind the entrance hole.
Decorative Roofs and Architectural Details
The roof is often the most visible part of a birdhouse and offers a fantastic opportunity for personalization.
- Shingled Roof: Cut small squares or rectangles of thin wood (cedar shingles or even reclaimed pallet wood) and overlap them to create a charming shingled effect.
- Copper or Metal Roof: A thin sheet of copper or aluminum can be cut and folded over the roof panels, offering a rustic look and excellent weather protection. Ensure edges are smooth and safe.
- Turret or Dormer: For a whimsical touch, add a small decorative turret or a miniature dormer window to the roofline. These are purely aesthetic.
- Finials: A turned wooden finial on the peak of an A-frame roof adds a sophisticated touch.
Adding a Personal Touch
- Wood Burning: Use a woodworking burner to engrave patterns, bird silhouettes, or even the house number onto your birdhouse. This adds a truly unique, artisanal flair.
- Non-Toxic Stains and Sealants: While natural wood is great, a non-toxic stain can enhance the wood’s grain and add color. Always use water-based, bird-safe products.
- Mounting Options: Consider how the birdhouse will be displayed. A sturdy post mounting system offers a classic look and can be predator-proofed with baffles, while a hanging chain provides flexibility.

These advanced touches transform a simple birdhouse into a miniature work of art and a truly inviting home for your feathered neighbors. When designing your custom features, always prioritize the birds’ safety and comfort.
Conclusion
Embarking on outdoor woodworking with birdhouse blueprints: beginner projects for outdoor woodworking with custom features is an incredibly rewarding journey. It offers a low-pressure environment to develop fundamental skills like measuring, cutting, and assembly, while simultaneously contributing to your local ecosystem. From the satisfaction of seeing your first cuts come together to the joy of observing birds nesting in a home you built, the experience is rich with personal achievement.
By focusing on essential design elements like proper ventilation, drainage, and predator guards, you ensure a safe and healthy habitat for birds. As your confidence grows, integrating custom features like decorative roofs, integrated clean-out panels, or even personalized wood-burned details allows for creative expression and elevates your project from functional to truly unique. The skills gained from these beginner projects will serve as a strong foundation, encouraging you to explore more complex woodworking endeavors in the future. So grab your tools, choose your wood, and start building a welcoming haven for your feathered friends in 2026!
Actionable Next Steps:
- Gather Tools: Ensure you have basic measuring, cutting, drilling, and safety equipment.
- Select a Blueprint: Start with a simple A-frame or Wren house design.
- Choose Wood: Opt for cedar or pine for durability and bird safety.
- Prioritize Bird Needs: Always incorporate correct entrance hole size, ventilation, and drainage.
- Personalize Responsibly: Add custom features like decorative roofs or wood burning, ensuring all finishes are non-toxic.
SEO Meta Title: Birdhouse Blueprints: Beginner Outdoor Woodworking Projects SEO Meta Description: Explore birdhouse blueprints for beginners in 2026. Learn simple cuts, assembly, and custom features like ventilation & decorative roofs for outdoor woodworking.

