


For centuries, long before the hum of electric sanders or the whir of jointers, artisans relied on the quiet efficiency of the hand plane. This essential woodworking tool, often overlooked in the age of power machinery, remains an unparalleled instrument for achieving surfaces that are not just flat and smooth, but imbued with a tactile quality only hand tools can impart. This article provides an Introduction to Traditional Hand Planes: Essential Techniques for Smoothing, Squaring, and Shaping Wood, guiding you through the fundamental principles and practical skills needed to master this timeless craft.
Key Takeaways
- Understanding Plane Anatomy: Familiarity with the parts of a hand plane (sole, blade, frog, cap iron) is crucial for effective setup and use.
- Sharpening is Paramount: A razor-sharp blade is the single most important factor for success; dull planes tear wood rather than cut it cleanly.
- Mastering Basic Strokes: Learn how to flatten wide boards, square edges, and smooth surfaces using proper body mechanics and plane adjustment.
- Reading the Grain: Understanding wood grain direction is fundamental to preventing tear-out and achieving optimal results.
- Versatility of Planes: Different types of planes are designed for specific tasks, from broad surfacing to intricate shaping and joinery.
An Introduction to Traditional Hand Planes: Essential Tools and Setup
 Traditional hand planes are precision instruments designed to shave thin layers of wood, bringing a workpiece to its final dimensions with accuracy and a superior surface finish. While seemingly simple, mastering a hand plane involves understanding its components, proper setup, and the subtle art of blade sharpening.

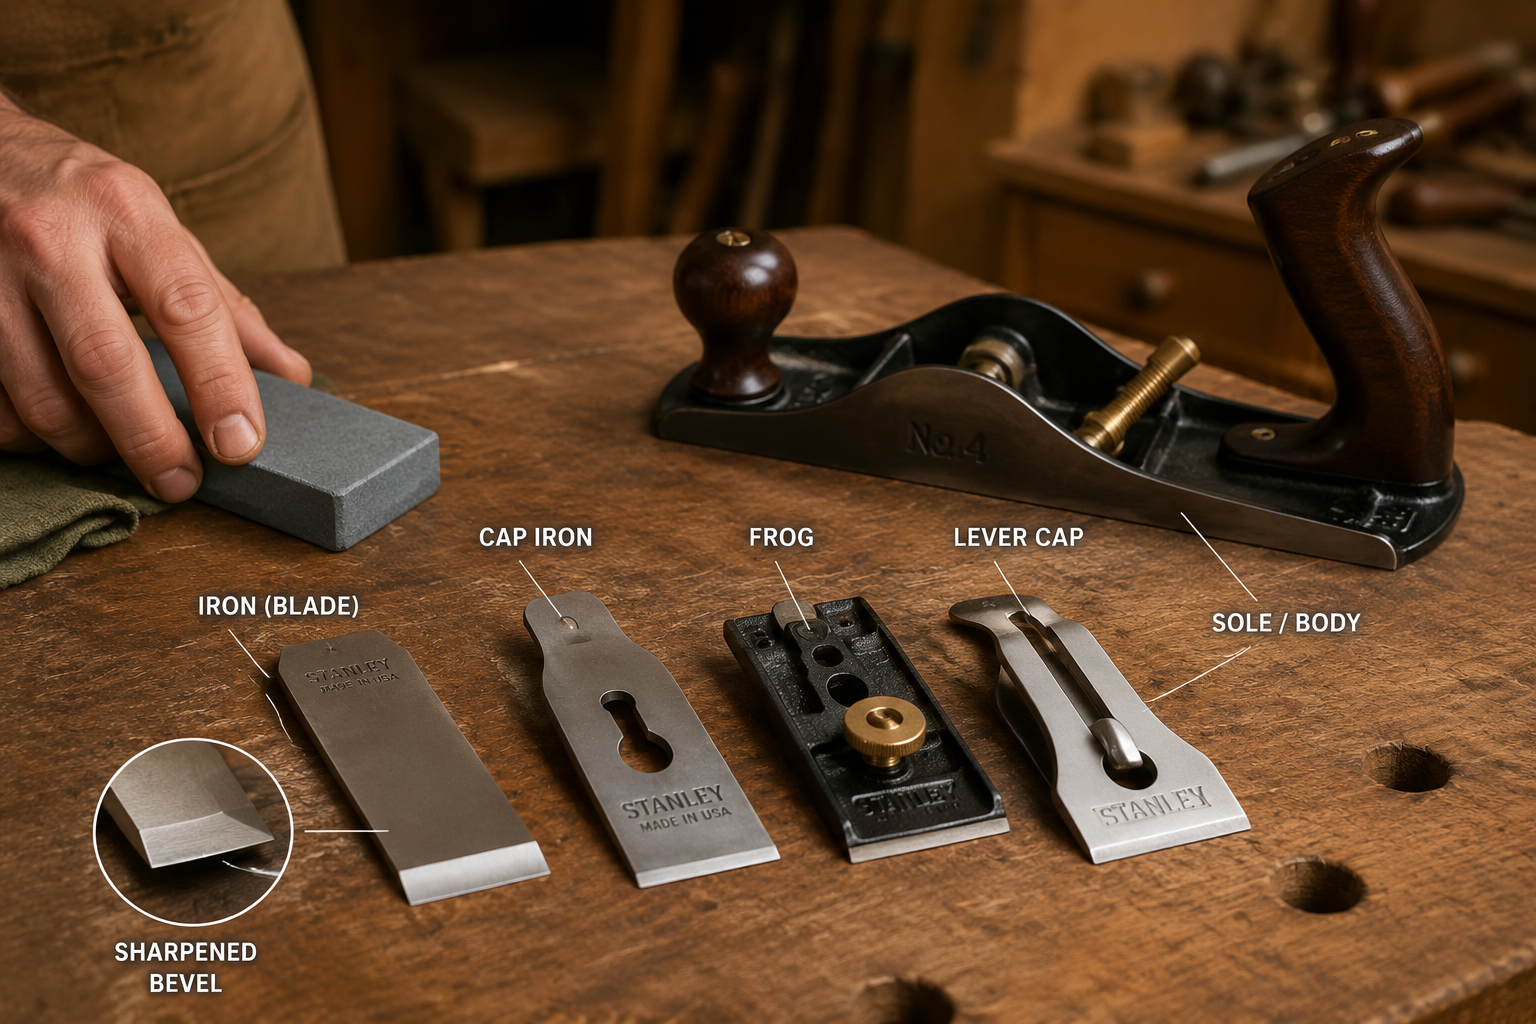
Anatomy of a Bench Plane
Most traditional bench planes, such as the widely recognized Bailey or Bedrock types, share common components:
- Sole: The flat bottom surface that rides on the wood. A truly flat sole is critical for accurate work.
- Blade (Iron): The cutting edge, typically made of high-carbon steel, that shaves the wood.
- Cap Iron (Chip Breaker): Sits on top of the blade, curling the shaving upwards and helping to prevent tear-out.
- Frog: The cast-iron assembly that supports the blade and cap iron, allowing for precise depth adjustment.
- Lever Cap: Holds the blade and cap iron assembly firmly to the frog.
- Handles (Tote and Knob): Provide comfortable grip and control for pushing the plane.
- Adjustments:
- Depth of Cut: A knurled nut or wheel adjusts how far the blade protrudes from the sole.
- Lateral Adjustment: A lever or screw moves the blade side-to-side to ensure an even cut across the entire width.
Essential Hand Plane Types
While many specialized planes exist, a few foundational types form the core of any woodworker’s kit:
- Smoothing Plane (e.g., No. 4): The most common plane, used for final surfacing and achieving a glass-smooth finish. Its shorter length makes it maneuverable.
- Jack Plane (e.g., No. 5): A versatile “jack-of-all-trades” plane used for initial stock removal, flattening rough lumber, and preparing surfaces for finer planes. It’s longer than a smoother but shorter than a jointer.
- Jointer Plane (e.g., No. 7 or No. 8): The longest bench plane, specifically designed for creating perfectly straight edges on long boards, essential for accurate glue-ups. Its length bridges hollows and humps, ensuring a straight reference.
- Block Plane: A small, one-handed plane with a low-angle blade, primarily used for planing end grain, chamfering edges, and fitting small parts.
The Critical Importance of Sharpening
A sharp blade is non-negotiable for effective hand planing. A dull plane will tear, chatter, and leave a rough surface, no matter how skilled the user. Achieving a razor-sharp edge involves several steps:
- Grinding (if necessary): Reshaping the bevel to the correct angle (typically 25-30 degrees for bench planes).
- Honing: Refining the edge on progressively finer sharpening stones (waterstones, oilstones, diamond stones).
- Stropping: Polishing the very edge to remove any burr and achieve ultimate keenness.
For a comprehensive guide on achieving razor-sharp edges for all your cutting tools, explore our resource on The Ultimate Guide to Sharpening Woodworking Chisels and Planes: Achieving Razor-Sharp Edges.
Mastering Basic Planing Techniques for Smoothing and Squaring
 With a well-tuned and sharp plane, you’re ready to tackle the core tasks: smoothing, squaring, and flattening. These techniques form the bedrock of traditional woodworking.
Holding and Pushing the Plane
Proper grip and body mechanics are crucial for control and efficiency.
- Bench Planes: Place your dominant hand on the tote (rear handle) and your non-dominant hand on the knob (front handle).
- Block Planes: Hold it firmly in one hand, often with your thumb resting on the cap iron for control.
- Stance: Stand with your weight balanced, allowing your body to move with the plane. Use your body weight, not just arm strength, to push the plane through the wood.
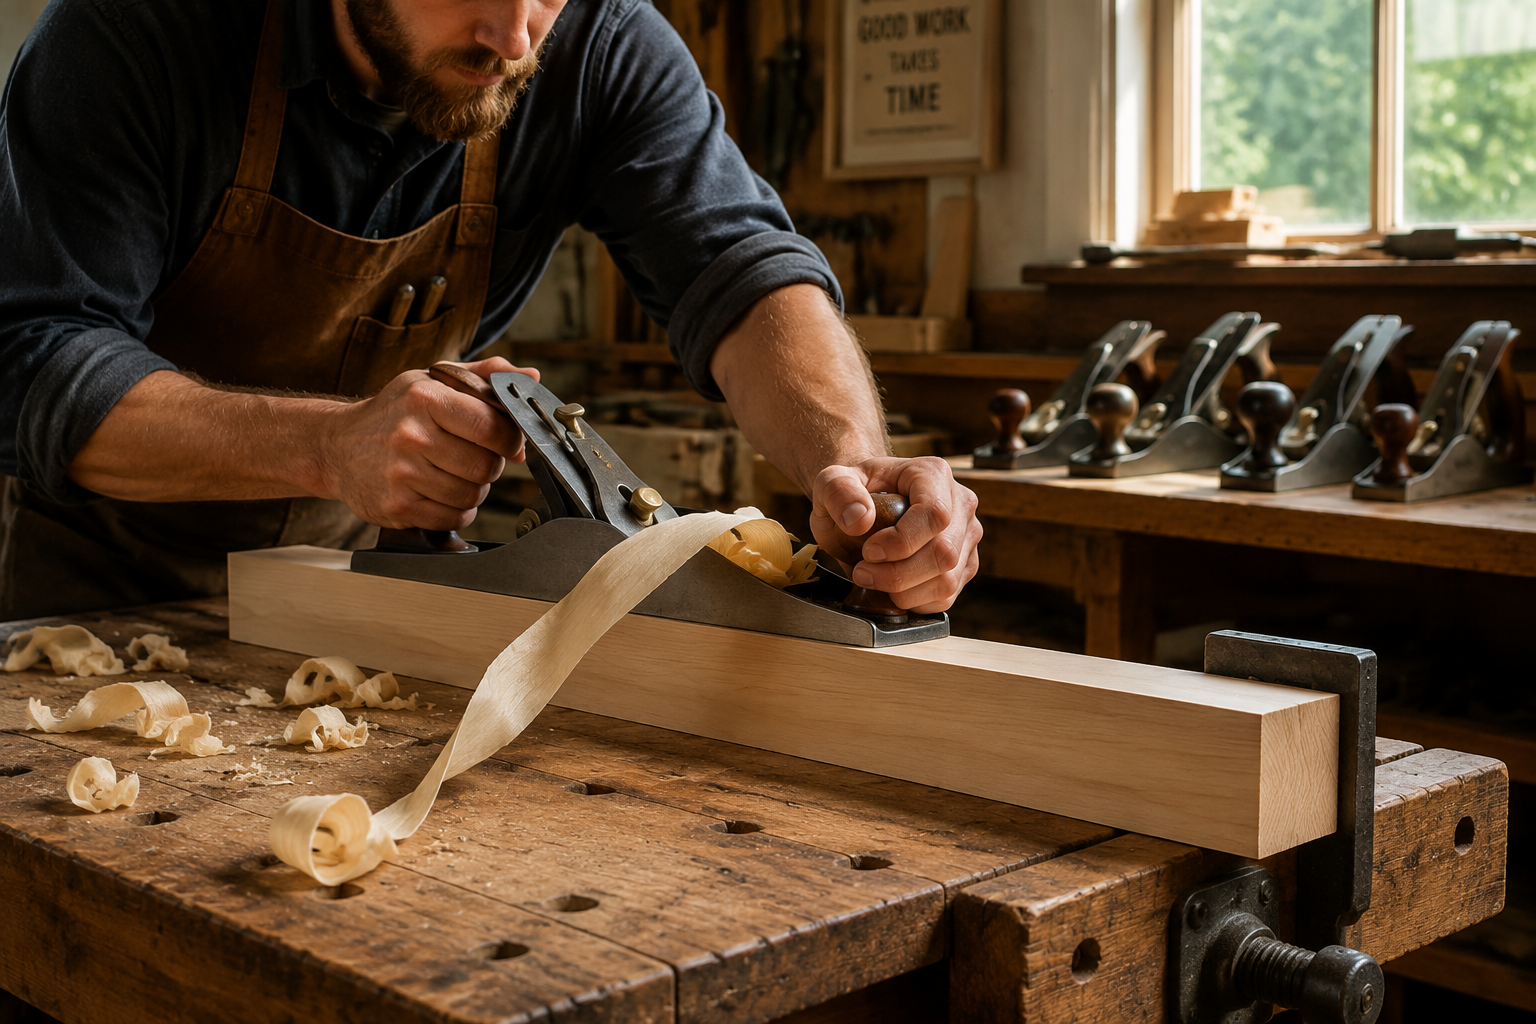
Smoothing a Surface
The goal of smoothing is to achieve a perfectly flat, tear-out-free surface ready for finishing.
- Assess Grain Direction: Always plane with the grain. Running against the grain will cause tear-out. Look at the grain pattern; imagine petting an animal – you want to go in the direction its fur lies flat.
- Adjust Depth of Cut: Start with a very fine shaving. You should see a thin, continuous curl of wood emerging from the mouth. Too deep, and the plane will be hard to push and prone to tear-out.
- Overlap Strokes: Work systematically, overlapping each stroke by about half the blade’s width to ensure uniform removal.
- Listen and Feel: A sharp plane cutting properly produces a consistent “whoosh” sound and feels smooth. Any chattering or digging indicates an issue with sharpness, setup, or grain direction.
- Check for Flatness: Periodically use a straightedge to check the surface for hollows or high spots. Focus your planing on the higher areas.
Squaring an Edge
Achieving a perfectly square 90-degree edge is fundamental for strong, gap-free joints. This is where a jointer plane truly shines.
- Reference Face: First, ensure one face of the board is perfectly flat (the “reference face”) using your smoothing plane.
- Clamp the Workpiece: Secure the board on your workbench, preferably with the edge slightly proud.
- Establish a Flat Edge: With your jointer plane, take successive passes along the edge, using the reference face against the fence of your bench or a guide block to keep the plane perpendicular.
- Check for Squareness: Use a try square to frequently check that the edge is exactly 90 degrees to the reference face. Adjust your pressure or plane angle slightly to correct any deviation.
- Windage Check: For long edges, sight down the edge to ensure it’s straight, checking for any twist or “wind.”
Flattening a Board (Face Planing)
Flattening a board is often the first step in preparing rough lumber. This process involves creating a single, true reference face.
- Identify High Spots: Place the board on a flat surface or winding sticks and identify the highest points and twists.
- Initial Stock Removal: Use a jack plane with a slightly cambered (curved) blade to quickly remove material from the high spots. The camber helps prevent the plane from digging in and allows for faster material removal.
- Transition to Smoothing: Once the surface is reasonably flat, switch to a smoothing plane with a straight blade (or very slight camber) to refine the surface.
- Repeat for Second Face: After creating one flat face, flip the board and plane the second face parallel to the first, often using calipers or marking gauges to maintain consistent thickness.
For those interested in preparing rough lumber efficiently, pairing hand plane techniques with power tools like a band saw for initial breakdown can be incredibly effective. Read more about Mastering the Band Saw: Essential Techniques for Resawing, Curve.
Advanced Hand Plane Techniques: Shaping and Refinement
 Beyond basic smoothing and squaring, hand planes offer incredible versatility for intricate shaping, joinery, and achieving specialized finishes.
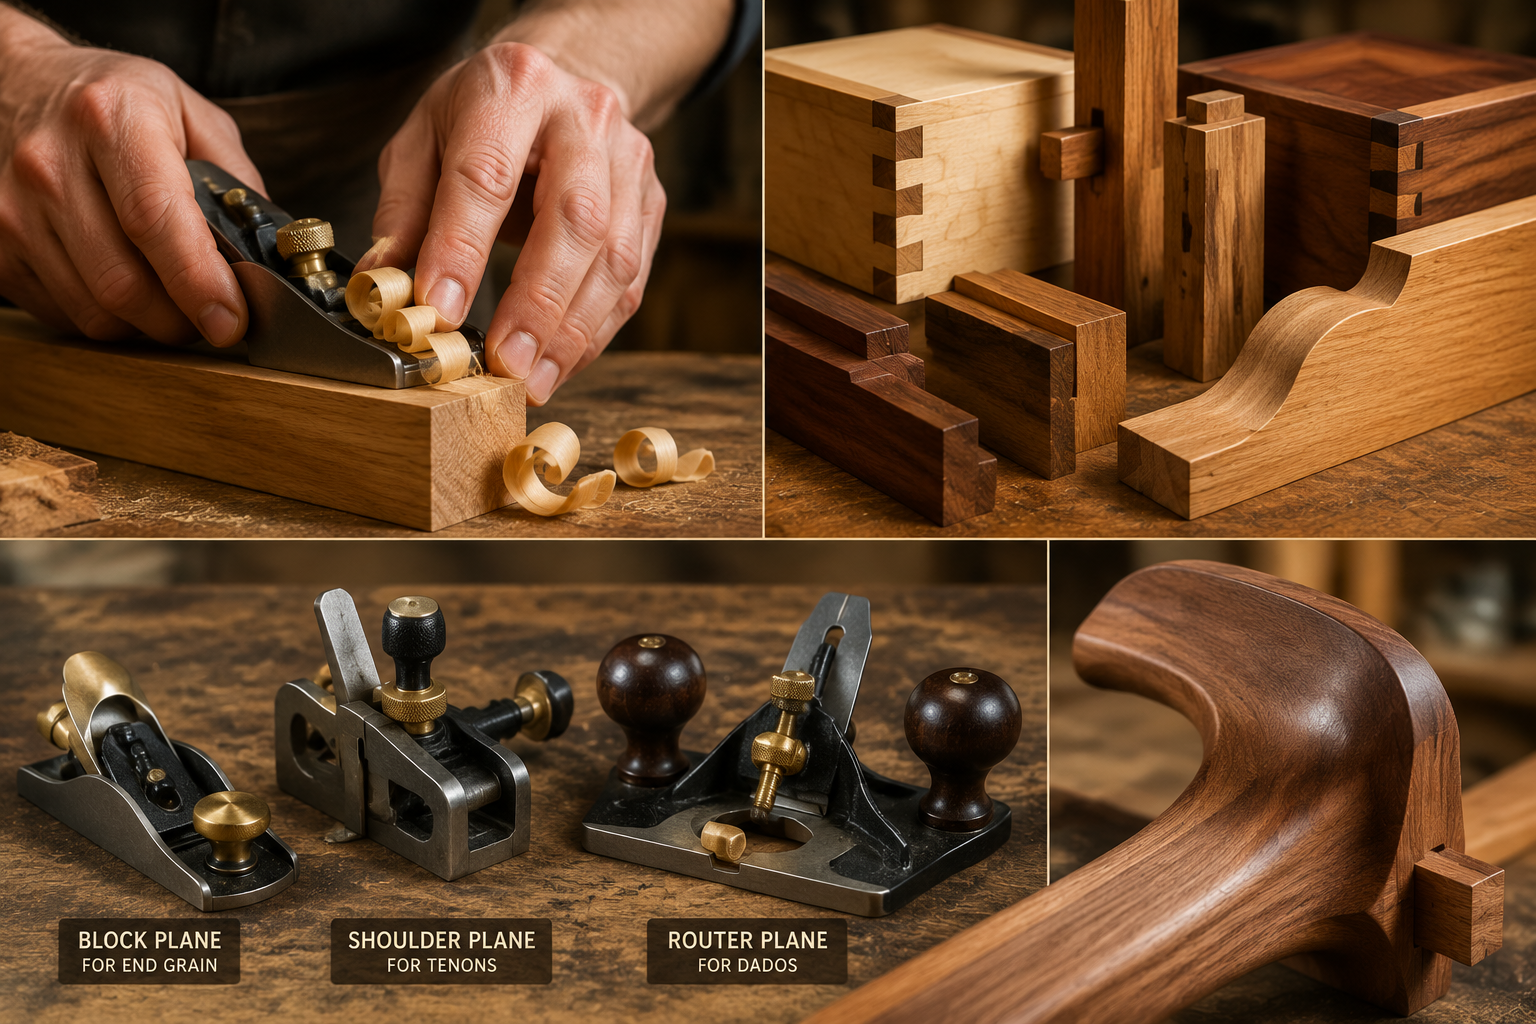
Chamfering and Beveling
Adding a chamfer (a 45-degree bevel) or a larger bevel to an edge can enhance aesthetics and prevent splintering.
- Block Plane for Chamfers: A block plane is excellent for small chamfers. Hold the plane at the desired angle and make light passes, using your fingers as a guide.
- Bench Plane for Bevels: For larger bevels, a smoothing or jack plane can be used. Mark your cut lines, then angle the plane to gradually remove material until the lines are met.
Creating Rabbets and Dados with Specialty Planes
While power routers excel at these tasks, specialty hand planes offer a quiet, dust-free alternative for precise joinery.

- Rabbet Planes: Designed to cut a step-shaped recess along the edge of a board.
- Router Planes: Used to cut accurate flat-bottomed grooves (dados) or recesses for inlay, often after the bulk of the material has been removed by other means.
- Shoulder Planes: Excellent for fine-tuning tenon shoulders and other joinery elements, allowing for perfectly tight fits.
Learning to create precise joinery by hand, such as dovetail joints, pairs perfectly with the use of specialty planes. Explore Mastering Dovetail Joints with Hand Tools: A Step-by-Step Guide for.
Working with Challenging Grains
Some woods, especially highly figured pieces or those with interlocked grain, are prone to tear-out. Advanced techniques can help:
- Higher Angle Frogs: Planes with a steeper bed angle (e.g., 50-55 degrees) can reduce tear-out in difficult grain by presenting the blade at a more aggressive cutting angle.
- Skewed Cuts: Sometimes, angling the plane slightly (skewing it) relative to the direction of travel can create a shearing cut that reduces tear-out, similar to how a skew chisel works.
- Scrub Plane: For very rough or knotty lumber, a scrub plane with a heavily cambered blade and wide mouth quickly reduces thickness, preparing the wood for finer planes.
Maintaining Your Hand Planes
Proper maintenance ensures your planes remain accurate and functional for generations.
- Cleanliness: Regularly clean the sole and internal mechanisms of your planes to prevent rust and ensure smooth operation.
- Rust Prevention: Apply a light coat of camellia oil or paste wax to exposed metal surfaces, especially the sole, after each use.
- Storage: Store planes safely to protect their blades and soles from damage. Magnetic tool holders or dedicated plane tillers are excellent options.
For those looking to breathe new life into older tools, our guide on Restoring Vintage Woodworking Hand Tools: A Guide to Rust Removal, Sharpening, and Handle Repair for Enhanced Performance offers invaluable advice.
Conclusion
The Introduction to Traditional Hand Planes: Essential Techniques for Smoothing, Squaring, and Shaping Wood reveals a world of precision, quiet satisfaction, and unparalleled results. While power tools certainly have their place in modern woodworking, the hand plane offers a connection to the material and a level of control that is deeply rewarding. By understanding the anatomy of these tools, committing to razor-sharp edges, and practicing the fundamental techniques of smoothing, squaring, and shaping, you can elevate your woodworking projects in 2026 and beyond. Embrace the journey of mastering these timeless tools, and discover the joy of creating truly exquisite wooden surfaces.
Actionable Next Steps
- Invest in Quality: Start with one or two good quality bench planes (a smoother and a jack plane are excellent choices). Consider vintage planes, which often offer superior craftsmanship at a lower cost than new premium models.
- Master Sharpening: Dedicate time to learning and practicing sharpening. It’s the most impactful skill for hand plane success.
- Practice on Scrap Wood: Before tackling a project, spend time on inexpensive lumber to get a feel for the plane, adjust the depth of cut, and learn to read the grain.
- Build a Sharpening Station: Set up a dedicated area for sharpening, ensuring you have the necessary stones, strops, and guides.
- Explore Specialized Planes: As your skills grow, consider adding specialized planes like a block plane or shoulder plane to your collection for more refined work.
SEO Meta Title: Master Traditional Hand Planes: Smoothing, Squaring & Shaping Wood SEO Meta Description: Unlock the art of hand planing in 2026. Learn essential techniques for smoothing, squaring, and shaping wood with traditional hand planes for superior results.
