
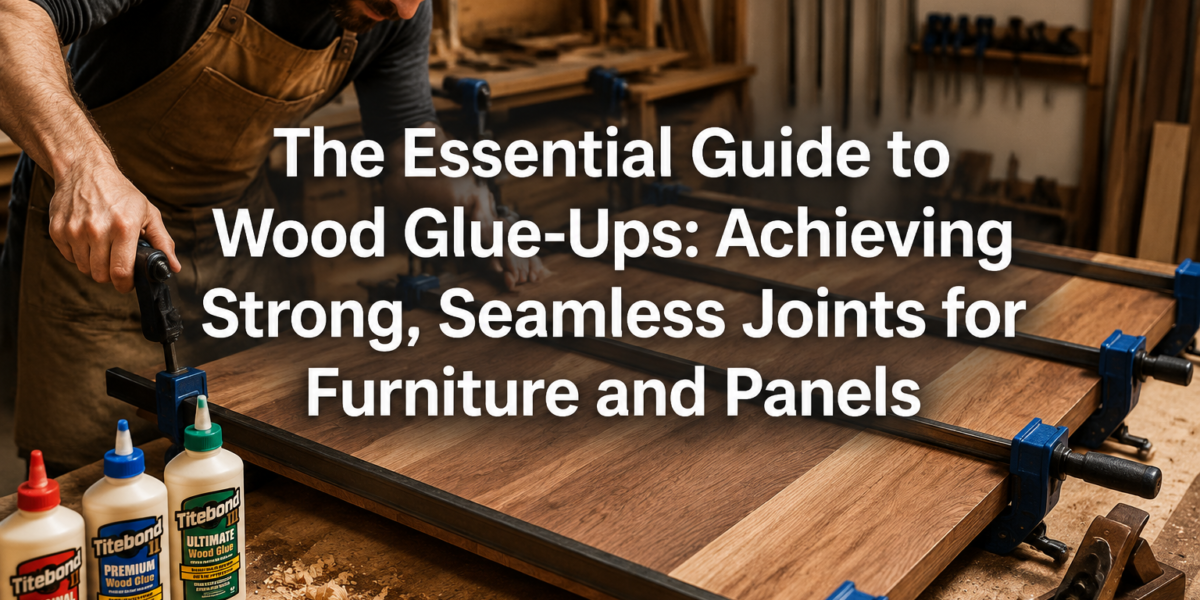

The structural integrity of a wooden project hinges on a bond often taken for granted: the glue-up. Many assume that merely applying glue and clamping is sufficient, yet the truth is that even the strongest adhesives are only as good as the preparation and execution of the joint itself. A flawed glue-up can lead to unsightly gaps, weak points, and ultimately, project failure, undermining hours of careful craftsmanship. This article, “The Essential Guide to Wood Glue-Ups: Achieving Strong, Seamless Joints for Furniture and Panels,” aims to demystify the process, transforming a common woodworking step into an art form that ensures durability and aesthetic perfection in every piece you create in 2026.
Key Takeaways
- Joint Preparation is Paramount: Achieve flat, straight, and square edges for optimal glue adhesion and invisible seams.
- Choose the Right Glue: Select adhesives based on project type, environmental conditions, and desired working time.
- Clamping Strategy Matters: Apply even, consistent pressure without over-clamping, using appropriate clamp types and cauls.
- Temperature and Humidity Control: Maintain stable workshop conditions to ensure proper glue curing and prevent stress on joints.
- Cleanliness and Cleanup: Address glue squeeze-out effectively and immediately for a professional finish.
Understanding Wood Glue Types and Their Applications
Selecting the correct adhesive is the first critical step in “The Essential Guide to Wood Glue-Ups: Achieving Strong, Seamless Joints for Furniture and Panels.” Each glue type offers distinct properties that make it suitable for different applications, exposure conditions, and desired working times. Understanding these nuances is crucial for achieving robust and aesthetically pleasing joints.

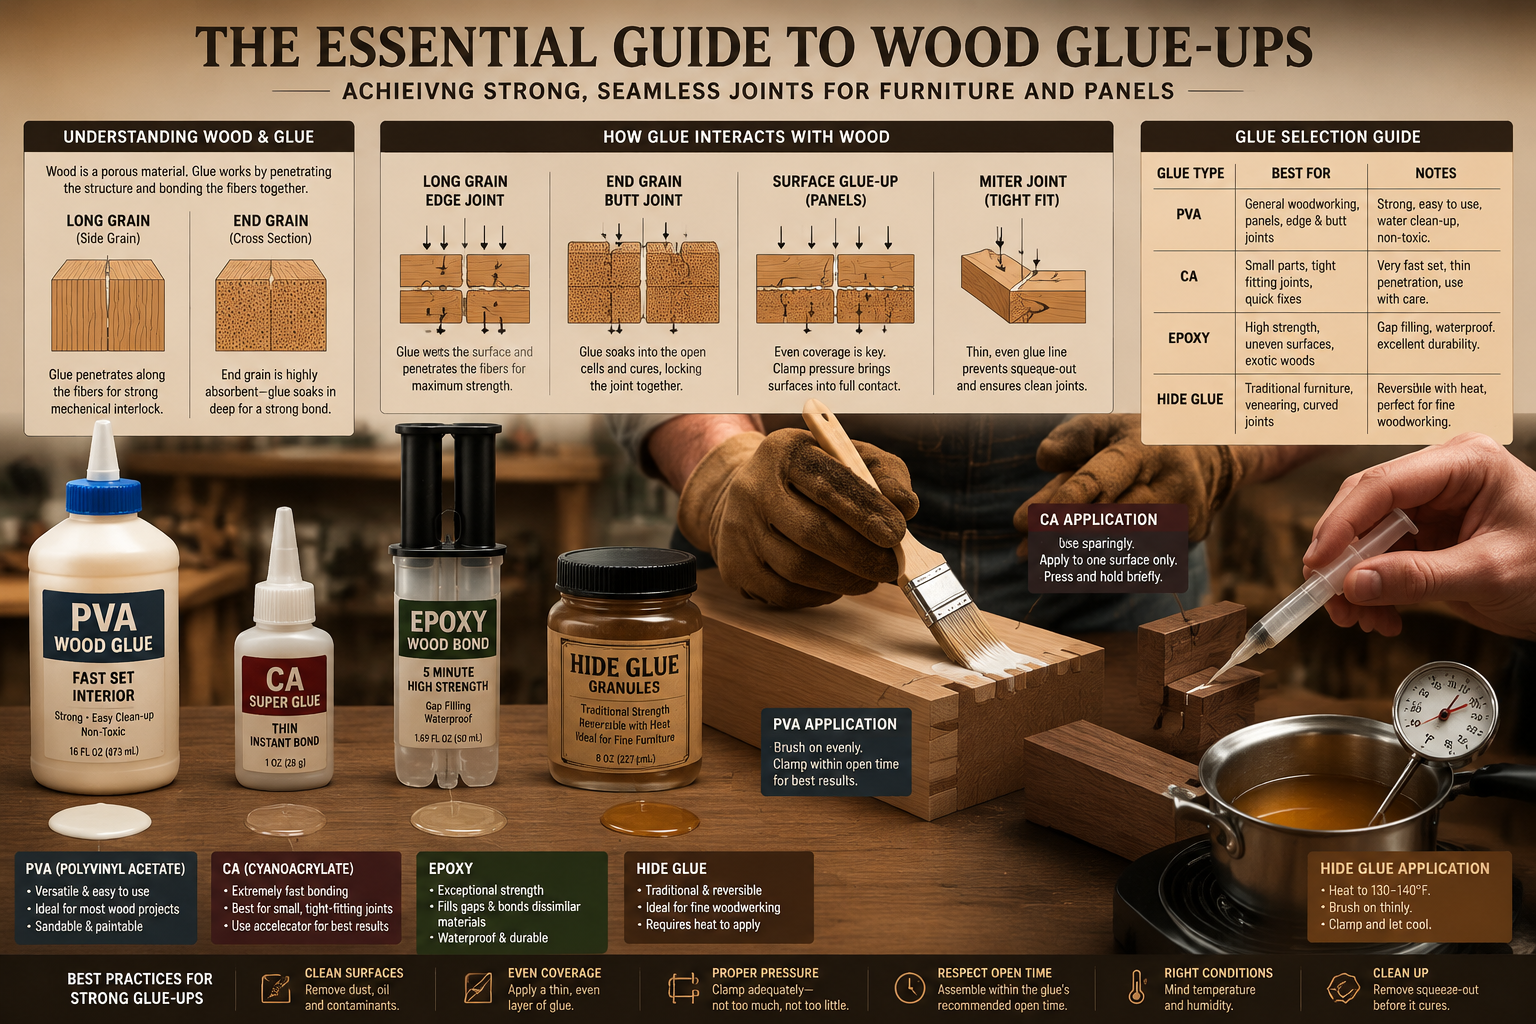
Common Wood Glues and Their Best Uses
Different woodworking glues possess unique characteristics affecting strength, drying time, water resistance, and sandability.
| Glue Type | Primary Use Cases | Key Characteristics | Working Time (Approx.) |
|---|---|---|---|
| PVA (Polyvinyl Acetate) | General woodworking, furniture, indoor projects, panel glue-ups | Strong, non-toxic, easy cleanup, not very water-resistant | 10-15 minutes |
| PVA (Water-Resistant) | Outdoor furniture, projects exposed to occasional moisture | Similar to standard PVA but with improved water resistance | 10-15 minutes |
| Polyurethane (PU) | Outdoor projects, oily woods, wood-to-metal/plastic bonding | Waterproof, expands as it cures (fills gaps), requires moisture | 20-30 minutes |
| Epoxy | Marine applications, gap filling, structural repairs, oily woods | Very strong, waterproof, excellent gap filler, two-part system | 5-60 minutes |
| Hide Glue | Fine furniture, instrument making, antique restoration | Reversible with heat/moisture, long open time, no creep | 30-60 minutes |
| CA (Cyanoacrylate) | Quick fixes, jigs, small joints, activating with accelerator | Instant grab, brittle, limited gap filling, various viscosities | Seconds |
For a deeper dive into choosing the right adhesive for every project, joint, and environmental condition, refer to our comprehensive guide on The Ultimate Guide to Wood Glue: Choosing the Right Adhesive for.
Factors Influencing Glue Selection
When making your choice, consider these important factors:
- Environmental Exposure: Will the project be indoors or outdoors? Exposed to high humidity or water? This dictates the required water resistance of your glue.
- Joint Type: Simple butt joints may benefit from gap-filling glues like epoxy or polyurethane, while well-fitted joinery (e.g., dovetail joints) works best with strong, non-expanding glues like PVA.
- Wood Type: Oily woods like teak or rosewood may require special glues (e.g., epoxy, polyurethane) or surface preparation.
- Working Time: Larger glue-ups, like those for wide panels or complex furniture assemblies, demand longer open and clamping times.
- Curing Time: Understand how long the glue needs to fully cure before stressing the joint or applying finish.
- Clean-up: Water-soluble glues like PVA are easier to clean than polyurethane or epoxy.
“The strength of a joint is not just about the glue, but about the quality of the mating surfaces and the consistency of the clamping pressure.”
Preparing Your Wood and Executing the Glue-Up
A successful wood glue-up hinges on meticulous preparation and careful execution. Neglecting even small details can compromise the strength and appearance of your “The Essential Guide to Wood Glue-Ups: Achieving Strong, Seamless Joints for Furniture and Panels” project.
Achieving Perfect Edges for Seamless Joints
The integrity of a glue joint is directly proportional to the quality of the mating surfaces.
- Flatness and Straightness: Use a jointer or a straight-edge with a router or track saw to ensure edges are perfectly flat and straight. Winding sticks can help detect twist in longer boards.
- Squareness: Edges must be precisely square (90 degrees) to the face of the board. This prevents gaps when boards are brought together.
- Cleanliness: Remove any sawdust, grease, or previous finish from the surfaces to be glued. A clean, dust-free surface allows for maximum adhesion.
- Test Fit: Always perform a dry run (without glue). Clamp the pieces together to ensure they mate perfectly without gaps or rocking. This also helps you plan your clamping strategy.
The Glue Application Process
Proper glue application ensures optimal coverage and bond strength.
- Quantity: Apply enough glue to completely cover both mating surfaces, but avoid excessive squeeze-out. Too little glue leads to a starved joint, too much can be messy and waste product.
- Coverage: Use a brush, roller, or simply spread with a finger to ensure even coverage. For long joints, a glue roller can be invaluable.
- Open Time: Be mindful of the glue’s “open time” – the period it remains workable after application before it starts to skin over. For large assemblies, faster-setting glues may require quick work or multiple passes.
- Grain Direction: For panel glue-ups, alternate the end grain direction of adjacent boards. This helps counteract wood movement and reduces warping over time.
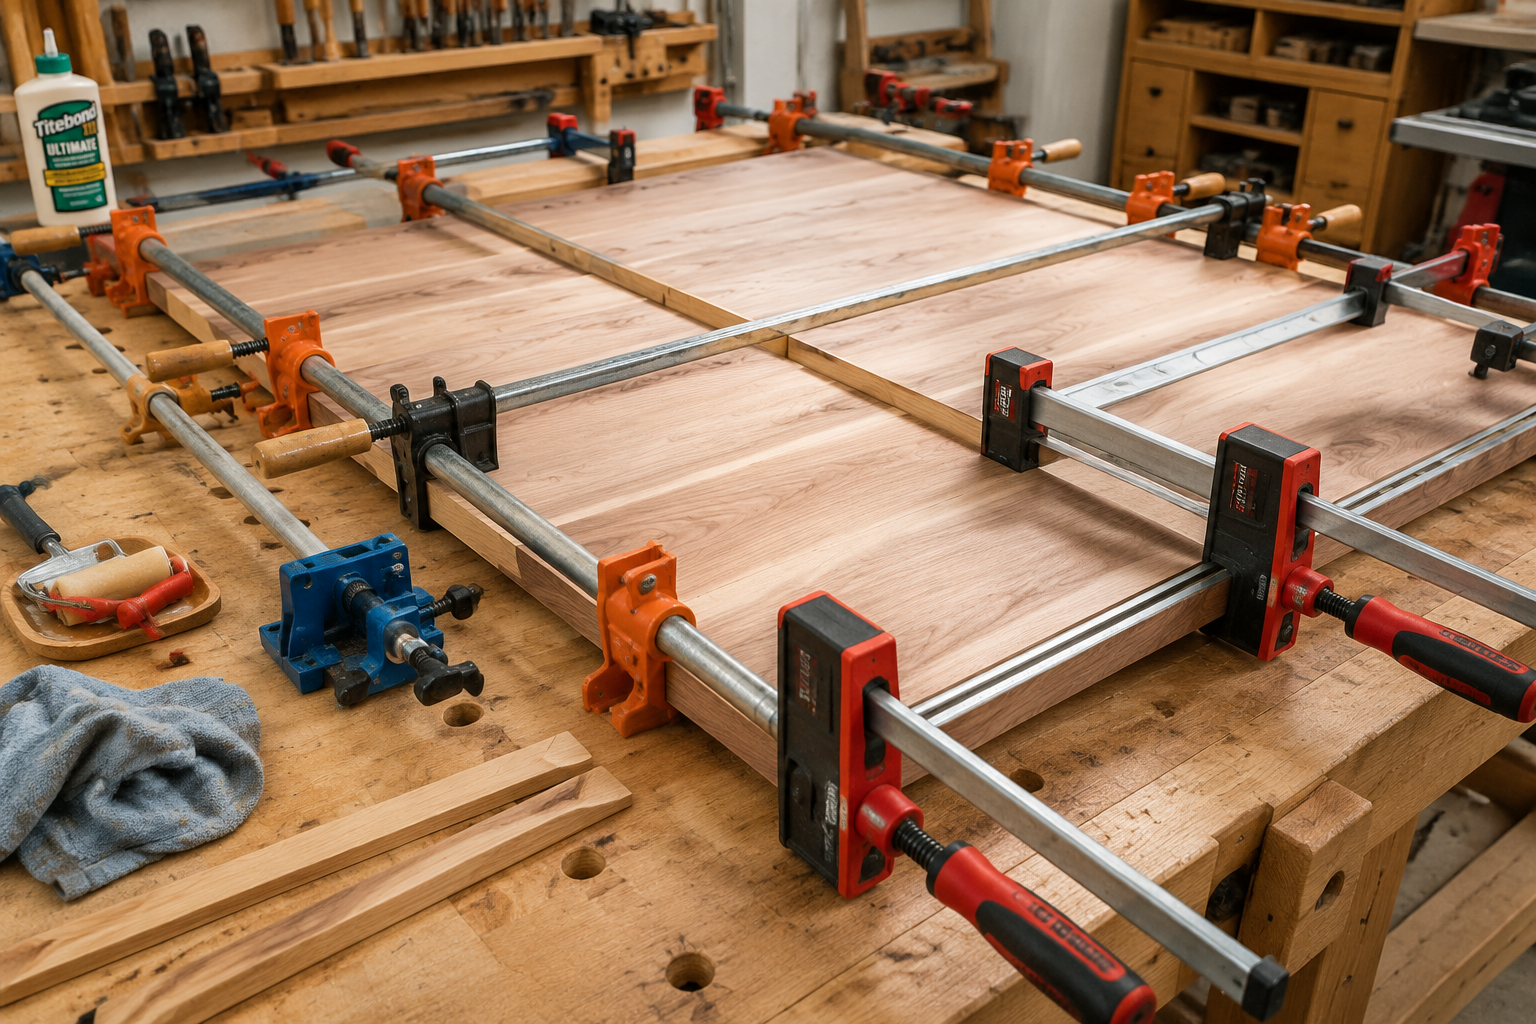
Clamping Techniques for Optimal Pressure
Clamping is arguably the most critical step after joint preparation in “The Essential Guide to Wood Glue-Ups: Achieving Strong, Seamless Joints for Furniture and Panels.”
- Even Pressure: Distribute clamps evenly along the length of the joint, typically every 6-12 inches, depending on wood thickness and stiffness.
- Appropriate Clamp Type:
- Bar clamps/Pipe clamps: Excellent for wide panels and furniture frames.
- Parallel jaw clamps: Provide very even pressure on both sides of the joint, reducing bowing.
- Spring clamps/Hand screws: Useful for smaller pieces or localized pressure.
- Cauls: Use waxed paper or clear packing tape on cauls (straight pieces of wood) to prevent them from sticking to the project. Place cauls above and below the joint, perpendicular to the seam, to help keep boards flat and prevent buckling.
- Moderate Pressure: Tighten clamps until you see a consistent, small bead of squeeze-out along the entire joint line. Over-clamping can starve the joint of glue, leading to a weaker bond, or even dent the wood.
- Check for Flatness: After initial clamping, quickly check the panel for flatness using winding sticks or a long straightedge. Adjust clamps as needed before the glue sets.
- Curing Time: Allow the glue to cure for the manufacturer’s recommended time before removing clamps and further working the piece. Rushing this step can lead to joint failure.
For those building larger projects like a custom workbench, understanding robust clamping strategies is essential. Check out our guide on Building a Custom Wood Workbench: Design Considerations and for more on large-scale assembly.
Troubleshooting and Finishing Touches for Your Glue-Ups
Even with careful planning, issues can arise during glue-ups. Knowing how to troubleshoot and apply proper finishing touches ensures that your “The Essential Guide to Wood Glue-Ups: Achieving Strong, Seamless Joints for Furniture and Panels” efforts result in flawless, enduring pieces.
Dealing with Common Glue-Up Problems
- Gaps in the Joint:
- Cause: Imperfectly prepared edges (not flat, straight, or square) or insufficient clamping pressure.
- Solution: For minor gaps, a gap-filling glue like epoxy or polyurethane might work, but the best approach is to re-joint the edges. Prevent this by thoroughly test-fitting and ensuring perfect edges before gluing.
- Boards Bowing or Cupping:
- Cause: Uneven clamping pressure, boards not truly flat, or excessive moisture absorption during glue-up.
- Solution: Use cauls above and below the joint, especially for wide panels, to help keep them flat. Ensure clamps are tightened gradually and evenly.
- Starved Joints (Too Little Squeeze-Out):
- Cause: Not enough glue applied or over-clamping.
- Solution: This is hard to fix after the fact. Disassemble, clean, and re-glue if the glue hasn’t fully set. Prevent by applying sufficient glue and clamping just enough to see a consistent bead of squeeze-out.
- Excessive Squeeze-Out:
- Cause: Too much glue applied.
- Solution: While messy, this is less detrimental to joint strength than starved joints. Scrape off excess glue immediately with a plastic scraper before it dries.
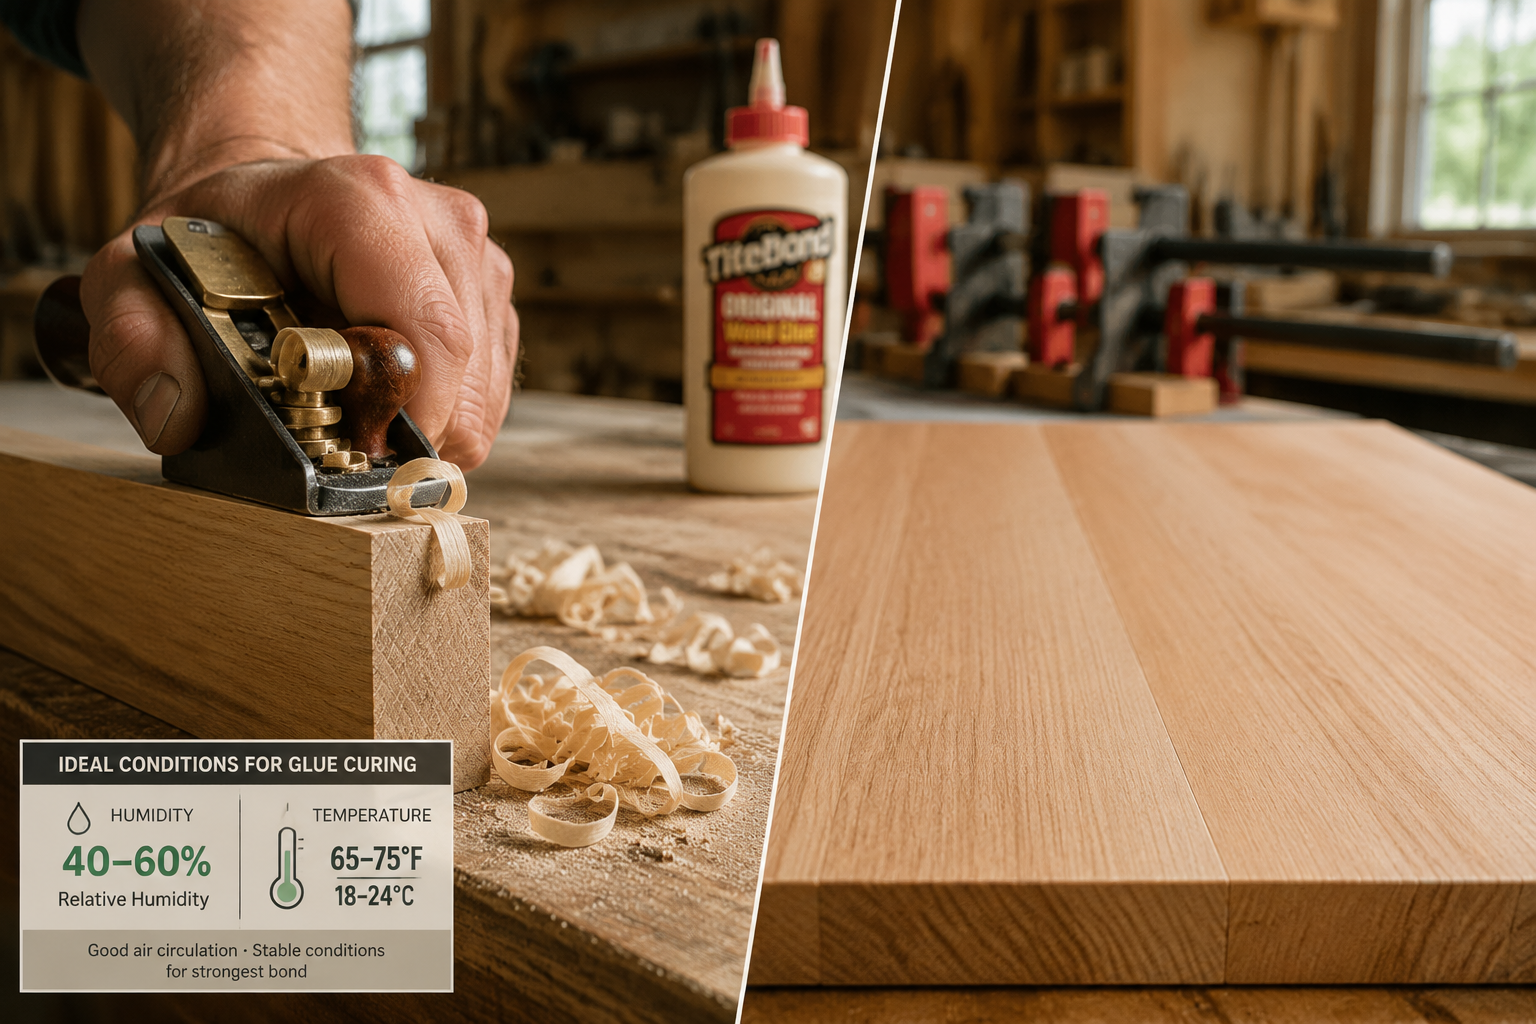
Optimal Workshop Conditions for Glue Curing
Temperature and humidity play a significant role in how glue cures and the long-term stability of your joints.
- Temperature: Most wood glues perform best between 60°F and 80°F (15°C and 27°C). Colder temperatures significantly extend curing times and can weaken the bond.
- Humidity: Extremely low humidity can cause glues to dry too quickly, reducing open time. High humidity can prolong drying times. Aim for a moderate humidity range (e.g., 30-50%) in your workshop for consistent results.
- Acclimation: Allow wood to acclimate to your shop’s environment for several days before milling and gluing. This minimizes wood movement after the glue-up.
Cleaning Up Glue Squeeze-Out
Proper cleanup prevents glue from interfering with finishes and ensures a clean aesthetic.
- Wet Glue: For water-soluble glues like PVA, immediately wipe away squeeze-out with a damp (not soaking wet) cloth or sponge. Be careful not to force glue into the wood grain.
- Dried Glue: For PVA, a sharp cabinet scraper or chisel can carefully remove dried beads. For more stubborn or non-water-soluble glues (like epoxy or polyurethane), specialized solvents may be needed, or careful sanding after full cure.
- Avoid Sanding Wet Glue: Never sand glue when it’s still wet or gummy. It will clog sandpaper and spread glue residue, potentially affecting subsequent finishes.
- Post-Cure Sanding: Once fully cured, sand the joint smooth, gradually moving through grits, to achieve a perfectly seamless surface. This is where the initial preparation truly pays off, as a well-executed glue-up will be almost invisible after sanding.
Incorporating sound finishing techniques from the start will elevate your projects. Consider our guide on cool wood finishing techniques for ideas on how to further enhance your finished pieces.
Conclusion
Mastering the art of wood glue-ups is more than just applying adhesive; it’s a foundational skill that separates amateur woodworking from professional craftsmanship. By meticulously preparing your lumber, selecting the appropriate glue for your project, employing precise clamping techniques, and understanding environmental factors, you can consistently achieve strong, invisible joints for all your furniture and panel work in 2026. This “The Essential Guide to Wood Glue-Ups: Achieving Strong, Seamless Joints for Furniture and Panels” has provided the framework, but true mastery comes with practice and attention to detail.

Begin by evaluating your current glue-up processes. Are your edges truly flat and square? Are you using the right glue for the job? Is your clamping strategy providing even pressure without over-tightening? By asking these questions and making incremental improvements, your projects will not only look better but will also stand the test of time, showcasing the enduring quality of well-crafted wood. Continue exploring advanced joinery techniques and expand your knowledge base to refine your skills further.
References
- Duginske, M. (1995). The Wood Handbook: Wood as an Engineering Material. Forest Products Society.
- Klos, W. (2010). Gluing and Clamping. Taunton Press.
- Peters, R. (2000). The Complete Illustrated Guide to Joinery. Taunton Press.
- Schmid, F. (2001). The Workbench Book. Taunton Press.
