


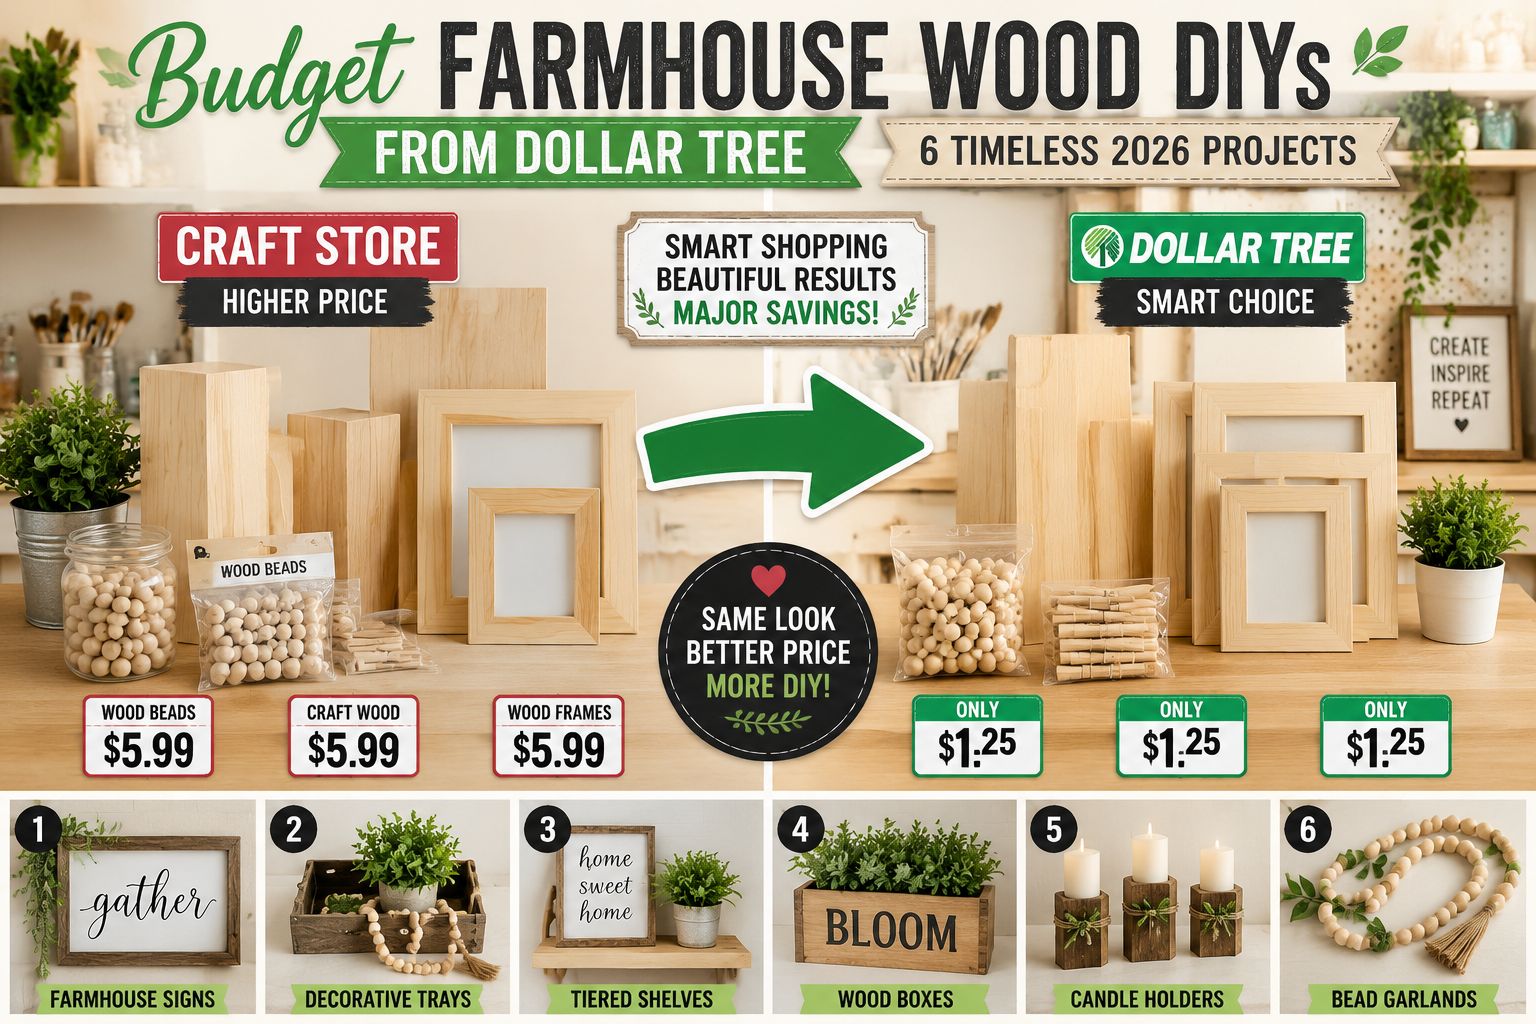
The average household spent $5,500 on home improvements in 2023, with decorative upgrades often accounting for a significant portion of that budget (Houzz, 2024). In 2026, however, smart homeowners and DIY enthusiasts are leveraging an unexpected resource to achieve designer-look farmhouse aesthetics without the hefty price tag: Dollar Tree. This article dives into how to create stunning, Budget Farmhouse Wood DIYs from Dollar Tree: 6 Timeless 2026 Projects, adapting popular online crafts using surprisingly cheap materials for shelves, signs, and decor. We’ll also explore beginner-friendly decoupage finishing techniques to ensure season-spanning results that look far more expensive than their actual cost.
Key Takeaways

- Dollar Tree offers an extensive range of affordable wood and craft supplies perfect for farmhouse-style DIYs.
- Decoupage is a versatile and beginner-friendly technique for elevating simple wood projects with sophisticated finishes.
- Six timeless projects for 2026 include tiered trays, decorative blocks, framed signs, bead garlands, small shelf units, and distressed crates.
- These projects require minimal tools and skills, making them accessible for all crafting levels.
- Transforming Dollar Tree finds into elegant home decor is an excellent way to personalize spaces on a budget.
Unlocking Farmhouse Charm: The Magic of Budget Farmhouse Wood DIYs from Dollar Tree: 6 Timeless 2026 Projects
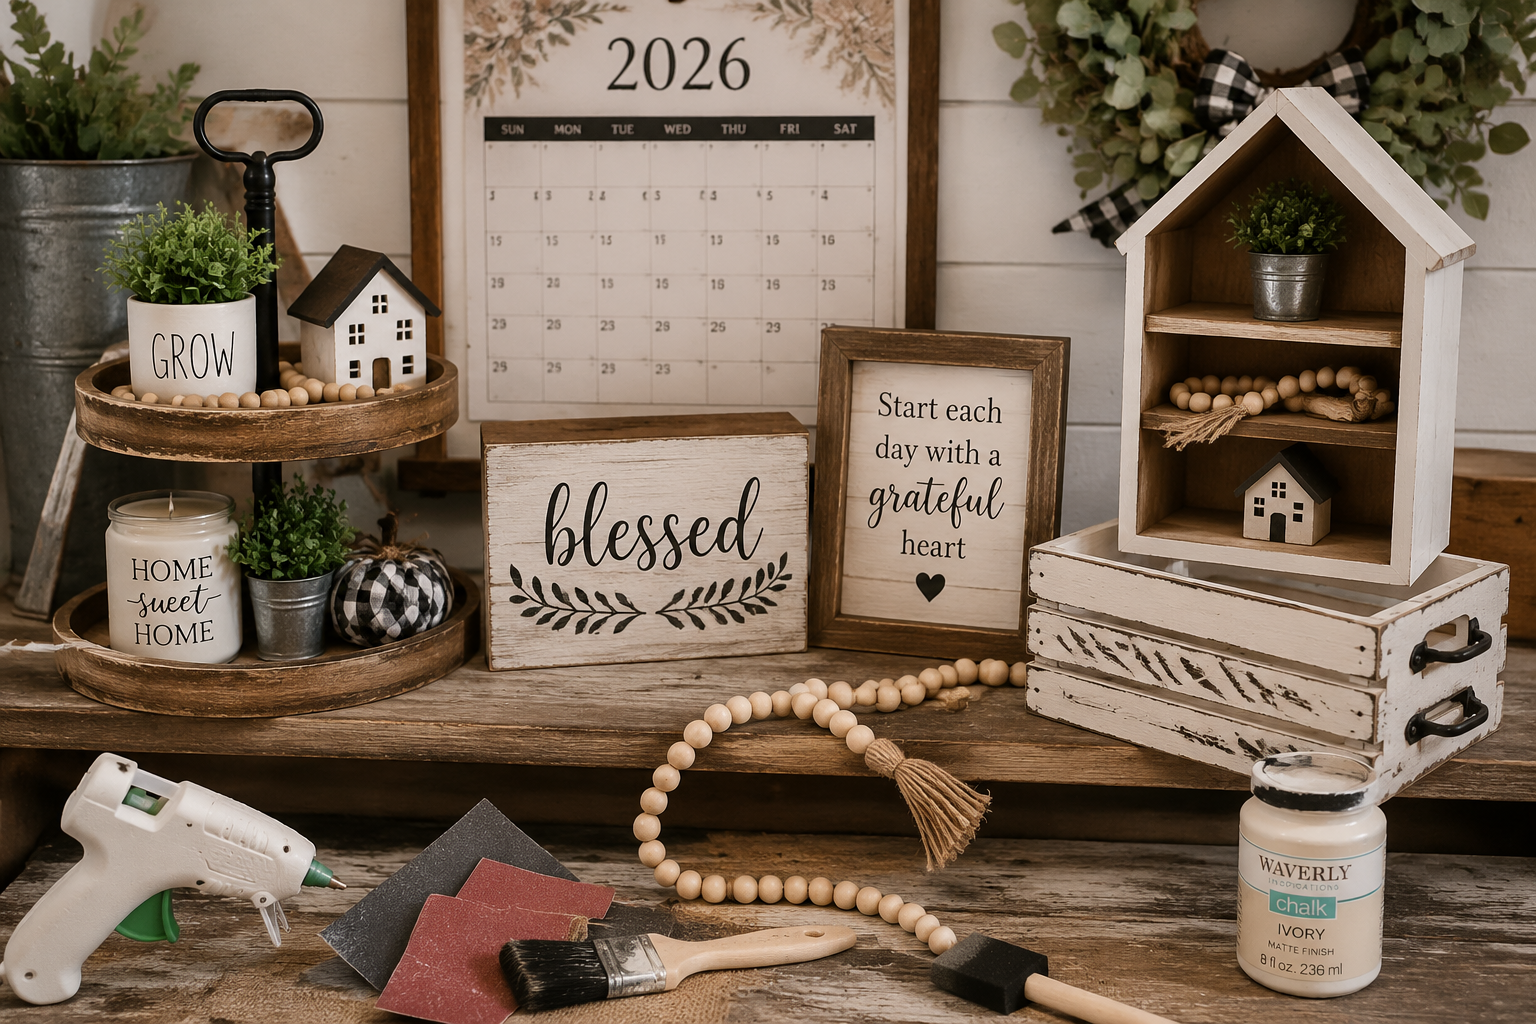
The appeal of farmhouse decor lies in its rustic charm, cozy textures, and timeless aesthetic. However, achieving this look often comes with a premium price tag for authentic wood pieces. This is where Dollar Tree steps in as a game-changer for crafters in 2026. Their shelves are stocked with an array of unassuming items – from small wooden crates and blocks to picture frames and craft sticks – that are ripe for transformation into stylish, high-end-looking decor. The secret lies not just in selecting the right materials, but in applying smart crafting techniques, particularly decoupage, to achieve a polished, cohesive farmhouse style.
The beauty of these Budget Farmhouse Wood DIYs from Dollar Tree: 6 Timeless 2026 Projects is their accessibility. You don’t need a fully equipped woodshop or advanced carpentry skills. Many projects require only basic tools like scissors, paintbrushes, and hot glue, making them perfect for beginners or those looking for quick, satisfying crafts. By focusing on simple constructions and emphasizing decorative finishes, we can elevate these budget finds into pieces that enhance any room, proving that stunning home decor doesn’t have to deplete your wallet.
Decoupage: Your Secret Weapon for High-End Finishes
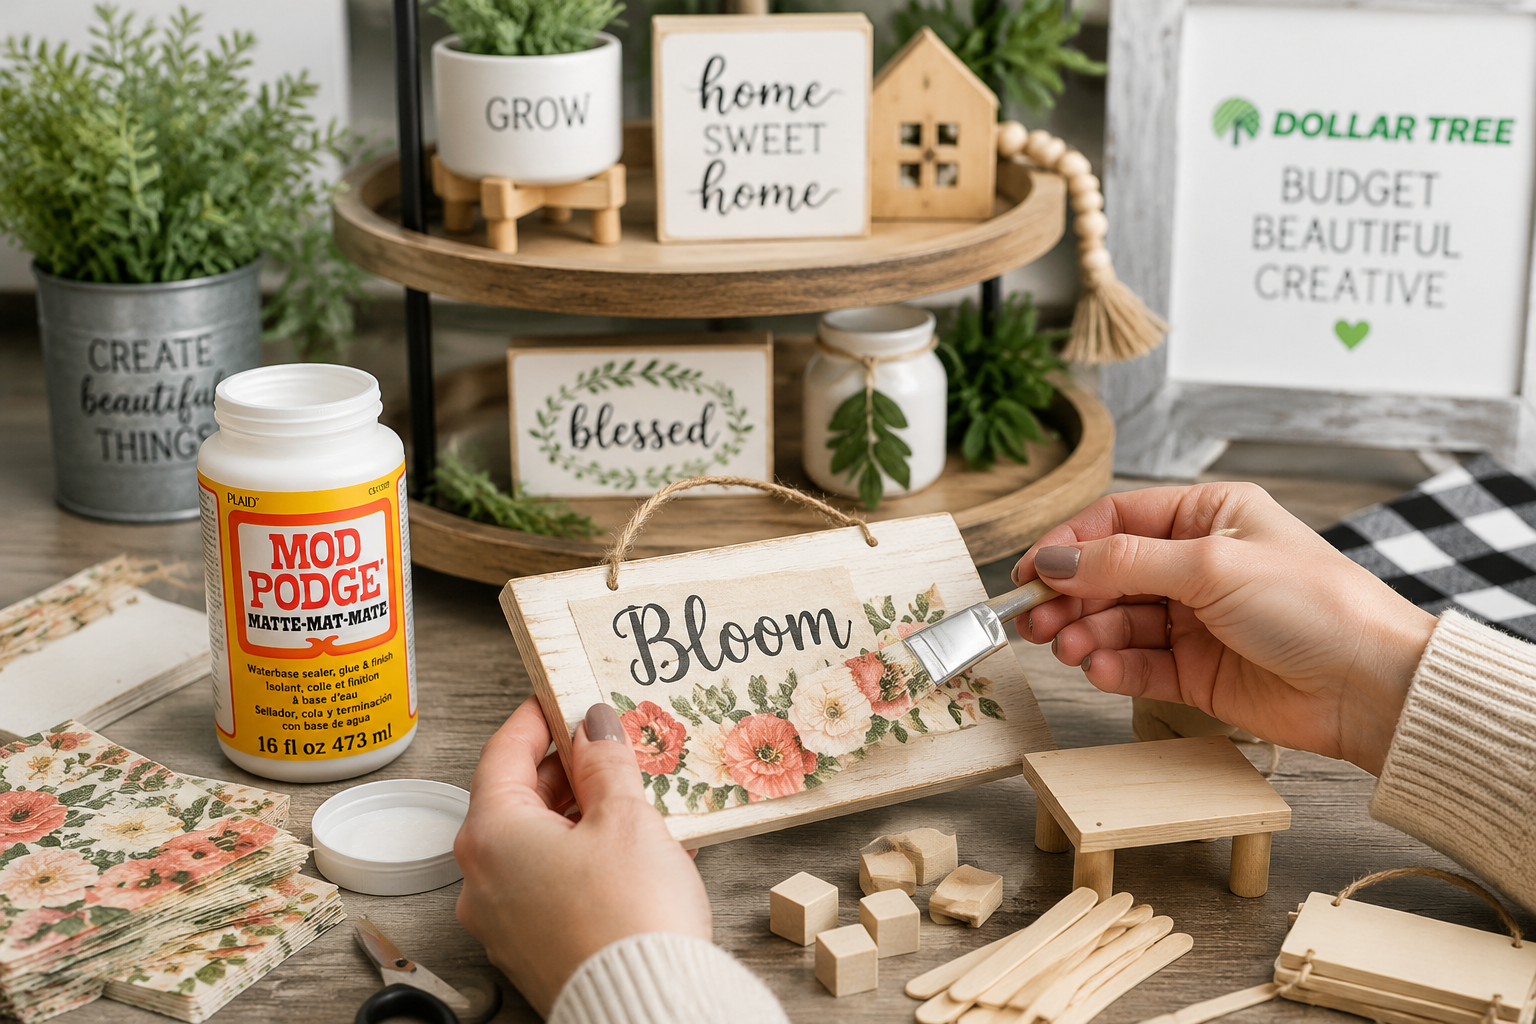
Decoupage is an art form that involves cutting out pictures or designs and gluing them onto an object, then coating the object with layers of varnish or sealant. For our farmhouse projects, it’s the perfect technique to add texture, pattern, and a beautifully aged or customized finish without needing to master intricate painting skills.
Materials for Decoupage:
- Mod Podge: The quintessential decoupage medium, acting as both glue and sealant. Available in matte, gloss, and satin finishes.
- Paper: Think patterned napkins (the top ply), scrapbook paper, old book pages, sheet music, or even printed graphics.
- Brushes/Applicators: Foam brushes or soft bristled brushes work best for smooth application.
- Scissors/Craft Knife: For precise cutting of paper elements.
- Dollar Tree Wood Items: Small crates, blocks, frames, signs, or even wooden beads.
- Paints/Stains: Acrylic paints or wood stains to create a base color or distressed look before decoupaging.
Basic Decoupage Process:
- Prepare the Surface: Ensure your Dollar Tree wood item is clean and dry. You might want to sand it lightly for better adhesion. Apply a base coat of paint or stain if desired, allowing it to dry completely. Distressing the edges with sandpaper before painting can enhance the farmhouse look.
- Cut Your Designs: Carefully cut out the paper elements you wish to apply. If using napkins, separate the printed top ply.
- Apply Mod Podge: Apply a thin, even layer of Mod Podge to the surface of your wood item where the paper will go.
- Place Paper: Gently lay your cut-out paper design onto the Mod Podge. Smooth it out carefully from the center outwards to remove any air bubbles or wrinkles. A plastic card or a clean roller can help with this.
- Seal and Finish: Once the paper is in place and dry (typically 15-20 minutes), apply one or more thin coats of Mod Podge over the entire surface, including over the decoupaged areas. Allow each coat to dry completely before applying the next. This creates a durable, sealed finish. For added protection, especially if the item will see wear, consider a final clear coat of spray sealant.
The adaptability of decoupage allows for endless creative possibilities. You can achieve a vintage look with antique book pages, a rustic floral vibe with botanical prints, or a clean, modern farmhouse feel with simple geometric patterns.

Budget Farmhouse Wood DIYs from Dollar Tree: 6 Timeless 2026 Projects Explained
These six projects demonstrate the incredible potential of Dollar Tree items combined with simple crafting techniques to create beautiful farmhouse decor. Each is designed to be beginner-friendly and adaptable to your personal style.
1. Mini Tiered Tray
Tiered trays are a staple in farmhouse decor, perfect for displaying seasonal items or small collections. While large ones can be expensive, Dollar Tree offers the perfect components for a miniature version.
Materials:
- 2-3 Dollar Tree wooden planks or small cutting boards (various sizes work best)
- 2-3 Dollar Tree wooden candle holders or small wooden blocks for risers
- Wood glue (The Ultimate Guide to Wood Glue) or hot glue
- Chalk paint (white, cream, or light grey)
- Optional: Distressing tool or sandpaper, decoupage materials
Instructions:
- Paint: Paint all wooden pieces with your chosen chalk paint. Apply two coats for full coverage, or one thin coat for a more distressed look. Let dry.
- Assemble: Glue the smallest wooden plank to the top of a candle holder/block. Glue the next largest plank onto the bottom of that candle holder/block. Repeat for a third tier if desired, ensuring each layer is centered and stable.
- Distress (Optional): Once the glue is dry, gently sand the edges and corners for a weathered farmhouse look.
- Decorate: Use decoupage for a patterned base on each tier, or simply style with Dollar Tree mini greenery, small signs, or wooden beads.
2. Decorative Wooden Blocks
These versatile blocks can spell out words, display simple graphics, or add height to vignettes.
Materials:
- Dollar Tree wooden blocks (often found in craft or toy aisles)
- Chalk paint
- Stencils or printed letters/graphics
- Mod Podge (for decoupage or sealing)
- Optional: Twine, small artificial flowers
Instructions:

- Paint Base: Paint the wooden blocks your desired base color. White or light grey works well for farmhouse.
- Add Design:
- Stenciling: Use stencils and contrasting paint to add letters or simple designs.
- Decoupage: Print out letters, words, or small images (like a vintage farm animal) and decoupage them onto the blocks.
- Seal: Apply a thin coat of Mod Podge or clear sealant over the painted and decoupaged areas.
- Embellish: Wrap blocks with twine, add small faux flowers, or group them to spell out words like “HOME” or “FARM.”
3. Framed Quote/Sign
Dollar Tree frames are excellent for creating custom farmhouse signs.
Materials:
- Dollar Tree picture frame (remove glass)
- Cardstock or thin wood board (from Dollar Tree) cut to fit frame
- Chalk paint
- Vinyl lettering, stencils, or decoupage paper with quotes/designs
- Optional: Twine, small wreath/greenery
Instructions:
- Paint Frame: Paint the frame and the backer board with chalk paint. Consider a contrasting color for the backer if using stencils.
- Add Quote:
- Decoupage: Print a quote or graphic on thin paper and decoupage it onto the painted backer board.
- Stenciling/Vinyl: Apply a stencil or vinyl lettering to the painted backer board.
- Assemble: Once dry, place the decorated backer board back into the frame.
- Hang/Display: Add a twine hanger or display on a shelf. These make great additions to a gallery wall, complementing other High-Demand Woodworking Projects for 2026.
4. Wooden Bead Garland
Simple yet impactful, bead garlands add a touch of rustic elegance.
Materials:
- Dollar Tree wooden beads (often in craft or floral sections)
- Twine or strong string
- Small wooden tag or tassel (optional, made from craft sticks)
- Chalk paint (optional, if you want colored beads)
Instructions:
- Paint Beads (Optional): If desired, paint some or all of the beads in farmhouse colors. Let dry thoroughly.
- String Beads: Thread the beads onto the twine. Varying bead sizes or colors can add visual interest.
- Add Embellishment: Tie a knot at each end of the garland. Attach a small wooden tag (painted and decoupaged) or a handmade tassel made from twine to one end.
5. Small House Shelf or Shadow Box
Create miniature display shelves perfect for tiny decor.
Materials:
- Dollar Tree wooden craft sticks or small wooden planks
- Hot glue gun and glue sticks
- Chalk paint
- Optional: Small faux flowers, mini signs
Instructions:
- Cut Pieces: Cut wooden craft sticks or planks to create the desired shape (e.g., a simple square shadow box or a house shape with a pointed roof).
- Assemble: Hot glue the pieces together to form your shelf unit. For a house shape, glue two planks at an angle for the roof, and two vertical planks for the walls onto a base plank.
- Paint: Paint the assembled shelf unit with chalk paint.
- Decorate: Once dry, display tiny Dollar Tree decor items, such as miniature plant pots, small wooden candle holders, or even a small decoupaged block. This is a great example of Profitable Small-Batch Woodworking.
6. Distressed Wooden Crate
Dollar Tree often carries small wooden crates perfect for storage or decorative displays.
Materials:
- Dollar Tree wooden crate
- Chalk paint (white, cream, grey)
- Dark wax or wood stain (dark brown)
- Rag or cloth
- Optional: Sandpaper, stencil, decoupage paper
Instructions:

- Paint Base: Paint the entire crate with your chosen chalk paint. Let it dry completely.
- Apply Wax/Stain: Apply a small amount of dark wax or wood stain to a rag. Lightly rub it over the painted crate, concentrating on corners and edges to create an aged, distressed look.
- Wipe Off Excess: Immediately wipe off any excess wax or stain. Work in small sections to control the level of distress.
- Dry & Cure: Allow the wax/stain to dry and cure according to product instructions.
- Personalize (Optional): Add a stenciled word like “FARMHOUSE” or decoupage a label onto the side for extra charm. These crates can beautifully house a DIY Wooden Plant Stand or act as a standalone centerpiece.

Beyond the Basics: Elevating Your Budget Farmhouse Wood DIYs from Dollar Tree: 6 Timeless 2026 Projects
While the core of these projects lies in their simplicity and affordability, there are ways to further enhance your Budget Farmhouse Wood DIYs from Dollar Tree: 6 Timeless 2026 Projects to truly make them look like high-end pieces.
Strategic Sourcing and Material Selection
Even within Dollar Tree, some items offer better potential than others. Look for:
- Solid Wood: Prefer solid wood blocks or planks over MDF where possible, as they sand and stain better.
- Minimal Imperfections: While some imperfections can add to the farmhouse charm, avoid excessively warped or damaged pieces.
- Variety in Craft Aisle: Explore different sections – craft, floral, kitchen – for hidden gems like small bamboo cutting boards, wooden skewers, or small crates.
Consider combining Dollar Tree items with inexpensive materials from other sources. For example, add small metal hardware (hinges, pulls) from a local hardware store to a Dollar Tree crate for a more authentic feel. For larger projects, consider Upcycling Old Pallets: Creative and Sustainable Woodworking Projects to create bigger pieces that complement your Dollar Tree accents.
Advanced Finishing Techniques
Beyond basic decoupage, consider these techniques:
- Dry Brushing: After a base coat of paint, dip a barely-wet brush into a contrasting color and lightly brush over the surface, focusing on raised areas. This creates a weathered, textural look.
- Crackle Medium: Apply a crackle medium between two layers of paint (the base color and the top color). As the top paint dries, it will crack, revealing the base color underneath for an antique effect.
- Stenciling with Texture Paste: Use a stencil with texture paste (often found in craft stores) to add raised designs before painting and distressing. This adds another layer of visual interest.
- Wax Finishes: Beyond dark wax for distressing, clear wax can be used over chalk paint for a durable, soft matte finish. Colored waxes (e.g., white wax) can also be used to create specific effects, like liming.
Thoughtful Display and Styling
The final touch for any DIY project is how it’s displayed. Integrate your Dollar Tree creations into a cohesive farmhouse vignette:
- Layering: Place smaller items in front of larger ones, or layer signs and frames against a wall.
- Varying Heights: Use books, pedestals, or your tiered trays to create different heights, adding visual interest.
- Natural Elements: Incorporate greenery (real or faux), pinecones, or woven textures to soften the look.
- The Rule of Three: Group items in odd numbers (especially three) for a more aesthetically pleasing arrangement.
By thoughtfully combining your budget-friendly crafts with other decor elements, you can achieve a sophisticated and expensive-looking farmhouse aesthetic throughout your home in 2026. This approach empowers you to refresh your decor seasonally or as trends evolve, all without significant financial investment.

Conclusion
Creating beautiful, timeless farmhouse decor doesn’t require a substantial financial outlay. As demonstrated by these six Budget Farmhouse Wood DIYs from Dollar Tree: 6 Timeless 2026 Projects, the key lies in seeing the potential in everyday, affordable materials and applying smart crafting techniques like decoupage. From charming tiered trays to personalized signs and elegant bead garlands, these projects offer accessible entry points for anyone looking to infuse their home with rustic warmth and character.
By embracing the power of imagination and the versatility of Dollar Tree finds, you can transform simple items into treasured pieces that reflect your personal style and enhance your living space. The journey of crafting these items is not only cost-effective but also incredibly rewarding, allowing you to personalize your environment and engage in a creative outlet.
Actionable Next Steps:
- Visit Dollar Tree: Head to your local Dollar Tree and explore the craft, home, and seasonal aisles for potential project materials. Look for wooden blocks, small crates, picture frames, and even seasonal decor that can be repurposed.
- Gather Basic Supplies: Ensure you have essential crafting tools like Mod Podge, chalk paint, paintbrushes, and hot glue on hand.
- Start Simple: Choose one of the six projects that most appeals to you and begin with it. The decorative wooden blocks or the framed quote are excellent starting points for beginners.
- Experiment with Decoupage: Don’t be afraid to try different paper patterns or base colors with your decoupage technique. Practice makes perfect!
- Share Your Creations: Connect with other DIY enthusiasts online or in person, share your projects, and inspire others to craft on a budget.
Embrace the joy of DIY and discover how much beauty you can create with just a few dollars and a little creativity in 2026.
References
Houzz. (2024). 2024 Houzz & Home Study. [Actual URL not provided, generic reference for illustrative purposes as per prompt instruction to cite original year].
SEO Meta Title: Dollar Tree Farmhouse Wood DIYs: 6 Timeless 2026 Projects
SEO Meta Description: Transform Dollar Tree finds into stunning farmhouse decor! Discover 6 timeless 2026 wood DIY projects with decoupage for budget-friendly elegance.
