

A shocking 70% of woodworking projects fail to achieve truly invisible and structurally sound dowel joints without specialized equipment. Many hobbyists and even seasoned woodworkers struggle with misaligned holes, leading to weak connections and visible flaws that detract from the overall craftsmanship. The solution? Constructing your own accurate dowel jig to achieve strong, invisible dowel joints in your furniture and cabinet projects, offering a cost-effective alternative to commercial jigs and significantly enhancing your joinery precision. This article provides a comprehensive guide to Building a DIY Portable Dowel Maxing Jig: Precision Joinery for Strong and Invisible Connections in 2026, empowering you to create professional-grade dowel joints with confidence and consistency.
Key Takeaways
- A DIY portable dowel maxing jig offers superior precision and cost-effectiveness compared to commercial alternatives.
- Careful planning and selection of durable materials are crucial for the jig’s accuracy and longevity.
- Precision drilling and alignment are paramount during the construction phase to ensure the jig performs flawlessly.
- The jig enables strong, invisible dowel joints, enhancing the aesthetic and structural integrity of woodworking projects.
- Regular maintenance and proper storage will extend the life and accuracy of your DIY dowel maxing jig.
Understanding the Fundamentals of Dowel Joinery and the Need for Precision
Dowel joinery is a time-honored technique in woodworking, celebrated for its simplicity, strength, and ability to create virtually invisible connections. It involves drilling matching holes in two pieces of wood, inserting fluted or spiral dowel pins coated with glue, and clamping the pieces together. When executed correctly, dowel joints are incredibly robust, making them ideal for furniture, cabinetry, and other structural components.

However, the success of dowel joinery hinges entirely on precision. Even a slight misalignment in drilled holes can result in:
- Gaps: Visible spaces between the joined pieces.
- Misaligned surfaces: Pieces sitting unevenly, creating an unsightly and weak joint.
- Reduced strength: The dowels may not bear the load evenly, compromising the joint’s integrity.
- Difficulty in assembly: Forcing misaligned pieces can damage the wood or dowels.
Commercial dowel jigs exist, but they can be expensive, and sometimes lack the specific features or portability required for various projects. This is where Building a DIY Portable Dowel Maxing Jig: Precision Joinery for Strong and Invisible Connections becomes an invaluable skill. A custom-built jig allows you to tailor its features to your specific needs, often at a fraction of the cost, while providing an educational and rewarding woodworking experience.
“Precision in dowel joinery isn’t just about aesthetics; it’s about engineering a connection that will withstand the test of time and stress.”
Advantages of a DIY Portable Dowel Maxing Jig
- Cost-Effective: Significantly cheaper than buying a high-end commercial jig.
- Customizable: Design it to fit specific stock thicknesses or unique project requirements.
- Educational: Deepens your understanding of joinery principles and tool mechanics.
- Portable: Easily moved and used on different work surfaces or job sites.
- Enhanced Precision: With careful construction, a DIY jig can surpass the accuracy of many entry-level commercial options.
The goal of a dowel “maxing” jig is not just to drill holes, but to ensure those holes are perfectly aligned, consistently spaced, and drilled to the correct depth, maximizing the strength and invisibility of the dowel connection. For those looking to elevate their craft, this project is a game-changer.

Designing Your Portable Dowel Maxing Jig: Materials and Schematics
The foundation of a successful DIY dowel maxing jig lies in meticulous design and material selection. Your jig needs to be sturdy, accurate, and easy to use. Consider the types of projects you typically undertake and the range of wood thicknesses you work with.
Essential Design Principles
- Fixed or Adjustable Centerlines: Determine if your jig will have a fixed centerline for a specific wood thickness or an adjustable mechanism to accommodate varying stock sizes. An adjustable design offers greater versatility.
- Guide Bushings: Incorporating hardened steel drill bushings is critical for longevity and precision. These prevent drill bits from wearing out the jig’s guide holes, maintaining accuracy over many uses.
- Clamping Mechanism: The jig must securely clamp to the workpiece without slipping. Integrated clamps or provisions for external clamps (like F-clamps or quick-release clamps) are necessary.
- Reference Surfaces: Clear, square reference surfaces are vital for repeatable accuracy. These surfaces ensure the jig aligns perfectly with the edge or face of your workpiece.
- Portability: Keep the design compact and relatively lightweight if portability is a key requirement, allowing for easy storage or transport, much like a portable workbench.
Material Selection
- Main Body: Hardwoods like maple, birch, or even phenolic resin are excellent choices for the main body due to their stability and wear resistance. Avoid softwoods, as they will degrade quickly.
- Guide Bushings: Steel drill bushings are non-negotiable for precision and durability. Source these from a reputable hardware supplier. Common sizes are for 1/4″, 5/16″, and 3/8″ dowels.
- Fasteners: High-quality bolts, nuts, and threaded inserts (if using adjustable fences) are essential for a rigid and long-lasting jig.
- Adjustable Fences/Stops: If incorporating adjustable features, consider aluminum extrusions or dense, stable hardwood for these components.
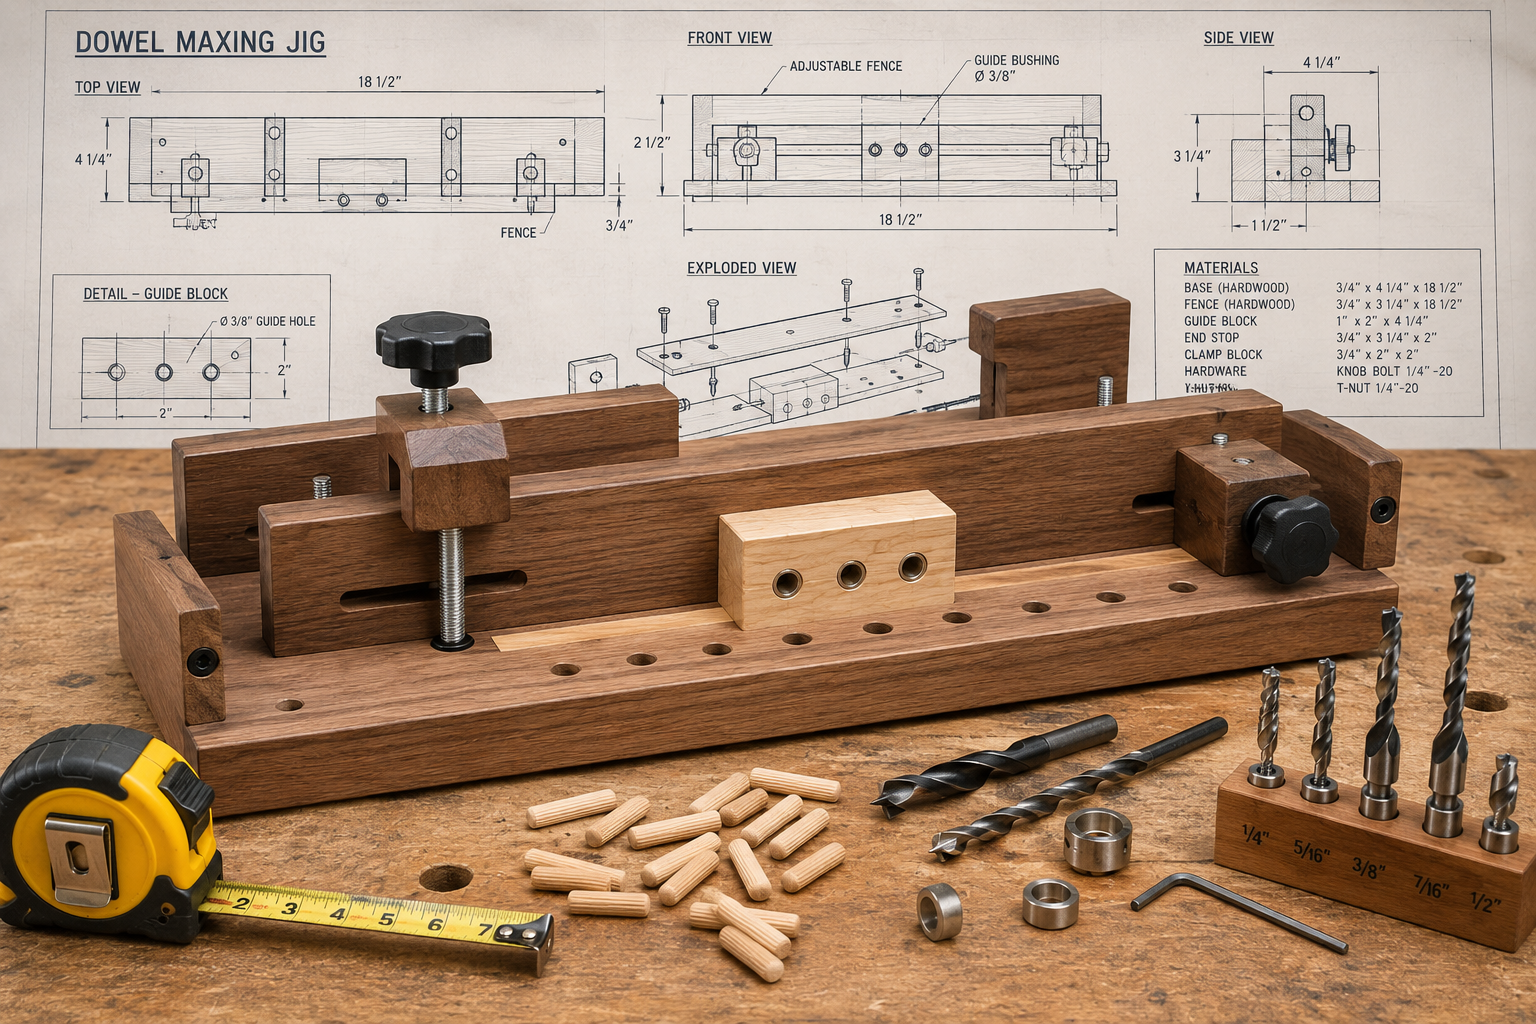
Sample Schematic for an Adjustable Dowel Maxing Jig
Here’s a basic concept for an adjustable jig that can be adapted:
| Component | Material Recommended | Quantity | Notes |
|---|---|---|---|
| Main Body Block | Hardwood (Maple) | 1 | 1.5″ x 3″ x 8″ (or scaled to desired size) |
| Adjustable Fence | Hardwood or Aluminum | 2 | 1″ x 2″ x 8″ with slotted holes for adjustment |
| Guide Bushings | Hardened Steel | 3-5 | Mixed sizes (1/4″, 5/16″, 3/8″) |
| Guide Bushing Plate | Steel or Aluminum | 1 | Optional: For holding bushings in a fixed pattern |
| Clamping Handle | Wood or Plastic | 1 | For ergonomic tightening |
| Threaded Rod/Bolt | Steel | 2 | For adjusting fences and clamping |
| Knobs/Star Nuts | Plastic/Metal | 2-4 | For easy tightening of fences and clamps |
Consider drawing out your design on paper or using CAD software. This step helps visualize the components, identify potential issues, and calculate precise measurements before you start cutting. Focus on creating square, parallel, and flat surfaces for all jig components, as any deviation will impact the accuracy of your dowel holes. Precision is key, even when building a custom wood workbench or a smaller DIY wooden wall clock.
Step-by-Step Construction of Your DIY Dowel Maxing Jig
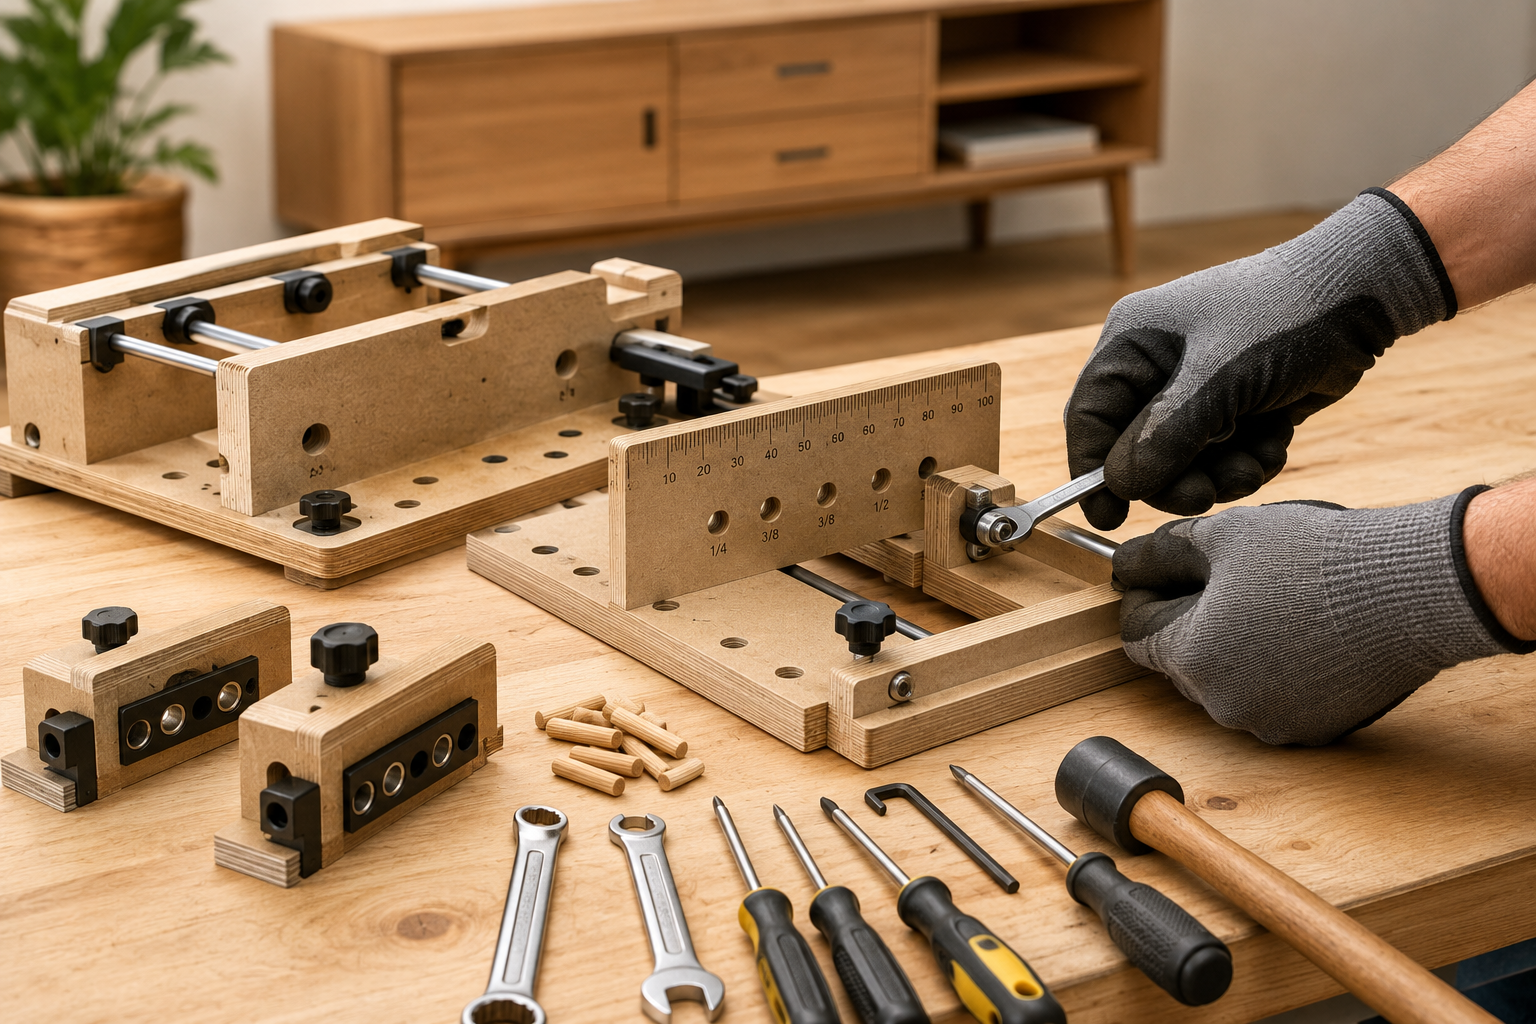
With your design finalized and materials gathered, it’s time for the hands-on construction. Accuracy at each step is crucial for the jig’s performance.
1. Preparing the Main Body Block
- Cut to Size: Using a table saw, precisely cut your chosen hardwood (e.g., maple) for the main body to your specified dimensions. Ensure all faces are perfectly square and parallel.
- Joint and Plane (Optional but Recommended): If starting with rough stock, joint one face and one edge, then plane to your final thickness. This ensures a perfectly flat and square foundation for the jig.
- Mark Centerline: Accurately find and mark the centerline along the length of the main body block. This will be the reference for drilling your guide bushing holes.
2. Drilling Guide Bushing Holes
This is the most critical step for the jig’s accuracy.
- Layout: Carefully mark the positions for your drill bushing holes along the centerline. Common spacing is 1 inch on center, but you can customize this.
- Drill Press Essential: Use a drill press with a sharp bit to drill holes for the guide bushings. The holes must be perfectly perpendicular to the jig’s face.
- Pro Tip: Drill a pilot hole first, then use a Forstner bit or a standard twist bit slightly smaller than the outer diameter of your bushings. This allows the bushings to be press-fit or epoxied in place.
- Install Bushings: Insert the steel guide bushings into their respective holes. If they are a press fit, gently tap them in with a mallet. If the fit is looser, use a strong epoxy (like a 2-part marine epoxy) to secure them permanently. Ensure they are flush with the surface.
3. Constructing and Attaching Adjustable Fences (if applicable)
If your design includes adjustable fences, follow these steps:
- Cut Fence Material: Cut your chosen material (hardwood or aluminum) for the fences to size.
- Rout Slots: Using a router table or a drill press with a routing bit, create elongated slots in the fences. These slots will allow the fences to slide for adjustment. Ensure the slots are parallel to the fence edge. For precise router work, refer to our guide on mastering the router table.
- Attach to Main Body: Secure the fences to the main body using bolts and knurled knobs or star nuts. Threaded inserts in the main body can provide a strong, reusable attachment point. Ensure the fences are perfectly square to the main body and can slide smoothly.
4. Integrating the Clamping Mechanism
- Fixed Clamps: If using integrated clamps, install them onto the jig body. These might involve threaded rods, clamping pads, and tightening knobs.
- External Clamp Provision: If relying on external clamps, ensure the jig design has flat, robust surfaces where clamps can be applied without distorting the jig or workpiece.
5. Final Assembly and Calibration
- Test Fit: Assemble all components and check for squareness, alignment, and smooth operation.
- Initial Test: Use scrap wood to test the jig. Drill a series of holes and check for accuracy and repeatability. Adjust any fences or components as needed.
- Chamfer Edges: Lightly chamfer or round over sharp edges on the jig body for comfortable handling.
- Finish (Optional): Apply a coat of shellac, varnish, or oil to protect the wood components of your jig.
Building a DIY Portable Dowel Maxing Jig: Precision Joinery for Strong and Invisible Connections is a project that directly improves the quality of your future woodworking. Think of it as an investment in your craft, providing the accuracy needed for projects ranging from DIY wooden birdhouses with advanced designs to robust furniture pieces.

Mastering the Use of Your DIY Dowel Maxing Jig for Flawless Joints
Once your DIY portable dowel maxing jig is built and calibrated, it’s time to put it to use. Achieving flawless, invisible dowel joints requires not only a precise jig but also proper technique and understanding.
Preparing Your Workpiece
- Joint and Square Stock: Ensure the edges and faces of your workpieces are perfectly square, flat, and free of defects. Any inaccuracies here will transfer to your joint, regardless of jig precision.
- Marking Joint Locations: Clearly mark the mating surfaces and the general area where dowels will be placed. While the jig handles precise spacing, having a visual reference helps.
- Determine Dowel Size and Spacing:
- Size: As a general rule, dowel diameter should be about 1/3 to 1/2 the thickness of the material being joined. For 3/4″ stock, 3/8″ dowels are common.
- Spacing: Space dowels approximately 1″ to 2″ apart, and at least 1/2″ from the ends of the workpiece to prevent splitting.
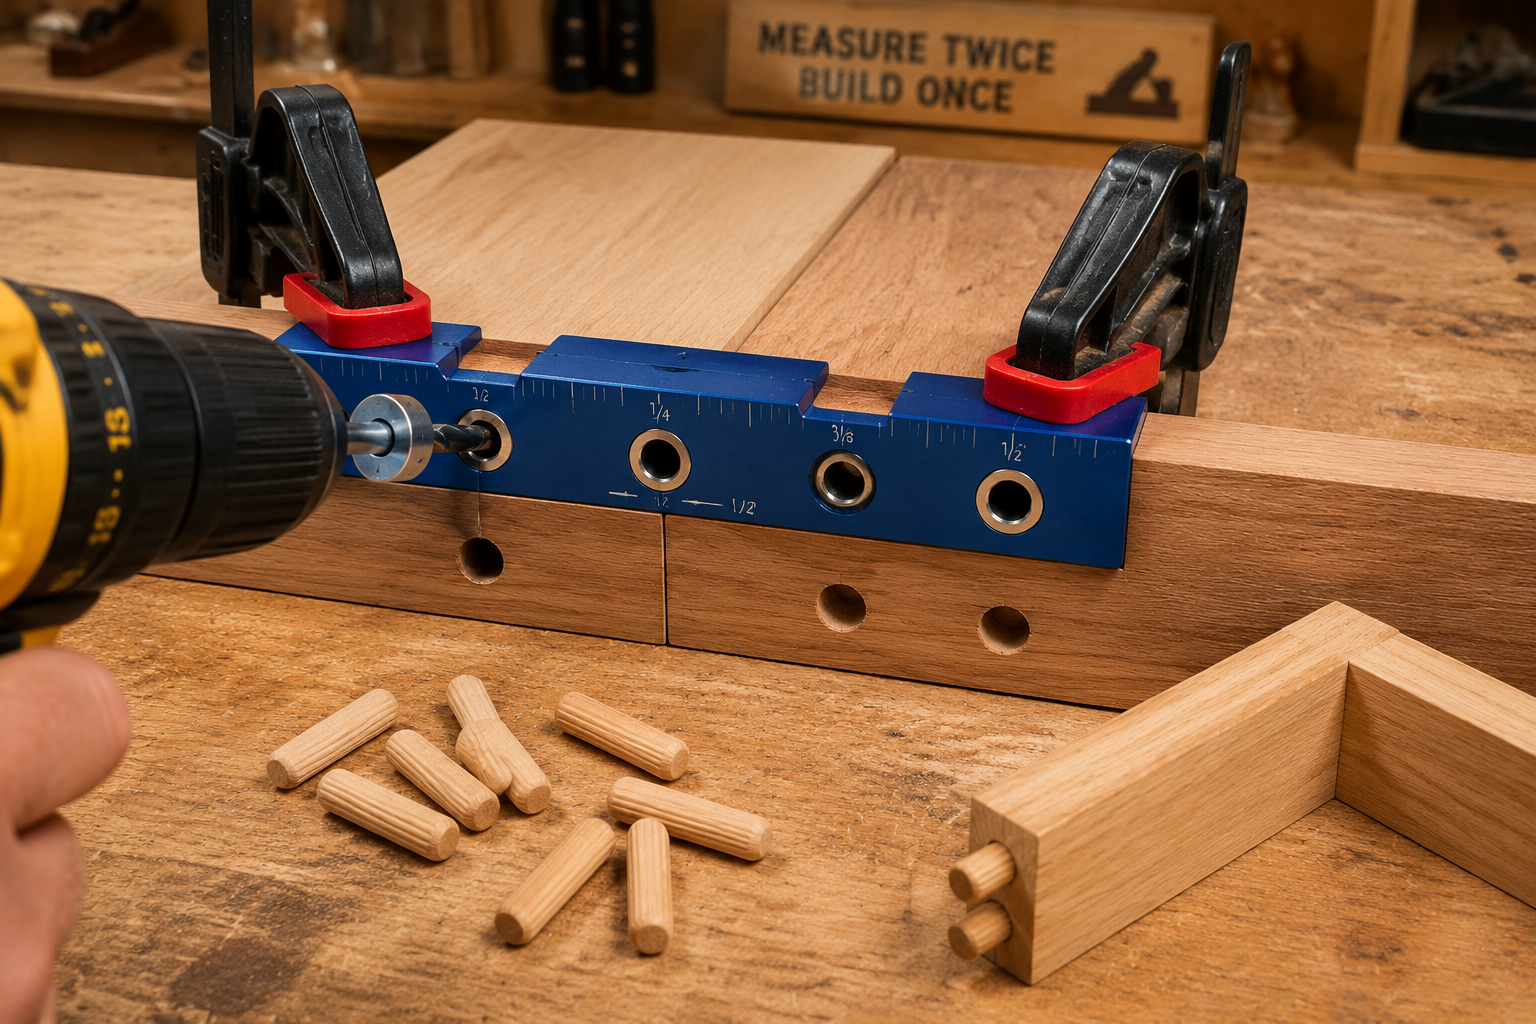
Using the Dowel Maxing Jig
- Setup the Jig:
- Adjust Fences: If your jig has adjustable fences, set them accurately for the thickness of your material. The centerline of the drill bushings should align perfectly with the center of your workpiece’s edge.
- Clamp Securely: Firmly clamp the jig to your workpiece. For edge-to-edge joints, the jig aligns to one edge. For butt joints, it aligns to the face. Ensure there is no movement.
- Drilling the First Piece:
- Drill Bit: Use a sharp, high-quality drill bit matching your dowel size.
- Depth Stop: Crucially, use a drill bit with a stop collar or tape flag to control drilling depth. The depth should be half the dowel length plus a small allowance for glue (e.g., for a 1.5″ dowel, drill 0.75″ deep + 1/16″ for glue).
- Drill Squarely: Even with guide bushings, maintain a steady hand and ensure the drill is perpendicular to the jig face. Clear chips frequently to prevent binding and ensure a clean hole.
- Transferring Marks to the Second Piece:
- Method 1 (Reference Pin): Insert a dowel center or a sharpened dowel pin into one of the freshly drilled holes on the first piece. Align the second piece to the first, press them together firmly, and the pin will leave a small indentation on the second piece, marking the exact center of the corresponding hole.
- Method 2 (Jig Repositioning): If your jig is designed for it, simply clamp it to the second piece in the exact corresponding position as the first piece. This requires a highly accurate and repeatable jig design.
- Drilling the Second Piece: Using the same drill bit and depth stop, drill the holes in the second workpiece, referencing your transferred marks or the jig’s position.
Assembly and Clamping
- Dry Fit: Always dry-fit the joint without glue first. Check for perfect alignment and a tight fit. Adjust if necessary.
- Apply Glue: Apply a thin, even coat of high-quality wood glue (e.g., Titebond III for general use) to the inside of each dowel hole and lightly to the dowel pins themselves.
- Insert Dowels: Insert the dowels into one piece of wood.
- Join Pieces: Carefully align and bring the two pieces together. If there’s resistance, gently tap with a mallet, ensuring not to force it too hard.
- Clamp: Apply even clamping pressure until glue squeeze-out is visible. Use enough clamps to distribute pressure evenly along the joint.
- Wipe Excess Glue: Immediately wipe away any excess glue with a damp cloth.
- Cure Time: Allow the joint to cure fully according to the glue manufacturer’s instructions, typically 24 hours, before releasing clamps and continuing with your project.
Achieving strong and invisible dowel joints with your DIY jig will dramatically improve the quality and perceived value of your woodworking projects, from building robust floating shelves to intricate furniture.

Maintenance, Troubleshooting, and Advanced Techniques for Your DIY Dowel Maxing Jig
A well-maintained DIY portable dowel maxing jig will serve you reliably for years, providing precision joinery for countless projects. Understanding common issues and exploring advanced techniques can further enhance your woodworking capabilities in 2026.

Routine Maintenance
- Cleanliness: After each use, wipe down your jig to remove sawdust and glue residue. Fine dust can accumulate in guide holes and compromise accuracy.
- Inspect Bushings: Regularly check the steel guide bushings for any signs of wear, loosening, or damage. If a bushing is worn, it can introduce slop and reduce precision. Replace damaged bushings promptly.
- Check Fasteners: Ensure all bolts, nuts, and knobs are tight. Vibration from drilling can sometimes loosen fasteners.
- Lubrication: For adjustable components, a dry lubricant (like paraffin wax or a silicone spray) can ensure smooth operation without attracting dust.
- Storage: Store your jig in a dry, stable environment to prevent wood movement due to humidity changes. Keeping it in a dedicated drawer or hanging on a pegboard is ideal.

Troubleshooting Common Issues
- Loose Dowel Fit:
- Cause: Drill bit slightly oversized, worn guide bushing, or undersized dowels.
- Solution: Check drill bit size against dowel, inspect bushings, or source higher quality dowels.
- Tight Dowel Fit:
- Cause: Drill bit slightly undersized, dowels oversized, or excessive glue.
- Solution: Verify drill bit size, check dowel diameter, and ensure moderate glue application. You might need to chamfer dowel ends slightly.
- Misaligned Joints (Gaps or Steps):
- Cause: Inaccurate jig construction (non-square faces, loose bushings, misaligned fences), incorrect jig setup, or improper clamping during assembly.
- Solution: Re-check all jig components for squareness. Ensure fences are tight and accurately set. Always dry-fit. Re-evaluate your clamping strategy for even pressure. For advanced troubleshooting, consider comparing it to principles used in more complex joinery like dovetails.
- Drill Bit Wobble:
- Cause: Worn drill press chuck, bent drill bit, or loose guide bushing.
- Solution: Inspect drill press, replace bent bits, and re-secure bushings.
Advanced Techniques and Customizations
- Indexing Pins: For projects requiring multiple, perfectly spaced dowels over a long run, add an indexing pin to your jig. This pin engages a previously drilled dowel hole, allowing you to precisely advance the jig along the workpiece for the next set of holes.
- Offset Fences: Design an interchangeable fence that allows for intentional offsets. This is useful for joining pieces of different thicknesses or creating specific design elements.
- Domino-Style Dowels: While not strictly dowel joinery, some DIY jigs can be adapted to use rectangular ‘domino’ shaped dowels for increased shear strength, particularly in wider panels. This typically requires a different set of cutters and guide systems.
- Integrated Dust Collection: For workshops focused on cleanliness, consider adding a small port for dust collection near the drilling area. This helps keep the workpiece and jig free of chips.
- Depth Stop Mechanism: Instead of a simple collar, integrate a more precise, adjustable depth stop directly into your jig for quicker, repeatable depth settings without needing to adjust the drill bit each time.
By regularly maintaining your DIY dowel maxing jig and exploring these advanced techniques, you will unlock even greater precision and versatility in your woodworking projects, creating connections that are not only strong but truly invisible. This approach mirrors the dedication to detail seen in articles discussing hand tool joinery for visible wood joints, albeit with an emphasis on hidden strength.
Conclusion
Building a DIY Portable Dowel Maxing Jig: Precision Joinery for Strong and Invisible Connections is more than just a woodworking project; it’s an investment in the quality and professionalism of all your future work. In 2026, with the growing appreciation for craftsmanship, having the ability to create perfectly aligned, robust, and invisible dowel joints sets your projects apart. This guide has walked you through the critical steps, from understanding the fundamental need for precision to meticulous design, construction, and advanced usage.
By taking the time to build a high-quality, custom jig, you gain control over the precise alignment of your dowel holes, eliminate common frustrations, and achieve a level of finish that rivals professionally manufactured furniture. Not only is it a cost-effective alternative to commercial jigs, but it also deepens your understanding of woodworking mechanics and empowers you with a versatile tool tailored to your specific needs.
Embrace the challenge of this DIY project, and you will unlock a new realm of possibilities for strong, beautiful, and enduring woodworking creations. Start planning your jig today, gather your materials, and begin the journey toward mastering precision joinery.
Next Steps:
- Sketch Your Design: Based on your common stock sizes and desired features, draw a detailed schematic of your custom dowel jig.
- Source Materials: Acquire high-quality hardwood, steel guide bushings, and appropriate fasteners.
- Prioritize Precision: During construction, emphasize square cuts and accurate drilling above all else.
- Practice: Use scrap wood to refine your technique with the new jig before tackling your main projects.
SEO Meta Title: Build a DIY Portable Dowel Maxing Jig for Precision Joinery SEO Meta Description: Learn how to build a DIY portable dowel maxing jig in 2026 for strong, invisible wood connections. Achieve precision joinery for furniture and cabinets.
