


The frustration of a slightly off-square cut, the slight wobble of a workpiece, or the splintered edges that betray a lack of support are common rites of passage for new woodworkers. While power tools like tablesaws and miter saws offer incredible efficiency, their inherent accuracy often relies on more than just the tool itself. The truth is, achieving truly accurate crosscuts—the kind that lead to perfectly fitting joints and professional-looking projects—often hinges on the intelligent use of simple, homemade jigs. This article delves into Essential Jigs for Accurate Crosscuts: DIY Tablesaw and Miter Saw Guides for Beginners, focusing on how these workshop essentials boost both precision and safety, especially for those navigating the nuances of a small shop setup in 2026.
Key Takeaways
- Jigs Enhance Precision: Simple DIY jigs, like crosscut sleds and stop blocks, dramatically improve the accuracy of cuts made on tablesaws and miter saws, leading to better project outcomes.
- Safety First: Many jigs inherently increase safety by keeping hands away from blades and providing stable support for workpieces.
- Cost-Effective Solutions: Building your own jigs is an economical way to upgrade your workshop’s capabilities without investing in expensive commercial accessories.
- Skill Development: Constructing and using jigs helps beginners develop fundamental woodworking skills and a deeper understanding of tool mechanics.
- Customization for Your Shop: DIY jigs can be tailored precisely to your specific tools and workshop space, making them highly efficient and user-friendly.
Mastering Tablesaw Crosscuts: Essential DIY Jigs for Beginners
The tablesaw is the heart of many woodworking shops, but its primary function is ripping (cutting along the grain). While it can perform crosscuts, relying solely on the factory miter gauge for accuracy on wider boards or repetitive cuts is often a recipe for frustration. This is where Essential Jigs for Accurate Crosscuts: DIY Tablesaw and Miter Saw Guides for Beginners truly shines, particularly with a custom tablesaw crosscut sled.

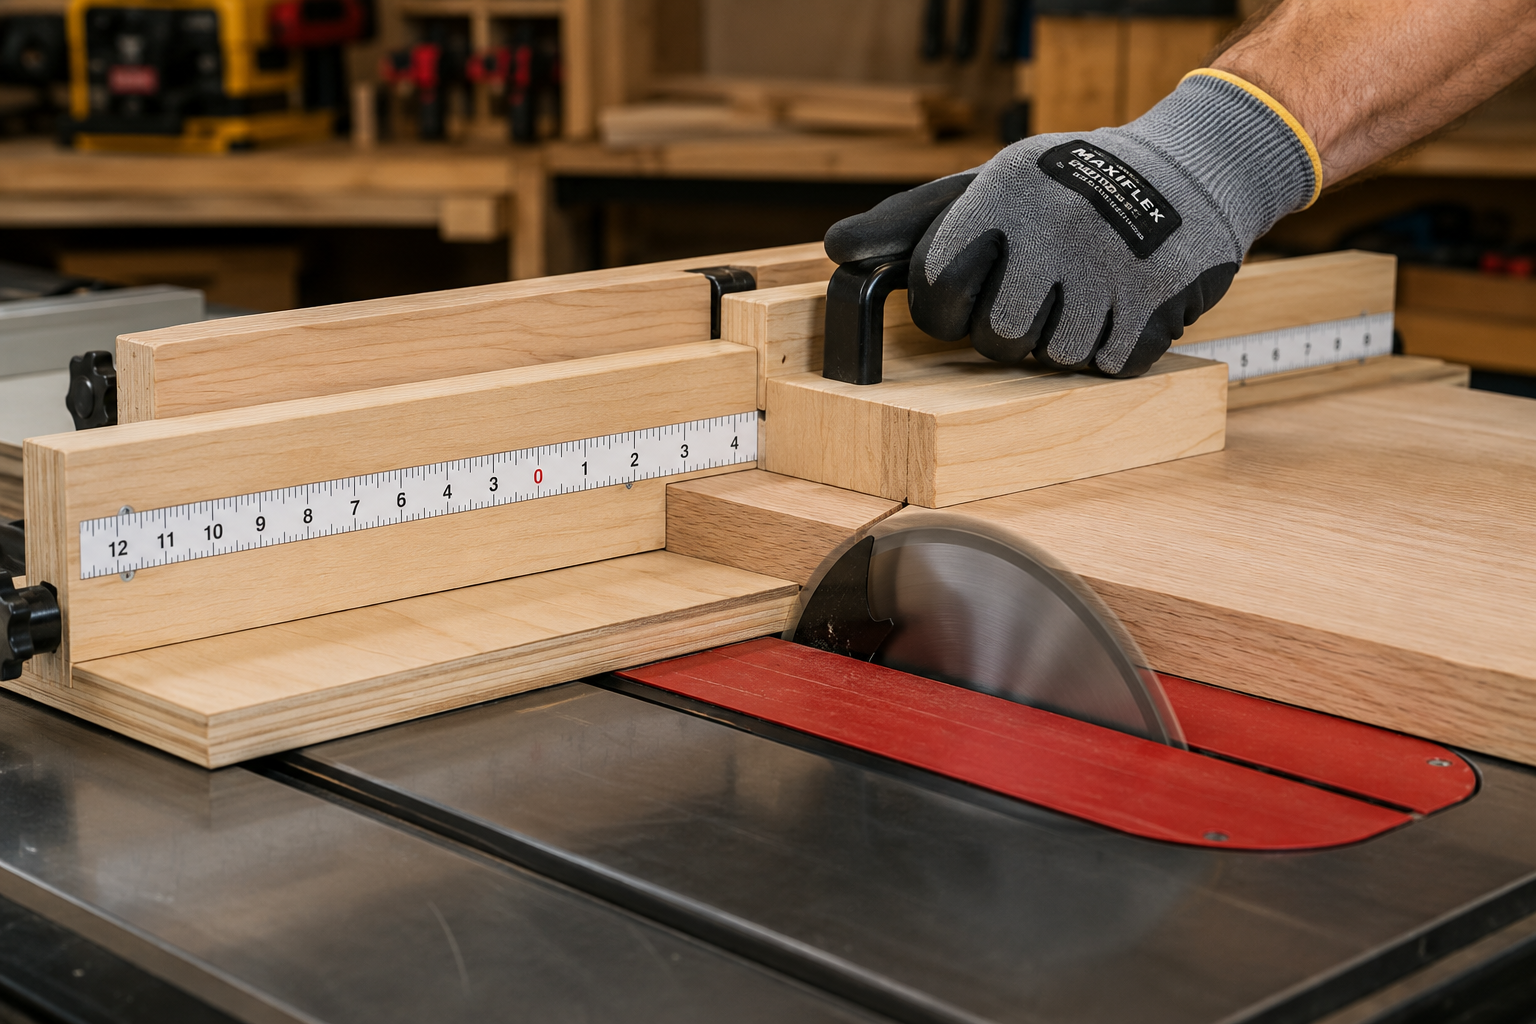
The Tablesaw Crosscut Sled: Your Foundation for Precision
A crosscut sled is arguably the most important jig for any tablesaw owner, especially for beginners. It transforms your tablesaw into an incredibly accurate crosscutting machine.
Why You Need One:
- Unmatched Accuracy: A well-built sled ensures perfect 90-degree cuts every time, and can be easily adjusted for precise angles.
- Zero-Clearance Support: The base of the sled acts as a zero-clearance insert, virtually eliminating tear-out on the underside of your workpiece.
- Enhanced Safety: The sled provides a stable platform, keeps your hands well away from the blade, and prevents small pieces from becoming dangerous projectiles.
- Repeatability: With integrated stop blocks, you can make identical cuts effortlessly.
Building Your First Crosscut Sled:
Building a basic crosscut sled is a fantastic beginner project. Here’s a simplified overview:
- Materials: You’ll need a flat sheet of plywood or MDF for the base (around 24″x24″ for most saws), two straight runners that fit snugly in your tablesaw’s miter slots, and two pieces of straight hardwood or plywood for the front and rear fences.
- Runners: Attach the runners to the underside of the base, ensuring they slide smoothly in the miter slots. Precision here is key.
- Fences: Attach the rear fence first. This is crucial for squaring the sled. Make a shallow cut through the sled base and then use a reliable square to align the front fence perfectly perpendicular to the blade kerf. This is a critical step for achieving a true 90-degree cut.
- Safety Features: Incorporate a push block or handle into your design for safe operation. A blade guard can also be added to the rear fence.
For a deeper dive into improving your workshop’s capabilities with essential jigs, consider exploring a Beginner’s Guide to Essential Woodworking Jigs: Improve Accuracy and.
Key Considerations for Your Sled:
- Size: Build a sled that can handle the largest crosscuts you anticipate, but not so large that it’s unwieldy for smaller pieces.
- Zero-Clearance Insert: The kerf cut into the sled’s base acts as a zero-clearance insert, which is vital for preventing tear-out.
- Auxiliary Fences & Stop Blocks: Add a removable auxiliary fence for sacrificial cuts or to integrate a stop block system for repetitive cuts. These often slide in a T-track embedded in the fence.

Push Sticks and Blocks: Beyond the Basic
While not strictly jigs in the same way a sled is, custom-made push sticks and blocks are indispensable safety tools that significantly enhance accuracy by allowing you to keep consistent pressure on your workpiece.
- Types: Create various designs: L-shaped push blocks for holding down and pushing simultaneously, narrow push sticks for ripping thin stock, and paddles for wider boards.
- Materials: Plywood or MDF scraps are perfect.
- Ergonomics: Design them with comfortable handles and non-slip pads if possible.
- Safety Reminder: Always use a push stick or block when making cuts that bring your hands close to the blade, or when working with small pieces.
Boosting Miter Saw Performance: DIY Guides for Accurate Crosscuts
Miter saws are renowned for their quick, precise angled and straight cuts. However, their factory fences are often too short for long workpieces, and achieving exact, repeatable lengths can be challenging without proper support. Essential Jigs for Accurate Crosscuts: DIY Tablesaw and Miter Saw Guides for Beginners for miter saws mainly revolve around extending their functionality.
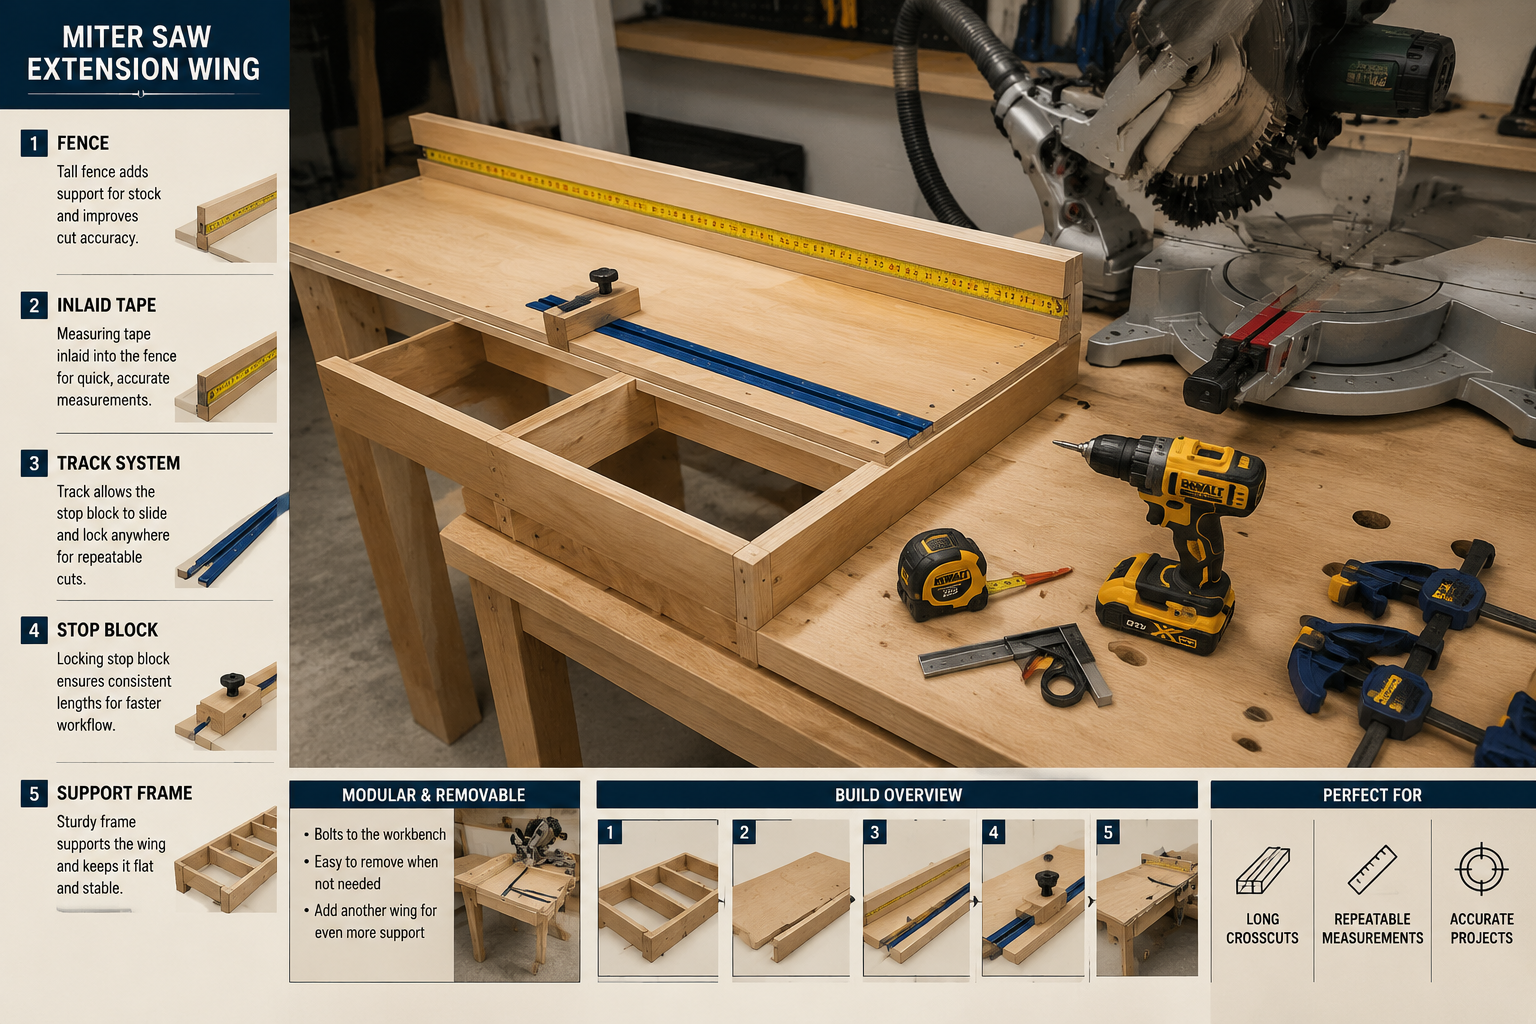
Miter Saw Station Extension Wings: Support and Repeatability
A dedicated miter saw station with extended fences and integrated stop blocks will transform your cutting experience.
The Benefits:
- Full Support: Long workpieces are fully supported on both sides of the blade, preventing wobbling and ensuring square cuts.
- Accurate Repeatable Cuts: Stop blocks allow you to make numerous identical length cuts quickly and precisely.
- Integrated Dust Collection: Many DIY miter saw stations incorporate better dust collection hoods.
- Organization: Provides dedicated storage for measuring tapes, pencils, and other accessories.
Design Considerations for Your Miter Saw Station:
- Level Surface: Ensure the extension wings are perfectly level with your saw’s bed. This is paramount for accuracy.
- Long Fences: Build fences that are at least 3-4 feet long on either side, extending the saw’s effective cutting capacity.
- Measuring System: Integrate a self-adhesive measuring tape into the fence or along the base of the wings.
- Stop Block System: Design a movable stop block that slides along the fence and locks firmly in place. T-track systems are popular for this.
- Storage: Consider adding drawers or shelves underneath for blades, safety gear, and other tools. For ideas on maximizing small spaces, see Building Modular Wood Storage Systems for Small Workshops: Maximizing.

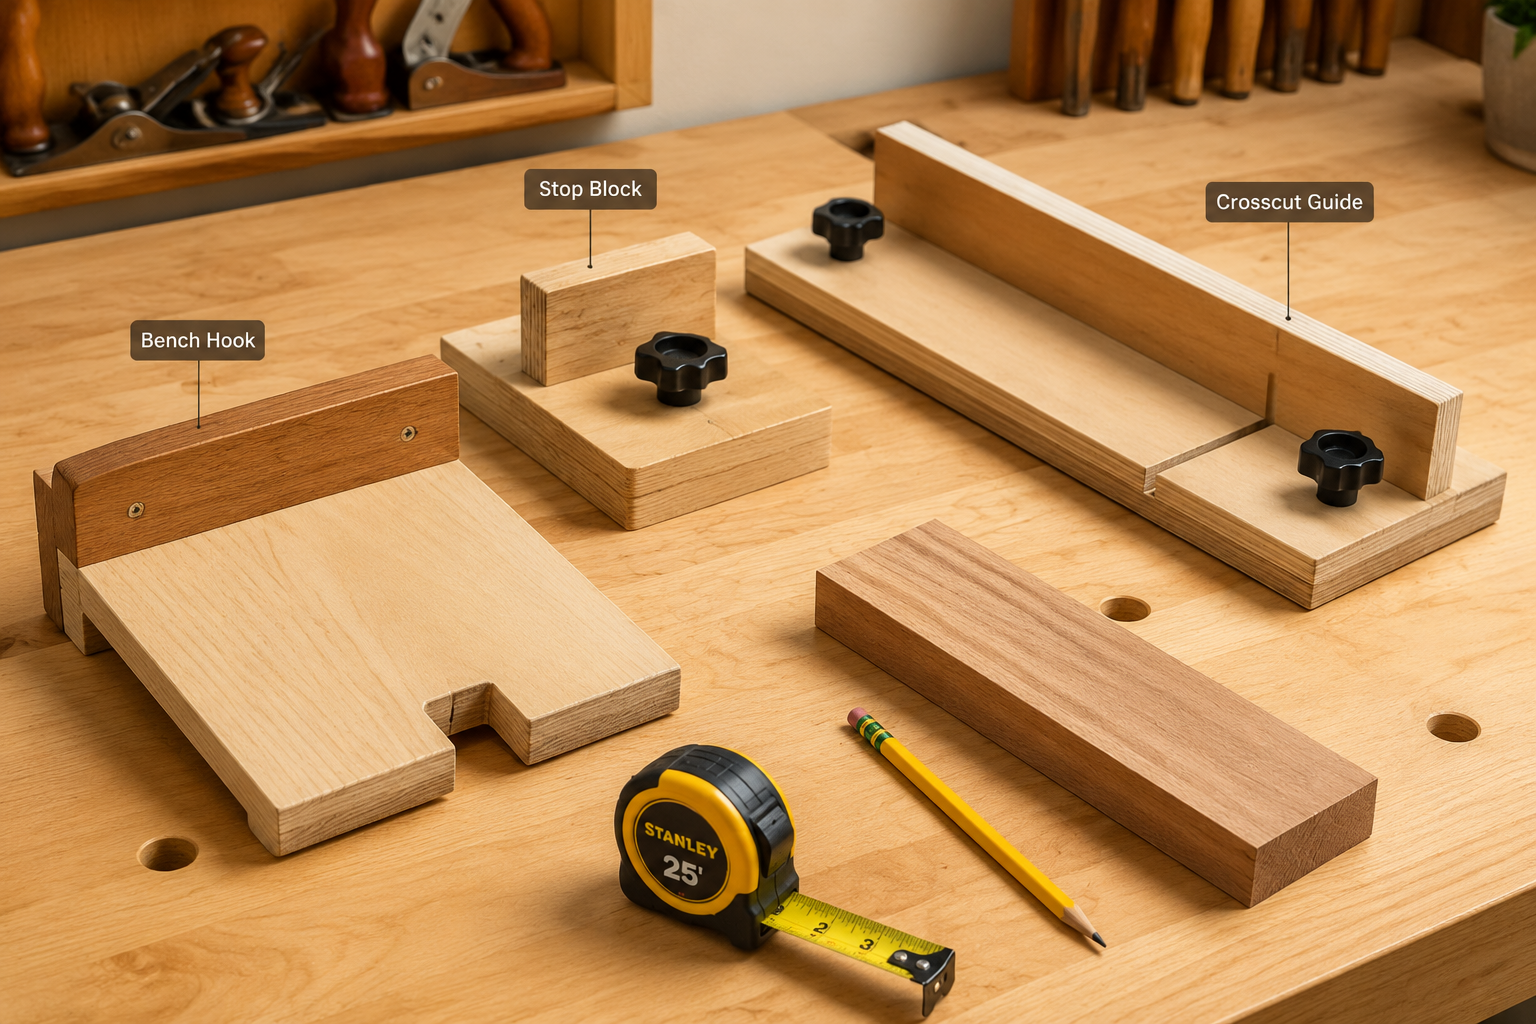
Simple Stop Blocks and Clamping Jigs
Even without a full station, simple DIY stop blocks can drastically improve your miter saw’s accuracy for repetitive cuts.
- Construction: A basic stop block can be a piece of wood clamped to your miter saw’s fence. For more precision, create an L-shaped block that hooks over the fence, secured with a clamp.
- Purpose: Ensures every piece cut is the exact same length, eliminating the need to measure each cut individually.
- Clamping Jigs: For small or awkwardly shaped pieces, a simple clamping jig can hold the workpiece securely against the fence, preventing movement during the cut.
General DIY Jigs for Enhanced Accuracy and Safety
Beyond dedicated tablesaw and miter saw jigs, there are several other universal DIY guides that contribute to Essential Jigs for Accurate Crosscuts: DIY Tablesaw and Miter Saw Guides for Beginners, improving both precision and workshop safety. These are often quick builds from scrap material.
Bench Hooks: Simple, Yet Effective
A bench hook is a rudimentary yet incredibly useful jig for hand saw work and marking.
- Purpose: It holds a workpiece securely against the edge of a workbench, allowing you to saw safely and accurately, especially for crosscuts with a hand saw. It also protects your workbench surface.
- Construction: Typically made from two pieces of plywood or solid wood. One piece acts as the base, another as a fence to push the workpiece against, and a third small piece underneath that hooks over the bench edge.
- Versatility: Great for marking cutlines, planing small edges, or even as a simple clamping aid. For beginners exploring hand tools, a bench hook is an excellent companion to a Beginner’s Guide to Japanese Hand Saws: Precision Cuts and Essential.
Featherboards: Keeping It Tight and Safe
Featherboards are not strictly for crosscuts but are essential for safety and accuracy when ripping on a tablesaw. They hold the workpiece firmly against the fence and down against the table.
- Types: Can be store-bought or easily made from a piece of wood or plywood cut with angled fingers.
- Application: Useful for preventing kickback and ensuring a consistent width cut. They are clamped to the tablesaw fence or table, applying pressure to the workpiece.
Router Table Jigs (Quick Mention)
While this article focuses on saw jigs, a quick mention of router table jigs is warranted as routers are often used in conjunction with precision-cut components. A simple straight-edge fence for a router table can ensure precise dadoes or rabbets for joinery. Learn more about Mastering the Router Table: Essential Jigs, Safety, and Advanced techniques.


Why DIY Jigs are Superior for Beginners
Building these jigs from scratch offers multiple advantages for beginner woodworkers:
- Understanding Your Tools: The process of building a jig forces you to understand the mechanics and limitations of your power tools.
- Customization: Unlike off-the-shelf solutions, DIY jigs can be perfectly tailored to your specific saw, workshop space, and most common project needs.
- Cost-Effective: Most jigs can be built from scrap materials, saving significant money compared to commercial alternatives.
- Empowerment: Successfully building a functional jig is incredibly rewarding and boosts confidence for tackling more complex projects, like perhaps a Beginner’s Guide to Building a Simple Wooden Bookshelf: Tools.
Conclusion
Achieving truly accurate crosscuts is a cornerstone of quality woodworking. For beginners, the journey towards precision doesn’t solely rely on expensive tools, but rather on the intelligent application of Essential Jigs for Accurate Crosscuts: DIY Tablesaw and Miter Saw Guides for Beginners. Building a tablesaw crosscut sled, extending your miter saw station, and utilizing simple bench hooks and stop blocks are foundational steps that will significantly improve your accuracy, enhance your safety, and accelerate your skill development. These DIY solutions are not just functional; they are an integral part of becoming a more competent and confident woodworker in 2026. Start with one, perfect it, and watch your project quality soar.
Actionable Next Steps:
- Build a Tablesaw Crosscut Sled: Prioritize this jig. It offers the biggest leap in accuracy and safety for your tablesaw.
- Assess Your Miter Saw Needs: If you frequently cut long boards, plan and build a miter saw station with extension wings.
- Stock Up on Scraps: Keep a good supply of plywood and MDF scraps for quick jig builds like push sticks and stop blocks.
- Practice Safe Setup: Always double-check your jig’s setup and make test cuts on scrap material before committing to your project piece.
SEO Meta Title: DIY Jigs for Accurate Crosscuts: Tablesaw & Miter Saw SEO Meta Description: Master accurate crosscuts in 2026 with DIY tablesaw and miter saw jigs. Essential guides for beginners to boost precision and safety.
