


Over 60% of homeowners report feeling overwhelmed by clutter, with entryways often serving as the primary bottleneck for disorganization. Shoes, bags, and coats accumulate rapidly, transforming a welcoming entrance into a chaotic zone. Addressing this challenge head-on, woodworking offers a practical yet elegant solution: Building a Simple Entryway Bench with Shoe Storage: Organize Your Home with Style. This project not only provides a convenient spot to sit while putting on or taking off shoes but also integrates essential storage to keep footwear neatly tucked away, transforming your home’s busiest threshold into a beacon of order and style.
Key Takeaways
- Customization is Key: Tailor your entryway bench design to fit your specific space and aesthetic preferences, ensuring it seamlessly integrates with your home’s existing decor.
- Material Matters: Selecting the right wood (e.g., pine, plywood, oak) and finishes profoundly impacts the bench’s durability, appearance, and ease of construction.
- Simple Joinery for Strength: Focus on straightforward yet strong joinery techniques suitable for beginners, such as pocket holes or screws, to ensure a robust and lasting structure.
- Integrated Storage Solutions: Design effective shoe storage, whether open shelves, cubbies, or pull-out drawers, to maximize organization and minimize clutter.
- Finishing for Longevity and Style: Proper sanding, staining, or painting protects the wood and enhances the bench’s aesthetic appeal, making it a stylish addition to your home.
Designing Your Entryway Bench with Shoe Storage
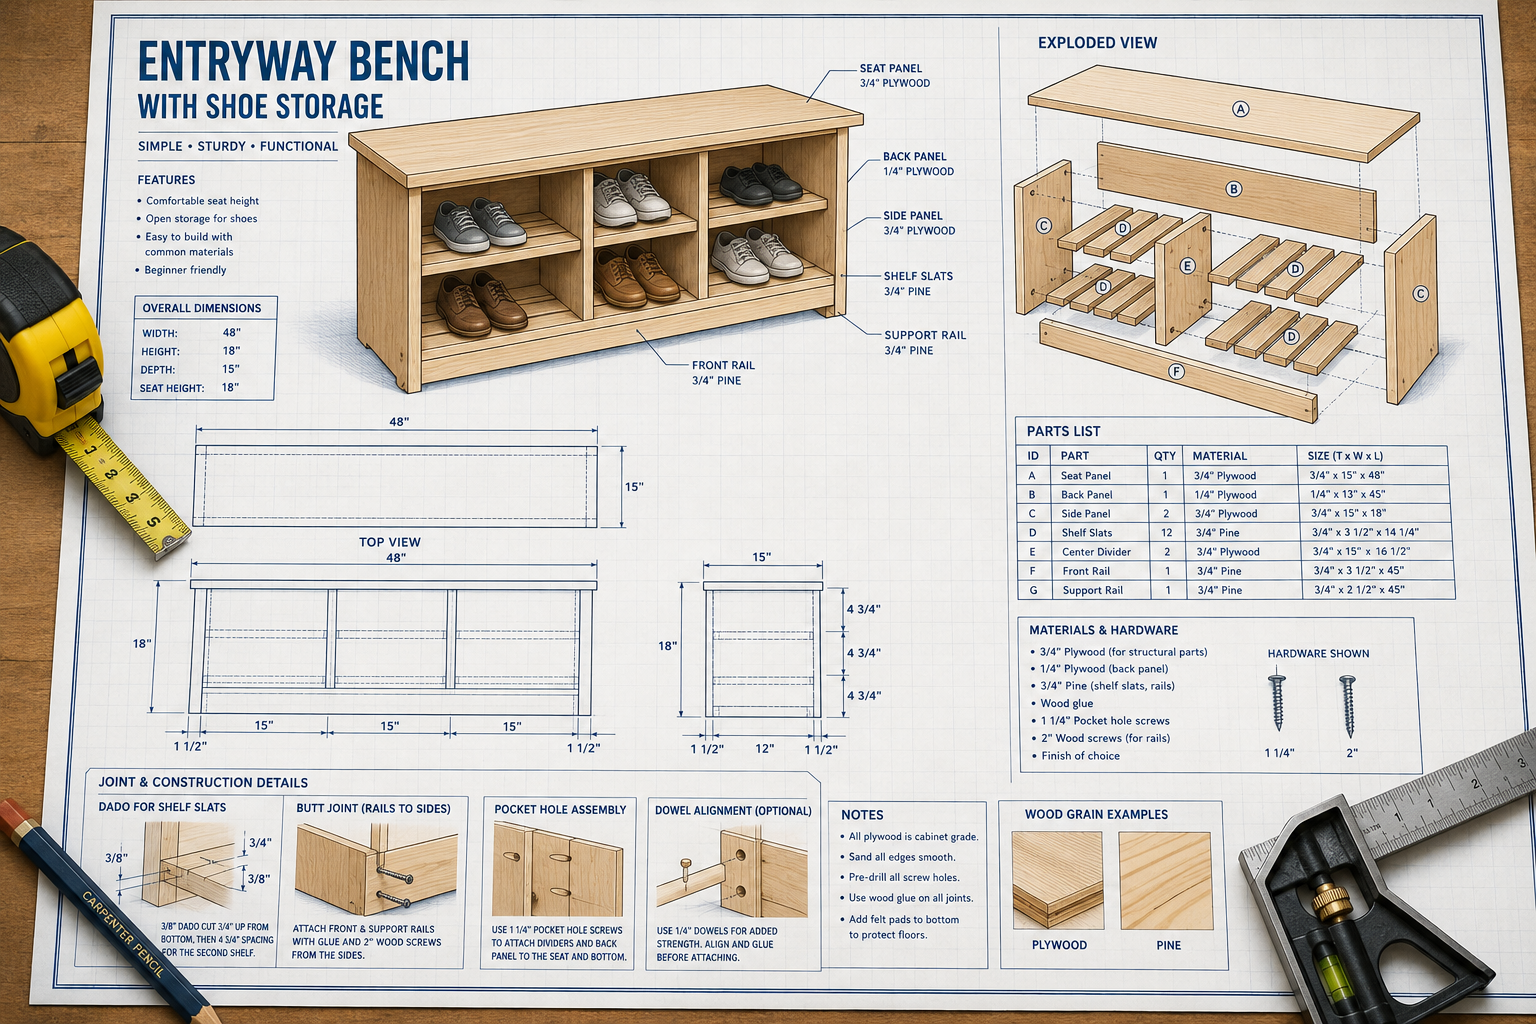
The initial phase of Building a Simple Entryway Bench with Shoe Storage: Organize Your Home with Style involves meticulous planning and design. A well-thought-out plan ensures the final piece is both functional and aesthetically pleasing. Consider the specific needs of your entryway and the amount of shoe storage required.

Assessing Your Space and Needs
Before sketching any designs, measure your entryway thoroughly. Note the available width, depth, and height. This will dictate the maximum dimensions of your bench. Next, consider your household’s shoe collection. Do you need space for everyday sneakers, winter boots, or a mix of both? This will influence the height and depth of your shoe cubbies or shelves.
For instance, a narrow hallway might benefit from a shallow bench with vertically stacked shoe slots, while a wider entry could accommodate a deeper bench with pull-out drawers or larger cubbies. Think about who will use the bench—children might require lower seating, while adults might prefer a standard chair height.
| Feature | Small Entryway | Medium Entryway | Large Entryway |
|---|---|---|---|
| Bench Width | 24-36 inches | 36-48 inches | 48-60+ inches |
| Bench Depth | 10-14 inches | 14-18 inches | 16-20+ inches |
| Shoe Storage | Vertical slots | Cubbies/Shelves | Drawers/Open Bins |
| Material | Plywood, Pine | Pine, Poplar | Oak, Maple |
Choosing Materials and Joinery Methods
Selecting the right materials is crucial for both the durability and appearance of your entryway bench. Common choices include:
- Plywood: An economical and stable choice, excellent for building strong, flat surfaces. It’s often faced with veneer for a better finish.
- Pine: Readily available and affordable, pine is easy to work with and takes stain well. It’s a good option for beginners.
- Poplar: A harder wood than pine, poplar is smooth and paints beautifully. It’s slightly more expensive but offers a finer finish.
- Oak/Maple: These hardwoods are very durable and offer a beautiful grain, but they are more challenging to work with and significantly more costly.
For a “simple” build, accessible joinery methods are ideal. Pocket hole joinery, using a jig to create angled holes for screws, is exceptionally strong and often preferred for furniture construction as it conceals fasteners effectively. Alternatively, traditional wood screws with pilot holes and wood glue can create a sturdy bench. Biscuit joints or dowel joints offer clean aesthetics but may require more specialized tools and precision. Remember, proper wood glue is an essential component for any strong wood joint. For insights into selecting the best adhesives, refer to The Ultimate Guide to Wood Glue: Choosing the Right Adhesive for every Project, Joint, and Environmental Condition.
“A well-designed entryway bench acts as a silent sentry, safeguarding your home’s serenity by keeping clutter at bay, while offering a warm invitation to all who enter.”
Sketching Your Design and Gathering Plans
Once you have a clear understanding of your space, needs, and material choices, begin sketching. Draw several iterations, experimenting with different configurations for shoe storage—open shelves, individual cubbies, or a combination. Consider adding a small shelf above the bench for keys or mail, or hooks for coats if space allows.
Numerous free plans and inspiration can be found online. Look for designs that match your skill level and desired aesthetic. For those interested in enhancing their workshop capabilities, consider “Building a Custom Wood Workbench: Design Considerations and Step-by-Step Plans for a Sturdy, Functional Foundation” to create a dedicated space for projects like this. Remember that woodworking jigs, like those discussed in Beginner’s Guide to Essential Woodworking Jigs: Improve Accuracy and Safety for Common Cuts, can significantly improve accuracy during construction.
Finalize your design with precise measurements for each component. Create a cut list for all wood pieces, detailing their dimensions. This preparation is key to a smooth and efficient build process.
Construction: Bringing Your Bench to Life
With your design finalized, the next step in Building a Simple Entryway Bench with Shoe Storage: Organize Your Home with Style is the actual construction. This phase involves accurate cutting, precise assembly, and ensuring the structural integrity of your bench.
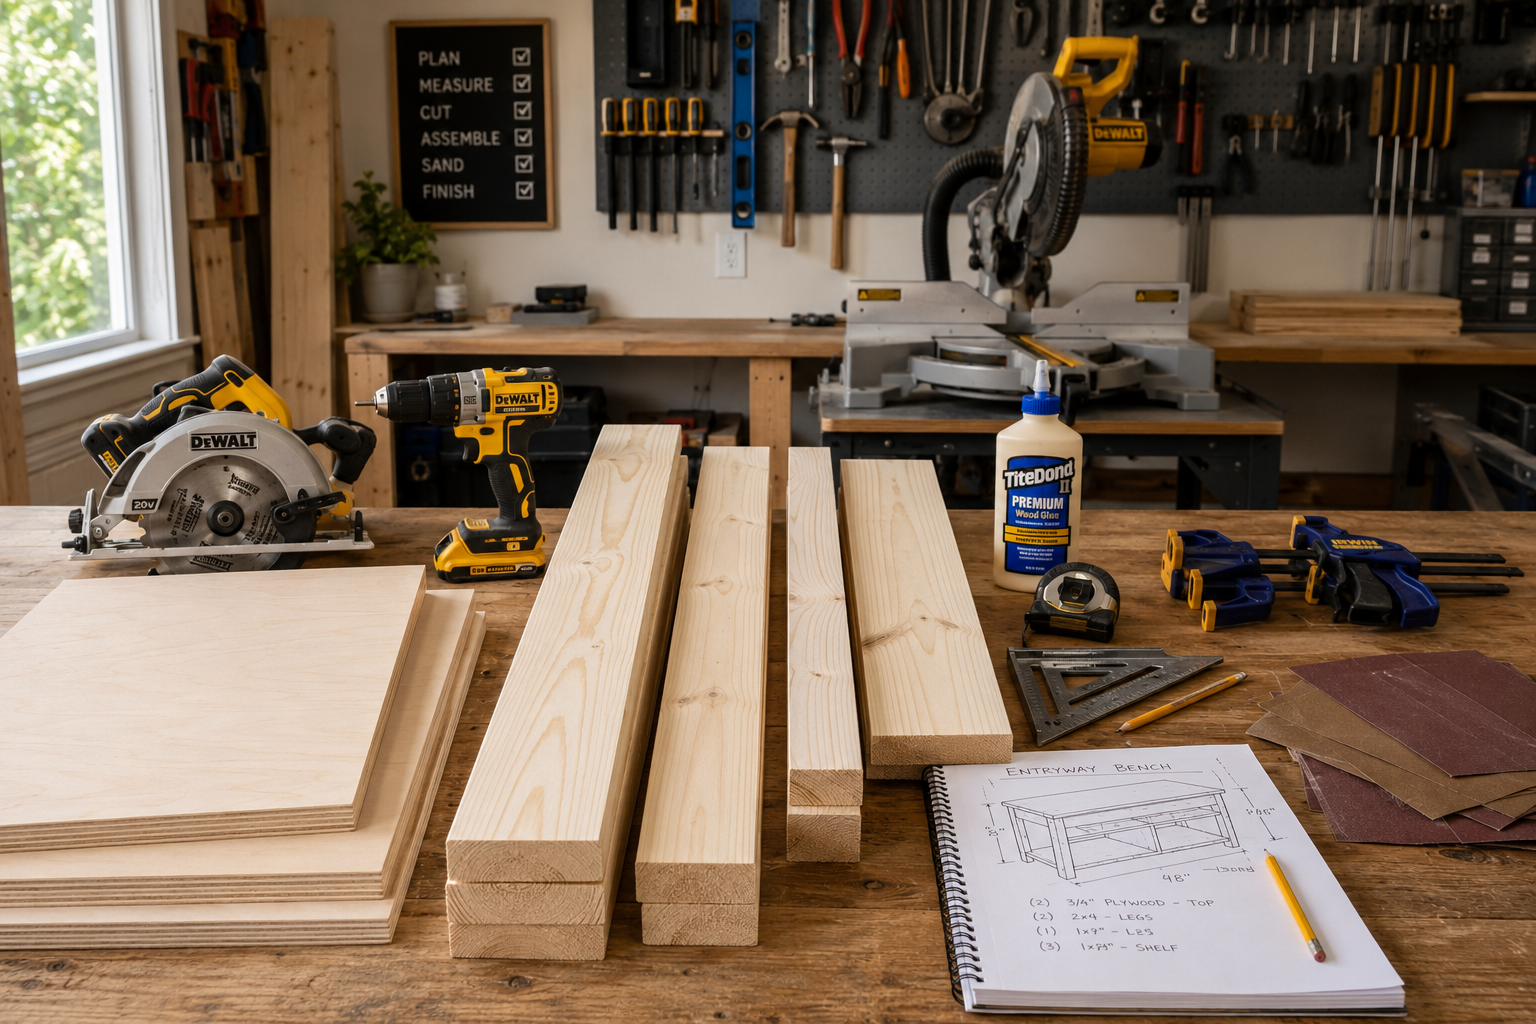
Preparing Your Workspace and Materials
A clean, organized workspace is paramount for safety and efficiency. Clear out any clutter and ensure adequate lighting. Lay out your tools, ensuring they are sharp and in good working order. If using power tools, check that all safety features are operational.
Based on your cut list, measure and mark your wood pieces precisely. Accuracy here prevents costly mistakes later. Use a circular saw, miter saw, or table saw to cut your pieces. For detailed instructions on cutting techniques, especially for plywood, resources like “Edge Joining Plywood: Best Methods and Tips” can be incredibly helpful. Always wear appropriate personal protective equipment (PPE) such as safety glasses, hearing protection, and dust masks. Consider setting up a dust collection system, as explored in Building a DIY Smart Workshop Dust Collection System: Integrating IoT Sensors for Automated Air Quality and Tool Activation to maintain a healthier environment.
Essential Tools for Bench Construction:
- Measuring Tape: For accurate dimensions.
- Pencil/Marker: For marking cut lines.
- Speed Square/Combination Square: For ensuring square cuts and layouts.
- Circular Saw/Miter Saw/Table Saw: For cutting wood pieces to size.
- Drill/Driver: For pilot holes and driving screws.
- Pocket Hole Jig (optional but recommended): For strong, concealed joints.
- Clamps: To hold pieces securely during assembly and gluing.
- Wood Glue: For strong, lasting joints.
- Sandpaper (various grits): For smoothing surfaces.
Assembling the Frame and Storage Sections
Begin by assembling the main frame of the bench. This usually involves connecting the side panels to the top and bottom supports. If you’re using pocket holes, drill these first according to your jig’s instructions. Apply a thin, even coat of wood glue to all mating surfaces before fastening with screws. Clamping the pieces together while the glue dries ensures maximum strength.
Next, build the internal shoe storage sections. This might involve creating dividers for individual cubbies or installing shelves at appropriate heights. For open-shelf designs, ensure the shelves are securely supported, possibly with dadoes (grooves) routed into the side panels or with cleats. For a simple bench, cleats or pocket screws from below the shelf into the uprights are sufficient.

Ensure all corners are square during assembly. Use your speed square or combination square frequently. Even slight inaccuracies can lead to a wobbly bench or ill-fitting components.
<code>Example Cut List (for a 36" wide x 18" deep x 18" high bench)

Component        | Quantity | Dimensions (L x W x T) | Material
-----------------|----------|------------------------|----------
Top Panel        | 1        | 36" x 18" x 3/4"       | Plywood
Bottom Panel     | 1        | 36" x 18" x 3/4"       | Plywood
Side Panels      | 2        | 17 1/4" x 18" x 3/4"   | Plywood
Vertical Dividers| 2        | 17 1/4" x 12" x 3/4"   | Plywood
Horizontal Shelf | 1        | 34 1/2" x 12" x 3/4"   | Plywood
Toe Kick (front) | 1        | 36" x 3" x 3/4"        | Pine
</code>
(Note: Dimensions are illustrative and should be adjusted to your specific design.)
Adding Details and Reinforcements
Once the main structure is complete, add any additional details from your design. This could include a decorative trim around the top, a back panel for added stability, or a toe kick at the bottom to prevent shoes from sliding underneath the bench and to provide a finished look.
Consider adding corner blocks or additional bracing in high-stress areas, especially if your bench is expected to bear significant weight. These small additions can dramatically increase the longevity and sturdiness of your furniture. If you’re incorporating drawers, now is the time to install the drawer slides and build the drawer boxes. Mastering techniques like those for Mastering Dovetail Drawers for Cabinets: Hand-Cut and Router Jigs for Seamless Furniture Integration can elevate the quality of your storage.
Finishing Your Entryway Bench for Style and Durability
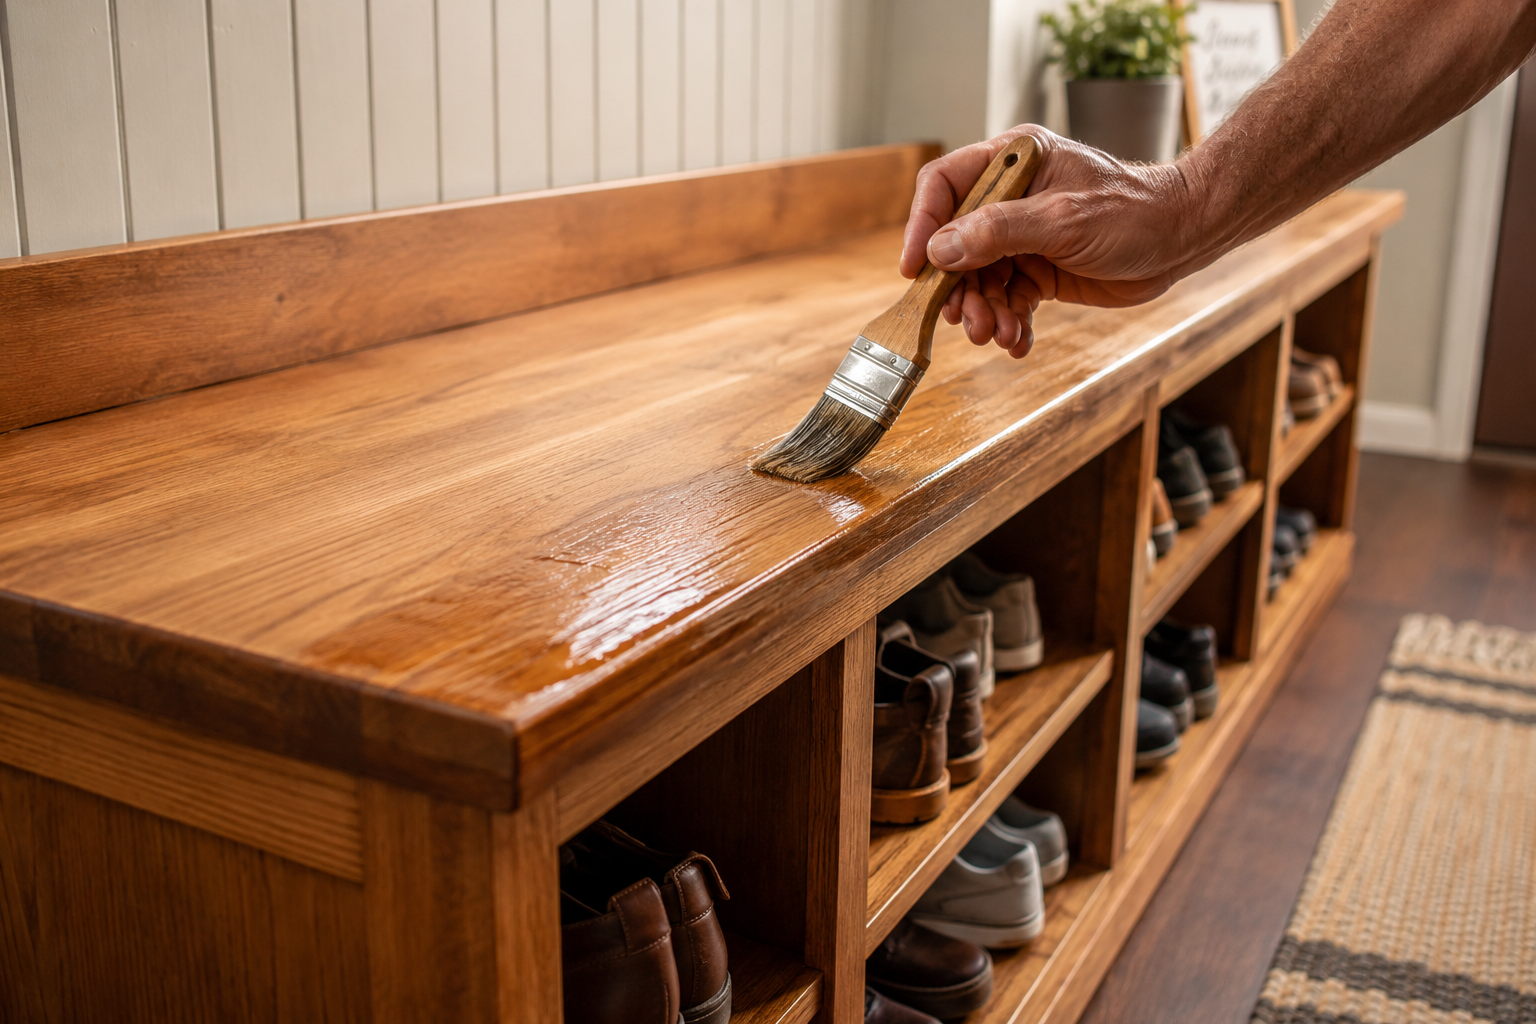
The final stage of Building a Simple Entryway Bench with Shoe Storage: Organize Your Home with Style is crucial for both its aesthetic appeal and its ability to withstand daily wear and tear. A thoughtful finishing process transforms raw wood into a piece of furniture that complements your home.
Sanding for a Smooth Surface
Sanding is perhaps the most tedious but also one of the most important steps. Start with a coarser grit sandpaper (e.g., 80 or 100 grit) to remove any major imperfections, glue squeeze-out, or rough edges. Progress through finer grits (120, 150, 180, and finally 220 grit) to achieve a silky-smooth surface. Always sand with the grain of the wood to prevent scratches.
For areas that will be frequently touched or sat upon, a thorough sanding is essential for comfort and durability. After each grit, wipe down the surface with a tack cloth or a slightly damp cloth to remove all dust before moving to the next finer grit. This prevents dust particles from scratching the surface when you use finer sandpaper.
Staining or Painting Your Bench
The choice between staining and painting largely depends on the type of wood you used and your desired aesthetic.
- Staining: If you used a wood with an attractive grain (like pine, oak, or maple), staining can enhance its natural beauty. Apply stain evenly with a brush or rag, wiping off excess according to the product’s instructions to prevent blotchiness. Always test the stain on a scrap piece of the same wood to ensure the color is what you desire.
- Painting: For woods with less interesting grain or if you want to match specific decor colors, painting is an excellent option. Use a high-quality primer first, especially on plywood or pine, to ensure even paint adhesion and a smooth finish. Apply several thin coats of paint, allowing each coat to dry thoroughly between applications, and lightly sand with fine-grit sandpaper (e.g., 220 or 320) between coats for a professional look.
For those curious about different wood finishing techniques, resources like Danish Oil vs. Linseed: The Ultimate Wood Finishing Guide or general guides on Antique Wood Finishing Techniques can provide valuable context and alternative ideas.
Applying a Protective Topcoat
A topcoat is crucial for protecting your entryway bench from moisture, scratches, and daily wear. Common options include:
- Polyurethane: Available in oil-based and water-based formulas, polyurethane provides a durable, hard-wearing finish. Water-based polyurethanes dry faster and have less odor, while oil-based versions are generally more durable and impart a slight amber tint. Apply in thin, even coats, sanding lightly with fine-grit sandpaper (e.g., 320 or 400) between coats.
- Varnish: Offers excellent protection, especially for high-traffic areas. Marine varnish provides superior water resistance, making it suitable for areas prone to moisture.
- Wax/Oil Finish: For a more natural, hand-rubbed look, a wax or oil finish can be applied. While beautiful, these finishes typically offer less protection against wear and moisture compared to polyurethane or varnish and may require more frequent reapplication.
Always follow the manufacturer’s instructions for application and drying times. Adequate ventilation is essential when working with finishes.
Adding Cushions and Personal Touches
Once the finish has fully cured, your bench is ready for its final touches. Add a comfortable cushion to the top for a more inviting seating experience. You can buy pre-made cushions or sew one yourself to match your decor. Store-bought baskets or bins can be placed in the cubbies for small items like gloves, scarves, or pet leashes, further enhancing the organization of your entryway.

Consider adding small felt pads to the bottom of the bench legs to protect your flooring. These simple additions complete the project and make your new entryway bench with shoe storage a functional and stylish addition to your home in 2026.
Conclusion
Building a Simple Entryway Bench with Shoe Storage: Organize Your Home with Style is a rewarding project that significantly enhances the functionality and aesthetics of your home’s entrance. From the initial design considerations and material selection to the precise construction and thoughtful finishing, each step contributes to a durable, stylish, and highly practical piece of furniture. This bench provides a dedicated spot for shoes, minimizing clutter and creating a more welcoming first impression for anyone entering your home in 2026.
By following the guidelines outlined, even novice woodworkers can achieve professional-looking results. The satisfaction of crafting something useful with your own hands, while simultaneously decluttering your living space, is immense. Take the leap, gather your tools, and transform your entryway into an organized and inviting haven.
Actionable Next Steps:
- Measure and Design: Accurately measure your entryway and sketch out several design ideas, considering your specific storage needs.
- Gather Materials: Create a detailed cut list and procure your chosen wood, fasteners, and finishing supplies.
- Prioritize Safety: Always wear appropriate PPE and ensure your workspace is clean and organized.
- Build with Precision: Focus on accurate cuts and strong joinery for a robust bench.
- Finish with Care: Sand thoroughly and apply your chosen stain/paint and protective topcoat for longevity and style.
