

The average person checks their smartphone 144 times a day, often reaching for it first thing in the morning and last thing at night (Asurion, 2023). This constant interaction underscores the need for convenient charging solutions, especially in the bedroom. For tech-savvy makers and woodworking enthusiasts, the desire to blend functional technology with elegant furniture design offers a unique opportunity. This article provides a comprehensive guide to building your own DIY Modern Nightstands with Integrated Wireless Charging: A Woodworking Project for Tech-Savvy Makers, combining contemporary aesthetics with practical wireless power delivery and smart storage.
This project goes beyond simple construction, inviting you to create a piece of furniture that seamlessly integrates into your smart home ecosystem while enhancing your daily routine. By the end, you’ll possess a beautiful, custom-made nightstand that reflects your craftsmanship and caters to modern technological demands.

Key Takeaways
- Design for Integration: Modern nightstands prioritize clean lines, minimalist aesthetics, and functional storage, which are ideal for concealing technology.
- Wireless Charging Essentials: Understand the components of a Qi wireless charging module and how to safely embed it within the nightstand’s structure.
- Wood Selection Matters: Choose appropriate hardwoods or plywoods that offer durability, workability, and a finish compatible with modern design.
- Precision and Safety: Accurate measurements, proper joinery, and careful electrical work are crucial for both the longevity and safety of your project.
- Finishing for Durability: Selecting the right finish not only enhances the nightstand’s appearance but also protects it from daily wear and tear.
Designing Your DIY Modern Nightstands with Integrated Wireless Charging
The foundation of any successful woodworking project begins with thoughtful design. For DIY Modern Nightstands with Integrated Wireless Charging, the goal is to create a piece that is both visually appealing and highly functional. This involves considering aesthetics, dimensions, storage needs, and how the wireless charging technology will be integrated.
Aesthetic Considerations: Warm Minimalism
Modern design often embraces minimalism, characterized by clean lines, uncluttered surfaces, and a focus on functionality. When designing your nightstand, think about:
- Geometry: Simple, geometric shapes are hallmarks of modern design. Rectangular or square tops, straight legs, and flush-mounted drawers contribute to a sleek look.
- Materials: Natural wood offers warmth and texture, balancing the potentially stark nature of modern aesthetics. Consider woods like maple, walnut, or white oak for their beautiful grain patterns and durability. For insights into balancing design with natural materials, explore Warm Minimalism in Woodworking: Balancing Clean Design with Textured Natural Materials.
- Hardware: Opt for minimalist hardware, such as finger pulls or push-to-open drawer slides, to maintain clean lines. Concealed hinges for any doors are also recommended.
- Finish: A clear, matte, or satin finish will allow the natural beauty of the wood to shine through, contributing to the modern aesthetic.
Functional Aspects: Dimensions and Storage
Before cutting any wood, determine the ideal dimensions for your nightstand.
- Height: A good rule of thumb is for the nightstand top to be roughly level with the top of your mattress. This ensures easy access to items. Standard heights typically range from 24 to 28 inches.
- Width and Depth: Consider the available space in your bedroom and what you typically keep on a nightstand. A width of 18-24 inches and a depth of 14-18 inches is common.
- Storage: Decide on the type and amount of storage you need.
- Open Shelf: Provides easy access to books or larger items.
- Drawer(s): Ideal for keeping clutter out of sight. Dovetail drawers are a classic, sturdy choice, and you can learn more about them in Mastering Dovetail Drawers for Cabinets: Hand-Cut and Router.
- Cabinet: Offers concealed storage for bulkier items.
Integrating the Wireless Charging Module
This is the core “tech-savvy” element of your DIY Modern Nightstands with Integrated Wireless Charging.
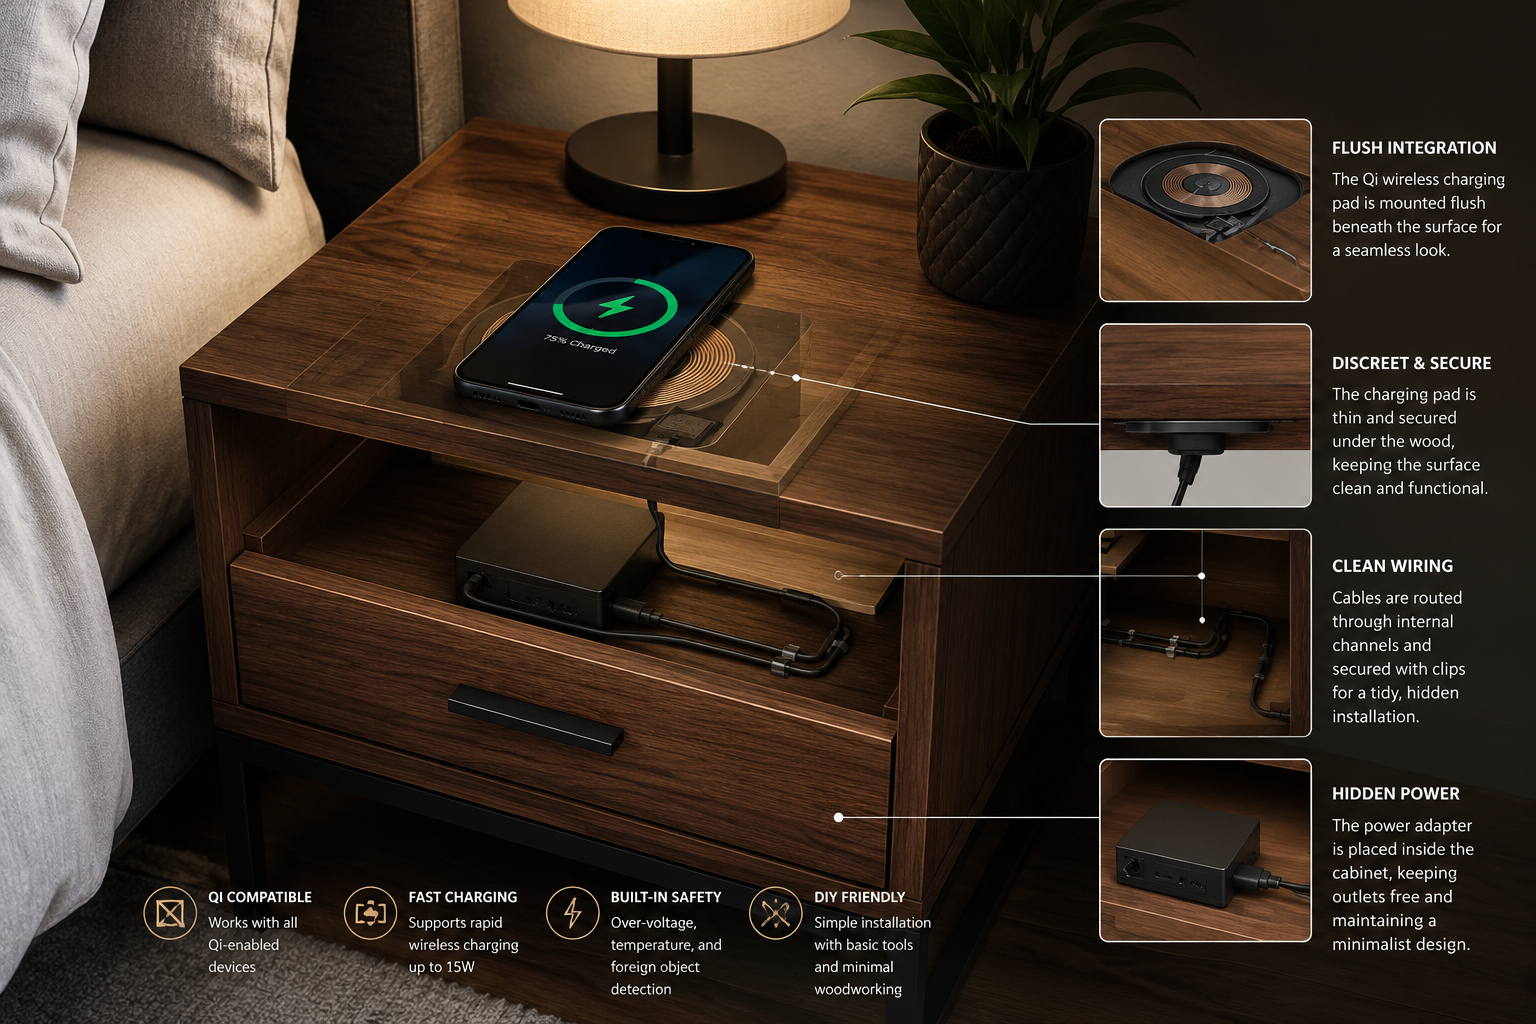
- Placement: The most intuitive placement is flush with the top surface of the nightstand. This requires routing a recess for the charging pad. Alternatively, it can be hidden just beneath the surface, allowing the phone to charge through a thin layer of wood.
- Cable Management: Plan for a discrete channel or routing path for the charging pad’s power cable to exit the nightstand. This prevents unsightly wires and contributes to the clean modern aesthetic. Consider incorporating it into a dedicated cable management channel within the nightstand’s back panel or leg.
- Power Source: The wireless charger will need to be plugged into a wall outlet. Think about how to position the nightstand relative to existing outlets. For advanced integration, you could also explore DIY Smart Home Integration with Custom Woodwork: Hiding Tech with for more ideas on concealing tech.
Materials and Tools for Your Woodworking Project
Crafting a high-quality nightstand requires selecting the right materials and having the necessary tools at hand. This section outlines the essential components and equipment for your DIY Modern Nightstands with Integrated Wireless Charging.
Wood Selection
Choosing the right wood is crucial for both the aesthetic and structural integrity of your nightstand.
- Hardwoods:
- Walnut: Known for its rich, dark color and beautiful grain, walnut is a premium choice that exudes sophistication. It’s durable and machines well.
- Maple: A light-colored, dense wood with a fine grain, maple offers a clean, contemporary look. It’s very durable and takes finishes beautifully.
- White Oak: Features a pronounced grain pattern and excellent strength, making it a popular choice for modern furniture. It can be stained to a variety of tones.
- Plywood: High-quality Baltic birch or furniture-grade plywood can be a cost-effective alternative for certain components, especially for drawer boxes or interior panels, provided edges are properly treated.
- Quantity: Accurately measure and calculate the board footage required based on your design plans. It’s always wise to purchase 10-15% more than calculated to account for mistakes or wood defects.
Wireless Charging Module
- Qi-Certified Wireless Charger: Look for a reputable, Qi-certified wireless charging module. Many options are designed to be embedded.
- Wattage: Choose a charger with sufficient wattage (e.g., 10W or 15W) to ensure fast charging for modern smartphones.
- Coil Placement: Some chargers have a single coil, while others have multiple coils, offering a wider charging area. Consider a multi-coil charger if you want more flexibility in phone placement.
- Power Adapter: Ensure the module comes with or is compatible with an appropriate power adapter.
Hardware
- Drawer Slides: Soft-close drawer slides are highly recommended for a premium feel and to prevent slamming.
- Fasteners: Wood screws, dowels, or biscuits for joinery, depending on your chosen construction method. For guidance on adhesives, refer to The Ultimate Guide to Wood Glue: Choosing the Right Adhesive for.
- Drawer Pulls (Optional): If using, select minimalist pulls that match your design. Alternatively, consider routing finger pulls directly into the drawer fronts.
Essential Tools
A well-equipped workshop makes all the difference.
- Measuring and Marking:
- Tape measure, ruler, combination square
- Marking knife, pencil
- Cutting:
- Table Saw: Essential for accurate rips and crosscuts.
- Miter Saw: For precise angle cuts and crosscuts.
- Jigsaw or Bandsaw: For curves or detailed cuts if your design requires them.
- Shaping and Joinery:
- Router (Table or Handheld): For dados, rabbets, edge profiling, and creating recesses for the wireless charger. For maximizing precision, see Choosing and Using Router Tables: Maximizing Precision and Safety for.
- Drill/Driver: For pilot holes and fastening screws.
- Chisels: For fine-tuning joints.
- Sanding:
- Random orbit sander
- Detail sander (optional)
- Sanding blocks and sandpaper in various grits (80-220+)
- Finishing:
- Applicators (brushes, rags, spray gun)
- Protective gloves
- Dust masks
- Safety Gear:
- Safety glasses (non-negotiable for all power tool use)
- Hearing protection
- Dust collection system or shop vacuum
Construction Steps for DIY Modern Nightstands with Integrated Wireless Charging
Building your DIY Modern Nightstands with Integrated Wireless Charging involves a sequence of precise woodworking steps, culminating in the integration of the charging technology.
Step 1: Cutting and Milling Lumber
- Rough Cut: Begin by crosscutting your lumber slightly oversized to your design dimensions.
- Jointing and Planing: Flatten one face and square one edge using a jointer, then thickness plane all pieces to your desired thickness. This ensures all parts are true and ready for precise joinery.
- Final Cut to Size: Using a table saw and miter saw, cut all components (top, sides, bottom, drawer fronts, drawer box parts, legs, etc.) to their exact final dimensions. Label each piece to avoid confusion.
Step 2: Joinery and Assembly of the Carcass
The carcass forms the main structure of your nightstand.
- Legs and Frame: If your design includes separate legs and a frame, assemble these first using mortise and tenon joints, dowels, or pocket screws for strength.
- Side Panels: Attach side panels to the frame or directly to the top and bottom. Depending on your design, you might use dados, rabbets, or biscuits for strong, hidden joints.
- Back Panel: Consider a recessed back panel of thin plywood to keep the structure square and provide a surface for wire management.
- Dry Fit: Always perform a dry fit of major components before applying glue to ensure everything aligns perfectly. Clamp everything together and check for squareness.
- Glue Up: Apply wood glue sparingly and clamp securely. Remove any excess glue squeeze-out with a damp cloth before it dries.
Step 3: Constructing Drawers
- Drawer Box: Build the drawer boxes using strong joinery like dovetails, dadoes, or rabbets. Plywood is often suitable for drawer boxes, with a solid wood front.
- Drawer Slides: Install the drawer slides into the carcass and onto the drawer boxes. Follow the manufacturer’s instructions carefully for proper alignment.
- Drawer Front: Attach the solid wood drawer front to the drawer box. Ensure even gaps around the front for smooth operation.
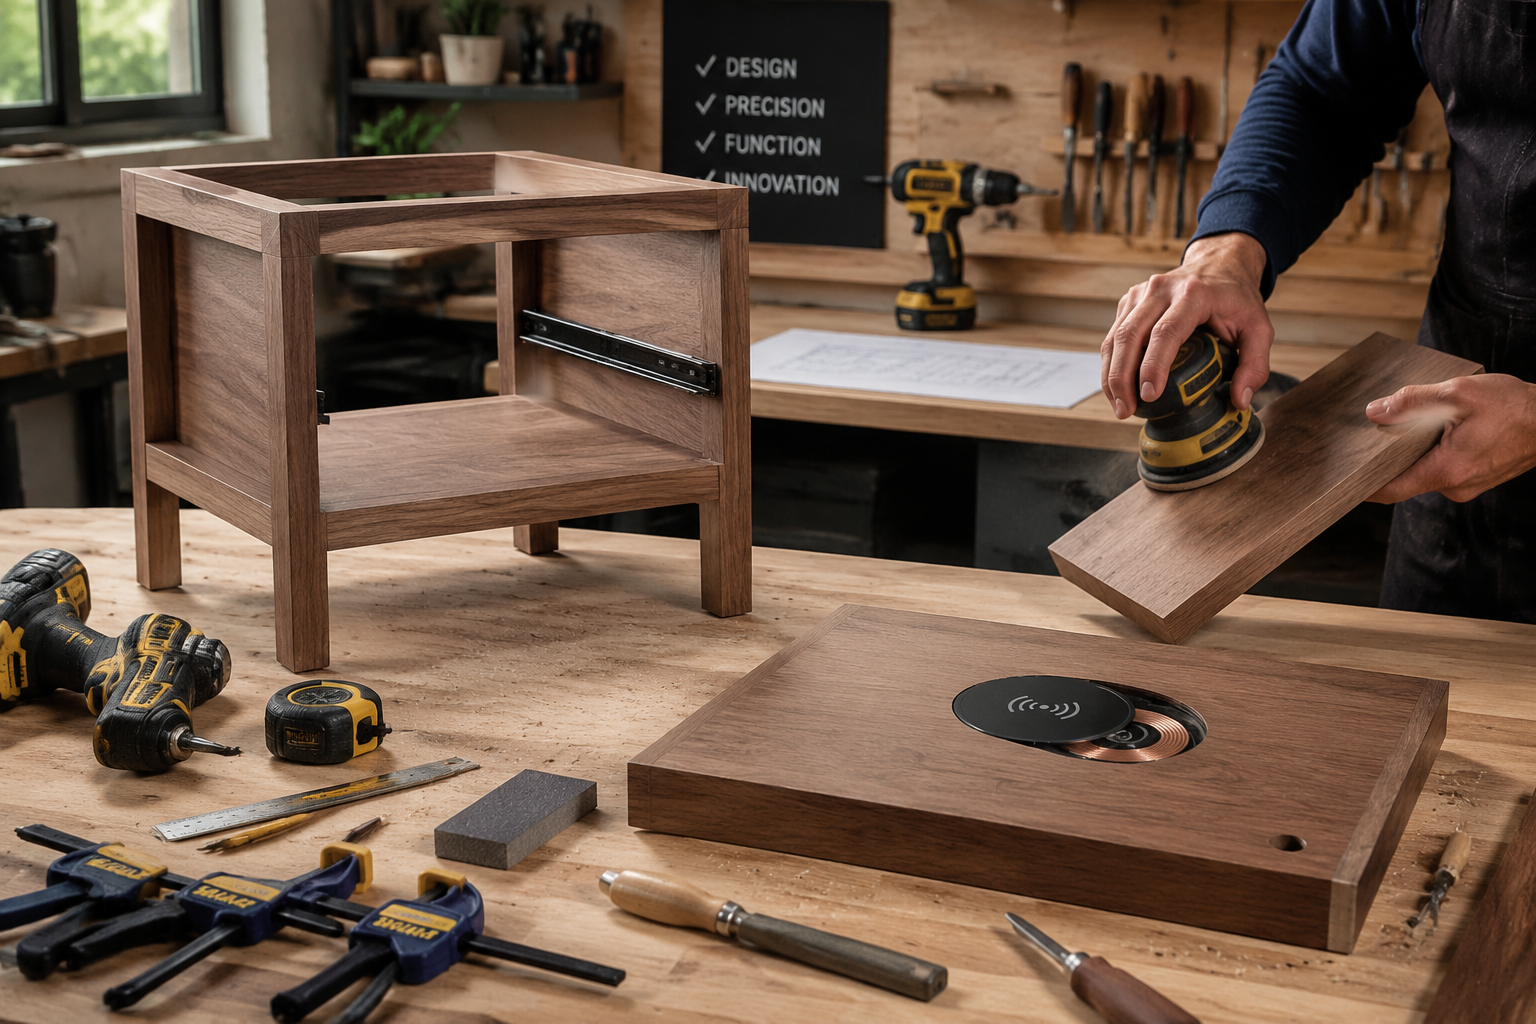
Step 4: Integrating the Wireless Charging Module
This is a critical stage for your DIY Modern Nightstands with Integrated Wireless Charging.
- Routing the Recess:
- Mark the exact location for your wireless charging pad on the underside of the nightstand top.
- Using a router with a template or a straight bit, create a recess that matches the diameter and depth of your charging module. The goal is for the module to sit flush or just below the surface.
- If routing for charging through the wood, ensure the remaining wood thickness is within the charger’s operational range (typically 3-8mm).
- Cable Routing: Create a channel or drill a hole from the charging module’s recess to an exit point on the back of the nightstand for the power cable. Ensure the cable is securely held and not pinched.
- Testing: Before final installation, test the wireless charger by plugging it in and placing your phone on the intended charging spot. Ensure it functions correctly.
- Securing the Module: Once tested, secure the charging module in its recess using a thin bead of epoxy or hot glue, ensuring it doesn’t interfere with the charging process.
Step 5: Sanding and Finishing
Proper sanding and finishing will protect your nightstand and enhance its beauty.
- Sanding: Start with 80-100 grit sandpaper to remove any marks, then progress through 120, 150, 180, and finally 220 grit. Sand with the grain for the best results. For more on various finishes, check out Natural Wood Finishing Techniques.
- Dust Removal: Thoroughly clean all dust from the nightstand before applying finish. Use a tack cloth or compressed air.
- Finishing Application:
- Stain (Optional): If you want to alter the wood color, apply a wood stain according to the manufacturer’s instructions.
- Topcoat: Apply a durable topcoat like polyurethane, lacquer, or an oil-based finish. Polyurethane offers excellent protection and comes in various sheens. Apply multiple thin coats, sanding lightly with fine grit (320-400) between coats for a smooth finish.
- Curing: Allow ample time for the finish to fully cure before heavy use.
Step 6: Final Assembly and Installation
- Attach Top: Securely attach the finished top to the nightstand carcass using screws from underneath or through cleats.
- Install Back Panel: Attach the back panel, ensuring any cable exit points are clear and tidy.
- Leveling Feet (Optional): Add adjustable leveling feet to compensate for uneven floors.
- Cable Management: Route the main power cable cleanly down to the floor outlet.
Conclusion
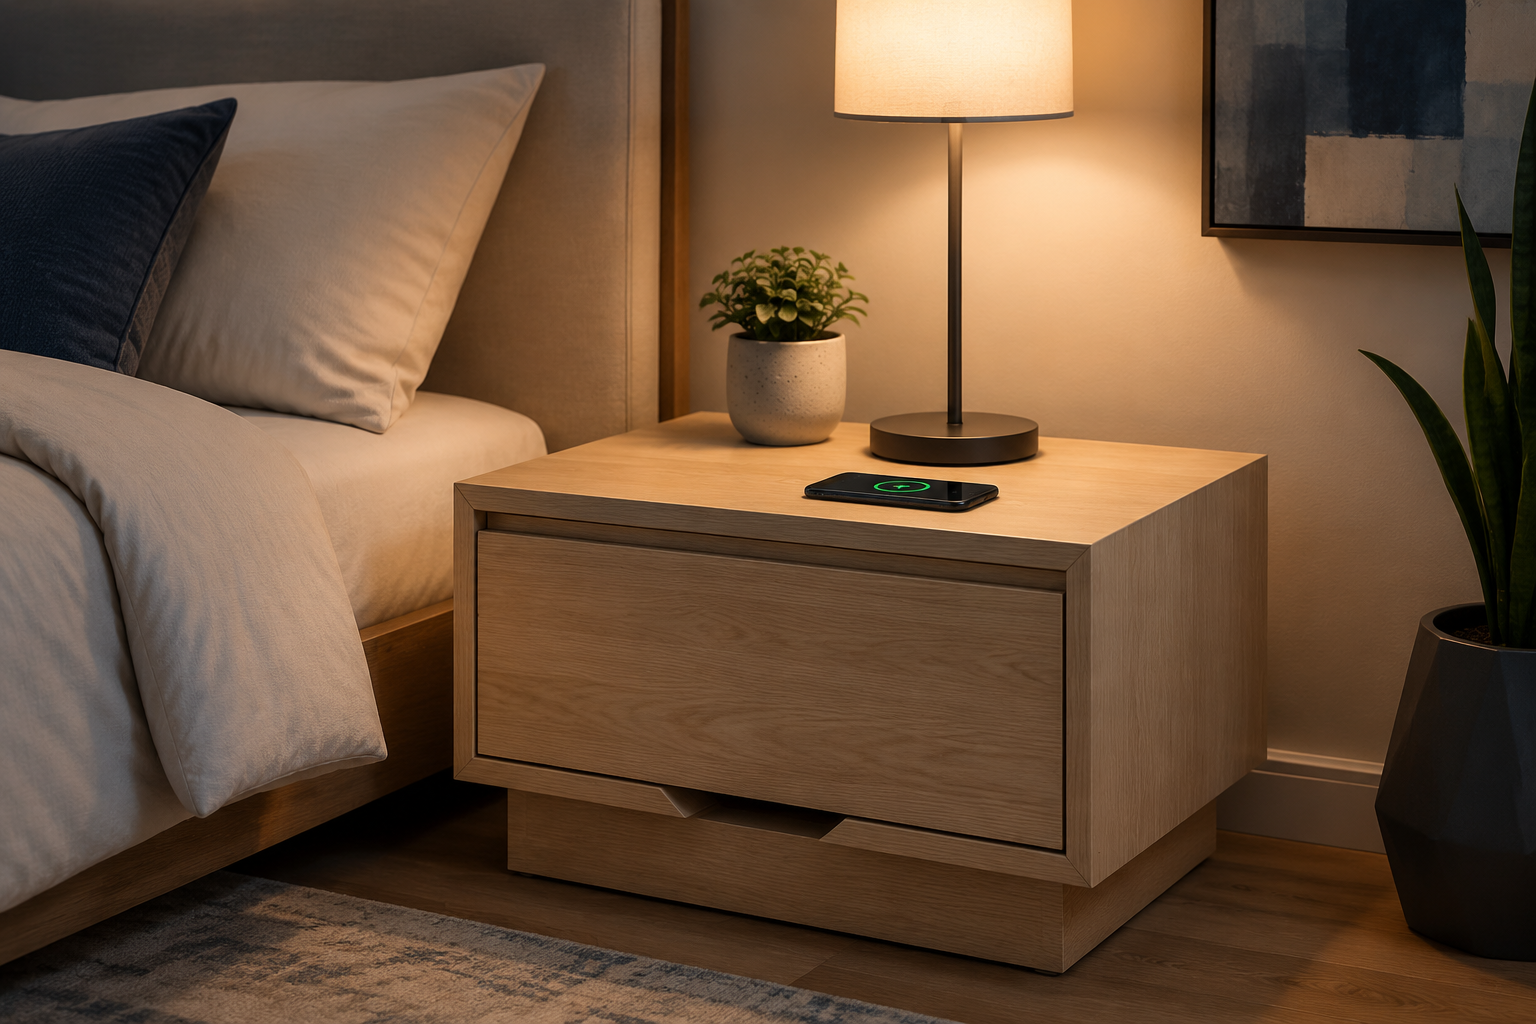
Building your own DIY Modern Nightstands with Integrated Wireless Charging offers a uniquely rewarding experience, blending the timeless craft of woodworking with contemporary technological convenience. This project not only furnishes your bedroom with a stylish and functional piece but also hones your skills in design, precision joinery, and smart home integration. The satisfaction of seeing your smartphone effortlessly charge on a nightstand you crafted yourself is unparalleled.
By carefully planning your design, selecting quality materials, and executing each construction step with attention to detail, you can create a bespoke furniture piece that serves your needs for years to come. Embrace the challenge, enjoy the process, and elevate your space with personalized craftsmanship.

Actionable Next Steps:
- Refine Your Design: Sketch out your ideal nightstand, considering dimensions, storage, and wireless charger placement.
- Source Materials: Research and select your preferred wood, wireless charging module, and hardware.
- Gather Tools: Ensure you have all the necessary woodworking and safety tools before beginning.
- Practice Joinery: If new to certain joints, practice on scrap pieces before cutting into your project lumber.
- Start Building: Take it one step at a time, enjoying the creation process of your tech-integrated furniture.
SEO Meta Title: DIY Modern Nightstands with Integrated Wireless Charging SEO Meta Description: Build sleek DIY modern nightstands with integrated wireless charging. This woodworking project blends contemporary design, smart tech, and efficient storage for tech-savvy makers in 2026.
