


The average hobbyist or professional woodworker spends nearly 15% of their workshop time searching for misplaced tools, a significant drain on productivity and creative flow (Woodcraft Insights, 2026). This inefficiency is particularly frustrating when dealing with high-performance equipment like Milwaukee power tools, where quick access and proper maintenance are paramount. The solution lies in a dedicated organizational strategy, specifically Custom Wooden Storage for Milwaukee Power Tools: Workshop Organization and Protection. This article will guide you through the process of designing and constructing bespoke wooden storage solutions that not only enhance your workshop’s aesthetic but also safeguard your valuable Milwaukee tools, ensuring they are always ready for the next project.
Key Takeaways
- Tailored Efficiency: Custom wooden storage maximizes space and optimizes workflow by creating dedicated, easily accessible homes for each Milwaukee tool and its accessories.
- Enhanced Protection: Wood provides natural cushioning, and custom-fitted compartments guard against impact, dust, and moisture, extending the lifespan of your valuable power tools.
- Aesthetic Integration: Bespoke wooden solutions elevate the professional appearance of your workshop, transforming clutter into a display of craftsmanship.
- Cost-Effective Investment: While requiring an initial time commitment, DIY custom storage can be more economical than commercial alternatives and offers long-term benefits in tool preservation and operational efficiency.
- Future-Proofing: Modular and adaptable designs allow for expansion and modifications as your Milwaukee tool collection grows or workshop needs evolve.
Designing Custom Wooden Storage for Milwaukee Power Tools: Enhancing Workshop Organization
Effective workshop organization begins with a well-thought-out design for your storage solutions. When creating Custom Wooden Storage for Milwaukee Power Tools: Workshop Organization and Protection, the primary goal is to ensure every tool has a designated, easily accessible home. This not only saves time but also reduces the risk of damage.

Assessing Your Milwaukee Tool Collection
Before cutting any wood, conduct a thorough inventory of your Milwaukee power tools and their associated accessories. Categorize them by type (drills, saws, grinders, batteries, chargers, bits, blades, etc.) and frequency of use. Consider:
- Size and Shape: Each Milwaukee tool has a unique form factor. Your storage must accommodate these precisely.
- Weight: Heavier tools require more robust shelving or drawer bases.
- Accessories: Don’t forget space for batteries, chargers, drill bit sets, saw blades, and safety gear.
- Frequency of Use: Tools used daily should be the most accessible, perhaps on open shelves or wall-mounted racks. Less frequently used items can be stored in drawers or enclosed cabinets.
Fundamental Design Principles for Custom Wooden Storage
When designing your storage, focus on functionality, protection, and accessibility.
- Modularity: Build storage in modular units that can be rearranged or expanded. This allows your workshop to evolve with your projects and tool acquisitions. Consider building a custom wood workbench with integrated storage.
- Vertical Space Utilization: Workshops often have limited floor space. Utilize walls for shelves, French cleat systems, or custom cabinets. Robust floating shelves can be excellent for frequently accessed tools.
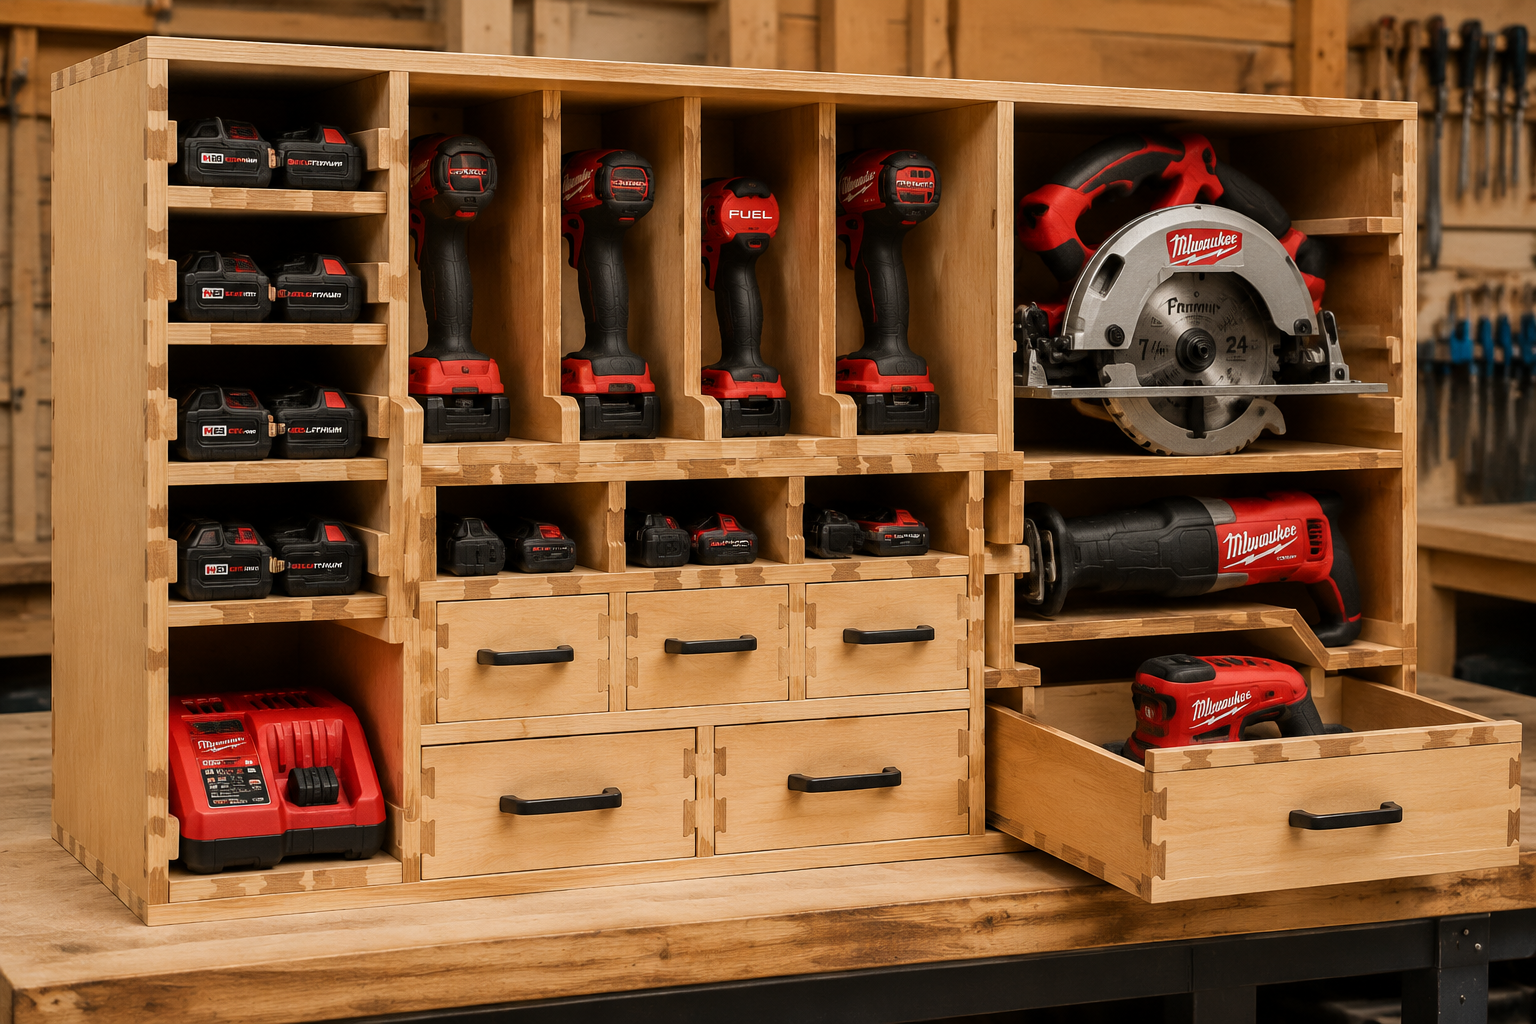
- Tool-Specific Fit: Instead of generic bins, design custom-fit slots or cradles for each Milwaukee tool. This prevents tools from shifting, rattling, and damaging each other.
- Visibility: Where appropriate, use open storage or transparent drawer fronts (plexiglass inserts in wood frames) to quickly identify tools. For enclosed storage, clear labeling is essential.
Popular Wooden Storage Solutions for Milwaukee Tools
- French Cleat Walls: A versatile system using angled wooden strips on the wall and matching strips on tool holders. It allows for quick rearrangement and addition of new storage modules.
- Benefits: Highly flexible, excellent for maximizing wall space.
- Considerations: Requires precise cuts and can accumulate dust on open tools.
- Tool Cabinets: Enclosed wooden cabinets protect tools from dust and workshop debris. They can feature shelves, drawers, or pull-out trays.
- Benefits: Superior protection, clean aesthetic, can be secured.
- Considerations: Requires more space, may hide tools from immediate view.
- Custom Drawers with Inserts: Dovetailed or box-joint drawers fitted with custom foam or wooden dividers provide excellent organization and protection. For joinery techniques, explore hand tool joinery.
- Benefits: Optimal protection, tidy appearance.
- Considerations: More complex to build, requires precise measurements for inserts.
- Portable Tool Carts: Mobile wooden carts can house frequently used tools, allowing you to bring your workstation directly to your project.
- Benefits: Portability, reduces walking time.
- Considerations: Requires floor space, needs sturdy casters.
| Storage Type | Key Benefit | Best For | Skill Level for DIY |
|---|---|---|---|
| French Cleat | Ultimate Flexibility | Wall-mounted tools, frequently used items | Intermediate |
| Enclosed Cabinet | Dust & Impact Protection | Less frequently used, sensitive tools | Intermediate/Advanced |
| Drawer Organizers | Precision Fit, Accessory Management | Bits, fasteners, smaller power tools | Intermediate |
| Mobile Cart | Portability, Project-Specific Organization | Active projects, larger tools | Intermediate |
Crafting and Constructing Custom Wooden Storage for Milwaukee Power Tools
The construction phase of your Custom Wooden Storage for Milwaukee Power Tools: Workshop Organization and Protection is where design concepts become tangible solutions. Attention to detail in material selection, joinery, and finishing will determine the longevity and effectiveness of your storage.
Material Selection
Choosing the right wood is crucial for durability and aesthetics.
- Plywood: A popular choice for workshop furniture due to its stability, strength, and relatively lower cost. Baltic birch plywood is particularly prized for its consistent layers and smooth finish.
- MDF (Medium-Density Fiberboard): Economical and stable, but less durable than plywood for heavy-duty applications and susceptible to moisture damage. Best for drawer bottoms or less structural components.
- Solid Wood: Offers superior strength, durability, and a classic aesthetic. Species like pine, maple, or oak are excellent choices but come at a higher cost. They are ideal for high-wear areas or where aesthetics are paramount.
- Hardware: Don’t skimp on hardware. High-quality drawer slides (full extension, heavy-duty), hinges, and casters will ensure smooth operation and long-term reliability. Magnetic catches can be useful for cabinet doors.
Essential Woodworking Techniques for Custom Storage
Successful construction relies on a combination of precision and appropriate techniques.
- Accurate Measuring and Cutting: The foundation of any good project. Utilize a tape measure, ruler, square, and marking knife for precision. Power saws like a table saw or circular saw with a guide rail are indispensable for straight, accurate cuts. Beginners can benefit from our guide to essential woodworking jigs.
- Joinery:
- Pocket Hole Joinery: Fast and strong, suitable for cabinet carcasses and frame assemblies.
- Dovetails and Box Joints: Offer superior strength and a beautiful aesthetic, ideal for drawers or visible components. Mastering dovetail joinery for drawers adds a touch of craftsmanship.
- Dadoes and Rabbets: Excellent for shelves, drawer bottoms, and back panels, providing strong, self-aligning joints.
- Assembly: Use clamps to hold components square while fasteners (screws, nails) and glue dry. Ensure all joints are tight and flush.
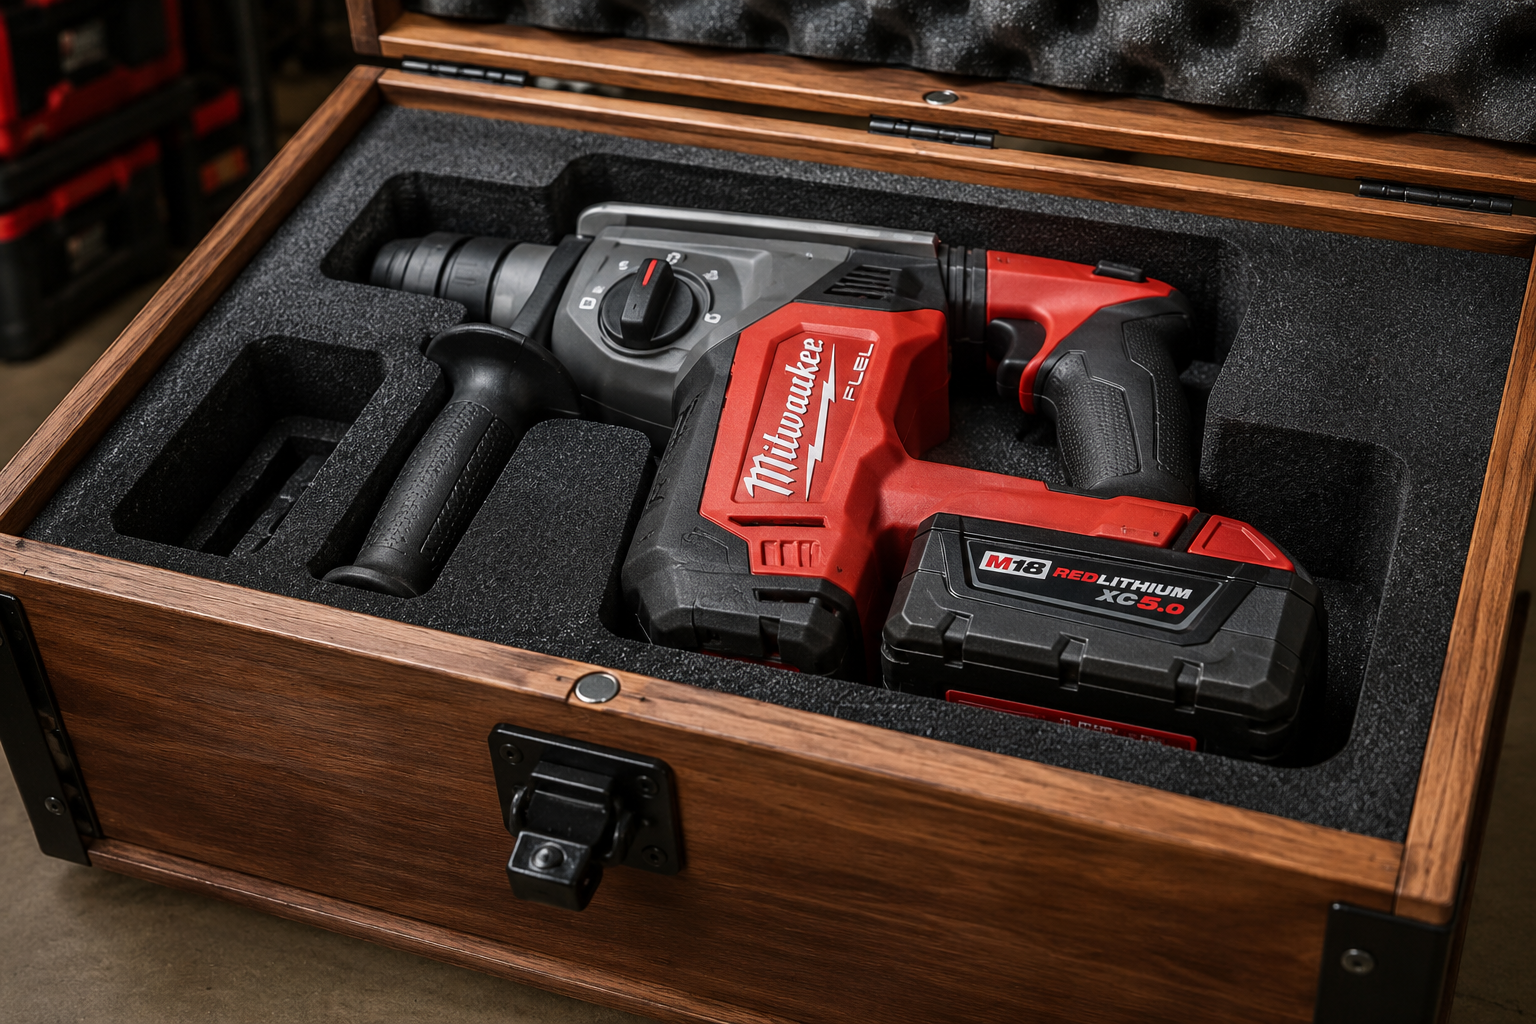
- Custom Inserts: For tool protection, consider:
- Kaizen Foam: Multi-layered foam that can be custom cut to the exact shape of your tools.
- Plywood or MDF Dividers: Can be cut to create compartments within drawers.
- Felt or Rubber Liners: Provide a soft surface for tools and prevent scratching.
Step-by-Step Construction Overview (Example: Milwaukee Drill & Driver Cabinet)
- Design and Dimension: Sketch out your cabinet, noting dimensions for each Milwaukee drill, impact driver, batteries, and charger. Plan for dedicated slots or cradles.
- Cut Components: Cut plywood panels for the cabinet sides, top, bottom, and back. Cut lumber for drawer faces, sides, and backs.
- Assemble Carcass: Use pocket holes or dadoes to assemble the cabinet box. Ensure it is square.
- Build Drawers: Construct drawers using dovetail or box joints for strength, or simpler butt joints with screws and glue for less strenuous applications. Install drawer slides.
- Create Tool Cradles/Inserts:
- For drills/drivers: Cut plywood or solid wood blocks with relief cuts or routed pockets that perfectly cradle the tool’s shape.
- For batteries/chargers: Design snug compartments to hold them securely.
- Mounting: If wall-mounting, ensure proper backing or stud attachment. For freestanding units, add a sturdy base or adjustable feet.
Finishing and Protecting Your Custom Wooden Storage
The final stage of creating Custom Wooden Storage for Milwaukee Power Tools: Workshop Organization and Protection involves finishing. Proper finishing not only enhances the appearance of your woodworking but also provides crucial protection against the harsh environment of a workshop.
Choosing the Right Finish
The best finish for workshop storage balances durability, ease of application, and protection.
- Polyurethane: Highly durable and resistant to abrasion, chemicals, and moisture. Available in oil-based (more durable, ambering effect) and water-based (dries faster, clearer, less odor) varieties. Ideal for workbench tops or high-contact surfaces.
- Varnish: Similar to polyurethane, offering good protection and a harder film.
- Shellac: Dries very fast, acts as an excellent sealer, and is easy to repair. Less durable than polyurethane for heavy wear, but a good base coat.
- Oil Finishes (e.g., Tung Oil, Linseed Oil): Penetrate the wood, providing a natural look and feel. They offer good water resistance but less abrasion resistance than film-building finishes. Easy to reapply for maintenance. For a deeper dive into wood finishing, refer to our wood finishing techniques guide.
- Paint: Provides full coverage and allows for color coordination with your workshop. Use durable, high-quality enamels for best results.
Application Techniques for Durable Finishes
- Surface Preparation: This is paramount. Sand all wooden surfaces thoroughly, progressing through grits from 80 or 120 up to 180 or 220. Remove all sanding dust before applying any finish.
- Sealing: Apply a thin coat of diluted shellac or a sanding sealer. This helps even out absorption and raises the grain for a final light sanding.
- Applying the Main Finish:
- Polyurethane/Varnish: Apply thin, even coats with a quality brush or foam applicator. Allow adequate drying time between coats (as per manufacturer instructions). Lightly sand with fine-grit sandpaper (320-400) between coats to ensure good adhesion and a smooth finish.
- Oil Finishes: Apply liberally, let it soak in for 15-30 minutes, then wipe off all excess completely. Repeat for several coats over days or weeks.
- Paint: Use a primer first, then apply two or more thin coats of paint, allowing proper drying time between each.
Enhancing Protection and Longevity
- Dust Control: Enclosed cabinets with tight-fitting doors and drawers significantly reduce dust accumulation on tools, a major enemy of electronics and moving parts. Consider adding weather stripping around door edges for an extra seal.
- Moisture Management: Apply a moisture-resistant finish, especially if your workshop is prone to humidity fluctuations. For high-humidity environments, consider adding desiccant packets inside enclosed cabinets.
- Impact Absorption: Line tool cradles and drawer bottoms with felt, rubber matting, or custom-cut foam inserts. This cushions tools against accidental drops and prevents scratching.
- Labeling: Clearly label each compartment or drawer. This is crucial for maintaining organization and quickly locating tools. Use stencils, a label maker, or even small engraved wooden tags.
- Ventilation: For tools that generate heat (like chargers), ensure sufficient airflow if they are stored in enclosed spaces while operating.

By investing time in proper finishing and incorporating protective features, your custom wooden storage for Milwaukee power tools will not only look professional but will also stand the test of time, keeping your valuable equipment in pristine condition for years to come. This approach aligns perfectly with creating a smart workshop storage solution that maximizes both functionality and durability.
Conclusion
Creating Custom Wooden Storage for Milwaukee Power Tools: Workshop Organization and Protection is an investment that pays dividends in efficiency, tool longevity, and workshop aesthetics. By meticulously designing solutions tailored to your specific Milwaukee collection, selecting appropriate materials, employing sound woodworking techniques, and applying durable finishes, you transform a cluttered workspace into an organized, productive environment. This bespoke approach ensures each tool is not only readily accessible but also perfectly protected from the wear and tear of a busy workshop.
The satisfaction of working in an organized space, knowing precisely where every Milwaukee tool and accessory resides, cannot be overstated. Beyond the immediate benefits, these custom wooden solutions become a testament to your craftsmanship, elevating your workshop into a functional and inspiring area. Start by assessing your tools, sketching out your designs, and then enjoy the rewarding process of building storage that serves your specific needs for years to come.
Meta Title
Custom Wooden Storage for Milwaukee Tools: Workshop Organization & Protection
Meta Description
Design & build custom wooden storage for your Milwaukee power tools in 2026. Optimize workshop organization, enhance protection, and boost efficiency.
Tags
Milwaukee tools, custom wooden storage, workshop organization, power tool protection, DIY storage, woodworking projects, tool storage ideas, workshop efficiency, woodcraft, tool organization, professional workshop, custom cabinets

